Dan looking good! Are you going to have heat problems with the turbo and the close proximity to the battery? It looks close, but could be the photo angle.
Navigation
Install the app
How to install the app on iOS
Follow along with the video below to see how to install our site as a web app on your home screen.
Note: This feature may not be available in some browsers.
More options
Style variation
You are using an out of date browser. It may not display this or other websites correctly.
You should upgrade or use an alternative browser.
You should upgrade or use an alternative browser.
Builds Here we go (FJ-40 getting a 3B/Turbo/H55f)... (1 Viewer)
- Thread starter DanS HJ-45
- Start date
This site may earn a commission from merchant affiliate
links, including eBay, Amazon, Skimlinks, and others.
More options
Who Replied?DanS HJ-45
SILVER Star
- Thread starter
- #202
Dan looking good! Are you going to have heat problems with the turbo and the close proximity to the battery? It looks close, but could be the photo angle.
I think it should be allright, but I will still fab up a little heat shield out of 16GA to protect the battery from the exhaust. I was just going to weld two M6 bolts to the side of the battery tray, and then bend a 90 degree piece of 16GA, about 6" tall with two holes for the bolts.
Wayne:
I think it is the HD kit. It rode great with exactly the suspension that's on it now, so I figure we'll put it all back together and see how it does before I worry about removing any leafs from the spring packs. On the front, it's a 3B instead of a 2F, but it's also got a MUCH heavier battery, and an 8074 to go on the front bumper.
Dan
crushers
post ho
the 3B weighs in amost the same as the 2F...
DanS HJ-45
SILVER Star
- Thread starter
- #204
the 3B weighs in amost the same as the 2F...
I measured 180 pounds different between this combo (3B/turbo/H55f) and the 2F/H42 that came out of the truck. I'm guessing that difference will be made up with the winch and the battery pretty easily (the 31M weighs 85 lbs IIRC--it is a heavy bugger).
Dan
Awl_TEQ
Supporting Vendor
Dan looking good! Are you going to have heat problems with the turbo and the close proximity to the battery? It looks close, but could be the photo angle.
I think it should be allright, but I will still fab up a little heat shield out of 16GA to protect the battery from the exhaust. I was just going to weld two M6 bolts to the side of the battery tray, and then bend a 90 degree piece of 16GA, about 6" tall with two holes for the bolts.
Dan
How about a turbo heat blanket?
DanS HJ-45
SILVER Star
- Thread starter
- #206
How about a turbo heat blanket?
I may end up doing both the heat shield and a heat blanket. I really like the idea of having the heat go out the tailpipe instead of into the engine bay.
So, tomorrow's project is to strip the axles apart and get the ARBs installed in the third members...
I'm kind of jumping out of order, as it were, but I have never installed ARBs, and my friend who has (alia176) has only so much time off that coincides with my time off....
Dan
DanS HJ-45
SILVER Star
- Thread starter
- #207
So, I stripped down the rear axle...
Here's the rear axle coming apart...
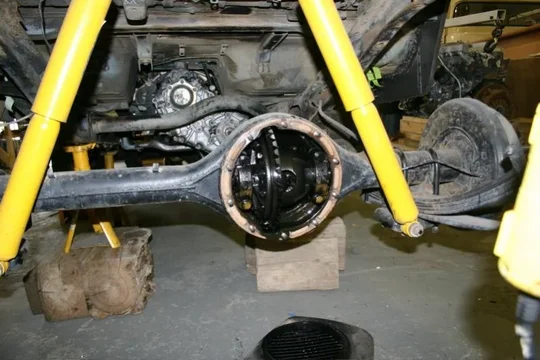
I had never done the C-clips before. That was MUCH easier to get apart than I was expecting. Somehow I doubt putting it back together will be quite that easy.
Because we were going to install ARBs, alia176 came over and we started doing the differential stuff. We took a baseline gear pattern: first one we took though had a pattern neither of us had ever seen. It was really, really odd. So we adjusted the carrier nuts a bit, and it came out to be a perfect pattern. It had kind of high backlash when we started, so I'm guessing that had a lot to do with the weird pattern. But here's what we had with a few turns of the spanner. Not bad at all, the gears have no real wear that I can see.

On the left rear though I found something alarming: I don't know what exactly it is, but it's not good. I think it's just a failed axle seal allowing gear oil to mix with brake dust, but this truck didn't pull at all before, and had fine brakes.


Here's the rear axle coming apart...

I had never done the C-clips before. That was MUCH easier to get apart than I was expecting. Somehow I doubt putting it back together will be quite that easy.
Because we were going to install ARBs, alia176 came over and we started doing the differential stuff. We took a baseline gear pattern: first one we took though had a pattern neither of us had ever seen. It was really, really odd. So we adjusted the carrier nuts a bit, and it came out to be a perfect pattern. It had kind of high backlash when we started, so I'm guessing that had a lot to do with the weird pattern. But here's what we had with a few turns of the spanner. Not bad at all, the gears have no real wear that I can see.

On the left rear though I found something alarming: I don't know what exactly it is, but it's not good. I think it's just a failed axle seal allowing gear oil to mix with brake dust, but this truck didn't pull at all before, and had fine brakes.

DanS HJ-45
SILVER Star
- Thread starter
- #208
Then I moved on to the front axle. On the right knuckle I knew something was no good when I didn't need a hub socket to loosen the hub nuts. They weren't even hand tight. Dad has owned this truck for about 4 years, and this is the first time we've been into the axles. It drove perfectly before we took it apart--amazingly.
Anyway, here's what came out of the right knuckle. Not birf soup. Not grease. Not oil. I really don't know how to describe what was in there--but it wasn't right.

On to the left side. This is the scary one. Again--this truck drove perfectly straight down the highway at 65 mph. I would not have EVER guessed this was in there...

With the knuckle itself removed, here's a better picture of the failed trunion (knuckle) bearing.
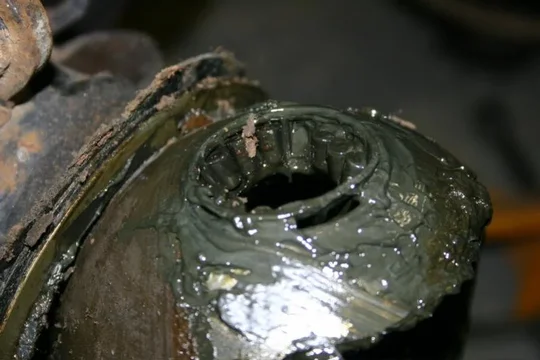


Anyway, here's what came out of the right knuckle. Not birf soup. Not grease. Not oil. I really don't know how to describe what was in there--but it wasn't right.

On to the left side. This is the scary one. Again--this truck drove perfectly straight down the highway at 65 mph. I would not have EVER guessed this was in there...

With the knuckle itself removed, here's a better picture of the failed trunion (knuckle) bearing.

DanS HJ-45
SILVER Star
- Thread starter
- #209
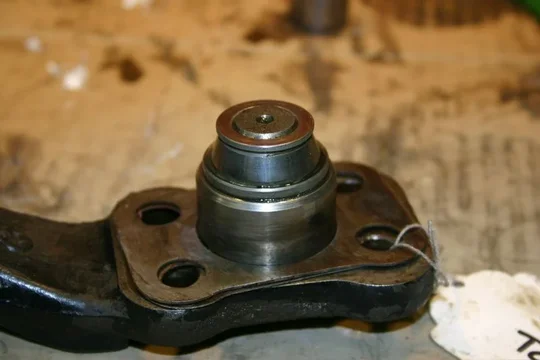
Here's the steering arm from the left knuckle. This is stuck on there something fierce. I'm afraid I'll have to cut it off of there or grind it off (carefully).
I made quite a mess!
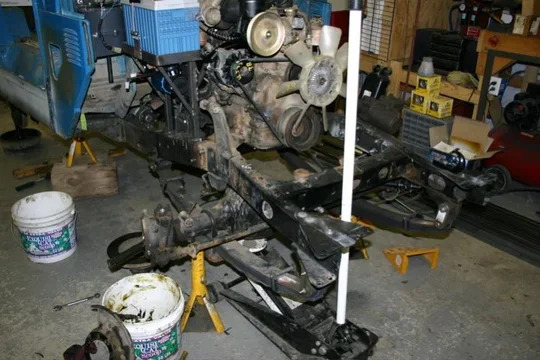
So, we had to put the ARB project on hold though, because someone (yeah, me) didn't think to order new carrier bearings. I don't know why. I HATE old bearings (see: left knuckle), but for some reason I didn't have new carrier bearings for the ARBs. There's already an order in to Marlin to remedy that, so I should be able to get the diffs set up later this week. In the meantime, I'll be cleaning and powdercoating the other axle parts so that it will all go back together for the final time real soon. Other than the knuckle bearing on the left, I didn't find any damage, so all I'm doing is cleaning and reassembling (which is good for me).
So, that's it until I get back from St. Louis on Wednesday night, but with any luck (cross your fingers for me) I won't have to work again for the month of November, so I will have more than enough time to get work done on the 40. I REALLY want to be able to let Dad drive it for Christmas (it is his truck, after all). That will depend more on how successful the slave drivers I work for are at scheduling me to work around the incredible amounts of training they are doing (and I am having to do).
Dan


I made quite a mess!

So, we had to put the ARB project on hold though, because someone (yeah, me) didn't think to order new carrier bearings. I don't know why. I HATE old bearings (see: left knuckle), but for some reason I didn't have new carrier bearings for the ARBs. There's already an order in to Marlin to remedy that, so I should be able to get the diffs set up later this week. In the meantime, I'll be cleaning and powdercoating the other axle parts so that it will all go back together for the final time real soon. Other than the knuckle bearing on the left, I didn't find any damage, so all I'm doing is cleaning and reassembling (which is good for me).
So, that's it until I get back from St. Louis on Wednesday night, but with any luck (cross your fingers for me) I won't have to work again for the month of November, so I will have more than enough time to get work done on the 40. I REALLY want to be able to let Dad drive it for Christmas (it is his truck, after all). That will depend more on how successful the slave drivers I work for are at scheduling me to work around the incredible amounts of training they are doing (and I am having to do).
Dan
crushers
post ho
rear brake, yep axle seal leak.
front, minor axle seal leak.
kingpin bearing, seem MUCH worse. a very sharp cold chisel works wonders at getting that race off. work both sides and use a file to smooth the retainer once completed. it comes off easier than you think.
front ends are ugly to work on, rubber gloves, old preused rags and lots of cleaner. going back together is a messy job too.
that truck is going to run like new when you are done.
cheers M8
DanS HJ-45
SILVER Star
- Thread starter
- #211
rear brake, yep axle seal leak.
front, minor axle seal leak.
kingpin bearing, seem MUCH worse. a very sharp cold chisel works wonders at getting that race off. work both sides and use a file to smooth the retainer once completed. it comes off easier than you think.
Good to know. I'll try that before I break out the die grinder then.
front ends are ugly to work on, rubber gloves, old preused rags and lots of cleaner. going back together is a messy job too.
that truck is going to run like new when you are done.
I rather like putting them back together. I have never had one NOT drive like it was new, and now I'll know what is in there, so then I just have to do preventative maintenance from now on, and not have to worry about fixing broken stuff so much.
I can't wait to get home on Wednesday night! I've got LOTS to do...
Dan
DanS HJ-45
SILVER Star
- Thread starter
- #212
I've been busy! First off: Dad stripped and painted the axle housings with POR-15. They look AWESOME (no pics yet though, I'll try to add one later to this post).
So, for the 60 series PS conversion I had to do something with the steering stabilizer. I could just not use it altogether, but I like the idea of leaving on there, since we've got it just sitting here....
So, I knocked the rivets off of the factory stabiliser bracket, and moved it towards the passenger side a bit. I actually just mocked it into place by reusing the hole farthest from the steering gearbox to bolt it to the frame (if that makes any sense). The picture should explain what I'm trying nicely.
I am still waiting on my relay rod to arrive, so I can't be sure how it works until I have that and have bolted the knuckles back on, but I think this location will work fine and not limit the steering travel at all.
this picture shows the now vacant hole to the right of the now relocated bracket.
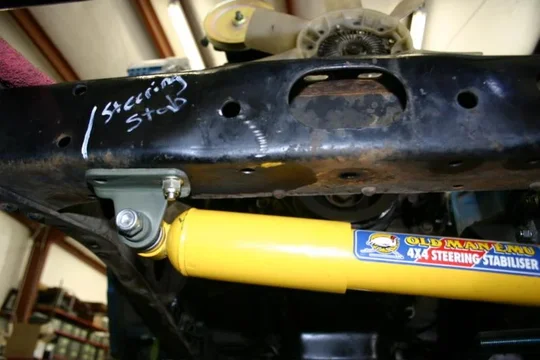
And here's how it looks bolted up to the 60 series drag link.


So, for the 60 series PS conversion I had to do something with the steering stabilizer. I could just not use it altogether, but I like the idea of leaving on there, since we've got it just sitting here....
So, I knocked the rivets off of the factory stabiliser bracket, and moved it towards the passenger side a bit. I actually just mocked it into place by reusing the hole farthest from the steering gearbox to bolt it to the frame (if that makes any sense). The picture should explain what I'm trying nicely.
I am still waiting on my relay rod to arrive, so I can't be sure how it works until I have that and have bolted the knuckles back on, but I think this location will work fine and not limit the steering travel at all.
this picture shows the now vacant hole to the right of the now relocated bracket.

And here's how it looks bolted up to the 60 series drag link.

DanS HJ-45
SILVER Star
- Thread starter
- #213
Also: I'm out of control.
Who does this?

That's right. I powder-coated the knuckles, lower cap, and steering arm. I hate waiting for paint to dry, so this works just fine. They came out BEAUTIFULLY.
I also powder-coated all the other bits for the knuckles. Like the backing plate and the various bracketry. It really came out nicely. It looks like a mirror now!
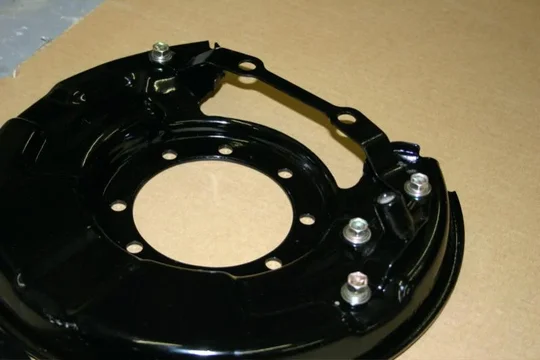
And here's just a quick picture of all the bits for the left knuckle. The right is also done, and I'm going to try to do the backing plates for the rear axle this evening.
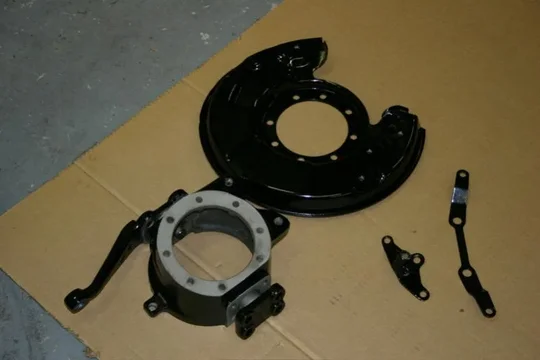
I've still got to install the ARB carriers into the diffs before I can button the axles up, but it's coming along very nicely now. Tonight I hope to clean and powder-coat those rear backing plates, and maybe the front wheel hubs too. It's just so much easier than painting...
Dan


Who does this?

That's right. I powder-coated the knuckles, lower cap, and steering arm. I hate waiting for paint to dry, so this works just fine.
I also powder-coated all the other bits for the knuckles. Like the backing plate and the various bracketry. It really came out nicely. It looks like a mirror now!

And here's just a quick picture of all the bits for the left knuckle. The right is also done, and I'm going to try to do the backing plates for the rear axle this evening.

I've still got to install the ARB carriers into the diffs before I can button the axles up, but it's coming along very nicely now. Tonight I hope to clean and powder-coat those rear backing plates, and maybe the front wheel hubs too. It's just so much easier than painting...
Dan
DanS HJ-45
SILVER Star
- Thread starter
- #214
So, today we brought the axle housings back up to the shop. This is just two coats of POR15. Since the truck won't live outside, and they are on the bottom of the truck, Dad wasn't too concerned with putting a UV blocking top coat on, so we'll leave them this way.
They look like mirrors!

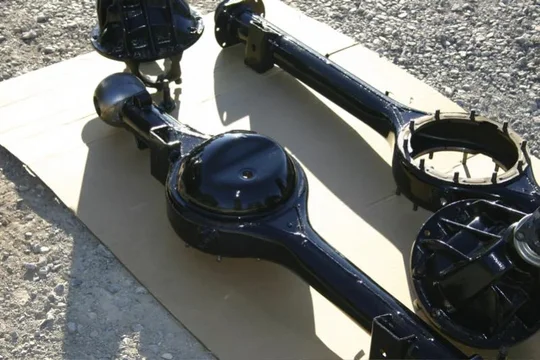
I also installed the new knuckle studs (with the E12 torx on the top). I also used good threadlock on them, so hopefully I don't remotely have to worry about these working their way loose.


They look like mirrors!


I also installed the new knuckle studs (with the E12 torx on the top). I also used good threadlock on them, so hopefully I don't remotely have to worry about these working their way loose.
DanS HJ-45
SILVER Star
- Thread starter
- #215
With all of that done, I installed both steering knuckles. It was a really easy job with those clean powdercoated parts. While they were out I had run some sandpaper on the bearing caps and their mates in the knuckle. It made a HUGE amount of difference to knock down some high spots. These guys just took light tapping to seat. I just assembled them with two nuts per cap, because I decided that the washers were just too crushed to be of much use, so I'll buy some new shiny ones tomorrow to finish it up.
I used the fancy pants knuckle centering tool to set the shims on the right side, and just duplicated what was on the left already. The preload came out perfectly, and I guess only time will tell about how well centered the spindles are.
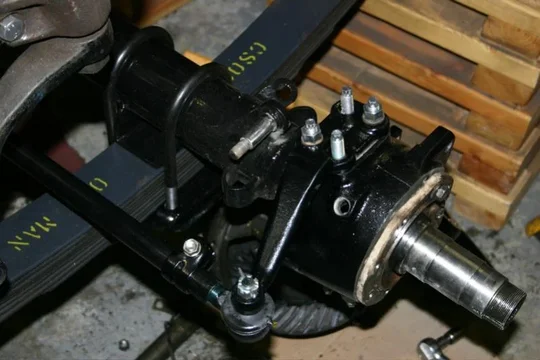

With both knuckles on, I went ahead and set the tie rod into place using the FSM's baseline measurement (47.4" IIRC). This way I can really be sure that the steering is allright when the relay rod finally gets here (I'm getting impatient, I really want to see it here soon).


I used the fancy pants knuckle centering tool to set the shims on the right side, and just duplicated what was on the left already. The preload came out perfectly, and I guess only time will tell about how well centered the spindles are.


With both knuckles on, I went ahead and set the tie rod into place using the FSM's baseline measurement (47.4" IIRC). This way I can really be sure that the steering is allright when the relay rod finally gets here (I'm getting impatient, I really want to see it here soon).

DanS HJ-45
SILVER Star
- Thread starter
- #216
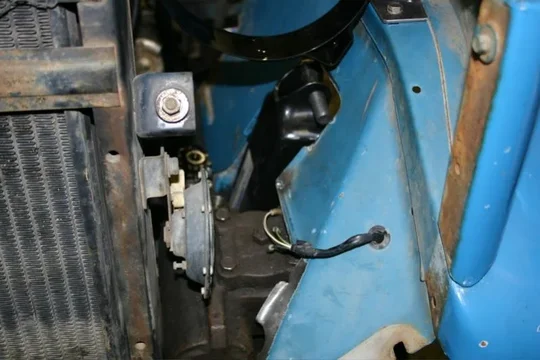
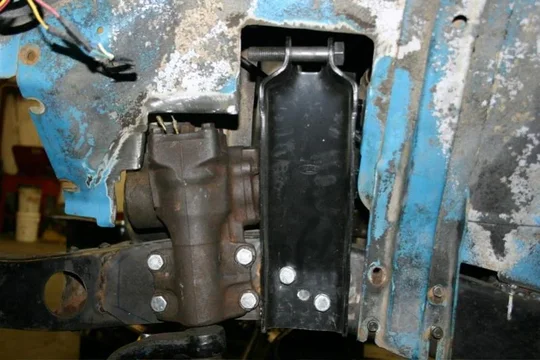
The other thing I did was I finally decided that I had better trim the left fender to fit the F-250 towers and the 60 series steering gearbox. A 5 minute job, but I've been procrastinating. I'll probably bend those edges back a bit to clean it up, and give it a little stiffening to replace the bent flanges that I cut out.
Just two different views of it. I wanted to keep it as close as possible to the towers and gearbox, just to help keep junk out of the engine bay, but remember that I'll probably bend about 1/4" of those edges back to gain a little more clearance.


That's it for today! Tomorrow I will either be wheeling the faux-lux, or working on the 40 some more. Next up is the rear axle backing plates: they need to be powder coated and after that I will install the new wheel cylinders and shoes.
Dan


Just two different views of it. I wanted to keep it as close as possible to the towers and gearbox, just to help keep junk out of the engine bay, but remember that I'll probably bend about 1/4" of those edges back to gain a little more clearance.


That's it for today! Tomorrow I will either be wheeling the faux-lux, or working on the 40 some more. Next up is the rear axle backing plates: they need to be powder coated and after that I will install the new wheel cylinders and shoes.
Dan
DanS HJ-45
SILVER Star
- Thread starter
- #217
Well, today was both more and less productive than I like.
Less productive because I'm a moron and didn't order the new 50mm carrier bearings for the ARBs. Note: I did order new carrier bearings for the stock carrier. So, I've got to see if I can return one differential setup kit that I haven't opened, and see if Marlin will take back the one I opened (just enough to see that the bearings don't fit, or sell them here or something. Not much I can do on the axles until I get the ARBs installed in either axle. I guess this means I'll be calling Kurt up first thing monday morning to see if he's got any he can get here quick. Shoot: I might have to fly up to Salt Lake City just to pick up some bearings!
But, that left me with a lot of time to tinker on other things. One of them was I taught my mom to weld a little a few weeks ago, and she was bound and determined to practice and to start welding up a rack for the shop today.
Dad also got a full day up at the shop with us, so it was really very productive, even if I didn't take a lot of pictures. Dad spent the day stripping down the rear axle backing plates and brakes so that I can powder coat the backing plates tomorrow, and then get the rear drums ready for the differential to be reinstalled. But, I didn't take any pictures of that.
So, first I finished trimming the left fender to clear the F-towers and the 60 series PS box. I actually bent the metal back into a little flange on most of the cuts, to make it look more like the original. I'm happy with how that turned out.


Less productive because I'm a moron and didn't order the new 50mm carrier bearings for the ARBs. Note: I did order new carrier bearings for the stock carrier. So, I've got to see if I can return one differential setup kit that I haven't opened, and see if Marlin will take back the one I opened (just enough to see that the bearings don't fit, or sell them here or something. Not much I can do on the axles until I get the ARBs installed in either axle. I guess this means I'll be calling Kurt up first thing monday morning to see if he's got any he can get here quick. Shoot: I might have to fly up to Salt Lake City just to pick up some bearings!
But, that left me with a lot of time to tinker on other things. One of them was I taught my mom to weld a little a few weeks ago, and she was bound and determined to practice and to start welding up a rack for the shop today.

Dad also got a full day up at the shop with us, so it was really very productive, even if I didn't take a lot of pictures. Dad spent the day stripping down the rear axle backing plates and brakes so that I can powder coat the backing plates tomorrow, and then get the rear drums ready for the differential to be reinstalled. But, I didn't take any pictures of that.
So, first I finished trimming the left fender to clear the F-towers and the 60 series PS box. I actually bent the metal back into a little flange on most of the cuts, to make it look more like the original. I'm happy with how that turned out.


DanS HJ-45
SILVER Star
- Thread starter
- #218
Then I finally stopped procrastinating and started fabricating a bracket to hold the Donaldson air filter. I used two holed in the fender to bolt the bracket to, to which the Donaldson ring bracket bolt to (so, the Donaldson bracket bolts to my bracket). I also drilled a hole in the fender for the second bolt of the Donaldson bracket, but I will need to buy or make a 1/2" spacer to make that bolt tight.
Here you can see my bracket, bolted to the Donaldson ring bracket.
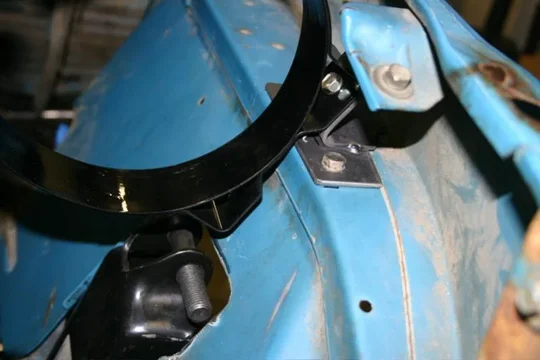
And here's the filter in there...

And then I put the new fender on the other side of the truck (LOVE the fit of the Toyota fender--it's perfect!), bolted the apron to it, and set the hood on. It all fits--BARELY. I might have to cut the intake down just 1/4" to make sure the rain cap on the Donaldson doesn't rub on the hood.
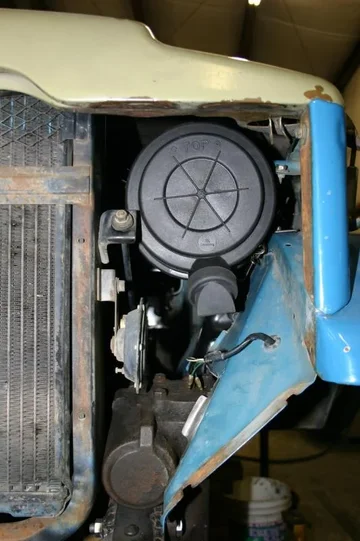


Here you can see my bracket, bolted to the Donaldson ring bracket.

And here's the filter in there...

And then I put the new fender on the other side of the truck (LOVE the fit of the Toyota fender--it's perfect!), bolted the apron to it, and set the hood on. It all fits--BARELY. I might have to cut the intake down just 1/4" to make sure the rain cap on the Donaldson doesn't rub on the hood.

Last edited:
DanS HJ-45
SILVER Star
- Thread starter
- #219
So, with that done, here's the bit of intake I have to figure out. Pretty easy by the looks of it. I might swap this Donaldson out for one with an elbow air outlet, but maybe not.

And here's an overview of the front end, with that sexy new front fender. I like the multicolored look, you?

I also buttoned up some odds and ends on the front axle. I bought new washers for the knuckle studs, so I put loctite on all of the studs and installed the washers and nuts for the final time. I also started installing the brake lines. Dad bought a complete set of stainless steel pre-bent brake lines from Classic Tube, so I started putting those on the axle. So far, my review of them is that they are FANTASTIC. I hope I can buy the same thing for my 45. The ones on the axle fit perfectly, and they look really, really good against the clean axle housing. And stainless lines make me happy. Something about avoiding rust in the brake system as much as possible... Also, the bling factor.

And that's it for today! Tomorrow I've got to run to town to get some odds and ends (like caliper paint for the rear drums), and then I'm just going to keep working on the odds and ends while I wait to finish the axles. The cleaned odds and ends REALLY are coming out nicely. It's getting so close I can taste it!
Dan


And here's an overview of the front end, with that sexy new front fender. I like the multicolored look, you?

I also buttoned up some odds and ends on the front axle. I bought new washers for the knuckle studs, so I put loctite on all of the studs and installed the washers and nuts for the final time. I also started installing the brake lines. Dad bought a complete set of stainless steel pre-bent brake lines from Classic Tube, so I started putting those on the axle. So far, my review of them is that they are FANTASTIC. I hope I can buy the same thing for my 45. The ones on the axle fit perfectly, and they look really, really good against the clean axle housing. And stainless lines make me happy. Something about avoiding rust in the brake system as much as possible... Also, the bling factor.


And that's it for today! Tomorrow I've got to run to town to get some odds and ends (like caliper paint for the rear drums), and then I'm just going to keep working on the odds and ends while I wait to finish the axles. The cleaned odds and ends REALLY are coming out nicely. It's getting so close I can taste it!
Dan
Awl_TEQ
Supporting Vendor
Dan,
Is that Donaldson from the FPG series? I've been lookin at them online and when I called the local distributer I forgot to ask if the elbows rotate on the models with the elbow. I assume they do - would you happen to know?
Is that Donaldson from the FPG series? I've been lookin at them online and when I called the local distributer I forgot to ask if the elbows rotate on the models with the elbow. I assume they do - would you happen to know?
Similar threads
Users who are viewing this thread
Total: 2 (members: 0, guests: 2)
