I am going to replace my Cold start injector time switch and most likely my water temp sensor while I'm at it. Would like some advice on how to do this though, because it looks to me like its connected directly to the coolant supply. How do I take these out without spilling coolant all over the damn place, or will coolant even spill out? any advice would be appreciated thank you guys!
Navigation
Install the app
How to install the app on iOS
Follow along with the video below to see how to install our site as a web app on your home screen.
Note: This feature may not be available in some browsers.
More options
Style variation
You are using an out of date browser. It may not display this or other websites correctly.
You should upgrade or use an alternative browser.
You should upgrade or use an alternative browser.
This site may earn a commission from merchant affiliate
links, including eBay, Amazon, Skimlinks, and others.
More options
Who Replied?I am going to replace my Cold start injector time switch and most likely my water temp sensor while I'm at it. Would like some advice on how to do this though, because it looks to me like its connected directly to the coolant supply. How do I take these out without spilling coolant all over the damn place, or will coolant even spill out? any advice would be appreciated thank you guys!
I can help here :
")
YES drain your Radatior say only a gallon or so , is needed to remove :
then :
you have all this to consider what all you needs and wants are in the world of the 3FE thermosts housing :

FJ62 3FE PLUG and PLAY Repair KIT OEM Genuine NipponDensso JAPAN , Fuel Pressure Temperature Sensor , SENDER WATER TEMPERATURE Gauge Fits 87 -90 . GREY TIP 1 wire comes with the OEM Connector Plug , Seal and Extra YAZAKI OEM Terminals - VintageTEqP
NOTE: This DOES NOT Come with the Wires Attached to the connector .... Genuine NipponDenso OEM JAPAN Parts Comes with...
vintageteqparts.com
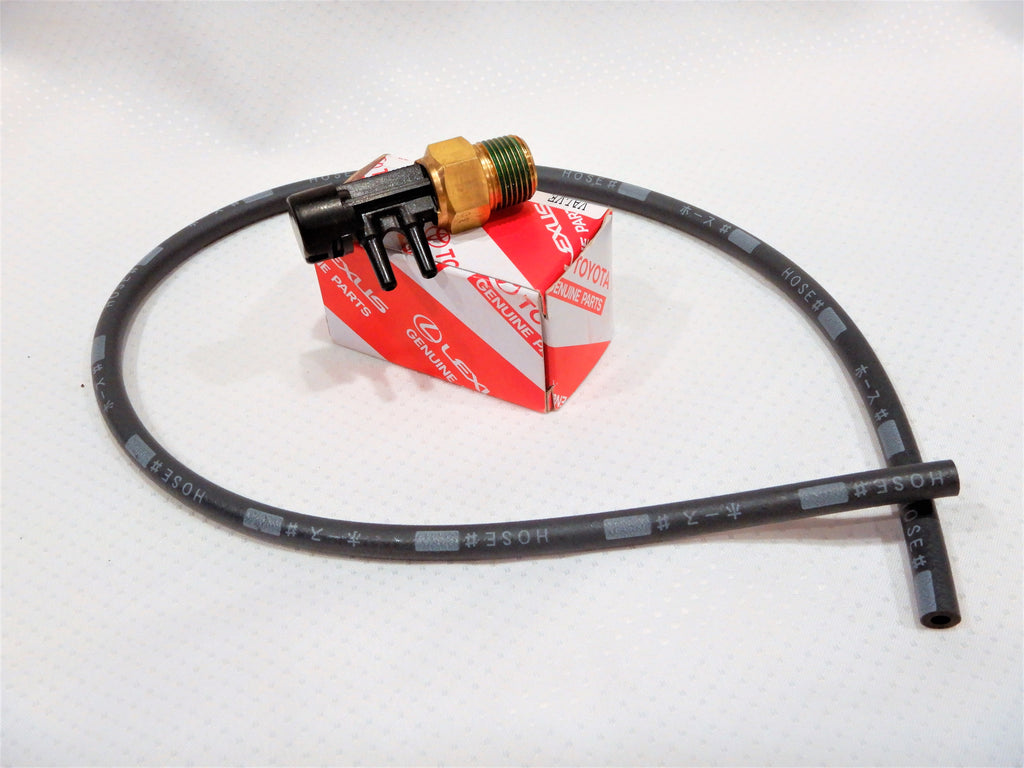
3FE PLUG and PLAY REPAIR KIT OEM Toyota BVSV VSV Valve, Bimetal Vacuum Switching, NO.2 ( FOR E.F.I ) 25820- Fits 88 -90 FJ62 USA & Canada Spec. sensor sender 3FE Vacuum HOSE TOO ! FJ80 also - VintageTEqParts.com
NOS OEM Toyota Comes w/ a nice long section of OEM toyota Factory Vacuum hose also ! Valve, Bi-metal Vacuum...
vintageteqparts.com

Genuine YAZAKI OEM Gage Assy, Water Temperature Sender Sensor 2/76 - 92 FJ40 FJ55 FJ60 FJ70 FJ80 FJ62 / 2F / 3F carb / 3F-E / 3FE Updated Marine Grade Alloy Tin Plated Repair Connector KIT & Special positive grip locking detent ball terminal - Vi
Genuine YAZAKI Japan spec. parts for Cluster meter Gage Assy, Water Temperature sensor / sending unit Fits 2/76 - 92...
vintageteqparts.com

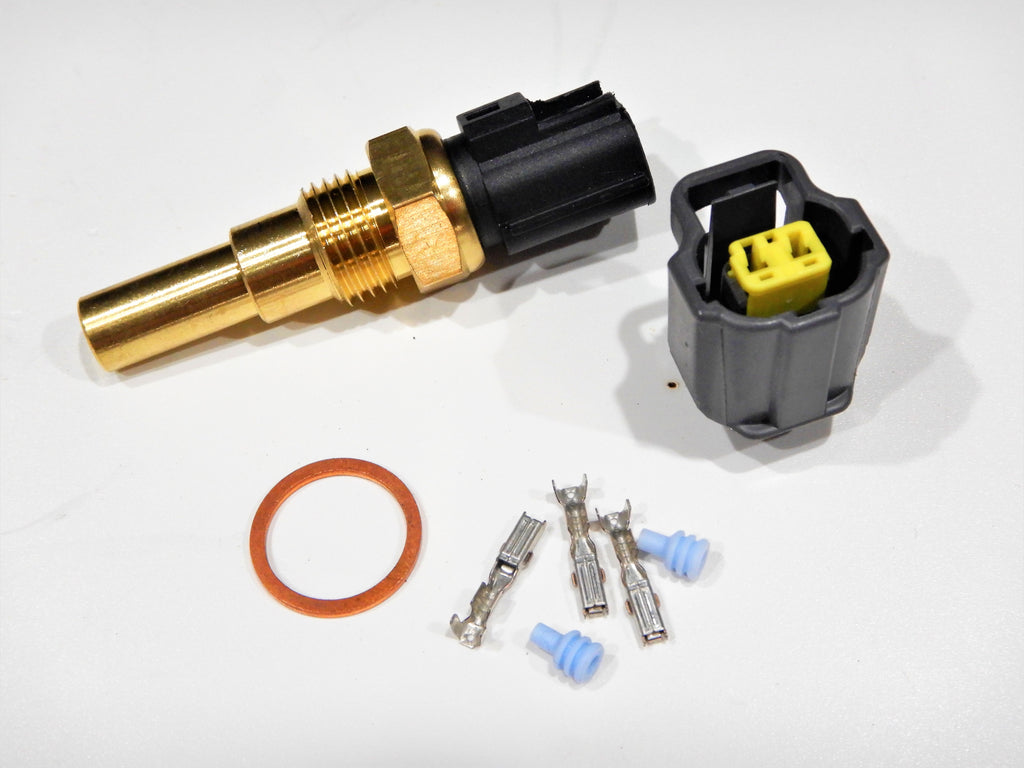
OEM GENUINE NipponDenso / DENSO Japan Spec. Parts 3-FE PLUG and PLAY Repair KIT Sensor, Sender Water Temperature ( For E.F.I.) Fits 88 - 92 FJ62 FJ80 3FE USA & Canada Spec. Also Fits : NON-USA 1HZ , 1KZT , 2LT , 2UZ , 22RE & 1PZ Engines
- OEM GENUINE NipponDenso / DENSO Japan spec. parts - Includes the Green & Yellow Service Spec. Connector Kit w/ rubber...
vintageteqparts.com
3FE PLUG and PLAY REPAIR KIT Cold Start Injector Thermal Time for EFI Timer Switch SENSOR Sender for Land Cruiser FJ62 FJ80 Pick-up 4Runner Fits 88 -90 FJ62 USA & Canada Spec. sensor sender 91-92 FJ80 89462-20040 - VintageTEqParts.com
NOTE: This DOES NOT Come with the Wires Attached to the connector .... Cold Start Injector Timer Switch SENSOR Sender for...
vintageteqparts.com
- Thread starter
- #4
Thank you for the info. It would make sense to replace what I can while I have access. Would you suggest I reuse the coolant or put new coolant in?I can help here :
YES drain your Radatior say only a gallon or so , is needed to remove :
then :
you have all this to consider what all you needs and wants are in the world of the 3FE thermosts housing :
FJ62 3FE PLUG and PLAY Repair KIT OEM Genuine NipponDensso JAPAN , Fuel Pressure Temperature Sensor , SENDER WATER TEMPERATURE Gauge Fits 87 -90 . GREY TIP 1 wire comes with the OEM Connector Plug , Seal and Extra YAZAKI OEM Terminals - VintageTEqP
NOTE: This DOES NOT Come with the Wires Attached to the connector .... Genuine NipponDenso OEM JAPAN Parts Comes with...vintageteqparts.com
3FE PLUG and PLAY REPAIR KIT OEM Toyota BVSV VSV Valve, Bimetal Vacuum Switching, NO.2 ( FOR E.F.I ) 25820- Fits 88 -90 FJ62 USA & Canada Spec. sensor sender 3FE Vacuum HOSE TOO ! FJ80 also - VintageTEqParts.com
NOS OEM Toyota Comes w/ a nice long section of OEM toyota Factory Vacuum hose also ! Valve, Bi-metal Vacuum...vintageteqparts.com
Genuine YAZAKI OEM Gage Assy, Water Temperature Sender Sensor 2/76 - 92 FJ40 FJ55 FJ60 FJ70 FJ80 FJ62 / 2F / 3F carb / 3F-E / 3FE Updated Marine Grade Alloy Tin Plated Repair Connector KIT & Special positive grip locking detent ball terminal - Vi
Genuine YAZAKI Japan spec. parts for Cluster meter Gage Assy, Water Temperature sensor / sending unit Fits 2/76 - 92...vintageteqparts.com
OEM GENUINE NipponDenso / DENSO Japan Spec. Parts 3-FE PLUG and PLAY Repair KIT Sensor, Sender Water Temperature ( For E.F.I.) Fits 88 - 92 FJ62 FJ80 3FE USA & Canada Spec. Also Fits : NON-USA 1HZ , 1KZT , 2LT , 2UZ , 22RE & 1PZ Engines
- OEM GENUINE NipponDenso / DENSO Japan spec. parts - Includes the Green & Yellow Service Spec. Connector Kit w/ rubber...vintageteqparts.com
3FE PLUG and PLAY REPAIR KIT Cold Start Injector Thermal Time for EFI Timer Switch SENSOR Sender for Land Cruiser FJ62 FJ80 Pick-up 4Runner Fits 88 -90 FJ62 USA & Canada Spec. sensor sender 91-92 FJ80 89462-20040 - VintageTEqParts.com
NOTE: This DOES NOT Come with the Wires Attached to the connector .... Cold Start Injector Timer Switch SENSOR Sender for...vintageteqparts.com
Thank you for the info. It would make sense to replace what I can while I have access. Would you suggest I reuse the coolant or put new coolant in?
if it were me ,
i would drain ALL the old coolant ,
install a FLUSH T KIT at back fire wall
OPEN side block drain
open lower radiator drain
open radiator cap off
and FULL on power flush with HOT water tap off your utility sink faucet threaded nozzle , if you follow me here ?
until ALL out coming water is clear coming out of each of the 3 open ports on the engine and RAD. assy
sounds like alot , but this is EAZY PEEZY and time so very well spent ............
long term engine preservation is the idea here ............
red66toy
Supporting Vendor
Get a stubby end wrench and you can do the swap with the thermostat housing on the rig most likely. The part number for the switch, if you already do not have one is 89462-20040 for FJ62s made from 8/88-90. If your FJ62 was made in early 88 then it will likely have a earlier version of the switch (89462-20010) that is unfortunately not made by Toyota anymore. You will need to swap to the newer switch and change the electrical connector to match at the same time. But that is not a hard job.I am going to replace my Cold start injector time switch and most likely my water temp sensor while I'm at it. Would like some advice on how to do this though, because it looks to me like its connected directly to the coolant supply. How do I take these out without spilling coolant all over the damn place, or will coolant even spill out? any advice would be appreciated thank you guys!
- Thread starter
- #7
Would you suggest doing the plug adapter swap or just find a used one with the old connector? I was planning to leave the housing on the engine rather than take it off, as long as i drain the coolant ill have pretty easy access to the plug.Get a stubby end wrench and you can do the swap with the thermostat housing on the rig most likely. The part number for the switch, if you already do not have one is 89462-20040 for FJ62s made from 8/88-90. If your FJ62 was made in early 88 then it will likely have a earlier version of the switch (89462-20010) that is unfortunately not made by Toyota anymore. You will need to swap to the newer switch and change the electrical connector to match at the same time. But that is not a hard job.
red66toy
Supporting Vendor
For the most reliability, I would go with a new unit and swap to the updated connector to match it. I think you can leave the whole housing on no problem give the location of the temp switch near the top. But, if your sensor tests as good according to the FSM then maybe just leave it be for now if you want.Would you suggest doing the plug adapter swap or just find a used one with the old connector? I was planning to leave the housing on the engine rather than take it off, as long as i drain the coolant ill have pretty easy access to the plug.
- Thread starter
- #9
My plan is now to do the conversion to the newer generation or cold start injector time switch, I found a kit from City Racer LLC with the female plug and one on Vintage Teq Parts. Is there any way of knowing which kit is going to be better than the other or more simple. Any video recommendation would also be helpful as i have not been able to find and demonstration of how to do it. Thank you for the help so far! next step is new vacuum lines along with itFor the most reliability, I would go with a new unit and swap to the updated connector to match it. I think you can leave the whole housing on no problem give the location of the temp switch near the top. But, if your sensor tests as good according to the FSM then maybe just leave it be for now if you want.
red66toy
Supporting Vendor
Cool! I think that is the best plan. Might as well just change to the newer style while they are still available new! As for vendor, I believe they are offering the same exact product, A OEM sender unit and matching connector. So it's up to you really. I have a personal preference for shopping with Roger at City Racer. But whoever you go with you will get the right parts so don't worry in that aspect.My plan is now to do the conversion to the newer generation or cold start injector time switch, I found a kit from City Racer LLC with the female plug and one on Vintage Teq Parts. Is there any way of knowing which kit is going to be better than the other or more simple. Any video recommendation would also be helpful as i have not been able to find and demonstration of how to do it. Thank you for the help so far! next step is new vacuum lines along with it
As for how to swap the sensor, easiest would be to take the top coolant hose off to get better access to the sender.
EDIT: Ok definitely need to take the top hose off to make it easy on yourself. Looks like you will need a 22mm end wrench for the sensor.
Last edited:
- Thread starter
- #11
Awesome that makes my mind a lot more at ease. Im confident in replacing the sensor my main concern is converting the female plug from the old version to the new style, I haven't done a lot of electrical work before if there are any tips or things to look out for.Cool! I think that is the best plan. Might as well just change to the newer style while they are still available new! As for vendor, I believe they are offering the same exact product, A OEM sender unit and matching connector. So it's up to you really. I have a personal preference for shopping with Roger at City Racer. But whoever you go with you will get the right parts so don't worry in that aspect.
As for how to swap the sensor, easiest would be to take the top coolant hose off to get better access to the sender.But, I believe you may be able to swap the sensory with the hose in place by using a stubby end wrench. I'll go check the size shortly and confirm you can get at it with the hose in place.
EDIT: Ok definitely need to take the top hose off to make it easy on yourself. Looks like you will need a 22mm end wrench for the sensor.
red66toy
Supporting Vendor
So splicing in the new sensor should be pretty straight forward. Basically cutting off the old sensor (keeping note what wires go where). Take pics before you do anything in case you forgetAwesome that makes my mind a lot more at ease. Im confident in replacing the sensor my main concern is converting the female plug from the old version to the new style, I haven't done a lot of electrical work before if there are any tips or things to look out for.
. With a FJ62, its worth investing in some decent electrical work tools, like good crimpers for the terminals and wire strippers/cutters. ") Even having extra wire on hand for repairs, heat shrink tubing for sealing repairs. If you are unsure on any electrical work it may be worth looking at Youtube for some tutorial videos. Its not that bad, you will get it done.
Even having extra wire on hand for repairs, heat shrink tubing for sealing repairs. If you are unsure on any electrical work it may be worth looking at Youtube for some tutorial videos. Its not that bad, you will get it done. I have been using these crimpers for the past 5 years and have been very happy with them. You can swap out the jaws if you use different terminals as well: Amazon product ASIN B0050KDKUC
- Thread starter
- #13
So I have started the process of replacing the sensors and I need to order a water temp switch now since the one I had the wire just slipped out. The cold start timer switch is very stuck and its a weird angle to use a wrench. Should I try heat or keep trying to use PB blaster to loosen the sensor? Also since I'm going to order more parts should I replace the bimetal vacuum switch that goes on the thermostat housing? Not sure how important that one is, it seems fine though from what I can tell.So splicing in the new sensor should be pretty straight forward. Basically cutting off the old sensor (keeping note what wires go where). Take pics before you do anything in case you forget
I have been using these crimpers for the past 5 years and have been very happy with them. You can swap out the jaws if you use different terminals as well: Amazon product ASIN B0050KDKUC
So I have started the process of replacing the sensors and I need to order a water temp switch now since the one I had the wire just slipped out. The cold start timer switch is very stuck and its a weird angle to use a wrench. Should I try heat or keep trying to use PB blaster to loosen the sensor? Also since I'm going to order more parts should I replace the bimetal vacuum switch that goes on the thermostat housing? Not sure how important that one is, it seems fine though from what I can tell.
NO HEAT !
remove the upper housing
- use a old beach towel and clamp in a vice carefully
- apply moderate increasing force
- it should break loose
- if your sensor is fused and you cant remove it ,
- i have FULLY Restored 3FE Upper Housings TOP SHELF parts ..........
- my opinion :
remove what parts you need to to gain access to remove this thermo switch , when it breaks loose all at once , you can break other parts in the process .........
clear work area is a SAFE and low cost damage work area
you follow me here ?
red66toy
Supporting Vendor
Shoot, that is a bummer its putting up a fight but not too surprising. Yeah I think heat will be bad since you dont want to melt any other sensors on there. I think if you can get the halves apart (make sure to put some anti-seize on the bolts when you put them back together) , then put the upper half on a flat surface or vise (like Matt suggested), you should be able to get a better angle on that top cold start temp sensor. If your thermostat is old this would be a good time to replace that as well, along with the gaskets for it.So I have started the process of replacing the sensors and I need to order a water temp switch now since the one I had the wire just slipped out. The cold start timer switch is very stuck and its a weird angle to use a wrench. Should I try heat or keep trying to use PB blaster to loosen the sensor? Also since I'm going to order more parts should I replace the bimetal vacuum switch that goes on the thermostat housing? Not sure how important that one is, it seems fine though from what I can tell.
Gasket for between the thermostat housing halves: 16341-61030
Thermostat gasket: 90430-43002
Thermostat: 90916-03052
If it really goes sideways and you need a new lower half of the housing. You can get a whole kit (all gaskets, housing and thermostat) from Roger at Cityracer for a good price: OEM Lower Thermostat Housing Kit for '88 to 92 Toyota Land Cruiser FJ62 FJ80 - https://www.cityracerllc.com/products/oem-lower-thermostat-housing-kit-for-88-to-92-toyota-land-cruiser-fj62?_pos=1&_sid=5e96e3fe8&_ss=r
As for the bi-metal sensor, I say test it according to the FSM before deciding if you want to replace it. Maybe while the top half is off you can loosen it at least and put some anti-seize on the threads so you can take it off easier later when its time to replace.
- Thread starter
- #16
Ok that worked really well, I got the senor off which is good. However the more I compare the top of my housing to those pictures, there is a lot of corrosion and pitting of the aluminum on mine. Not sure if it would effect the performance or structure of the housing since some of it is around where the thermostat gasket would go.NO HEAT !
remove the upper housing
- use a old beach towel and clamp in a vice carefully
- apply moderate increasing force
- it should break loose
- if your sensor is fused and you cant remove it ,
- i have FULLY Restored 3FE Upper Housings TOP SHELF parts ..........
- my opinion :
remove what parts you need to to gain access to remove this thermo switch , when it breaks loose all at once , you can break other parts in the process .........
clear work area is a SAFE and low cost damage work area
you follow me here ?
Ok that worked really well, I got the senor off which is good. However the more I compare the top of my housing to those pictures, there is a lot of corrosion and pitting of the aluminum on mine. Not sure if it would effect the performance or structure of the housing since some of it is around where the thermostat gasket would go.
View attachment 2760621
View attachment 2760624
some minor corrosion is expected .........
if it crosses a line of course you should consider replacing it ...........
how is the LOWER housing ?
the 2 flat gasket mating surfaces are most important
then ALL the various HOSE bibs
if the bibs are pitted badly then replace is the matter of course ..........
more photos of your housings would be helpfull ?
4Cruisers
SILVER Star
I use the same crimper - works great.So splicing in the new sensor should be pretty straight forward. Basically cutting off the old sensor (keeping note what wires go where). Take pics before you do anything in case you forget
I have been using these crimpers for the past 5 years and have been very happy with them. You can swap out the jaws if you use different terminals as well: Amazon product ASIN B0050KDKUC
- Thread starter
- #19
So as I find time I work on it bit by bit. One of the connectors does not have the wires attached to the connector, I'm not sure what to look up to find a video to see how to do it. If any one has advice on that it would be great. It has the wire, connector, and two metal pieces (brackets I want to call them). Messed up the first connector I tried to do and had to restart which is great, the wire slipped out after crimping it down due to not realizing what I had weren't actual crimpers. Wire is now a bit short but not too short which is good. Thanks everyone for the advice so far.
- Thread starter
- #20
Update: I have all the female connectors on and ready to go, next step is to put the sensors on the housing, thermostat, and then gasket between the upper and lower housing. Is it necessary to put anything on the threads of the sensors before putting them back in the housing? Waiting on a new radiator drain plug since my other one had stripped threads, then put water in and flush it all out. Is it worth it to put some prestone flush and cleaner in with it drive it around then drain and put coolant in, or leave it all open and use a garden hose at the top of the radiator and flush it that way? Thanks every one for the help, has been a "fun" learning experience
Similar threads
Users who are viewing this thread
Total: 1 (members: 0, guests: 1)