Navigation
Install the app
How to install the app on iOS
Follow along with the video below to see how to install our site as a web app on your home screen.
Note: This feature may not be available in some browsers.
More options
Style variation
You are using an out of date browser. It may not display this or other websites correctly.
You should upgrade or use an alternative browser.
You should upgrade or use an alternative browser.
Builds Benjamin’s 3D Prints Build (5 Viewers)
- Thread starter BenCC
- Start date
-
- Tags
- build build thread
This site may earn a commission from merchant affiliate
links, including eBay, Amazon, Skimlinks, and others.
More options
Who Replied?Yes please. Thanks.
Here's some right now (it's dark out here). I'll take a few tomorrow during the day as well.
BenCC
Supporting Vendor
- Thread starter
- #1,323
Make 17: Sub-woofer Cover
1 Overview of the Final Product


2 Description
@Sargy requested this sub-woofer cover for his aftermarket upgrade. Thanks to Sargy for being easy to work with.

The factory cover was mailed to me with the outline cutout.

After seeing the photo of his third row, I added the honey-cone structure to match the floor mat.

A couple of problems were identified when Sargy got the cover. And I made corresponding revisions. In second iteration, I designed the cover in 3 pieces. The joint line is hidden behind the round piece.

Note: Sargy's setup is here.

3. Purchase
$100 + Shipping with all fasteners.
Please PM for paypal payment.
1 Overview of the Final Product
2 Description
@Sargy requested this sub-woofer cover for his aftermarket upgrade. Thanks to Sargy for being easy to work with.
The factory cover was mailed to me with the outline cutout.
After seeing the photo of his third row, I added the honey-cone structure to match the floor mat.
A couple of problems were identified when Sargy got the cover. And I made corresponding revisions. In second iteration, I designed the cover in 3 pieces. The joint line is hidden behind the round piece.
Note: Sargy's setup is here.
3. Purchase
$100 + Shipping with all fasteners.
Please PM for paypal payment.
Last edited:
BenCC
Supporting Vendor
- Thread starter
- #1,324
Thanks for your reply. I'm not even thinking that complicated. As many of us has experienced or soon will need to replace the factory woofer speaker, after the woofer is removed it leaves a deep cutout as pictured above which is very hard to mount aftermarket woofer without an exact size and shape. I'm thinking an overlay of the factory woofer shape with say 1/2" to 1" thickness will allow us to mount new woofer in that location.
This may not be feasible at all because it is solvable with buying a HDPE sheet and cutting qith a jig saw.
But yes, let's revisit again later. Thanks!
Builds - Benjamin’s 3D Prints Build
Mine is a nice match. I can take a couple pictures if you want. Yes please. Thanks.
 forum.ih8mud.com
BenCC
Supporting Vendor
- Thread starter
- #1,325
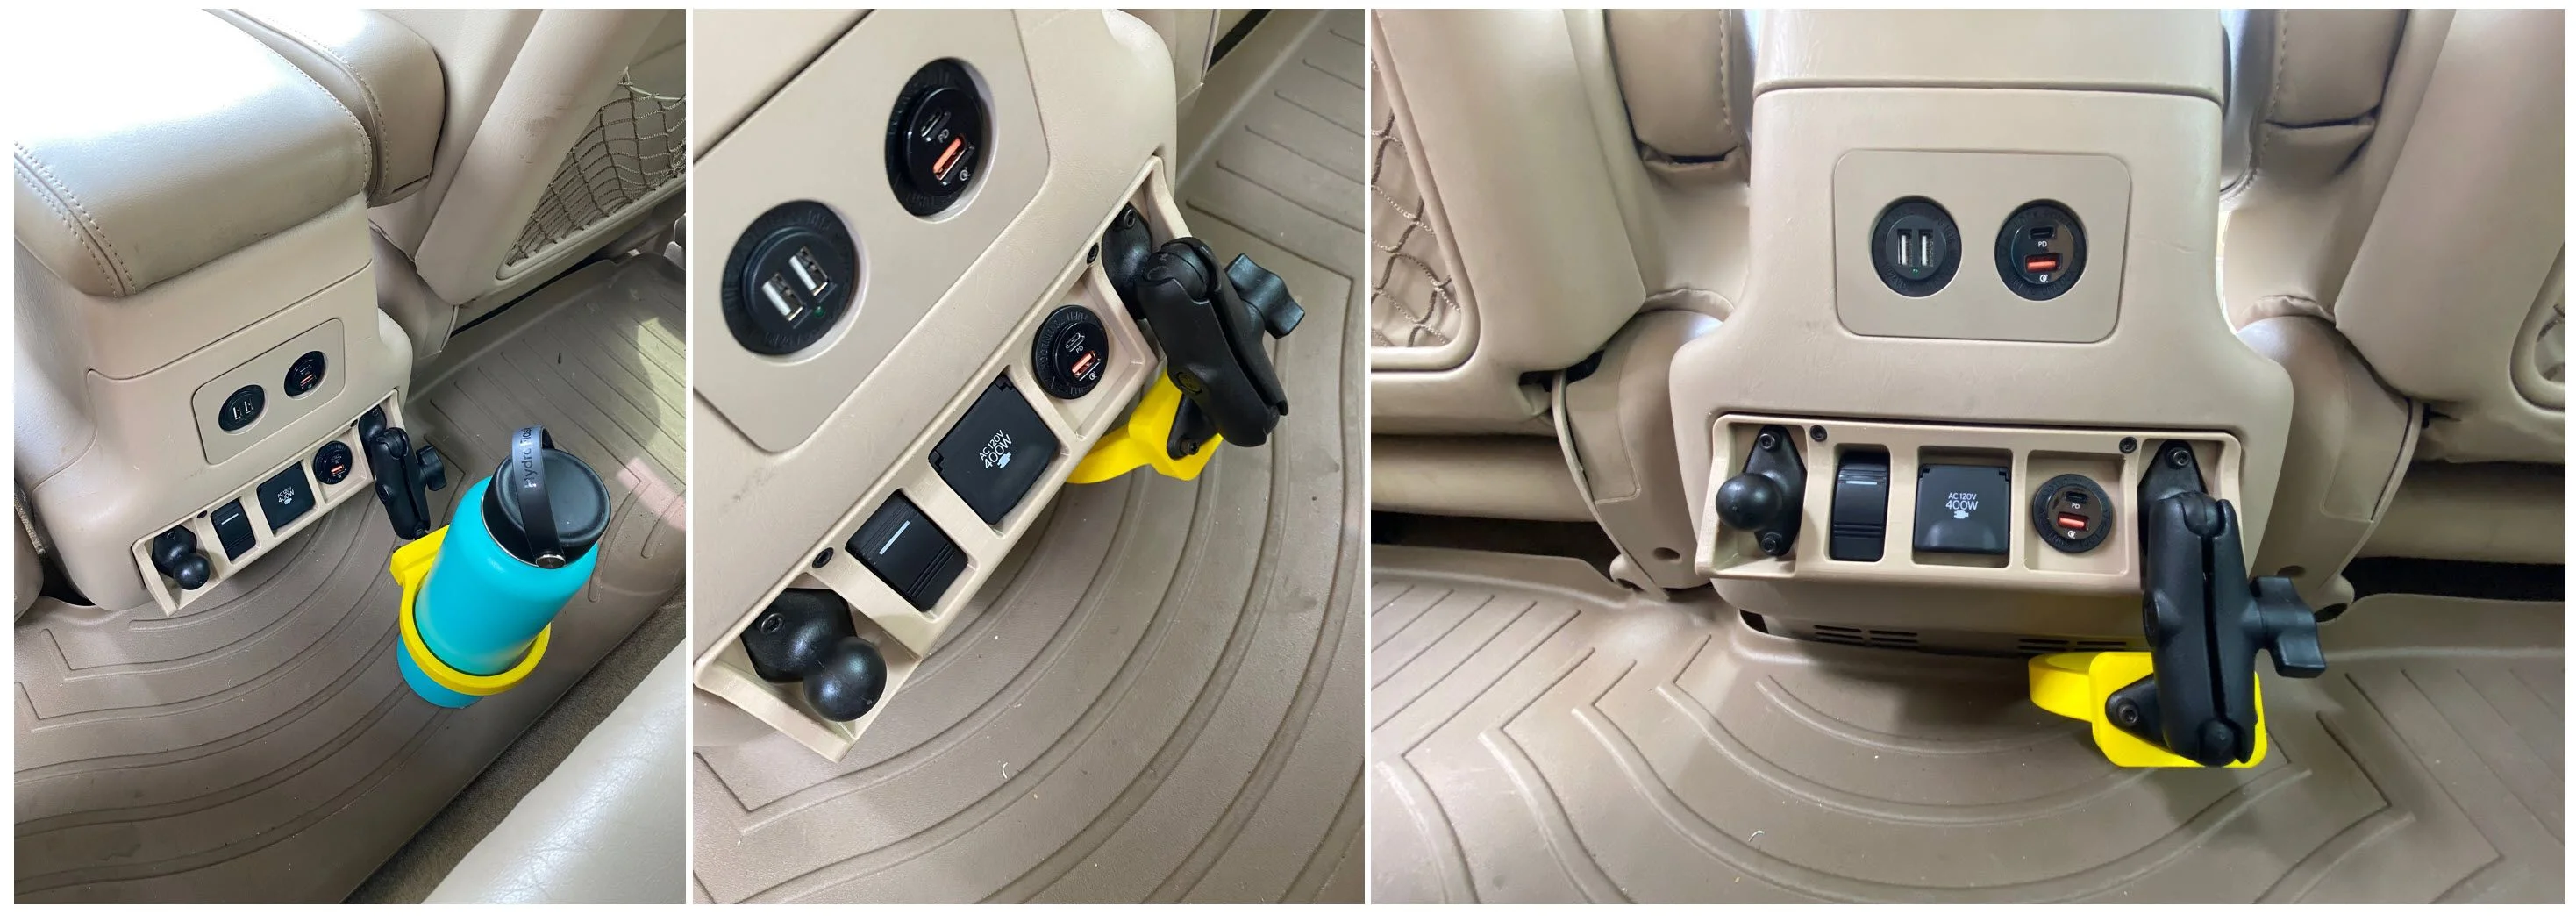
Make 29 V1: Second-row Cupholders Replacement
1 Overview of the Final Product


2 Description
M29 is to delete the second-row drawer/cupholders and set up a power distribution hub.
The bracket connects the factory panel to the rigid factory mounting points, providing a solid base for the faceplate.

The faceplate is customizable on CAD level to fit various devices.


V1-V5:

A potential use of RAM ball mount:
RAM Diamond Ball Base:
3. Purchase
$150
PM for paypal info.
What you get:
1 Overview of the Final Product
2 Description
M29 is to delete the second-row drawer/cupholders and set up a power distribution hub.
The bracket connects the factory panel to the rigid factory mounting points, providing a solid base for the faceplate.
The faceplate is customizable on CAD level to fit various devices.
V1-V5:
A potential use of RAM ball mount:
RAM Diamond Ball Base:
- Size B (1.0 inch) Aluminum: Amazon or RAM-B-238U
- Size B (1.0 inch) Composite: Amazon or RAP-B-238U
- Size C (1.5 inch) Aluminum: Amazon or RAM-238U
- 85530-35050-C0 and its Wire Harness (In-Cab 120V 400W Power Outlet Wire Harness - https://www.ktjo4x4.com/collections/in-cab-power-outlet-products/products/toyote-oem-12-in-cab-ac-120v-400w-power-outlet-plug-n-play-wire-harness-1)
3. Purchase
$150
PM for paypal info.
What you get:
- Bracket
- Faceplate
- Fasteners
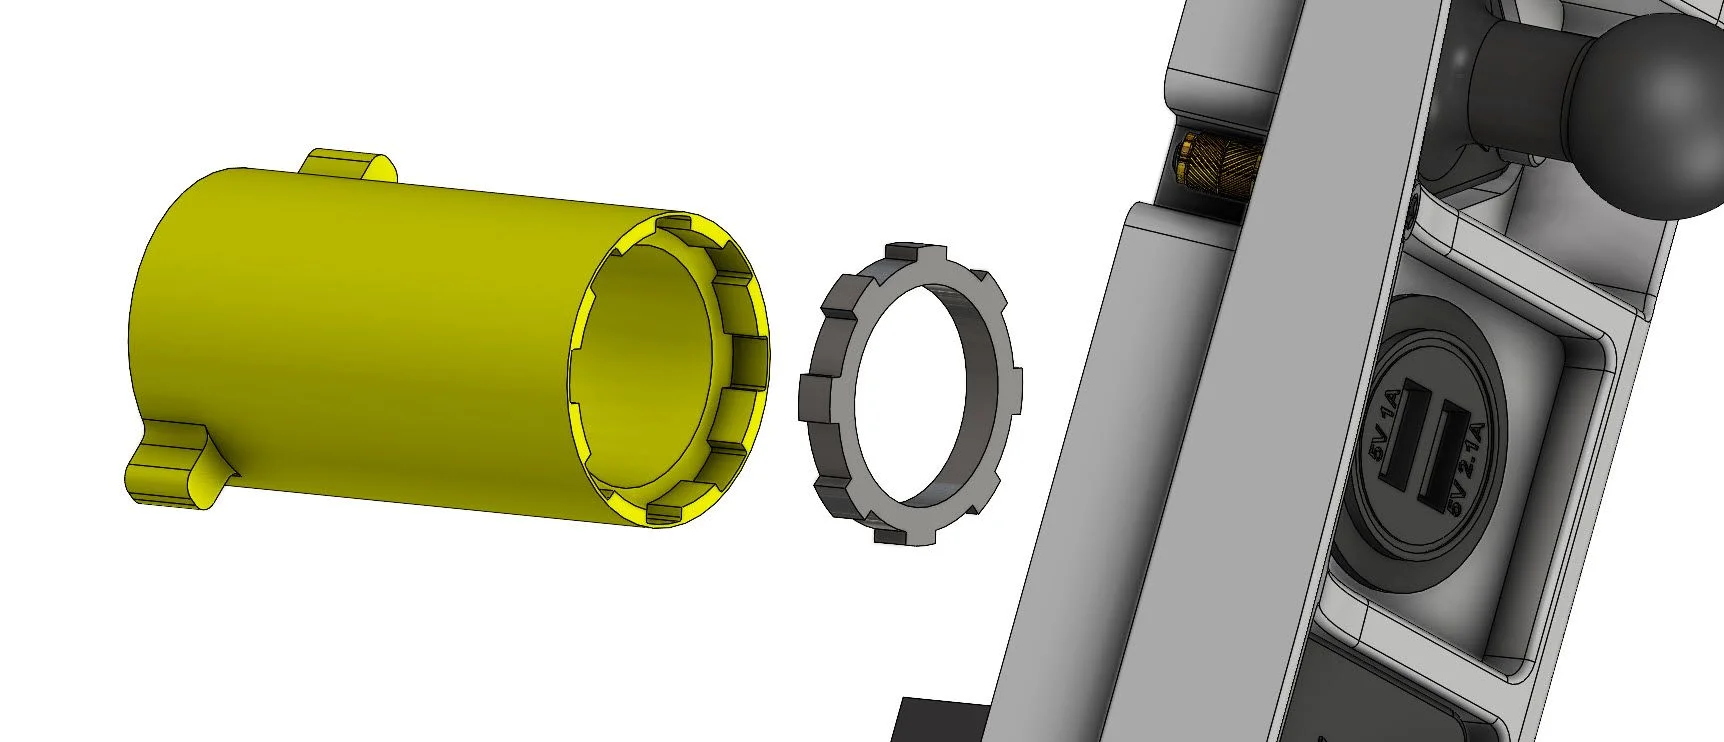
- 12V socket installation tool (Need this tool to install the threaded ring)
Last edited:
Excuse my ignorant, so where does the harness connect to? Is that for a specific Toy/Lex inverter appliance? How about aftermarket inverter, how do you connect that to the outlet?Harness arrived. It connects to the 120V Outlet (85530-35050-C0) which Make 7 V2 holds.
View attachment 2146378
BenCC
Supporting Vendor
- Thread starter
- #1,327
Good question.Excuse my ignorant, so where does the harness connect to? Is that for a specific Toy/Lex inverter appliance? How about aftermarket inverter, how do you connect that to the outlet?
The harness connects the 120V plug and gives you three terminals: load, ground, and neutral. You can either hardwire them to an inverter or wire them to a plug as shown in the image below. We don't have a factory power inverter on 100/LX470. I was planning to retrofit a inverter used on Tacoma. But it is too big to fit in the center storage compartment. I am now going to have a smaller 150W inverter. Does this answer your question?
Last edited:
Good question.
The harness connects the 120V plug and gives you three terminals: load, ground, and neutral. You can either hardwire them to a inverter or wire them to a plug as shown in the image below. We don't have a factory power inverter on 100/LX470. I was planning to retrofit a inverter used on Tacoma. But it is too big to fit in the center storage compartment. I am now going to have a smaller 150W inverter. Does this answer your question?
View attachment 2355868
If I mount an inverter in the rear cabin, how long of a line can I safely run to the outlet? I typically run larger AWG wire based on length of run and amount of "juice" that will be flowing thru it.
BenCC
Supporting Vendor
- Thread starter
- #1,329
I would not do that. Running 12V anywhere is safe. But running 120V AC from rear to the center storage box is a total different story.If I mount an inverter in the rear cabin, how long of a line can I safely run to the outlet? I typically run larger AWG wire based on length of run and amount of "juice" that will be flowing thru it.
For now I just put a small 150W inverter there. I still have the Tacoma inverter and planning to mount it in the tool storage place in the rear.
Brilliant work! I am especially impressed with the brass inserts in your mounting plate. Very impressive work. I'll be in for one of these.Make 29: Second-row Cupholders Replacement
1 Overview of the Final Product
View attachment 2355623
View attachment 2355601
View attachment 2355605
2 Description
M29 is to delete the second-row drawer/cupholders and set up a power distribution hub.
The bracket connects the factory panel to the rigid factory mounting points, providing a solid base for the faceplate.
View attachment 2355612
The faceplate is customizable on CAD level to fit various devices.
View attachment 2355616
A potential use of RAM ball mount:
RAM Diamond Ball Base:
120V Outlet
- Size B (1.0 inch) Aluminum: Amazon or RAM-B-238U
- Size B (1.0 inch) Composite: Amazon or RAP-B-238U
- Size C (1.5 inch) Aluminum: Amazon or RAM-238U
12V Socket
- 85530-35050-C0 and its harness
3. Purchase (Not for sale for now)
What you get:
- Bracket
- Faceplate
- Fasteners
- 12V socket installation tool (Need this tool to install the threaded ring)
I would not do that. Running 12V anywhere is safe. But running 120V AC from rear to the center storage box is a total different story.
For now I just put a small 150W inverter there. I still have the Tacoma inverter and planning to mount it in the tool storage place in the rear.
Got it. Kinda what I was figuring. 120 is a different beast
") Pretty sure I can fit a 150W inverter in my center console. I recently installed a 6 fuse Blue Sea panel on the front wall and mounted my MXT275 GMRS base unit in there too. Pretty sure I could make the 150W fit in there.
Pretty sure I can fit a 150W inverter in my center console. I recently installed a 6 fuse Blue Sea panel on the front wall and mounted my MXT275 GMRS base unit in there too. Pretty sure I could make the 150W fit in there.Did you remove the CD changer from the center console?Got it. Kinda what I was figuring. 120 is a different beast
So much want on that! perfect product.
Did you remove the CD changer from the center console?
My 98 didn't have that as an option nor the cupholders in the upper tray. Just an empty bin with one solitary 12v socket is all my LX came with.
So, is it safe to run a wire all the way up front to a Blue Sea fuse box from a to connect a power inverter mounted in the rear?I would not do that. Running 12V anywhere is safe. But running 120V AC from rear to the center storage box is a total different story.
For now I just put a small 150W inverter there. I still have the Tacoma inverter and planning to mount it in the tool storage place in the rear.
Got it, thanks friendoRunning 12V is OK but you need to size the cables based on the power draw
I
I am having trouble setting up the first thread. I set it up as a table of content. The problem is that the number of images reaches the limit (20 images per post).
I talked to the forum staff member. The limit cannot be lifted. Is there a way I can post more than 20 images, such as linking to external images?
You can probably just overflow it to the next post.
Exiled
SILVER Star
This M29 design is #GENIUS, I'm definitely planning on getting one of those for my 100, it will be perfect for long trips!