
Navigation
Install the app
How to install the app on iOS
Follow along with the video below to see how to install our site as a web app on your home screen.
Note: This feature may not be available in some browsers.
More options
Style variation
You are using an out of date browser. It may not display this or other websites correctly.
You should upgrade or use an alternative browser.
You should upgrade or use an alternative browser.
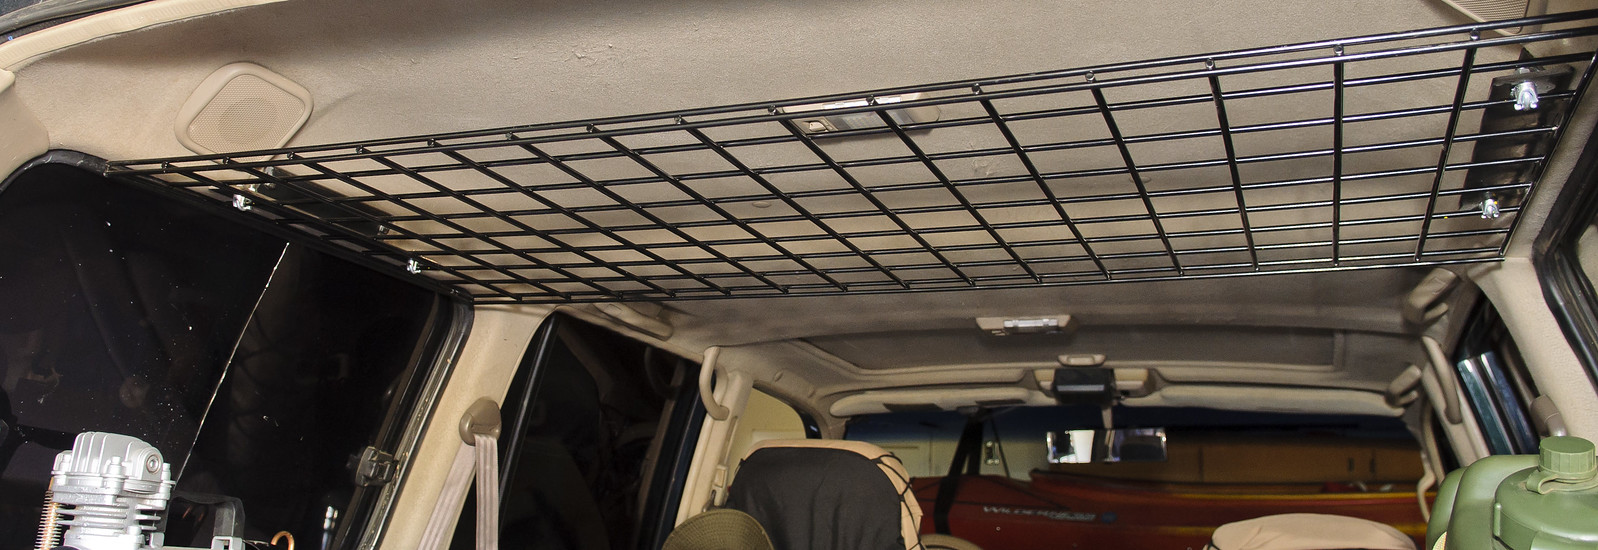
Attic racks made cheap and easy - 80 series
- Thread starter LandCruiserPhil
- Start date
This site may earn a commission from merchant affiliate
links, including eBay, Amazon, Skimlinks, and others.
Yeah, but can you lift an 80 with YOUR feel good shelf rack?Wait let me think about this for .0001 second $370 or $22


- Thread starter
- #164
Yeah, but can you lift an 80 with YOUR feel good shelf rack?
Not a problem with the magic dust
I know this is an old thread but thanks for the link for the wire grid, that's by far the best price. Even 2 year later it was only $32 with shipping. I got my brackets made and will hopefully have this finished up as soon as the grid gets here.Nice cheap solution! If you have a welder and want something more permanent, you can make this for about $8 in scrap metal:
First off you need a grid panel. After doing some searching online this was the cheapest I could find. Lots of places wanted too much for shipping. 2x4 grid panel in black for $28 shipped. Perfect, don't even need to cut it down to size. Black 2X4 Grid Panel - Bg-24 - Firefly Solutions
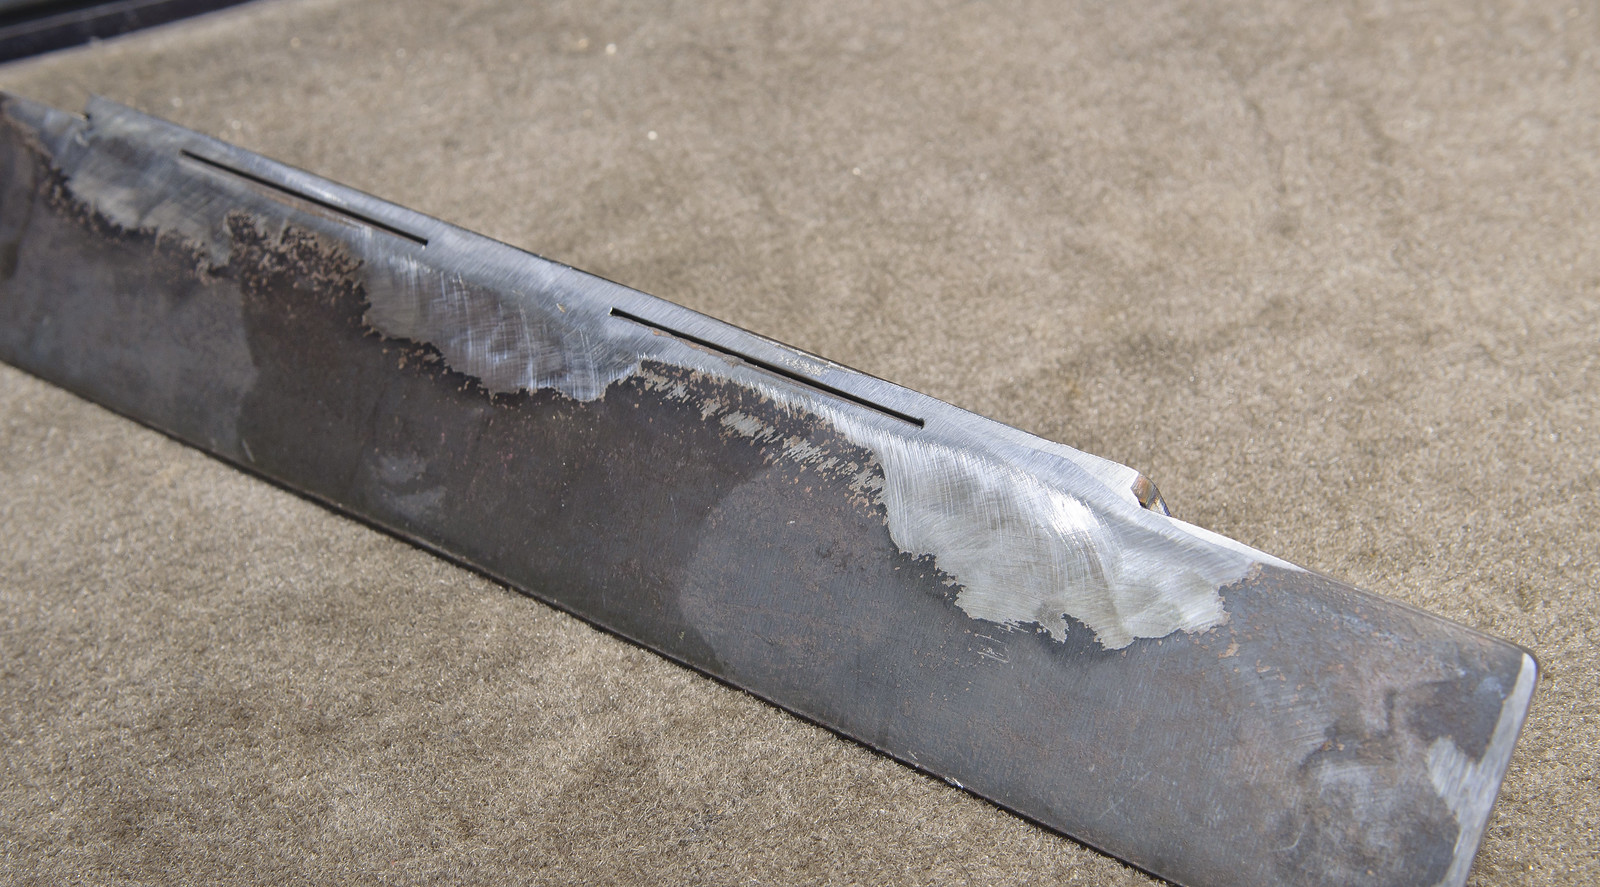
On to the brackets. Scrap pieces of 3/16" plate. Cut to size, welded and drilled to fit the existing grab handle bolt holes.
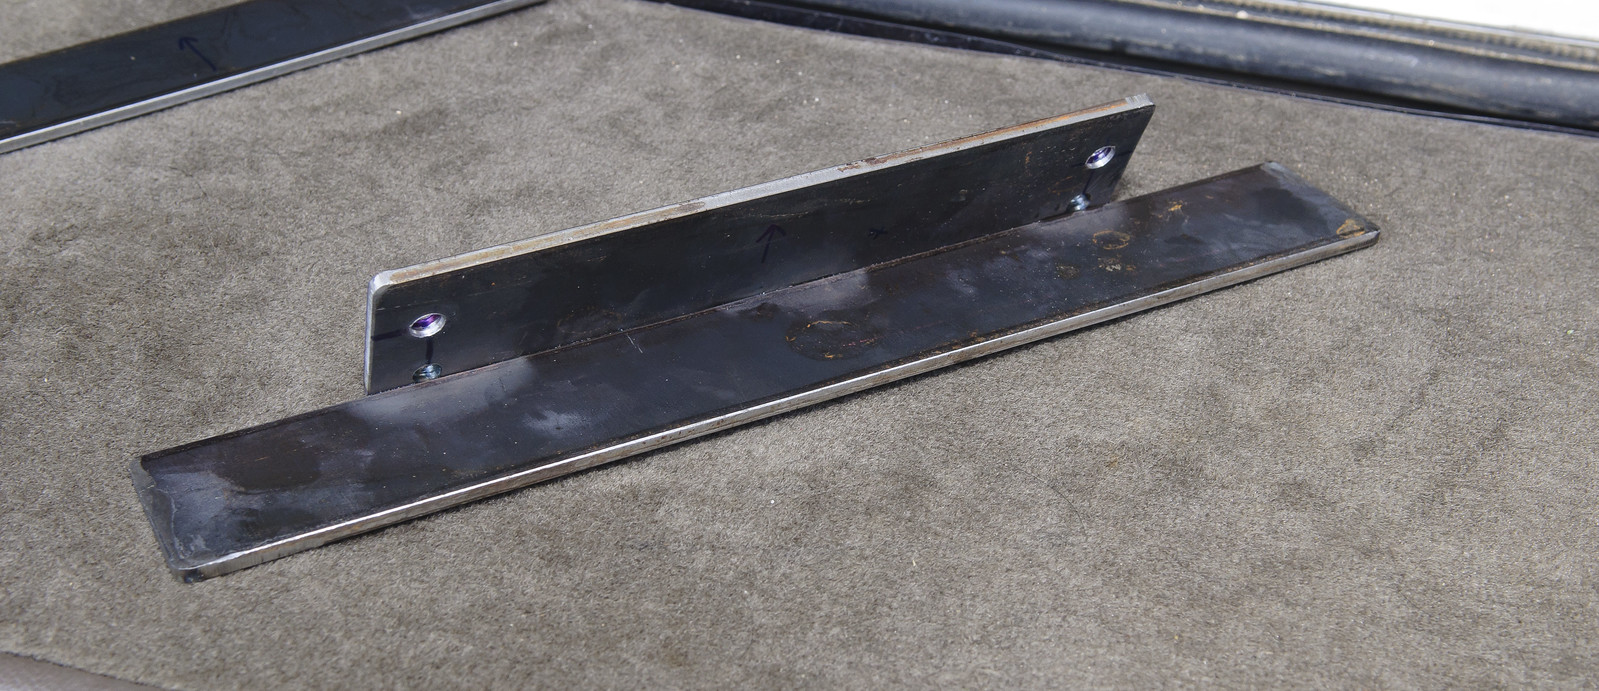
Ground the welds down cause I felt like being fancy
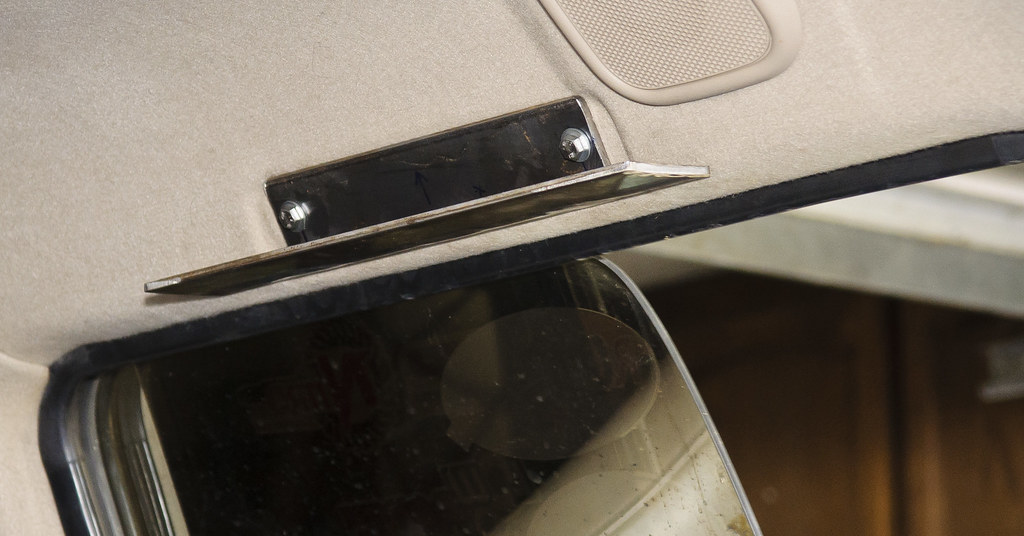
Bolted in
Mock fit
Panel is attached to the brackets using some u-bolt screw clamp thingamajiggers. I forget they're actual name at the moment
I know this is an old thread but thanks for the link for the wire grid, that's by far the best price. Even 2 year later it was only $32 with shipping. I got my brackets made and will hopefully have this finished up as soon as the grid gets here.
Funny you should post this. I was reading this thread last night and bought all the supplies this morning. I'm using the wire shelf with the 1" basket lip. And I have a pretty good idea for making the attic rack be able to tilt. Hoping to get started making the brackets when I get home from work...All depends on if my 5month old wants to nap or not ha.
Got mine installed today, this was a great idea. No more jackets laying in the back seat. I went with the brackets bolted into the 3rd row grab handles.


Looks great! Old thread.... but what I found to work great are "cattle panels" from Tractor Supply or any farm supply store! I paid $12 for a piece 4' by 12'......." Just throwing this out if anyone is looking"!
^^^^This is a nice bracket. Is this available somewhere? Did you fashion this yourself?
Got mine installed today, this was a great idea. No more jackets laying in the back seat. I went with the brackets bolted into the 3rd row grab handles.
What did you use for brackets? Did you fashion your own or did you find something that works?
My 100 was at the fabricator shop last week having armor built and I sent him a pic of what I needed and he made them.
Making your own bracket isn't too challenging. I used angle iron (cut sections from a discarded bed frame). You could also use heavy sheet metal or thin plate steel. For the spacing of the bolt holes, just place the old handle on the (soon to be) bracket and drill through the bolt holes that attached the handle.
- Thread starter
- #172
Hose clamps for the win
I bought two 12" pieces of slotted angle from Lowe's for $3 each and cut them down to ~9 inches for the brackets. Painted them black and that's it. Cheap and looks clean
Shop The Hillman Group 1-ft x 1-1/2-in Plated Steel Slotted Angle at Lowes.com

Shop The Hillman Group 1-ft x 1-1/2-in Plated Steel Slotted Angle at Lowes.com
So what I'm seeing is that everyone is mounting the rack on the bottom side of the mounts. No one is having any issues with the minimally less support for the rack and excessive flex?
@lastresort576
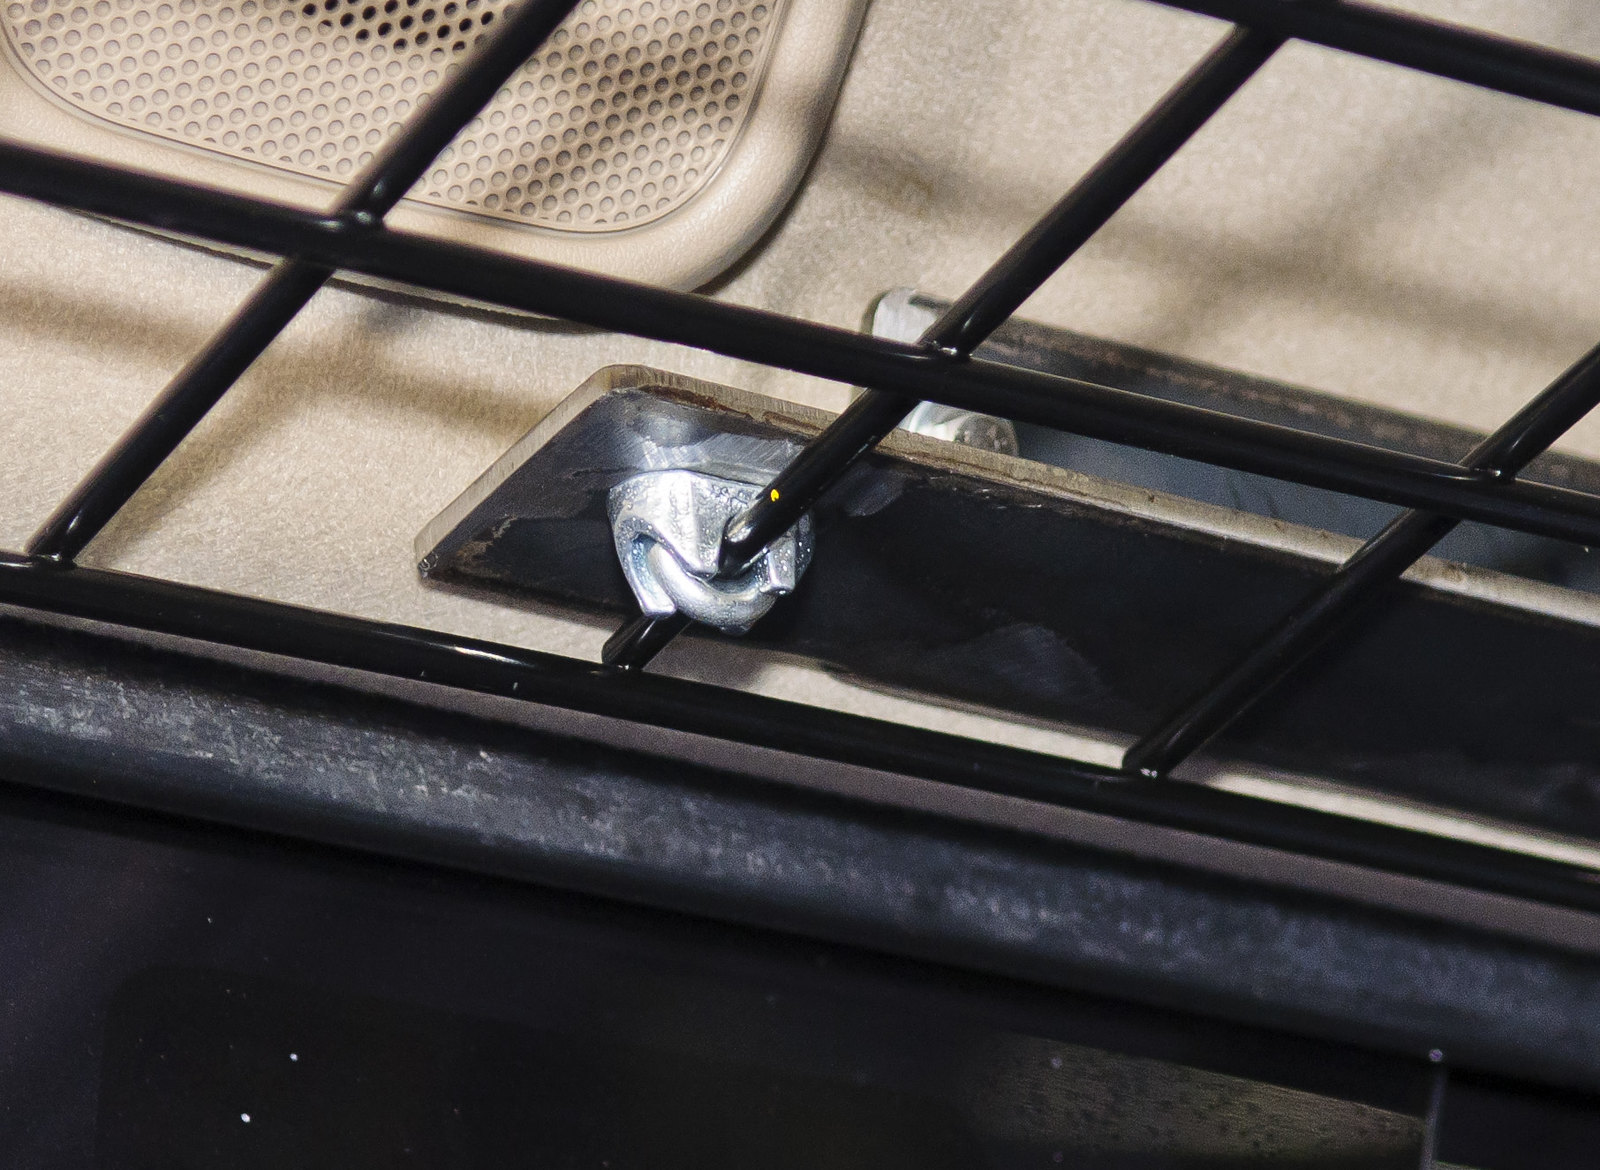
I was having quite a bit of flex/vibration with my attic rack. Enough to where items in the rack would vibrate off. The fix I found was cheap and easy. I attached a 1.5"x1/8" aluminum stock to the front of the rack. This stabilized the front of the rack and also provided a nice lip to prevent things from sliding forward. In addition to this I removed the center headliner clip/snap (I am not sure of the exact name). A 5/16" coarse threaded bolt fit perfectly in this hole. I got a 1/2" piece of aluminum, did some mock-ups, and made a rear support.
Front 1.5"x 1/8" front support/lip.

There are 3 rear headliner support clips. I removed the center one. They look like the one pictured below:

Fabricated rear support. 0.5" aluminum stock bent in a vise. Use a 5/16" coarse threaded bolt.

I was having quite a bit of flex/vibration with my attic rack. Enough to where items in the rack would vibrate off. The fix I found was cheap and easy. I attached a 1.5"x1/8" aluminum stock to the front of the rack. This stabilized the front of the rack and also provided a nice lip to prevent things from sliding forward. In addition to this I removed the center headliner clip/snap (I am not sure of the exact name). A 5/16" coarse threaded bolt fit perfectly in this hole. I got a 1/2" piece of aluminum, did some mock-ups, and made a rear support.
Front 1.5"x 1/8" front support/lip.
There are 3 rear headliner support clips. I removed the center one. They look like the one pictured below:
Fabricated rear support. 0.5" aluminum stock bent in a vise. Use a 5/16" coarse threaded bolt.
Last edited:
@thedoughboy
I'm using the wire shelf basket. So it should be pretty strong and has a lip going around it in its entirety. I almost had it all mounted up and ready for paint. But as I'm mounting mine on top of the mount, the basket at 48" was too wide and wouldn't fit.
I ended up shortening the width by like 2" and cutting down the shelf leg holes. I just got around to welding the basket end back on the main part today. So hopefully it'll be ready for me to drill the basket mount holes and paint it up tomorrow. I do like the idea of a center rear mount though. I just don't know where to hang it.
It's tricky trying to fab stuff up during the day while trying to watch my 5month old and get in the garage while he naps for 30min at a time. Ha
I'll likely make some changes in the future to clean it up and add some strength.
Last edited:
- Thread starter
- #178
Recently I have seen two sized grid (3/16" & 1/4"). The 3/16" wire is too light IMO for a loaded attic rack.
- Thread starter
- #179
I have been getting a lot of request guys interested if I make these. No because they are very simple for even a caveman (ebay links below) You can make fancy bracket if that floats your boat but I can tell you after 1000's of miles offroad with a packed rack hose clamps work and with a full rack (preferred by most men) you cant even see the hose clamps
Attic racks made cheap and easy - 80 series
Attic racks made cheap and easy - 80 series
Has anyone attempted to put one of these racks above the middle row seats? its just me and the wife in the front seats, and the dog is on the rear cargo drawers in the back, so i dont want to cut his head room any lower since he can stand there with minimal overhead. i might give the hose clamps a shot above the second row and see how it works. it would be handy for the wifes pillow and blanket. just curious if anyone has experience or pics with the rack above the middle seats