Navigation
Install the app
How to install the app on iOS
Follow along with the video below to see how to install our site as a web app on your home screen.
Note: This feature may not be available in some browsers.
More options
You are using an out of date browser. It may not display this or other websites correctly.
You should upgrade or use an alternative browser.
You should upgrade or use an alternative browser.
3FE refresh - doing a reboot on my '92 (2 Viewers)
- Thread starter LC8pilot
- Start date
This site may earn a commission from merchant affiliate
links, including eBay, Amazon, Skimlinks, and others.
More options
Who Replied?- Thread starter
- #42
Got the dizzy cap and wires all plugged up.

Some new helpers for getting that crank nut back on. This turned out to be a royal PITA. After I got the timing cover and pulley on, I tried to rig-up a chain to some bolts in the pulley. Couldn't get it tight enough for some reason to really grab hold of the pulley to allow me to torque the nut down. Finally decided to give up on that idea and crawl underneath to see if I could find the inspection window for the TC. Finally found it & popped off the cover. Everything I have read has said to use a 14MM deep impact socket to lock up the TC. Ok, no problem. Only thing is, the bolts are 12MM, NOT 14MM. After a beer I started to think that maybe the socket wasn't actually supposed to fit over the bolt but rather be wedged in between the plate and the groove (not sure of the technical name). VOILA! Solid lockup. The beer did its job.
Wedged the socket in there on a long extension (recommended in case you should drop the socket down in the black hole of the TC). Put my Hi-Lift handle over the 3/4" breaker bar and gave it some serious pull. Totally over-tightened the nut... :whoops: Put the torque wrench on the nut (253 lb/ft) and the thing clicked immediately. I don't think I tightened it too much over, but it was still a major drag.

Bad pic, but here's a blurry view of the inspection window and the 12MM bolt.

Timing cover (with all new bolts), pulley and crank nut back on. Water pump placed for a 'dry run'. I wanted to see how everything was going to fit prior to bolting eveything down.

Jason


Some new helpers for getting that crank nut back on. This turned out to be a royal PITA. After I got the timing cover and pulley on, I tried to rig-up a chain to some bolts in the pulley. Couldn't get it tight enough for some reason to really grab hold of the pulley to allow me to torque the nut down. Finally decided to give up on that idea and crawl underneath to see if I could find the inspection window for the TC. Finally found it & popped off the cover. Everything I have read has said to use a 14MM deep impact socket to lock up the TC. Ok, no problem. Only thing is, the bolts are 12MM, NOT 14MM.
 After a beer I started to think that maybe the socket wasn't actually supposed to fit over the bolt but rather be wedged in between the plate and the groove (not sure of the technical name). VOILA! Solid lockup. The beer did its job.
 Wedged the socket in there on a long extension (recommended in case you should drop the socket down in the black hole of the TC). Put my Hi-Lift handle over the 3/4" breaker bar and gave it some serious pull. Totally over-tightened the nut... :whoops: Put the torque wrench on the nut (253 lb/ft) and the thing clicked immediately. I don't think I tightened it too much over, but it was still a major drag.

Bad pic, but here's a blurry view of the inspection window and the 12MM bolt.

Timing cover (with all new bolts), pulley and crank nut back on. Water pump placed for a 'dry run'. I wanted to see how everything was going to fit prior to bolting eveything down.

Jason
Last edited:
94SRUNNER
GOLD Star
Fantastic progress!
So while you're on the topic of crank nuts for the 3fe, on my 3fe the crank nut does't thread on all the way and there is a void, I think it's tight it's just that there's a space in the nut where the crank does not thread all the way through, is that the case with yours?
for the coolant line/hose you ordered there is a thread on here with part numbers for the two front hoses off a FJ62 that are the same for our 80s and cost like $5 each. I just replaced mine, i havent found any numbers for the rear hoses though and of course if your hard lines needed replacing then you would need the 200$ piece.
Awesome thread!! Definitely subscribed to it!
- Thread starter
- #47
So while you're on the topic of crank nuts for the 3fe, on my 3fe the crank nut does't thread on all the way and there is a void, I think it's tight it's just that there's a space in the nut where the crank does not thread all the way through, is that the case with yours?
Interesting, on mine there didn't seem to be any void or space, though I wasn't really checking.
Jason
- Thread starter
- #48
for the coolant line/hose you ordered there is a thread on here with part numbers for the two front hoses off a FJ62 that are the same for our 80s and cost like $5 each. I just replaced mine, i havent found any numbers for the rear hoses though and of course if your hard lines needed replacing then you would need the 200$ piece.
That's good info, thnx. Might try to pick up a couple of the hoses for a 62 so that I can have some spares. I'm actually glad that I went ahead and bought the whole assembly. My hard lines were a little pitted and a bit banged up. The $200 was painful, though.

Jason
PabloCruise
SILVER Star
As a 3FE fan I can't wait to go through this thread!
- Thread starter
- #50
Mounting everything up. I put anti-seize on all my bolts. On the WP studs, I used a little Permatex #2 as a thread sealant - hope it works.

Pulley and tensioner brackets going on. I was a little concerned about the power steering pump and fluid resevoir as I completely drained the pump when I took everything apart. I wasn't sure if in doing so I may have compromised some of the internals. I cleaned both units as best I could. I then primed the resevoir fluid container and hit it with a few coats of Rustoleum krinkle black paint. I didn't want to reuse the o-ring that sits at the bottom of the resevoir (feeding into the pump), but as it turned out, of all the gazillions of random metric o-rings that I have lying around (bought one of those mega-assortment boxes), I didn't have a single one that was the right size - it's pretty skinny.

Got the thermostat housing gasket tacked on & stuck it to the head. No drama there. Sure is nice having all sorts of free room to get hoses routed and bolts torqued.

Jason


Pulley and tensioner brackets going on. I was a little concerned about the power steering pump and fluid resevoir as I completely drained the pump when I took everything apart. I wasn't sure if in doing so I may have compromised some of the internals. I cleaned both units as best I could. I then primed the resevoir fluid container and hit it with a few coats of Rustoleum krinkle black paint. I didn't want to reuse the o-ring that sits at the bottom of the resevoir (feeding into the pump), but as it turned out, of all the gazillions of random metric o-rings that I have lying around (bought one of those mega-assortment boxes), I didn't have a single one that was the right size - it's pretty skinny.

Got the thermostat housing gasket tacked on & stuck it to the head. No drama there. Sure is nice having all sorts of free room to get hoses routed and bolts torqued.

Jason
wow! that sure is a purdee motor! 
nicely done! my 3fe looks like a turd covered in grime and road trash... I almost thought about doing what you did- but, I am too OCD and would end up doing a total engine rebuild before I realized it... if you dont believe me- ask my son- his input shaft bearing on his honda was whining- I figure- easy fix! now, his engine is completely disassembled with all new guts going in it- and this all started with a transmission whine! oh, and we did rebuild the transmission too with some upgrades- upon pulling the trans- I noticed oil seals leaking- and one thing led to another- now he has a complete rebuilt port and polished head with a performance cam, larger injection system, re-sleeving the block with performance sleeves with heat dissapating fins to draw heat from the piston and cylinder walls, new performance rods, mains, pistons and racing rings, and a new Exedy Stage 2 racing clutch... I could only imagine if I decided to tear into the old 3fe what I would end up with... oh, and all the money tied up in his car is a loan he has to pay me back- loan borrrowed from my land-cruiser fund...

nicely done! my 3fe looks like a turd covered in grime and road trash... I almost thought about doing what you did- but, I am too OCD and would end up doing a total engine rebuild before I realized it... if you dont believe me- ask my son- his input shaft bearing on his honda was whining- I figure- easy fix! now, his engine is completely disassembled with all new guts going in it- and this all started with a transmission whine! oh, and we did rebuild the transmission too with some upgrades- upon pulling the trans- I noticed oil seals leaking- and one thing led to another- now he has a complete rebuilt port and polished head with a performance cam, larger injection system, re-sleeving the block with performance sleeves with heat dissapating fins to draw heat from the piston and cylinder walls, new performance rods, mains, pistons and racing rings, and a new Exedy Stage 2 racing clutch... I could only imagine if I decided to tear into the old 3fe what I would end up with... oh, and all the money tied up in his car is a loan he has to pay me back- loan borrrowed from my land-cruiser fund...

- Thread starter
- #52
Another shot with the thermostat housing/assembly. Got all of my sensors and switches hooked up. I wrapped every lead coming off of the wiring harness with a couple layers of electrical tape (the primo deluxe Super 88 stuff!). Figured it might not offer much protection, but every little bit helps. Those wires/connectors are getting pretty brittle.
SO glad to be doing the WP hoses with everything off of the front end of the truck. It would be a tough job to have change them out with everything in place. I tried to position all of my hose clamp heads for easy (relative) adjustment down the road.

Belts on! The picture at the beginning, before I took my old bets off... yep, worth a thousand words. New belts were very easy to route by looking at my pic. Of the old belts two were Gates and one was OEM. Definitely getting brittle and starting to crack. REALLY glad to get these swapped out. First time I've done belts on a car. Again, I'm glad everything was stripped down in front of them. I can see it taking a fair bit longer if the radiator and all the bits were hooked up. I had scribed little marks on everything when I was taking the old belts off so that I'd know where to tighten everything to when putting the new ones on. Gave me a good starting point since I don't have a belt tension gauge. I then tightened em up a bit more since I knew they'd stretch some.

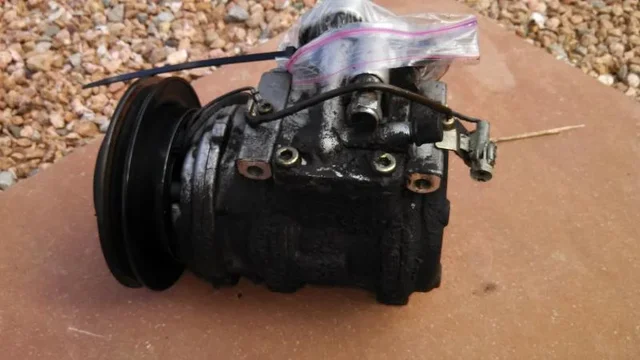
Angle shot showing A/C compressor. Cleaned up pretty good. We'll see how she works once I have some R12 reloaded. Does anybody know if Mr.T sells a kit with all the o-rings for the various A/C fittings?

Before I gave it a kerosene bath. Was careful (as best I could be) not to get any kerosene in any of the 'ports'.

Jason


SO glad to be doing the WP hoses with everything off of the front end of the truck. It would be a tough job to have change them out with everything in place. I tried to position all of my hose clamp heads for easy (relative) adjustment down the road.

Belts on! The picture at the beginning, before I took my old bets off... yep, worth a thousand words. New belts were very easy to route by looking at my pic. Of the old belts two were Gates and one was OEM. Definitely getting brittle and starting to crack. REALLY glad to get these swapped out. First time I've done belts on a car. Again, I'm glad everything was stripped down in front of them. I can see it taking a fair bit longer if the radiator and all the bits were hooked up. I had scribed little marks on everything when I was taking the old belts off so that I'd know where to tighten everything to when putting the new ones on. Gave me a good starting point since I don't have a belt tension gauge. I then tightened em up a bit more since I knew they'd stretch some.

Angle shot showing A/C compressor. Cleaned up pretty good. We'll see how she works once I have some R12 reloaded. Does anybody know if Mr.T sells a kit with all the o-rings for the various A/C fittings?

Before I gave it a kerosene bath. Was careful (as best I could be) not to get any kerosene in any of the 'ports'.
Jason
- Thread starter
- #53
wow! that sure is a purdee motor!
nicely done! my 3fe looks like a turd covered in grime and road trash... I almost thought about doing what you did- but, I am too OCD and would end up doing a total engine rebuild before I realized it... if you dont believe me- ask my son- his input shaft bearing on his honda was whining- I figure- easy fix! now, his engine is completely disassembled with all new guts going in it- and this all started with a transmission whine! oh, and we did rebuild the transmission too with some upgrades- upon pulling the trans- I noticed oil seals leaking- and one thing led to another- now he has a complete rebuilt port and polished head with a performance cam, larger injection system, re-sleeving the block with performance sleeves with heat dissapating fins to draw heat from the piston and cylinder walls, new performance rods, mains, pistons and racing rings, and a new Exedy Stage 2 racing clutch... I could only imagine if I decided to tear into the old 3fe what I would end up with... oh, and all the money tied up in his car is a loan he has to pay me back- loan borrrowed from my land-cruiser fund...
Nice! Lucky son. I wish I would have done more auto work with my dad as a kid growing up. As it is, a lot of this is brand new to me.


Jason
- Thread starter
- #54
Got this little guy all snugged-up. Hose looked a little short to me. Maybe short hose syndrome?

Sure enough, the thought of my short hose kept me up that night. Changed it first thing in the morning. Much better!

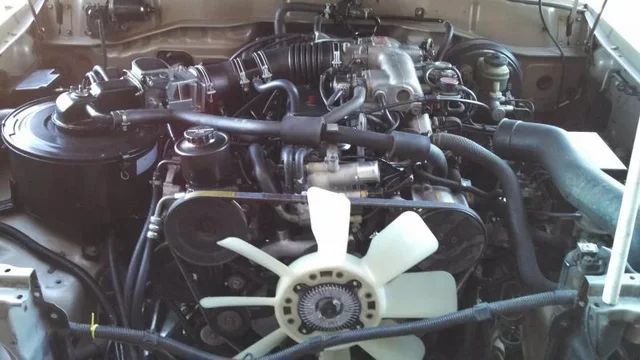
Fan clutch and fan all mounted up. Cleaned up the fan & it was in great shape, - no hair line cracks or chips. Had to loosen and then re-adjust my belts to get the fan installed as the pulley/clutch assembly was pretty tough to get mounted with the belts tight.
Also got the air cleaner assembly back on and new air cleaner hose(s) put on. Those two hoses are $$$. My one hose was cracked pretty bad right where it attached to the throttle body - I'm sure it didn't help vacuum any. Swapped out the air filter for a new one and then got vacuum lines routed.

Jason


Sure enough, the thought of my short hose kept me up that night. Changed it first thing in the morning. Much better!

Fan clutch and fan all mounted up. Cleaned up the fan & it was in great shape, - no hair line cracks or chips. Had to loosen and then re-adjust my belts to get the fan installed as the pulley/clutch assembly was pretty tough to get mounted with the belts tight.
Also got the air cleaner assembly back on and new air cleaner hose(s) put on. Those two hoses are $$$. My one hose was cracked pretty bad right where it attached to the throttle body - I'm sure it didn't help vacuum any. Swapped out the air filter for a new one and then got vacuum lines routed.
Jason
Last edited:
- Thread starter
- #55
So this whole 'refresh' started because I had a radiator leak at the top seam. It just sort of grew from there. Anyway, it's finally time to slap the new radiator in!
Old one was definitely in bad shape. The other side looks a lot worse.

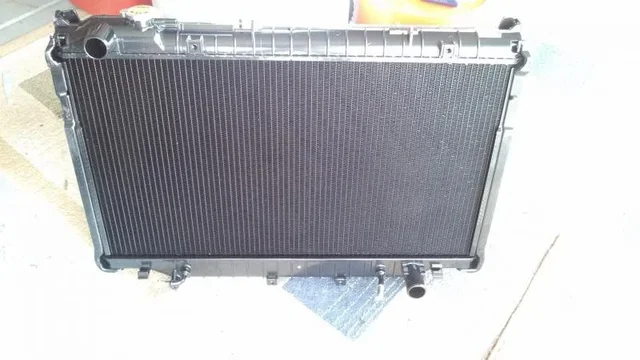
WOO HOO! Thank you Mr T! Nice and shiny.

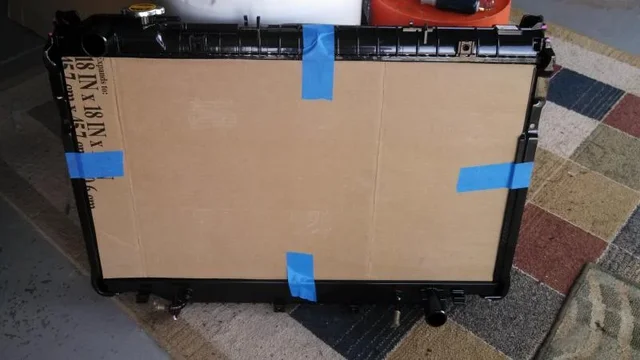
Covered both sides in cardboard before attempting to wedge it in the truck. I didn't trust myself enough to not put an elbow or ratchet through the fins. As soon as rad is in place and bolted in just yank cardboard.

Jason


Old one was definitely in bad shape. The other side looks a lot worse.

WOO HOO! Thank you Mr T! Nice and shiny.
Covered both sides in cardboard before attempting to wedge it in the truck. I didn't trust myself enough to not put an elbow or ratchet through the fins.
 As soon as rad is in place and bolted in just yank cardboard.
Jason
Last edited:
Great job on the 3fe refresh. Very inspiring.
For your a/c o-rings, look up Coolstream A/C. They are a sponsor here on Mud and they have a healthy Mud discount. All Denso parts. Great resource for the community.
Sent from my iPhone using IH8MUD
For your a/c o-rings, look up Coolstream A/C. They are a sponsor here on Mud and they have a healthy Mud discount. All Denso parts. Great resource for the community.
Sent from my iPhone using IH8MUD
- Thread starter
- #57
I tried to get the fan shroud back in after I had the radiator buttoned-up. That stubborn little donkey would not cooperate. I have no idea how people manage to get it installed in one piece and without jacking anything up!  I finally gave up and got the hacksaw out. Cut it right down the middle. Slid right in place after that. I was worried that it wouldn't mount securely if I cut it in half. No worries at all - with the top bolt and the rubber covered 'foot' that slips into the slot at the bottom of the rad, it fit nice and tight. Not sure why they didn't do it that way from the factory.

Pic with the fan in place. The chip was already there - doesn't seem to affect performance any. Upper rad hose installed (complete with nuclear sticker bits that did NOT want to come off). New Toyota hose clamps. I removed the A/C dryer to get better access to the driver-side radiator mounting bolts. Made it a lot easier to get to, and since I had already had the R12 evacuated, removing the dryer was no big deal.

After I double-checked all my hose connections and reinstalled my engine block drain plug, I went ahead and filled the system with a 50/50 mix. I had planned to use Toyota red for coolant after reading everything on MUD and even picked up 4 gallons of the stuff (liquid gold that Red is! $$$). But after thinking it through decided to use old-school conventional green since it looked like my truck had been using it since day one. I didn't want to chance not flushing the system completely of any old green and then have compatibility issues down the road with gelling. Plus, the green is a lot cheaper.
I jacked the front of the truck up slightly when filling the system so that gravity would do its job and help push any air pockets out. FSM calls for about 20 quarts (w/ front and rear heaters) but for some reason I could only get about 17 in. Anybody know why this would be the case??

Jason


Pic with the fan in place. The chip was already there - doesn't seem to affect performance any. Upper rad hose installed (complete with nuclear sticker bits that did NOT want to come off). New Toyota hose clamps. I removed the A/C dryer to get better access to the driver-side radiator mounting bolts. Made it a lot easier to get to, and since I had already had the R12 evacuated, removing the dryer was no big deal.
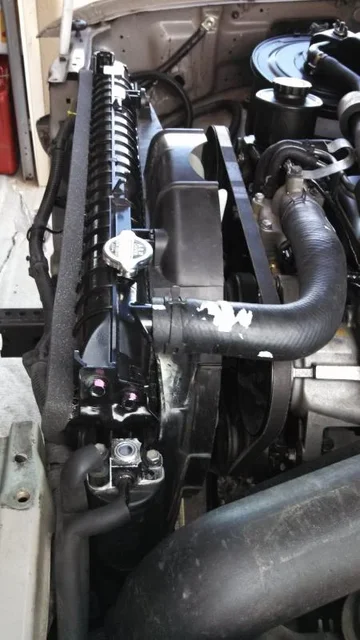
After I double-checked all my hose connections and reinstalled my engine block drain plug, I went ahead and filled the system with a 50/50 mix. I had planned to use Toyota red for coolant after reading everything on MUD and even picked up 4 gallons of the stuff (liquid gold that Red is! $$$). But after thinking it through decided to use old-school conventional green since it looked like my truck had been using it since day one. I didn't want to chance not flushing the system completely of any old green and then have compatibility issues down the road with gelling. Plus, the green is a lot cheaper.
I jacked the front of the truck up slightly when filling the system so that gravity would do its job and help push any air pockets out. FSM calls for about 20 quarts (w/ front and rear heaters) but for some reason I could only get about 17 in. Anybody know why this would be the case??

Jason
Last edited:
- Thread starter
- #58
Great job on the 3fe refresh. Very inspiring.
For your a/c o-rings, look up Coolstream A/C. They are a sponsor here on Mud and they have a healthy Mud discount. All Denso parts. Great resource for the community.
Sent from my iPhone using IH8MUD
Thanks! I'll give Coolstream a call. Hopefully I can get all the small parts in one 'kit'.

Jason
Would love to see a video when you first start it up!
- Thread starter
- #60
On the home stretch! Got the A/C condenser, cooler and top support brace back on.

Headlights and trim. LOTS of various screws and bolts to be replaced - luckily, I had put all the random fasteners/pieces in zip loc bags as I was taking everything apart and then labeled them with a Sharpie according to which sub-assembly they went to. That way, I more or less knew exactly what went where. Made reassembly easy. Wrapped the headlight harness with multiple layers of electrical tape and then tucked it up nice and tight with new clips.

Old battery installed. Had it on a trickle charger the whole time it was out of the truck. Not going to last much longer. Getting the new Urban Land Cruiser cables routed and installed on the posts was challenging. It was pretty cold outside and the cables are so thick that they were mega stiff. A hairdryer helped relax them a bit. Had to trim a small slot in the battery box.
Took the opportunity to install a new windshield washer fluid resevoir/tank and front washer pump that I had sitting in the garage. What a PITA that was!! You have to have tiny little capuchin fingers to get the hose on the back of the resevoir bottle (the hose attaches the front bottle to the bottle that's housed inside the fender). That, and the fact that you can't easily move the fuse box to get access makes for a frustrating "I'll just do this real quick" job. Note - the pumps are different for front and rear. I ended up trying to use my leftover front pump (that was still good) and the brand new front pump that I got from Dan thinking that I would have working front and rear washers. Not the case, the connectors are different.

SHAAAZAM!! Glamour shot.

Jason


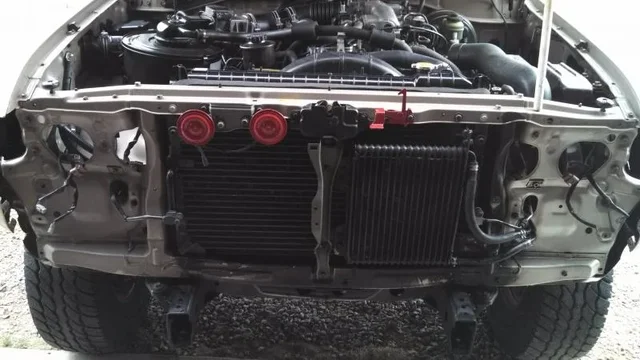
Headlights and trim. LOTS of various screws and bolts to be replaced - luckily, I had put all the random fasteners/pieces in zip loc bags as I was taking everything apart and then labeled them with a Sharpie according to which sub-assembly they went to. That way, I more or less knew exactly what went where. Made reassembly easy. Wrapped the headlight harness with multiple layers of electrical tape and then tucked it up nice and tight with new clips.
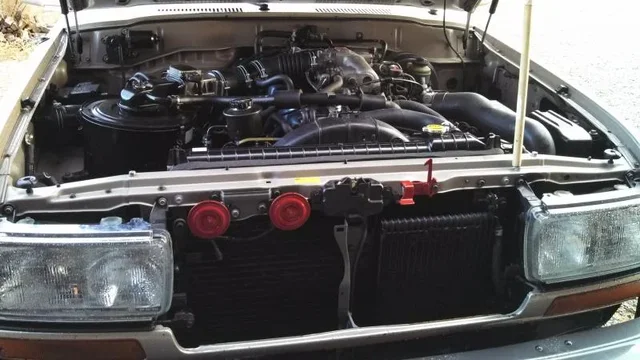
Old battery installed. Had it on a trickle charger the whole time it was out of the truck. Not going to last much longer. Getting the new Urban Land Cruiser cables routed and installed on the posts was challenging. It was pretty cold outside and the cables are so thick that they were mega stiff. A hairdryer helped relax them a bit. Had to trim a small slot in the battery box.
Took the opportunity to install a new windshield washer fluid resevoir/tank and front washer pump that I had sitting in the garage. What a PITA that was!! You have to have tiny little capuchin fingers to get the hose on the back of the resevoir bottle (the hose attaches the front bottle to the bottle that's housed inside the fender). That, and the fact that you can't easily move the fuse box to get access makes for a frustrating "I'll just do this real quick" job. Note - the pumps are different for front and rear. I ended up trying to use my leftover front pump (that was still good) and the brand new front pump that I got from Dan thinking that I would have working front and rear washers. Not the case, the connectors are different.

SHAAAZAM!! Glamour shot.

Jason
Similar threads
Users who are viewing this thread
Total: 3 (members: 0, guests: 3)
