3FE refresh - doing a reboot on my '92 (1 Viewer)

This site may earn a commission from merchant affiliate
links, including eBay, Amazon, Skimlinks, and others.

I tried to get the fan shroud back in after I had the radiator buttoned-up. That stubborn little donkey would not cooperate. I have no idea how people manage to get it installed in one piece and without jacking anything up! :confused: I finally gave up and got the hacksaw out. Cut it right down the middle. Slid right in place after that. I was worried that it wouldn't mount securely if I cut it in half. No worries at all - with the top bolt and the rubber covered 'foot' that slips into the slot at the bottom of the rad, it fit nice and tight. Not sure why they didn't do it that way from the factory.


Jason


Make sure the shroud does not deflect. It would be a real shame if the spinning fan coms in contact with it and scatters shrapnel all over that beautiful motor.
 
I tried to get the fan shroud back in after I had the radiator buttoned-up. That stubborn little donkey would not cooperate. I have no idea how people manage to get it installed in one piece and without jacking anything up! :confused:

TAKE OFF THE FAN/FAN CLUTCH ASSEMBLY. The shroud just slips right in.

You know, when I saw the picture of the front of the motor with the fan in place, I said to myself, "I'm sure he's going to take that off."
I guess I should have said something. If I were you, I'd find a good used fan shroud from a 91/92 and replace that one.
 
Subscribed!
Man, that engine is gorgeous! When you're done, I'm printing the thread and adding it to my FSM print outs.
Its inspirational and very well done.

In regards to the fan shroud installation at the plant, I wouldn't be surprised if the whole radiator cross support enters the assy line as a single, pre-assembled piece.
I'm curious about this myself, so I'll look into it and report back if I find an answer.

Way to go!
 
TAKE OFF THE FAN/FAN CLUTCH ASSEMBLY. The shroud just slips right in.

You know, when I saw the picture of the front of the motor with the fan in place, I said to myself, "I'm sure he's going to take that off."
I guess I should have said something. If I were you, I'd find a good used fan shroud from a 91/92 and replace that one.


DOH! I knew it had to be possible. Guess I should've thought outside the box.

I went ahead and epoxied the top 'halves' of the shroud together for the time being. I'll keep my eyes peeled for a used unit.

Jason
 
Subscribed!
Man, that engine is gorgeous! When you're done, I'm printing the thread and adding it to my FSM print outs.
Its inspirational and very well done.

In regards to the fan shroud installation at the plant, I wouldn't be surprised if the whole radiator cross support enters the assy line as a single, pre-assembled piece.
I'm curious about this myself, so I'll look into it and report back if I find an answer.

Way to go!

Thanks! Was collecting parts for so long it took me a while to finally just jump in and start doing it.

:beer:

Jason
 
After bolting everything back together, I did a double and then triple check of all my connections and fasteners. I checked the torque on all my lug nuts (earlier, I had found one that was almost ready to fall off), topped-off air pressure and got under the truck and tightened all the belly pan bolts (thought it might be a good idea). I was shocked at how loose they were! Almost every single one was just barely beyond finger tight. Surprised I hadn't lost any. Finally, I filled the crankcase with Rotella T (15W-40).

The moment of truth. Grabbed the key and gave it a twist. Cranked for a couple of seconds and then backed-off. My battery is almost toast at this point so I was trying to be gentle. Cranked again and she fired up! Real cranky sounding, but running. :bounce: :bounce: Didn't think to get video.

I let it idle for a few minutes to warm up. Idle was right about 650 RPM (at least from the gauge) but VERY rough. :confused: Hopped in and gave her a go. When wound up a little (past 1300 or so RPMs) she seemed to run a little smoother, but when coming to a stop the truck would almost die. I thought it might be a vacuum issue so I re-checked all my lines. Everything looked good. I also re-checked my plugs/wires - they were good. Not sure what the problem was, I shut the motor down. For a little context, the truck ran pretty smoothly before my tear down. Not new Prius smooth, but 21 yr-old 3FE smooth.

I suspected that I might have jacked something up when removing/reinstalling my rocker assembly. That, or my dizzy was way off. I was super careful, but I guess you never know. Tapping out at this point as the thought of resetting the distributor and timing with never having done either before gave me angst.

Jason

Sounds like it could of been alot worse. Did you adjust the valves when you put the rocker assembly on? (I know they are to be adjusted warm) Distributor could be off, if you have a timing light, check that it's timed correctly. I would guess it is off a bit.
 
Sounds like it could of been alot worse. Did you adjust the valves when you put the rocker assembly on? (I know they are to be adjusted warm) Distributor could be off, if you have a timing light, check that it's timed correctly. I would guess it is off a bit.

Thanks. Nope, didn't adjust the valves. Also, don't have a timing light. I figured at this point I might just call in for reinforcements.

Jason
 
So now we're just about real time with this 'refresh'. I called a local Toyota-only shop here in town for a diagnosis. The owner and his wife have owned the shop for years and are highly respected in the community. I know them pretty well and knew I'd get some good answers. Drop the truck off and have a lengthy conversation detailing everything that I did and the process I followed. A little while later I get a call. Apparently, number four cylinder was dead - as in 0 compression. They adjusted the valves (not sure exactly what negative clearance means, but valve in #4 had it). They also reset the dizzy/timing. They rechecked the compression and #4 was now showing 145 psi! Other cylinders were all between 140 and 145 as well. BAM!!! Truck now runs fantastic! As in, really really smooth. :clap::clap::clap::clap::clap:

I also got kudos for my work. Apparently my attention to detail was pretty good. :cheers:

FWIW - When I first got the truck the compression numbers were all between 130-138, IIRC. I would like to think the work I did had some influence there, but I'm guessing it was the fresh valve adjust. :p


Jason
 
Had Thursday and Friday off for Thanksgiving and drove the truck all over the place (as much as I could) - Giddy as a little school girl! :D The wife is happy, too. :clap:

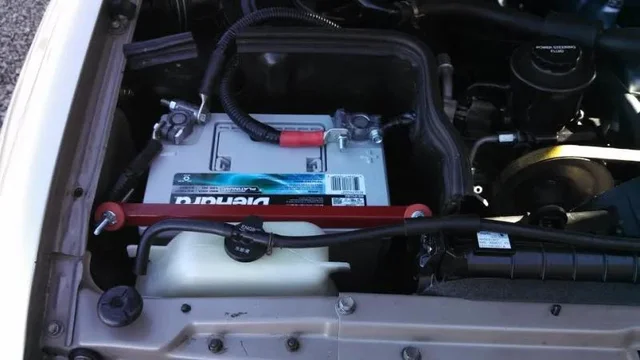
With the cold snap that rolled through I had to keep the truck on a battery tender at night. Time to head to Sears. Unfortunately, the smokin deal they had on Diehard Platinums must have been only for a couple of days. I ended up paying full price ($229 + tax) for a group 34. Ouch.


The new Diehard looks a little dinky next to the old group 24.

250.jpg


Nice new cables and the slot that I had to cut in the battery tray.

251.jpg


Sort of second guessing the 34. Wish I would have just ponied up for the 31. Lots of room in the tray.

254.jpg


Straightforward and easy install... it is just a battery. I did have to get creative on the hold-down, though. Definitely wish I would have just gotten the bigger battery. There's plenty of room.

252.jpg


A nice new AGM battery running 850 CCAs is a wonderful thing, though! The battery, along with my new cables, made a world of difference. Very strong starts now and hardly any 'fluttering' of the needle when my signals are flashing.

:cheers:

Jason

250.jpg


251.jpg


254.jpg


252.jpg
 
Last edited:
So now we're just about real time with this 'refresh'. I called a local Toyota-only shop here in town for a diagnosis. The owner and his wife have owned the shop for years and are highly respected in the community. I know them pretty well and knew I'd get some good answers. Drop the truck off and have a lengthy conversation detailing everything that I did and the process I followed. A little while later I get a call. Apparently, number four cylinder was dead - as in 0 compression. They adjusted the valves (not sure exactly what negative clearance means, but valve in #4 had it). They also reset the dizzy/timing. They rechecked the compression and #4 was now showing 145 psi! Other cylinders were all between 140 and 145 as well. BAM!!! Truck now runs fantastic! As in, really really smooth. :clap::clap::clap::clap::clap:

I also got kudos for my work. Apparently my attention to detail was pretty good. :cheers:

FWIW - When I first got the truck the compression numbers were all between 130-138, IIRC. I would like to think the work I did had some influence there, but I'm guessing it was the fresh valve adjust. :p


Jason

So pleased to hear it was something simple. You've done some inspiring work here and deserve to enjoy that giddy feeling! :cheers:
 
congrads on the successful turn of events! at first, i was a little worried reading- but, relieved to find out that you didnt screw things up- and she is running smooth once again- and hopefully good for another 200k-300k more reliable miles.
 
Love it

I've been working on my 3FE at a much slower pace, but hope to get mine as clean one day. Can you give any insight into replacing the push-rod cover gasket? The right side of my motor is covered in funk below the pushrod cover. I've already replaced the dizzy o-ring too. I know there are threads on this, but any additional insight would be appreciated. I have the pushrod gasket gasket, the valve cover gasket and the new bolt grommets to replace. I want to do them all when I decide to do the valve adjustment (very soon), but would love any insight you have. BTW, I would like to take apart as little as possible to get the job done.

Thanks and once again...beautiful job! Does she feel a lot stronger?
 
A quick note about this, although you already covered my thoughts with the battery replacement.
It's always good practice to remove the EFI fuse and allow the ECU to reboot/relearn parameters after any significant changes are made to the motor or associated sensors. I have a habit of doing this after a simple tune-up. Remember, it's 1987 technology.

I'm glad a valve adjust got you going. Enjoy it.

Thanks Jon - I didn't think to pull the fuse. Hopefully my battery disconnect accomplished the same thing.

Jason
 
I've been working on my 3FE at a much slower pace, but hope to get mine as clean one day. Can you give any insight into replacing the push-rod cover gasket? The right side of my motor is covered in funk below the pushrod cover. I've already replaced the dizzy o-ring too. I know there are threads on this, but any additional insight would be appreciated. I have the pushrod gasket gasket, the valve cover gasket and the new bolt grommets to replace. I want to do them all when I decide to do the valve adjustment (very soon), but would love any insight you have. BTW, I would like to take apart as little as possible to get the job done.

Thanks and once again...beautiful job! Does she feel a lot stronger?


Thanks! My butt dyno tells me that the work was well worth it. I notice a little more pull off the line and slightly better acceleration. The big difference is how smooth the truck feels now. I'm curious to see how/if my mpgs change.

As far as the push rod cover gasket. It really didn't seem too bad - but of course I had everything removed, which made a huge difference. I made sure everything was as clean as possible before taking the cover off. I then heated the cover up for a few minutes with a hot hairdryer (wasn't sure if a heat gun would be too hot) to soften everything up. The heat made everything more pliable. I then used a rubber mallet to tap a putty knife between the cover and block to wedge/pry the cover off, working small sections at a time. One thing that was tricky was getting a good grip on the lip/edge of the cover to pull it from the block.
After the cover came off I cleaned it up real good and spent a lot of time cleaning crusty cork gasket from the block using a razor blade scraper and green Scotch Brite pads. I then used the hi-tack sealant to glue the new gasket onto the cover & let it dry for a bit. After that, it was just a matter of placing the cover on and getting the bolts/nuts tightened. I found that the easiest way (for me) to tighten the bolts was to use a 1/4" thumb/wheel ratchet as it was small enough to reach the bolts at the fire wall. I tightened everything from the center out. IF I ever have to do that job again, I would just spend the $25 or so on a brand new cover and not worry about getting the cover off without warping it.

Hope that helps a little!

Jason
 

Users who are viewing this thread

Back
Top Bottom