Are you worried about your logo getting removed when people paint the bare metal? I think the logo plate is very clever by the way.View attachment 1067074 Spending the day wiring up the new Fire Extinguigher Mount. Haven't decided what in the world these are going to operate yet but we shall see. The other side of the bracket though *evil laugh* oh I gots me an idea
Navigation
Install the app
How to install the app on iOS
Follow along with the video below to see how to install our site as a web app on your home screen.
Note: This feature may not be available in some browsers.
More options
Style variation
You are using an out of date browser. It may not display this or other websites correctly.
You should upgrade or use an alternative browser.
You should upgrade or use an alternative browser.
What Did You Do with Your 80 This Weekend? (40 Viewers)
This site may earn a commission from merchant affiliate
links, including eBay, Amazon, Skimlinks, and others.
More options
Who Replied?steering shaft seal at the firewall?Did this first thing this morning. Looks like there is a small chance that it was bad. As is evidenced by the lack of any rubber.
View attachment 1066849
Sick! I've been house hunting in central oregon area for a couple months now. Hope to wheel these trails soonWent wheelin. Cline Butte 4/25


NLXTACY
Wits' End
Are you worried about your logo getting removed when people paint the bare metal? I think the logo plate is very clever by the way.
No bare metal. They are all getting powder coated. I'm just using this one to mess around with. But if they want to remove the plate that bad then go for it. It's one of the reasons I chose rivets. I'm not a fan of huge, horsey logos on my truck so I'm not going to expect people are going to fall over themselves to show of mine

Sanded and painted my armor. Damn new England rust!


Last night My wife and I and the lx450 visited her works appreciation dinner. She works for veterans united. They provide home loans to veterans across the country. The special guest for the night was this guy

After a short presentation her work and Gary Sinise foundation presented a grant to build a smart home for this airman

Brian Kolfage, Jr.
Here is his story
http://cala.arizona.edu/news/most-severely-wounded-airman-history-triple
So for all those who have served. Thank you!

After a short presentation her work and Gary Sinise foundation presented a grant to build a smart home for this airman
Brian Kolfage, Jr.
Here is his story
http://cala.arizona.edu/news/most-severely-wounded-airman-history-triple
So for all those who have served. Thank you!
Took off the studded snow tires at went up Arctic Valley trail just north of Anchorage. Nice little scenic elevation climb in the dirt.

Incredible! Post more pics if you get a chance. Love Alaska scenery.Took off the studded snow tires at went up Arctic Valley trail just north of Anchorage. Nice little scenic elevation climb in the dirt.
Incredible! Post more pics if you get a chance. Love Alaska scenery.
Here's a quick sample.
Kenai lake, mountains south of Tok,ak looking into Wrangell park
My jk on the trip to AK from Atlanta GA where I'm from, the view at the top of Mt Alyeska in Girdwood.
Alaska is a beautiful special place that photos don't do it justice.
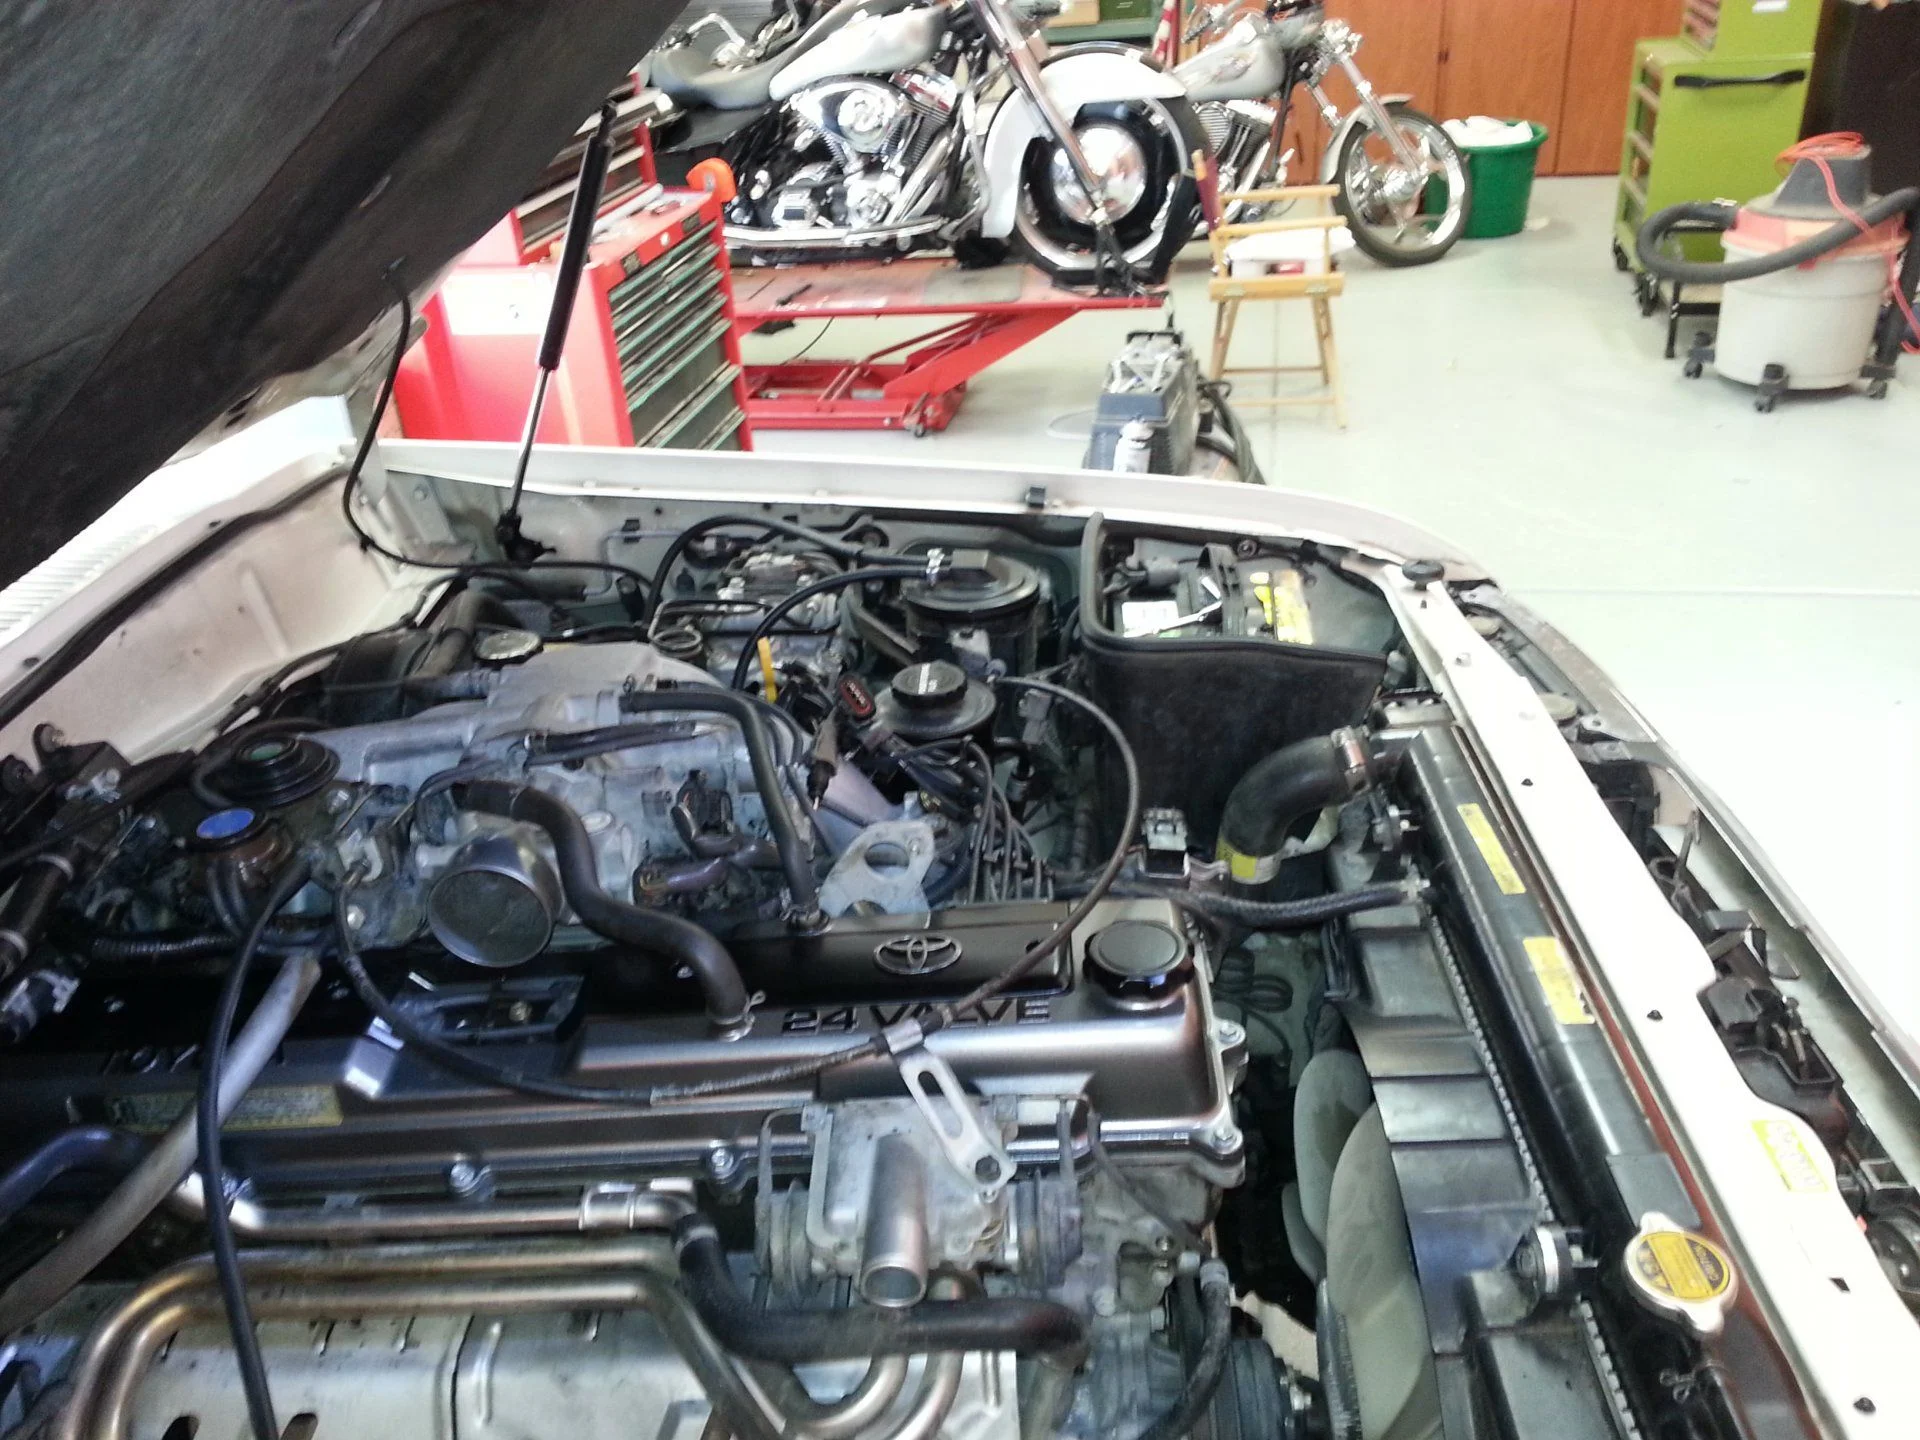
After last weekends cleaning session and a week in the bike shop with no new drops on the floor it was time to start addressing the sources.
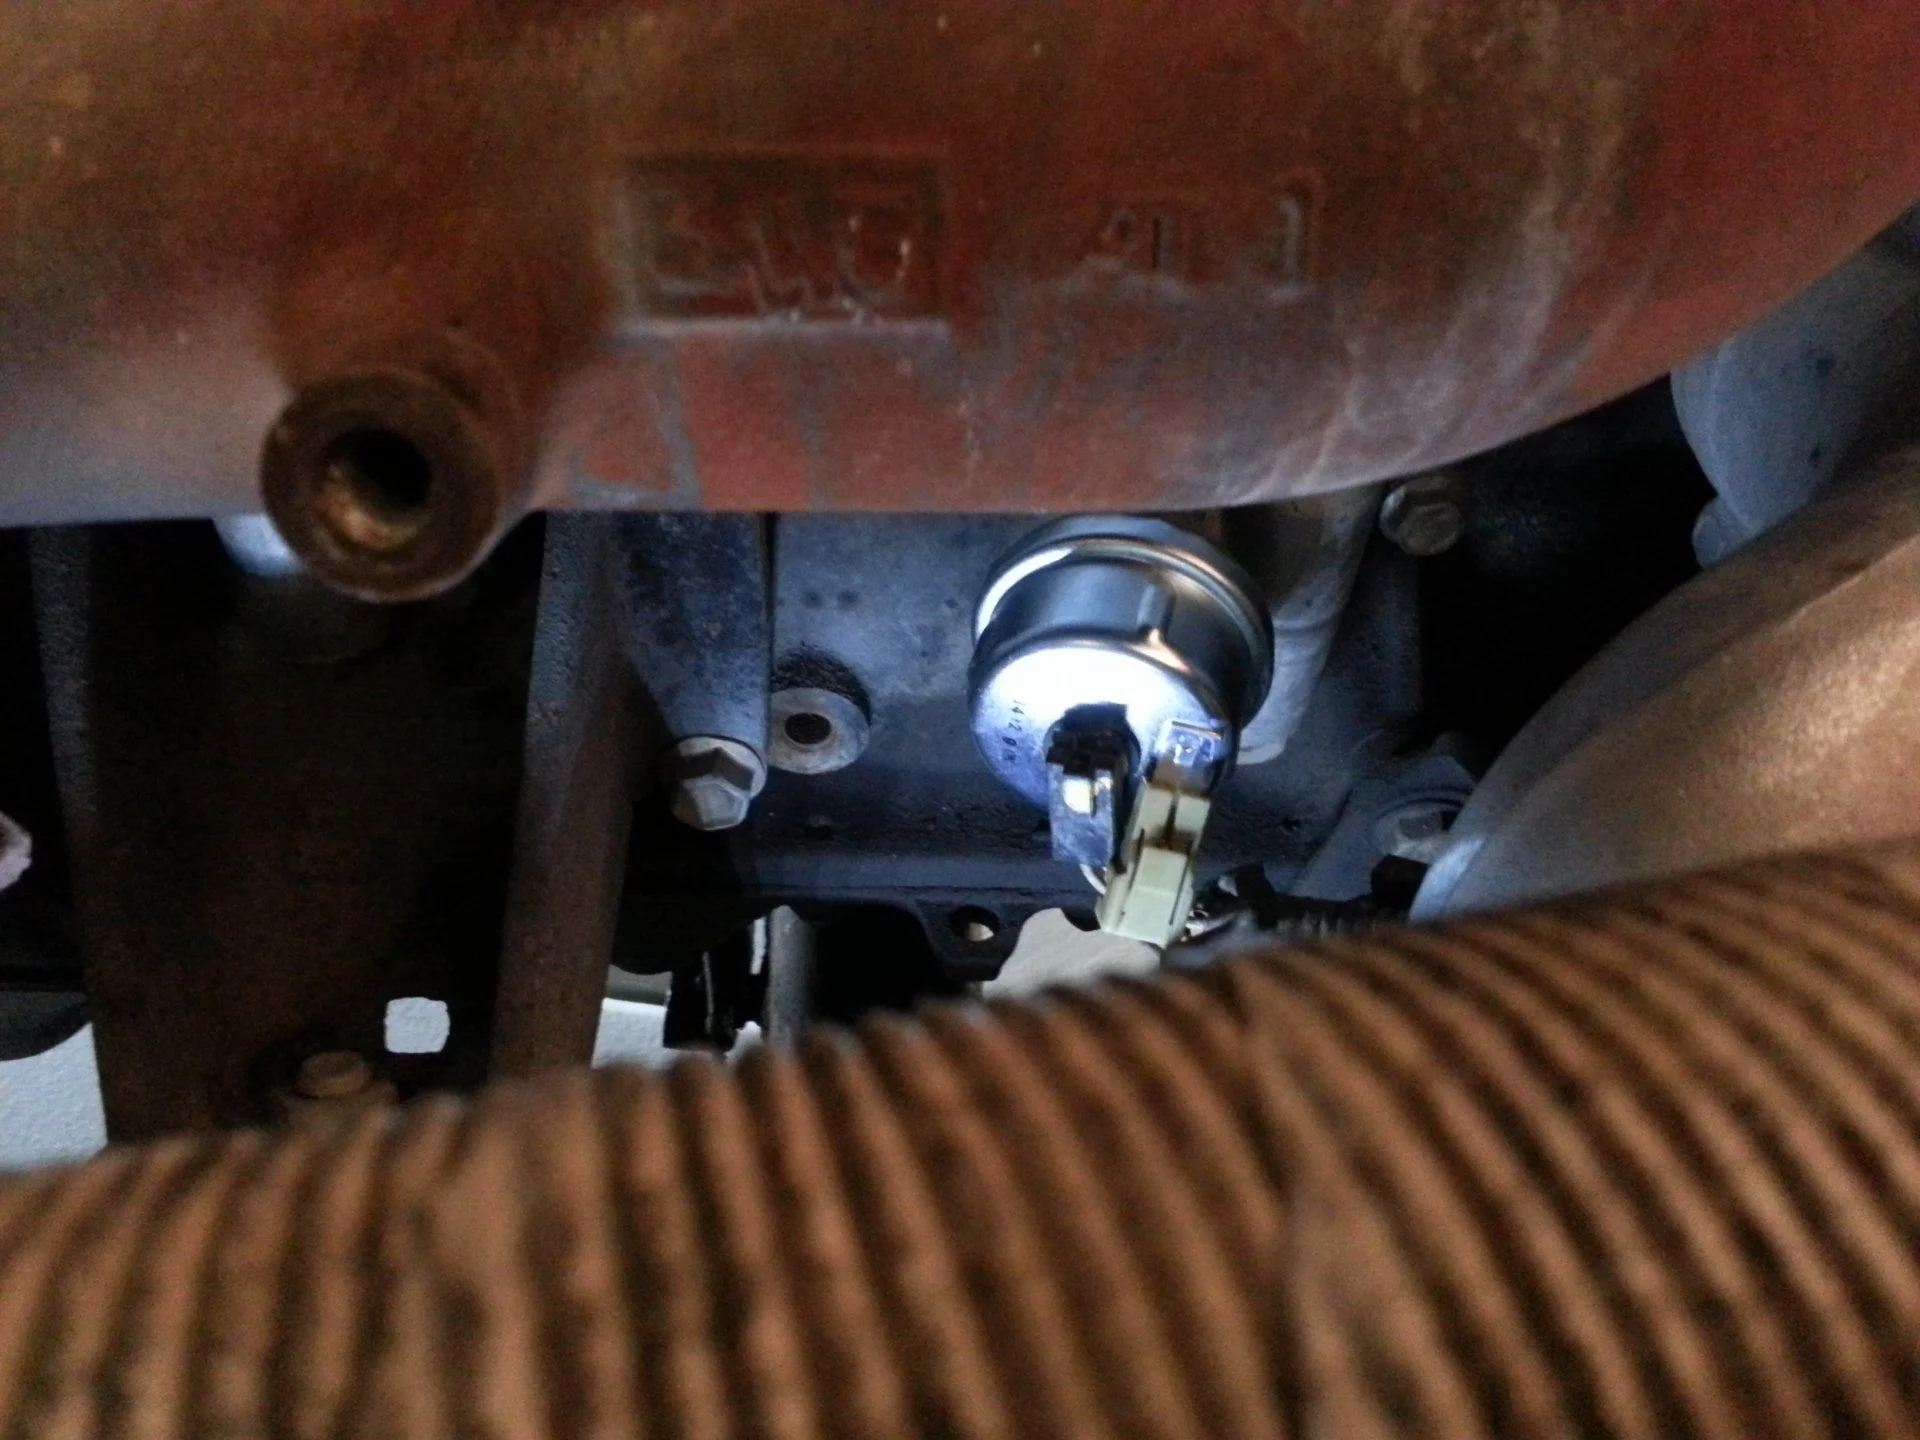
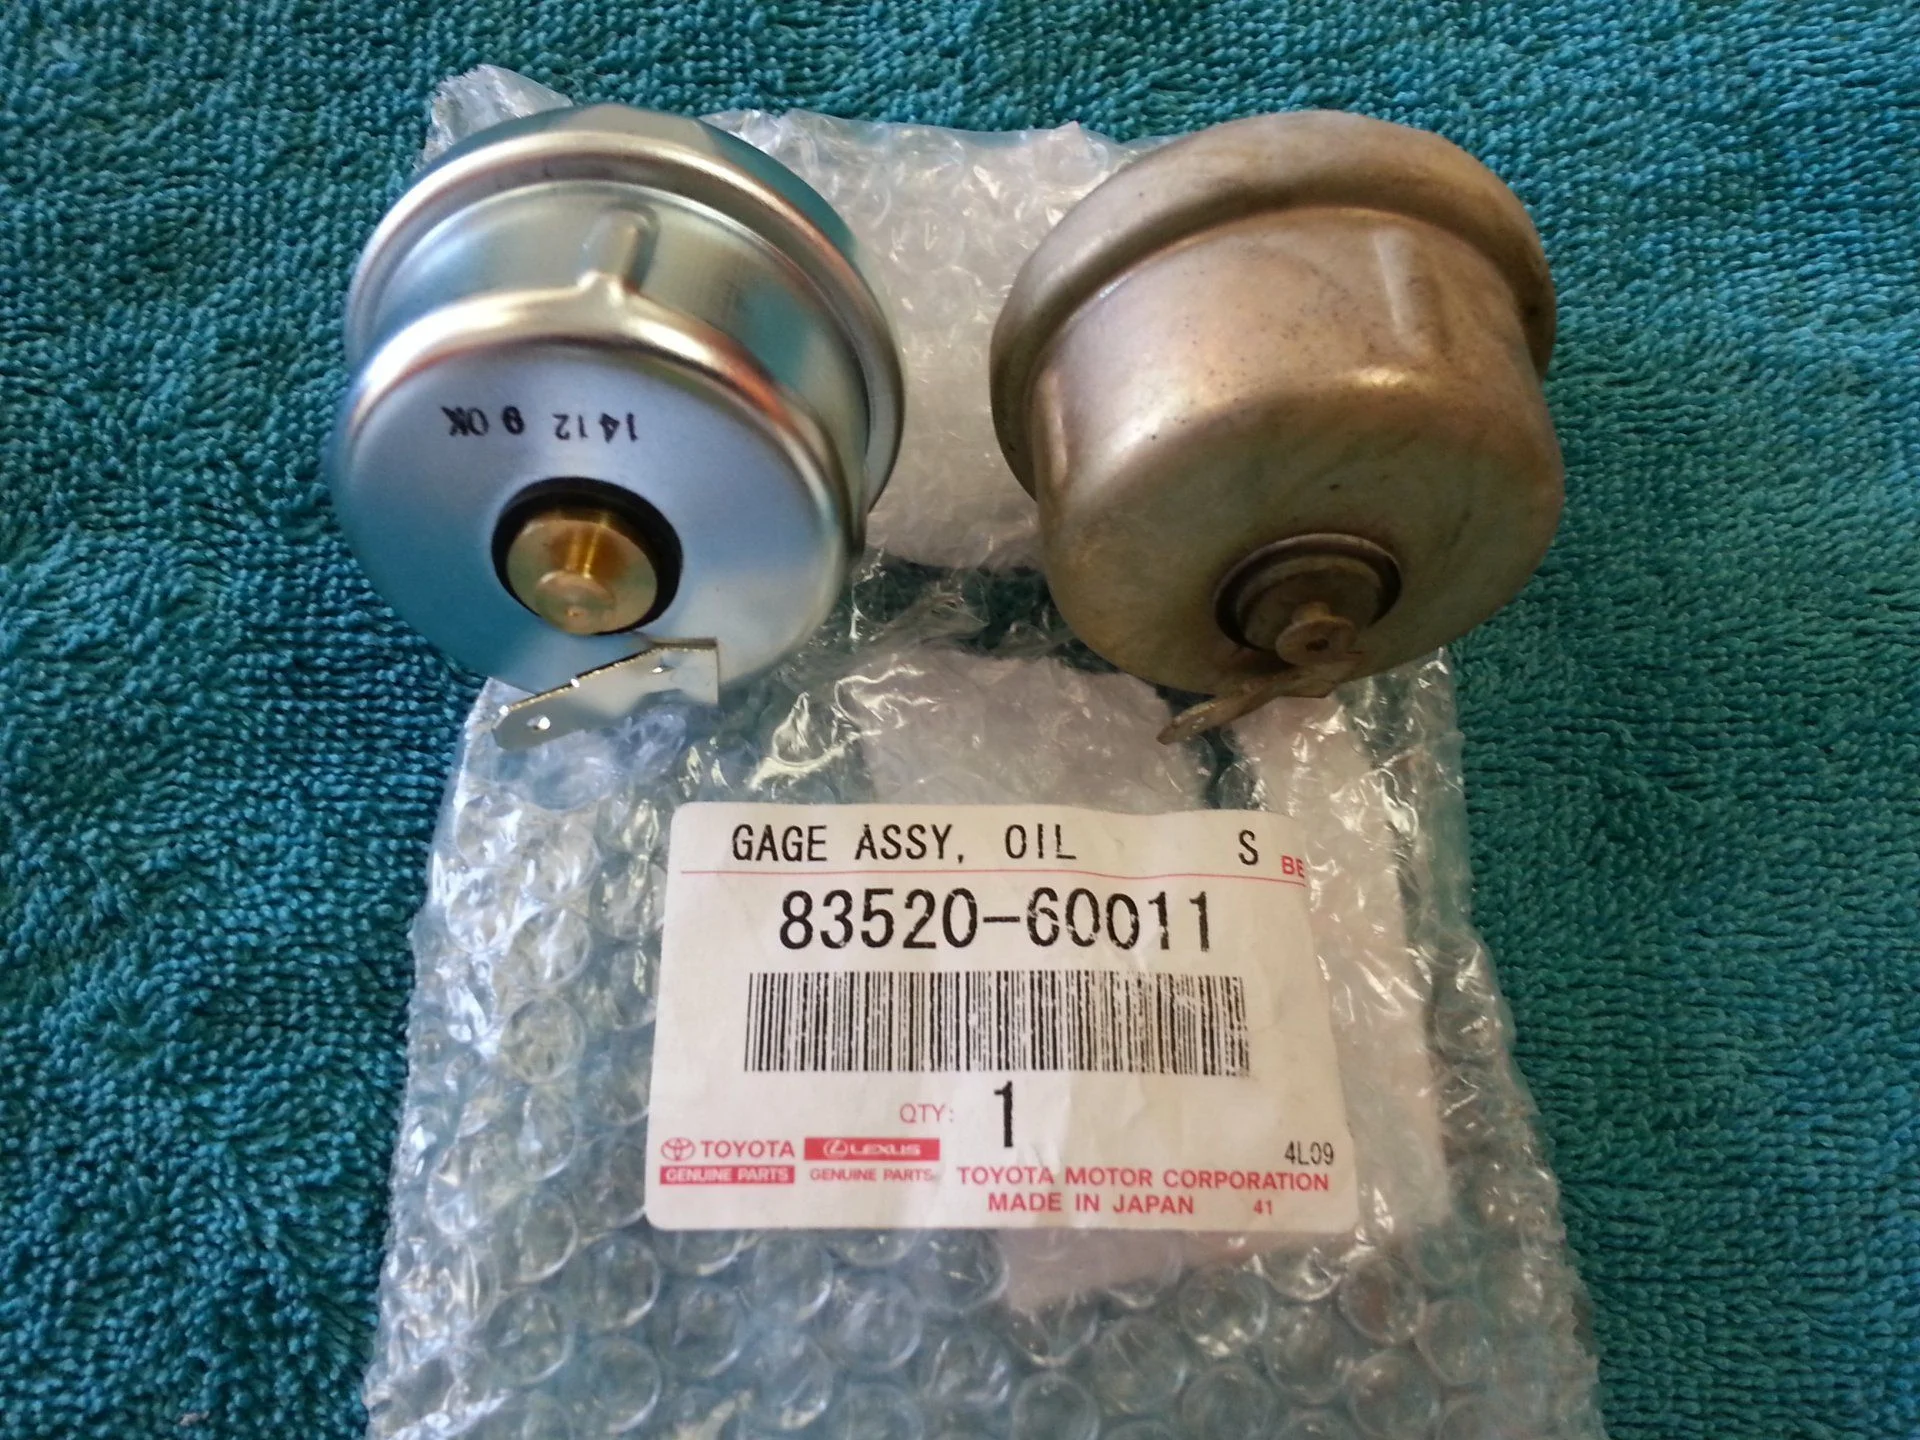
First on the agenda was to replace the bad oil pressure sender that was causing the gauge to fluctuate. Pulled the air box and the front heat shield to get to the little bugger.
I sized the fitting to be 14mm and grabbed the stubby wrench but the old one was just hand tight and spun right out. Compared the new one to the old just in case.
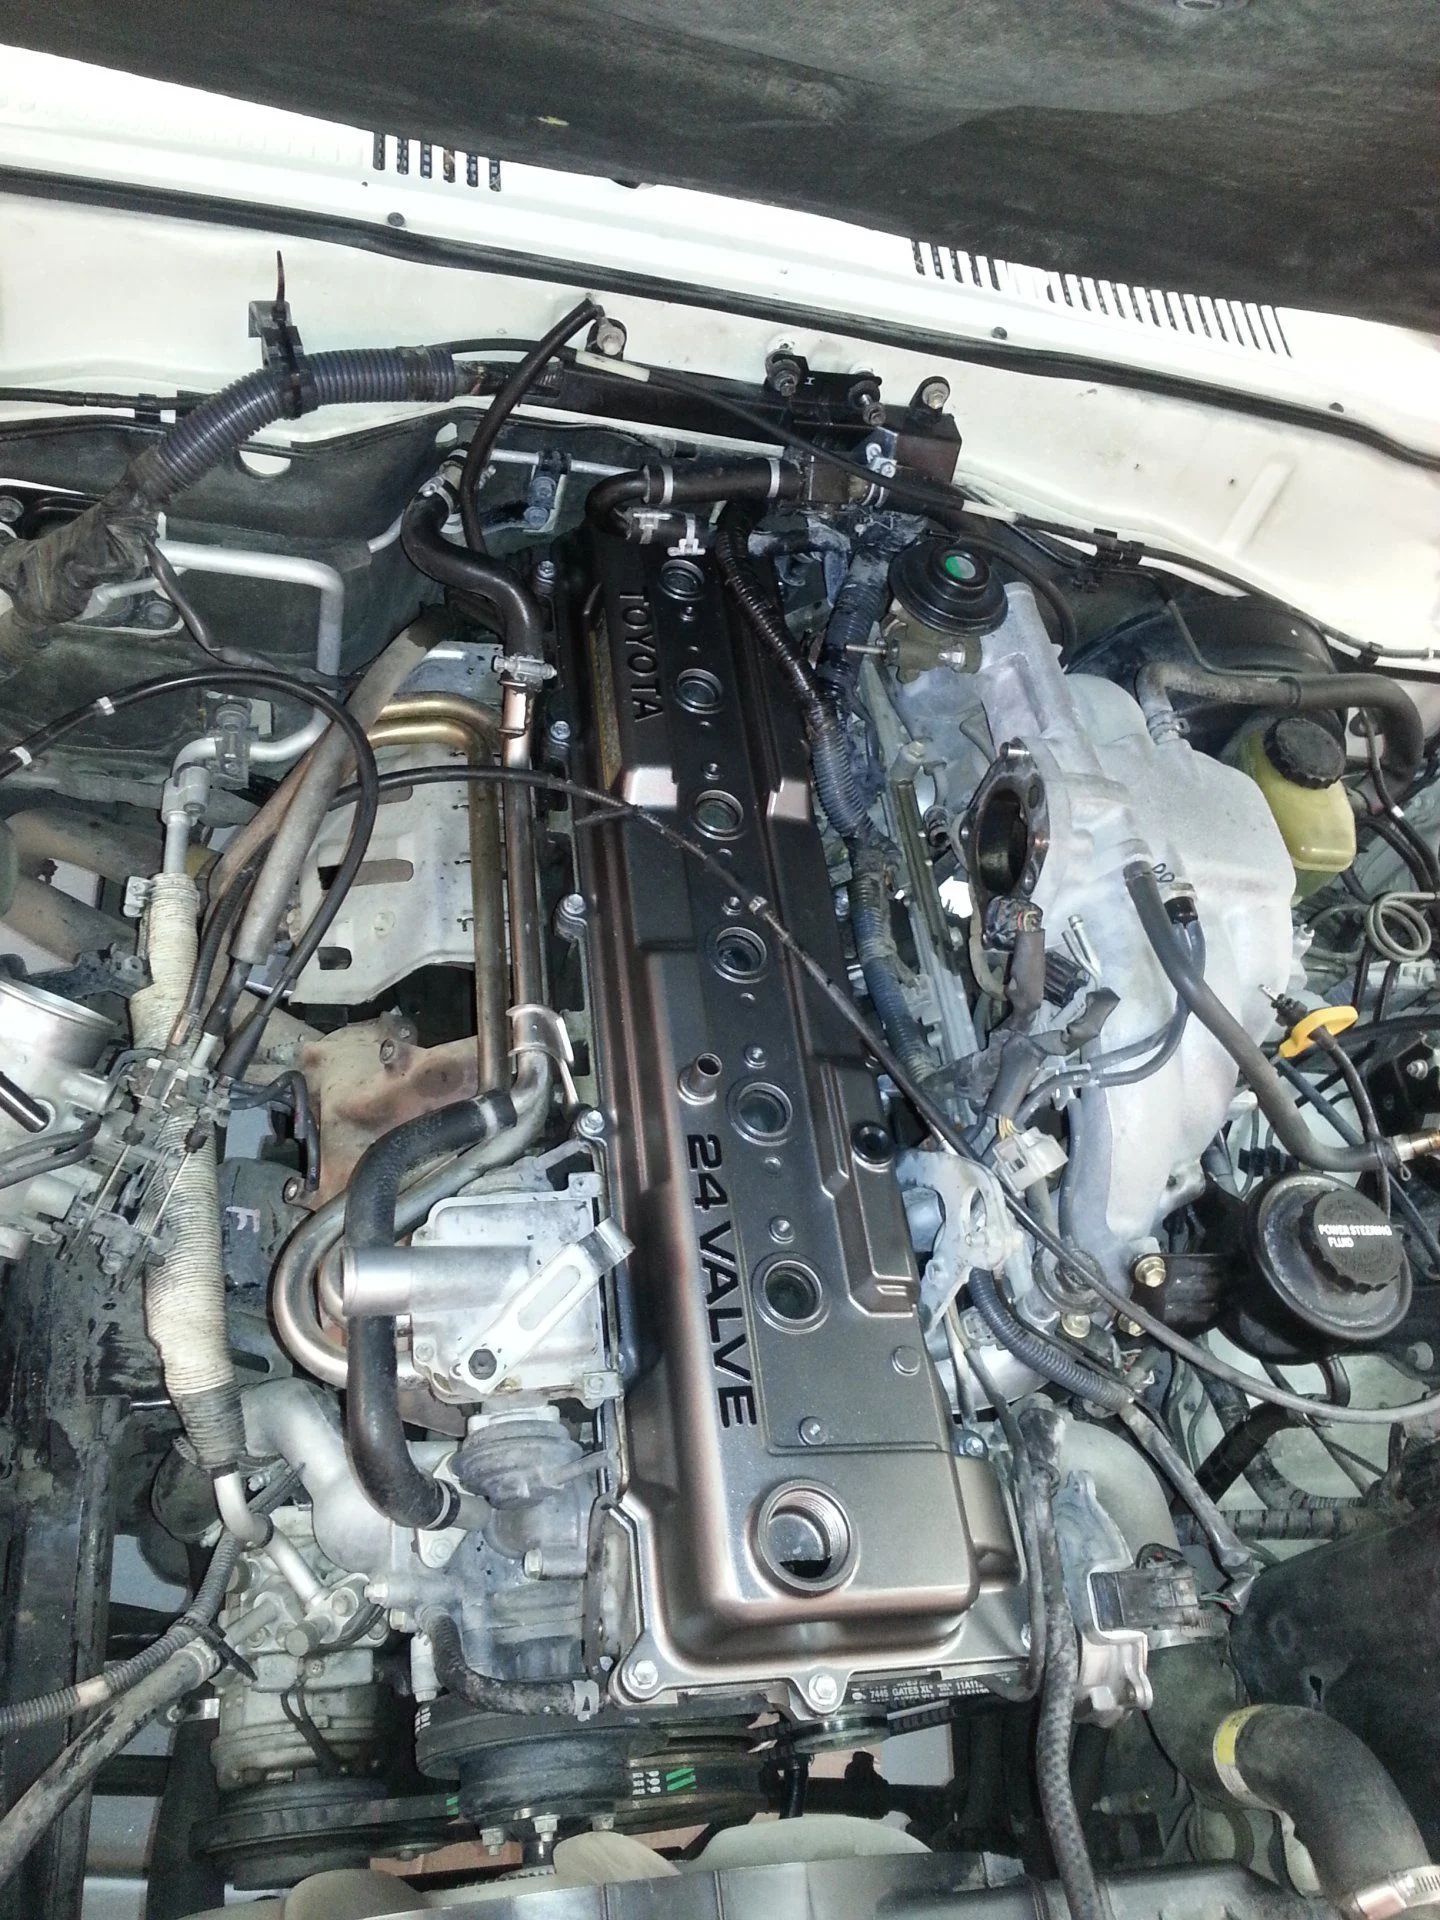
Installed the new one and snugged it good. Looks nice way down in there.
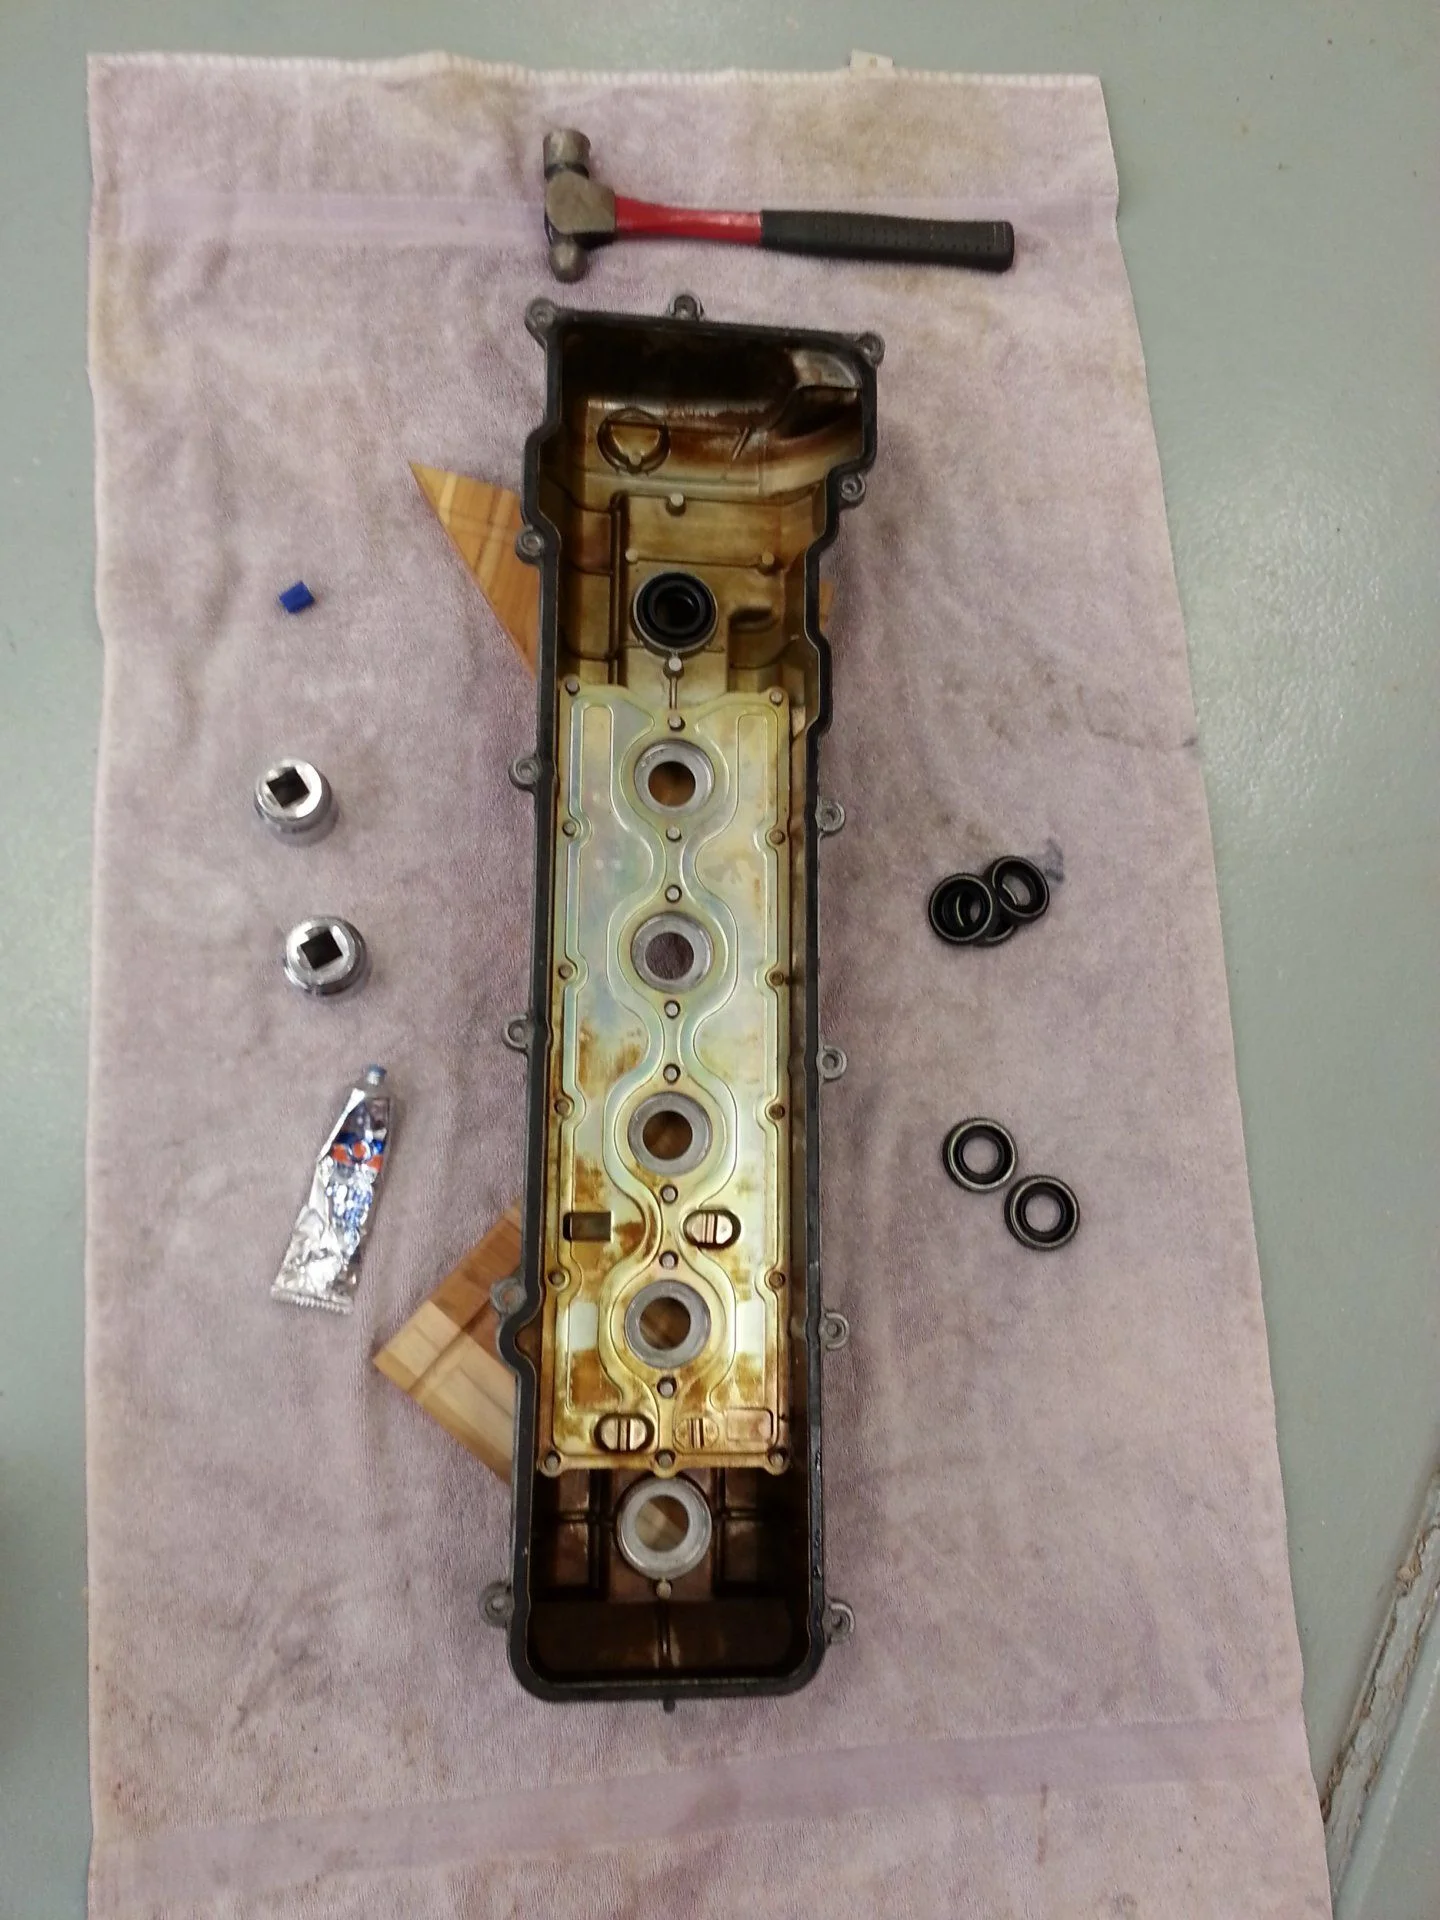
Now on to valve cover gasket and spark plug tube seals. Managed to get enough room to lay the throttle body aside without disconnecting the cables and some room at the back by unbolting the heater control valve from the firewall. Underneath it was not bad for 23 years. Several of the spark tube seals shattered either before or during the valve cover lift off. Spent more than an hour with the shop vac and a 1/2" nozzle getting fragments out.

Pulled the remaining seals and cleaned up the cover and laid it out for installing the new seals. Some scrap teak blocks to level / elevate it, some RTV and a 1 1/4" and 1 3/8" socket to seat the new seals.
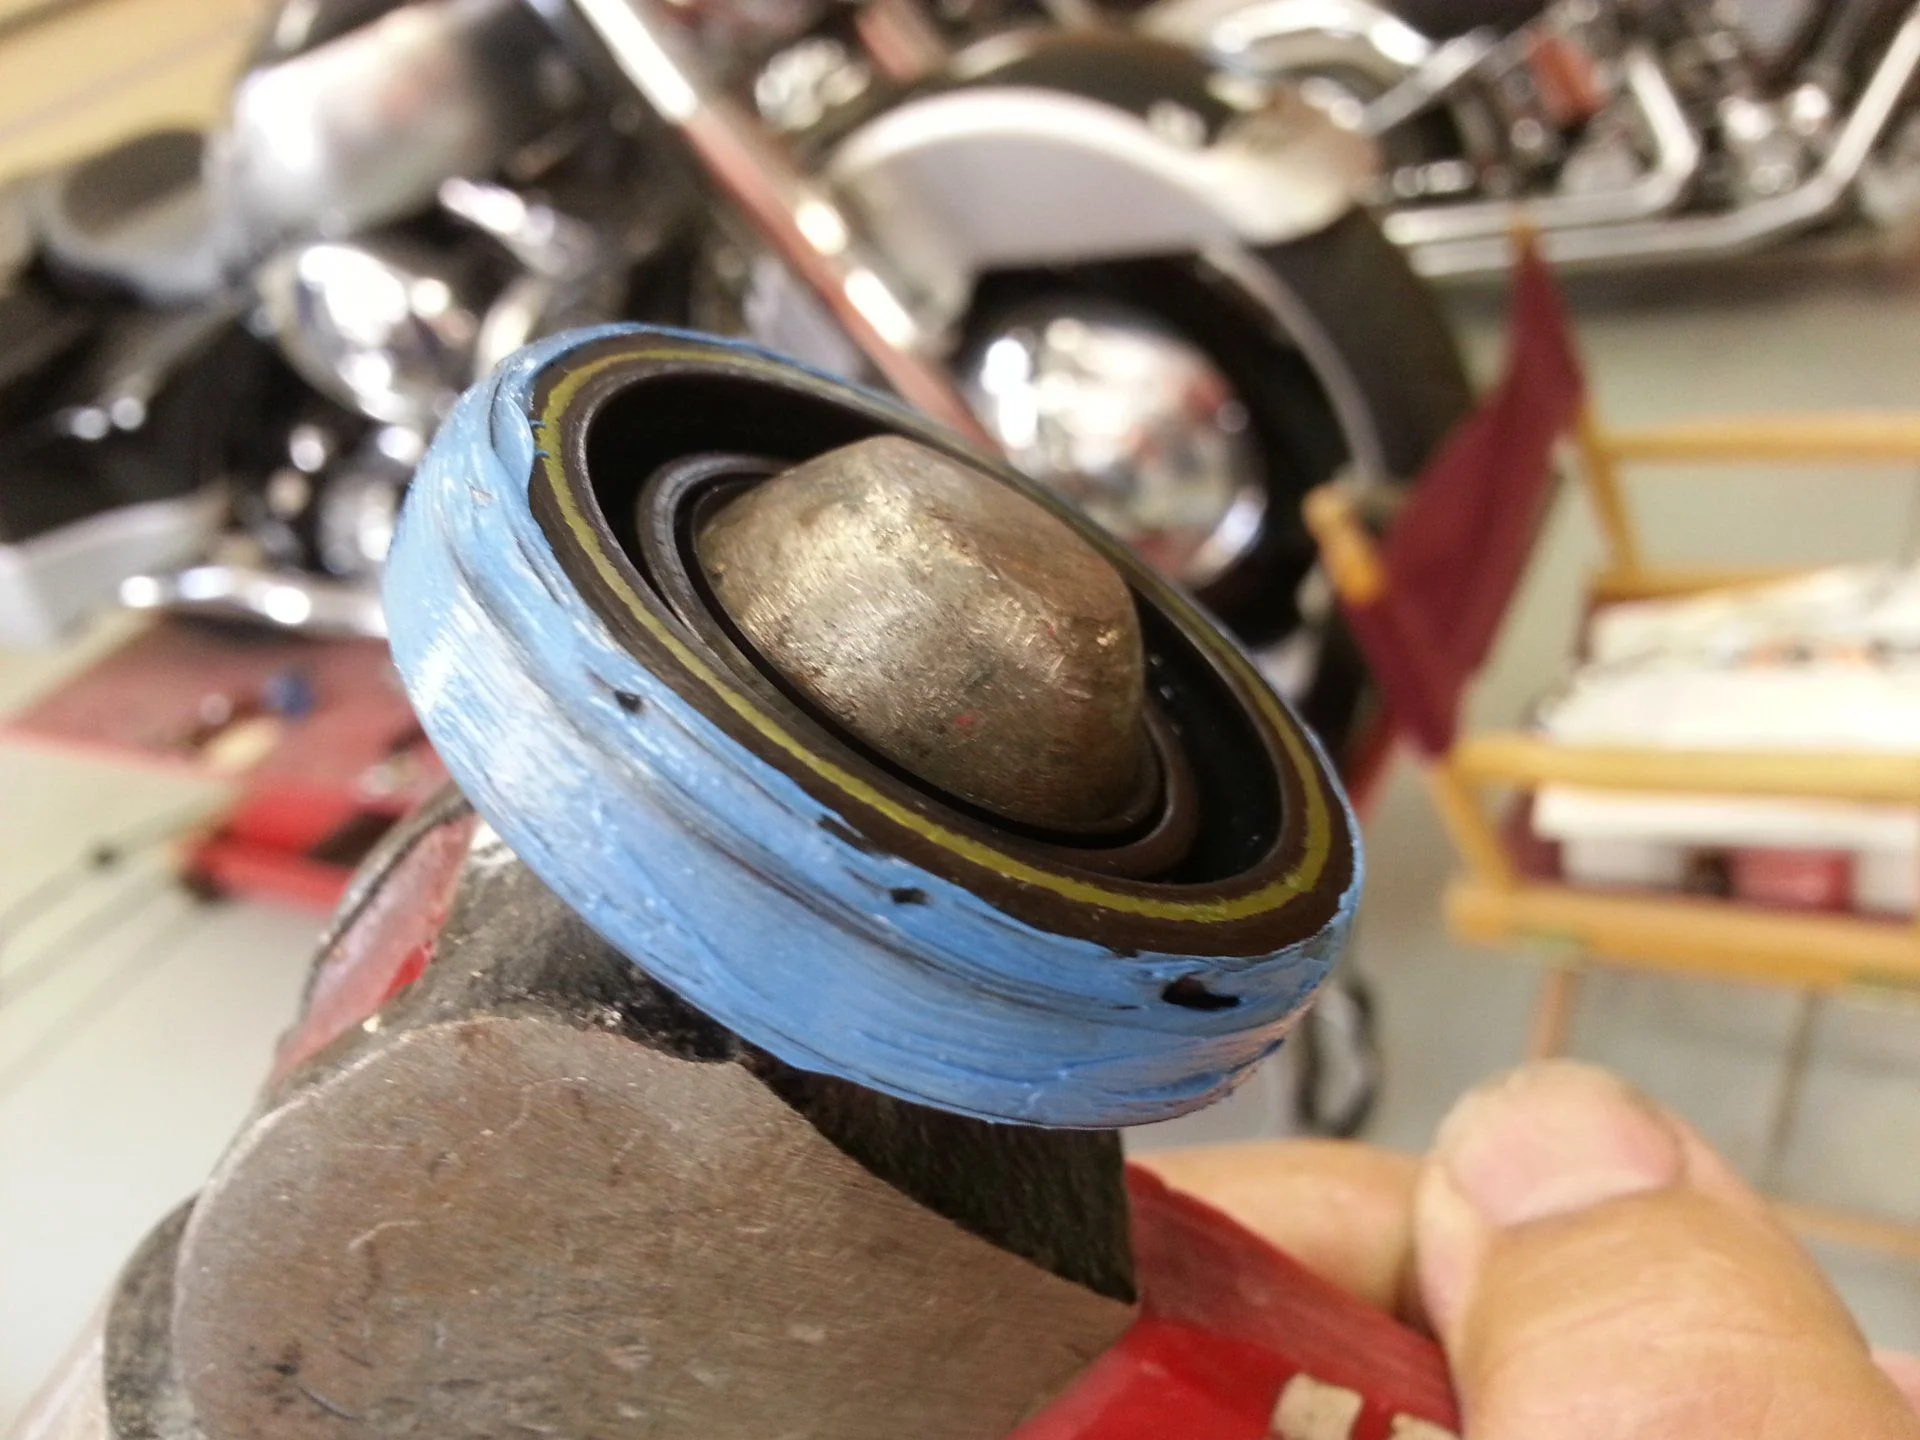
The ball end of my hammer work well to apply the thin layer of RTV before seating. The old seals had sealant ridges so adding some would slightly lubricate the seal for installing and secure the seal.
New seal seated to the bottom of the cavity.
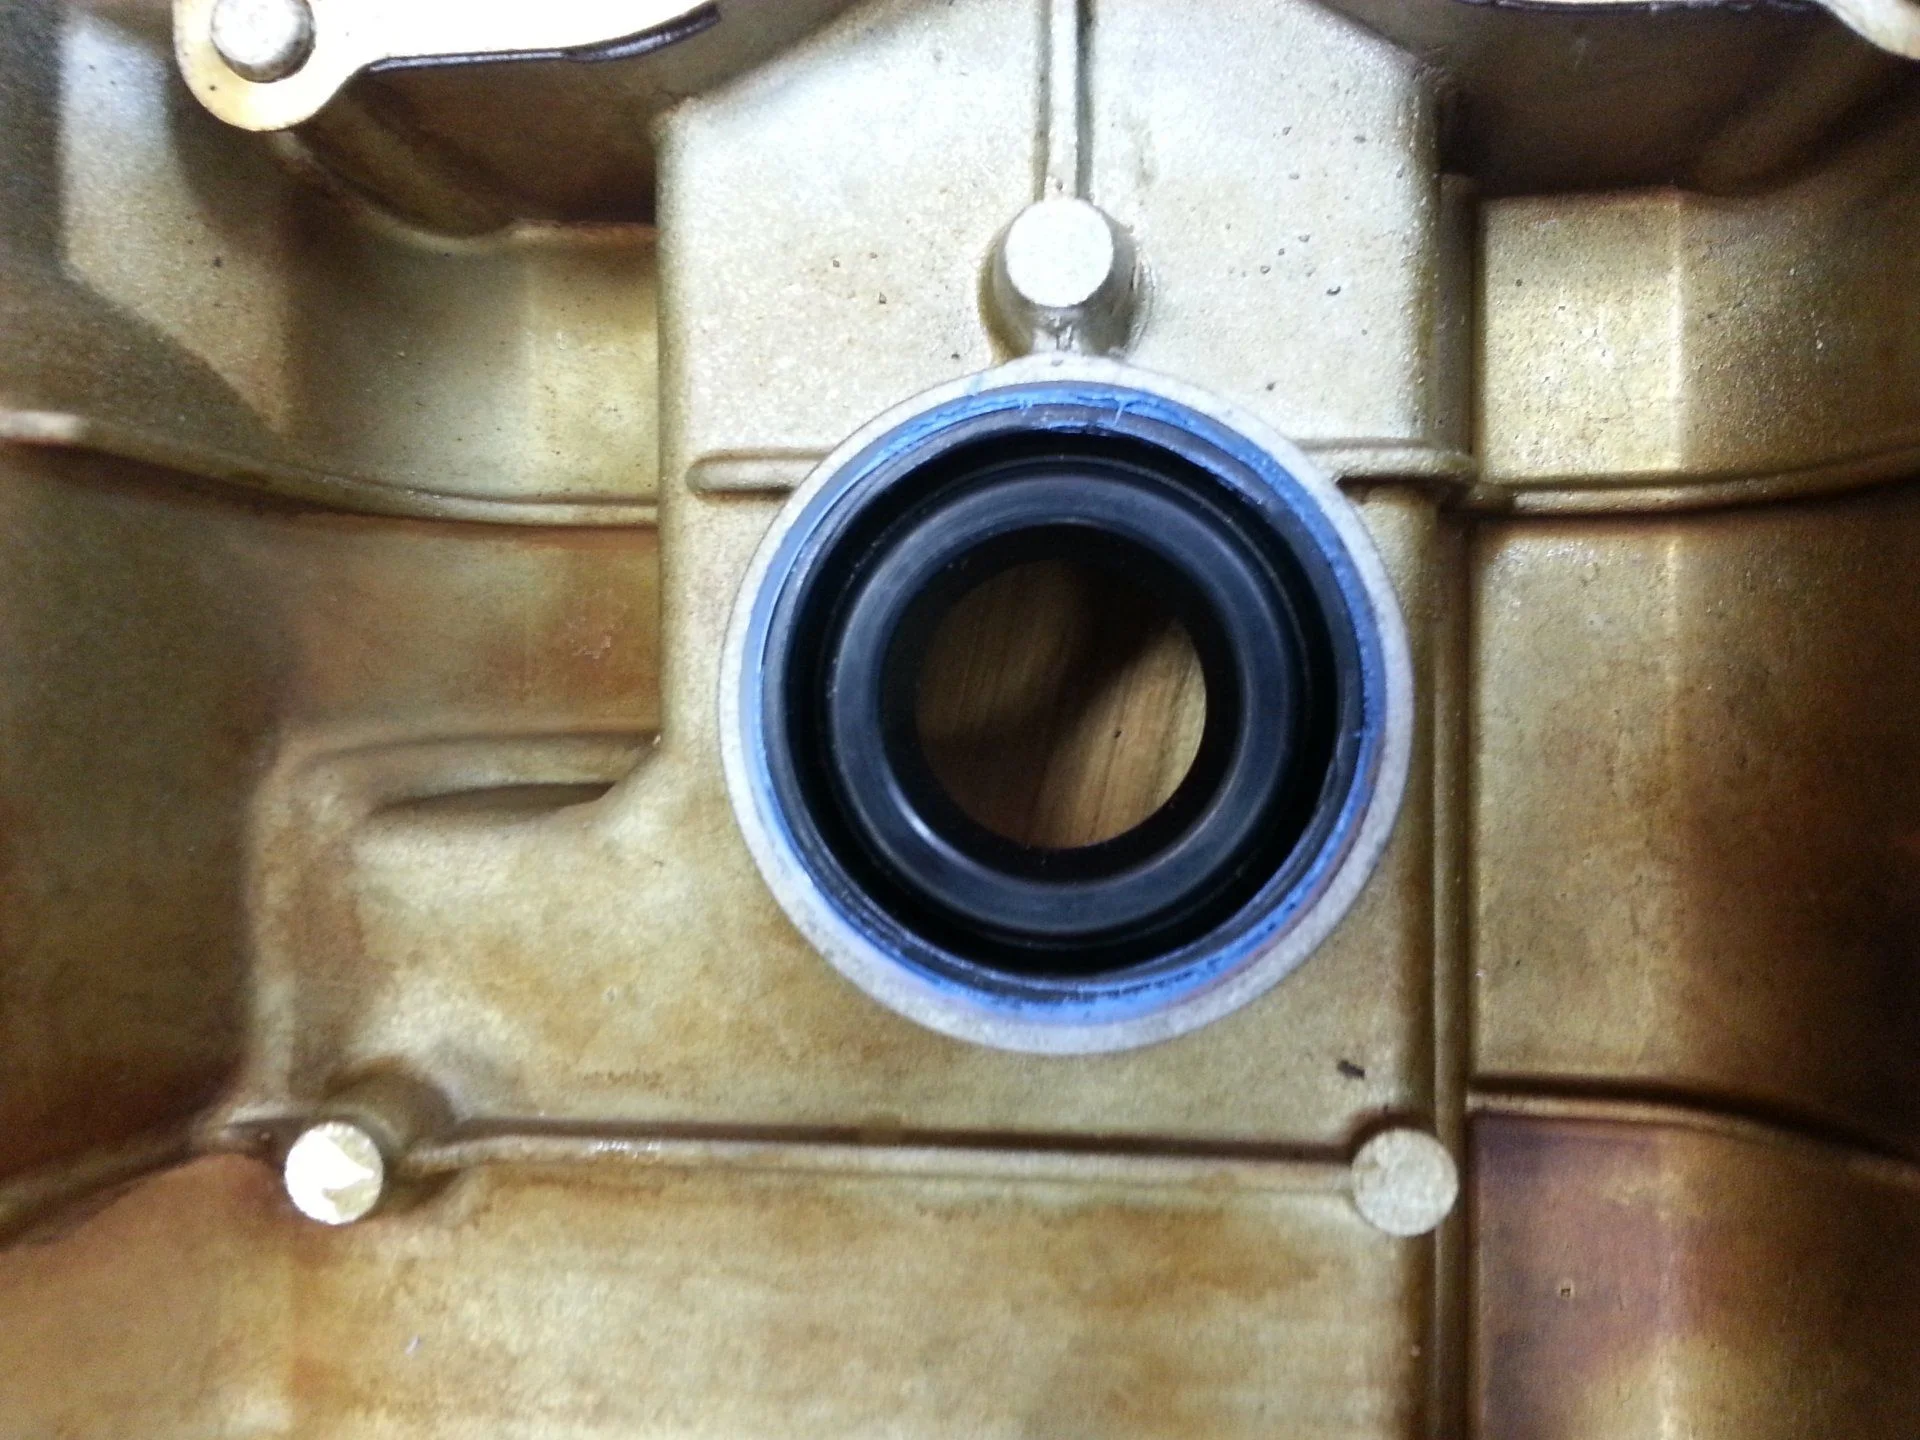
Excess sealant wiped clean.
Sanded/primed and painted the valve cover and the plug covers.
Ready for new plugs/wires/cap/gasket and rotor. Did the distributor shaft seal at this time as well.
The top end cleaned up nicely.
Next, oil pump o-ring and front main seal.
First on the agenda was to replace the bad oil pressure sender that was causing the gauge to fluctuate. Pulled the air box and the front heat shield to get to the little bugger.

I sized the fitting to be 14mm and grabbed the stubby wrench but the old one was just hand tight and spun right out. Compared the new one to the old just in case.
Installed the new one and snugged it good. Looks nice way down in there.
Now on to valve cover gasket and spark plug tube seals. Managed to get enough room to lay the throttle body aside without disconnecting the cables and some room at the back by unbolting the heater control valve from the firewall. Underneath it was not bad for 23 years. Several of the spark tube seals shattered either before or during the valve cover lift off. Spent more than an hour with the shop vac and a 1/2" nozzle getting fragments out.
Not bad for a 23 year old
Inside the cam area looked pretty good. Three of the old spark tube seals stayed in the head...
Pulled the remaining seals and cleaned up the cover and laid it out for installing the new seals. Some scrap teak blocks to level / elevate it, some RTV and a 1 1/4" and 1 3/8" socket to seat the new seals.
Ready to install new seals
Placed the valve cover on a pair of teak scrap to make it stable and level. A bit of RTV around...
The ball end of my hammer work well to apply the thin layer of RTV before seating. The old seals had sealant ridges so adding some would slightly lubricate the seal for installing and secure the seal.
Helping Hammer
Used the ball end of one of my hammers to hold the seal as I added a very thin layer of RTV
New seal seated to the bottom of the cavity.
New seal seated
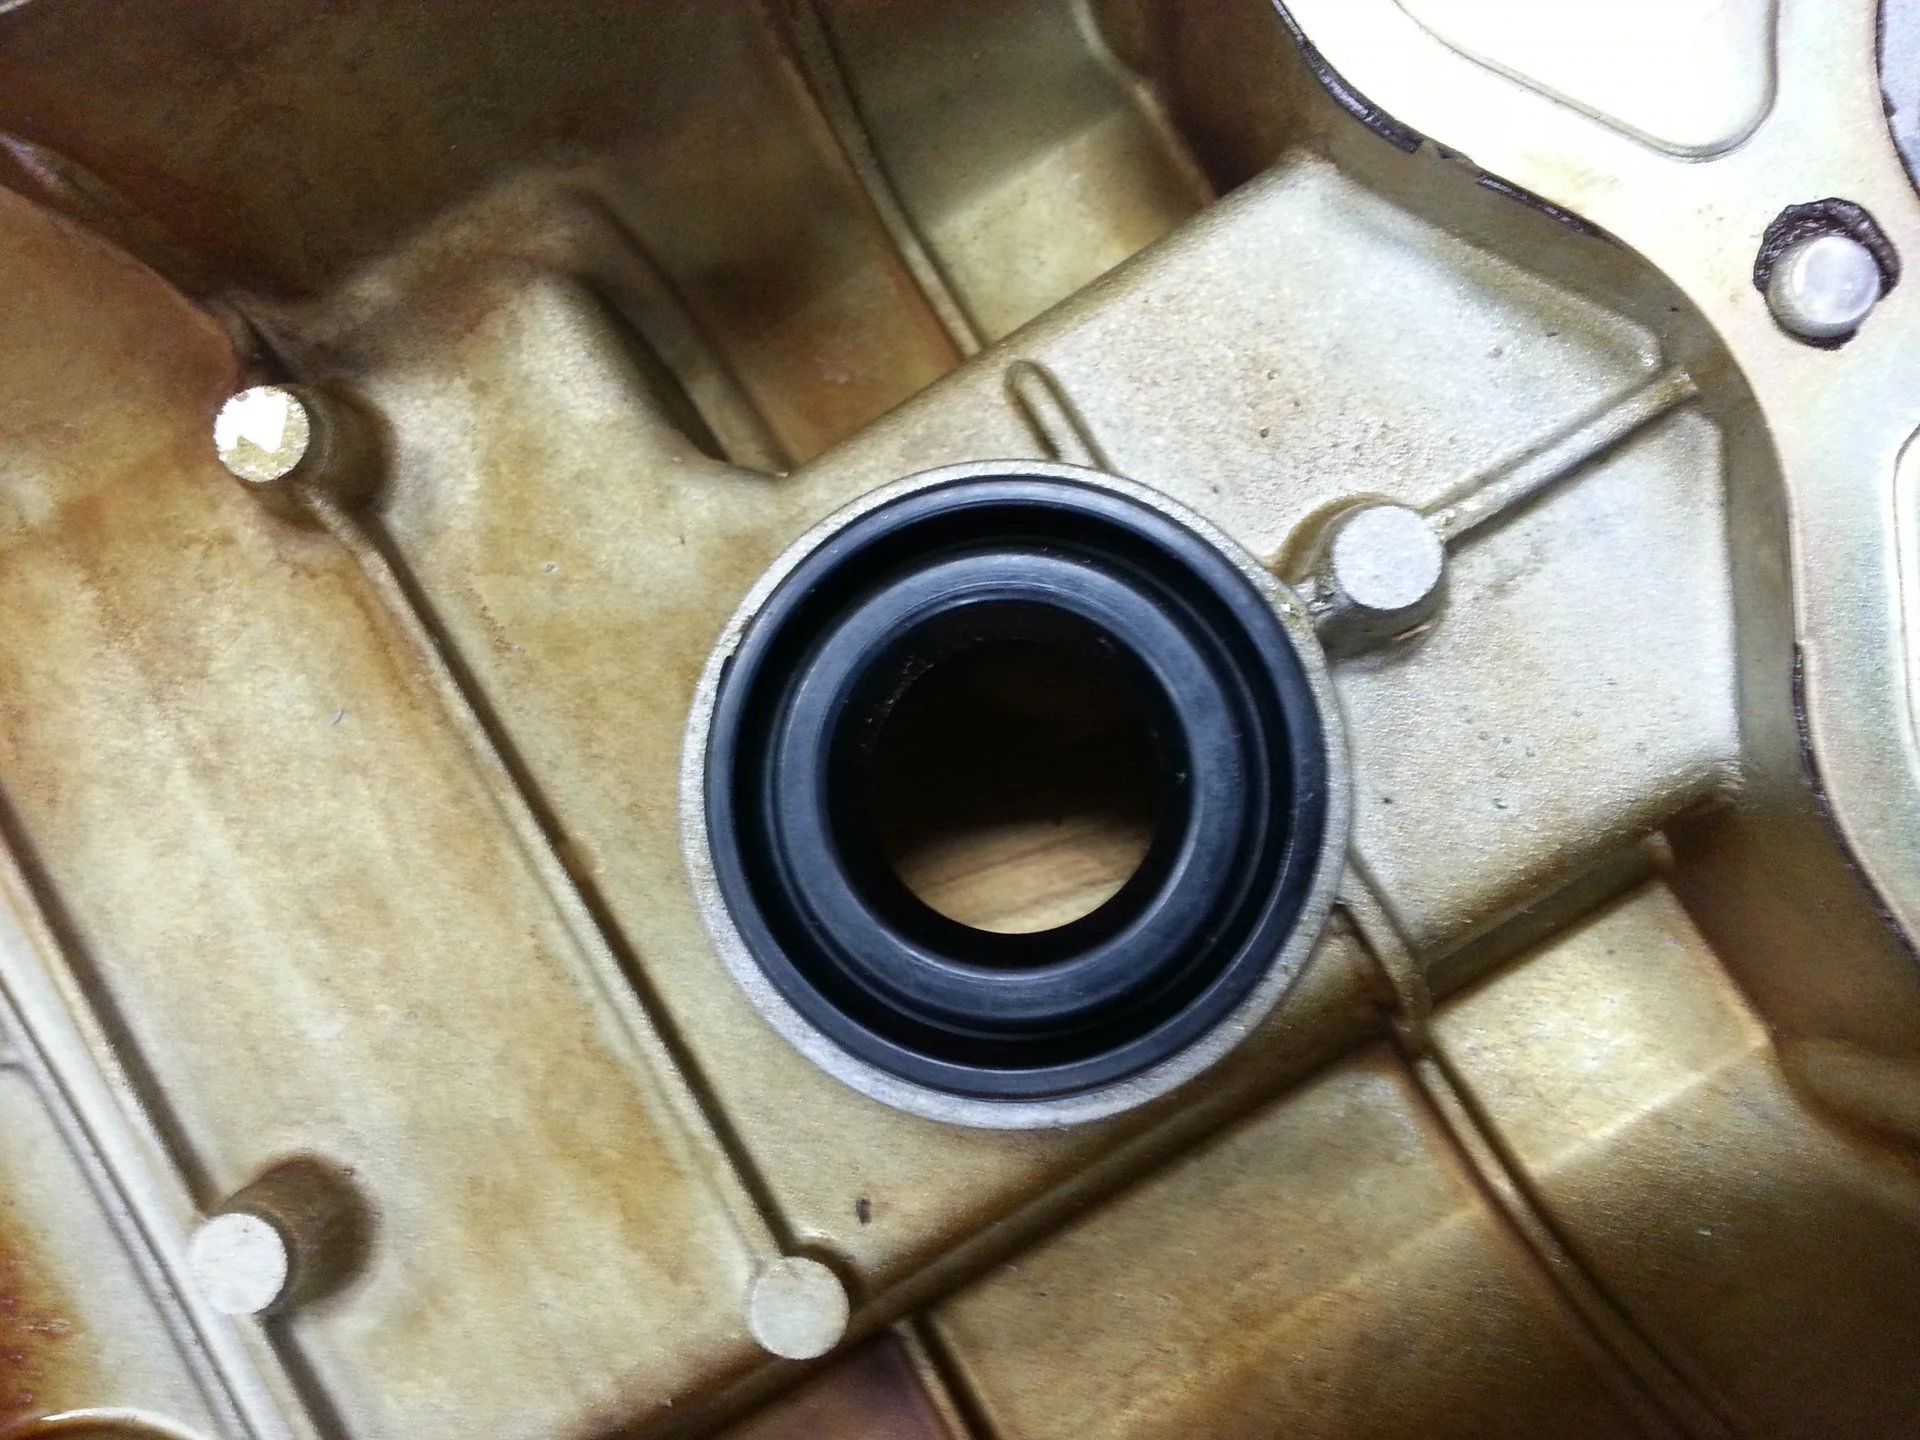
The original seals showed signs of being seated in a sealant so i repeated the process wiping...
Excess sealant wiped clean.
New seal seated
I seated the new seals to the bottom of the recess which left them below the surface on this...
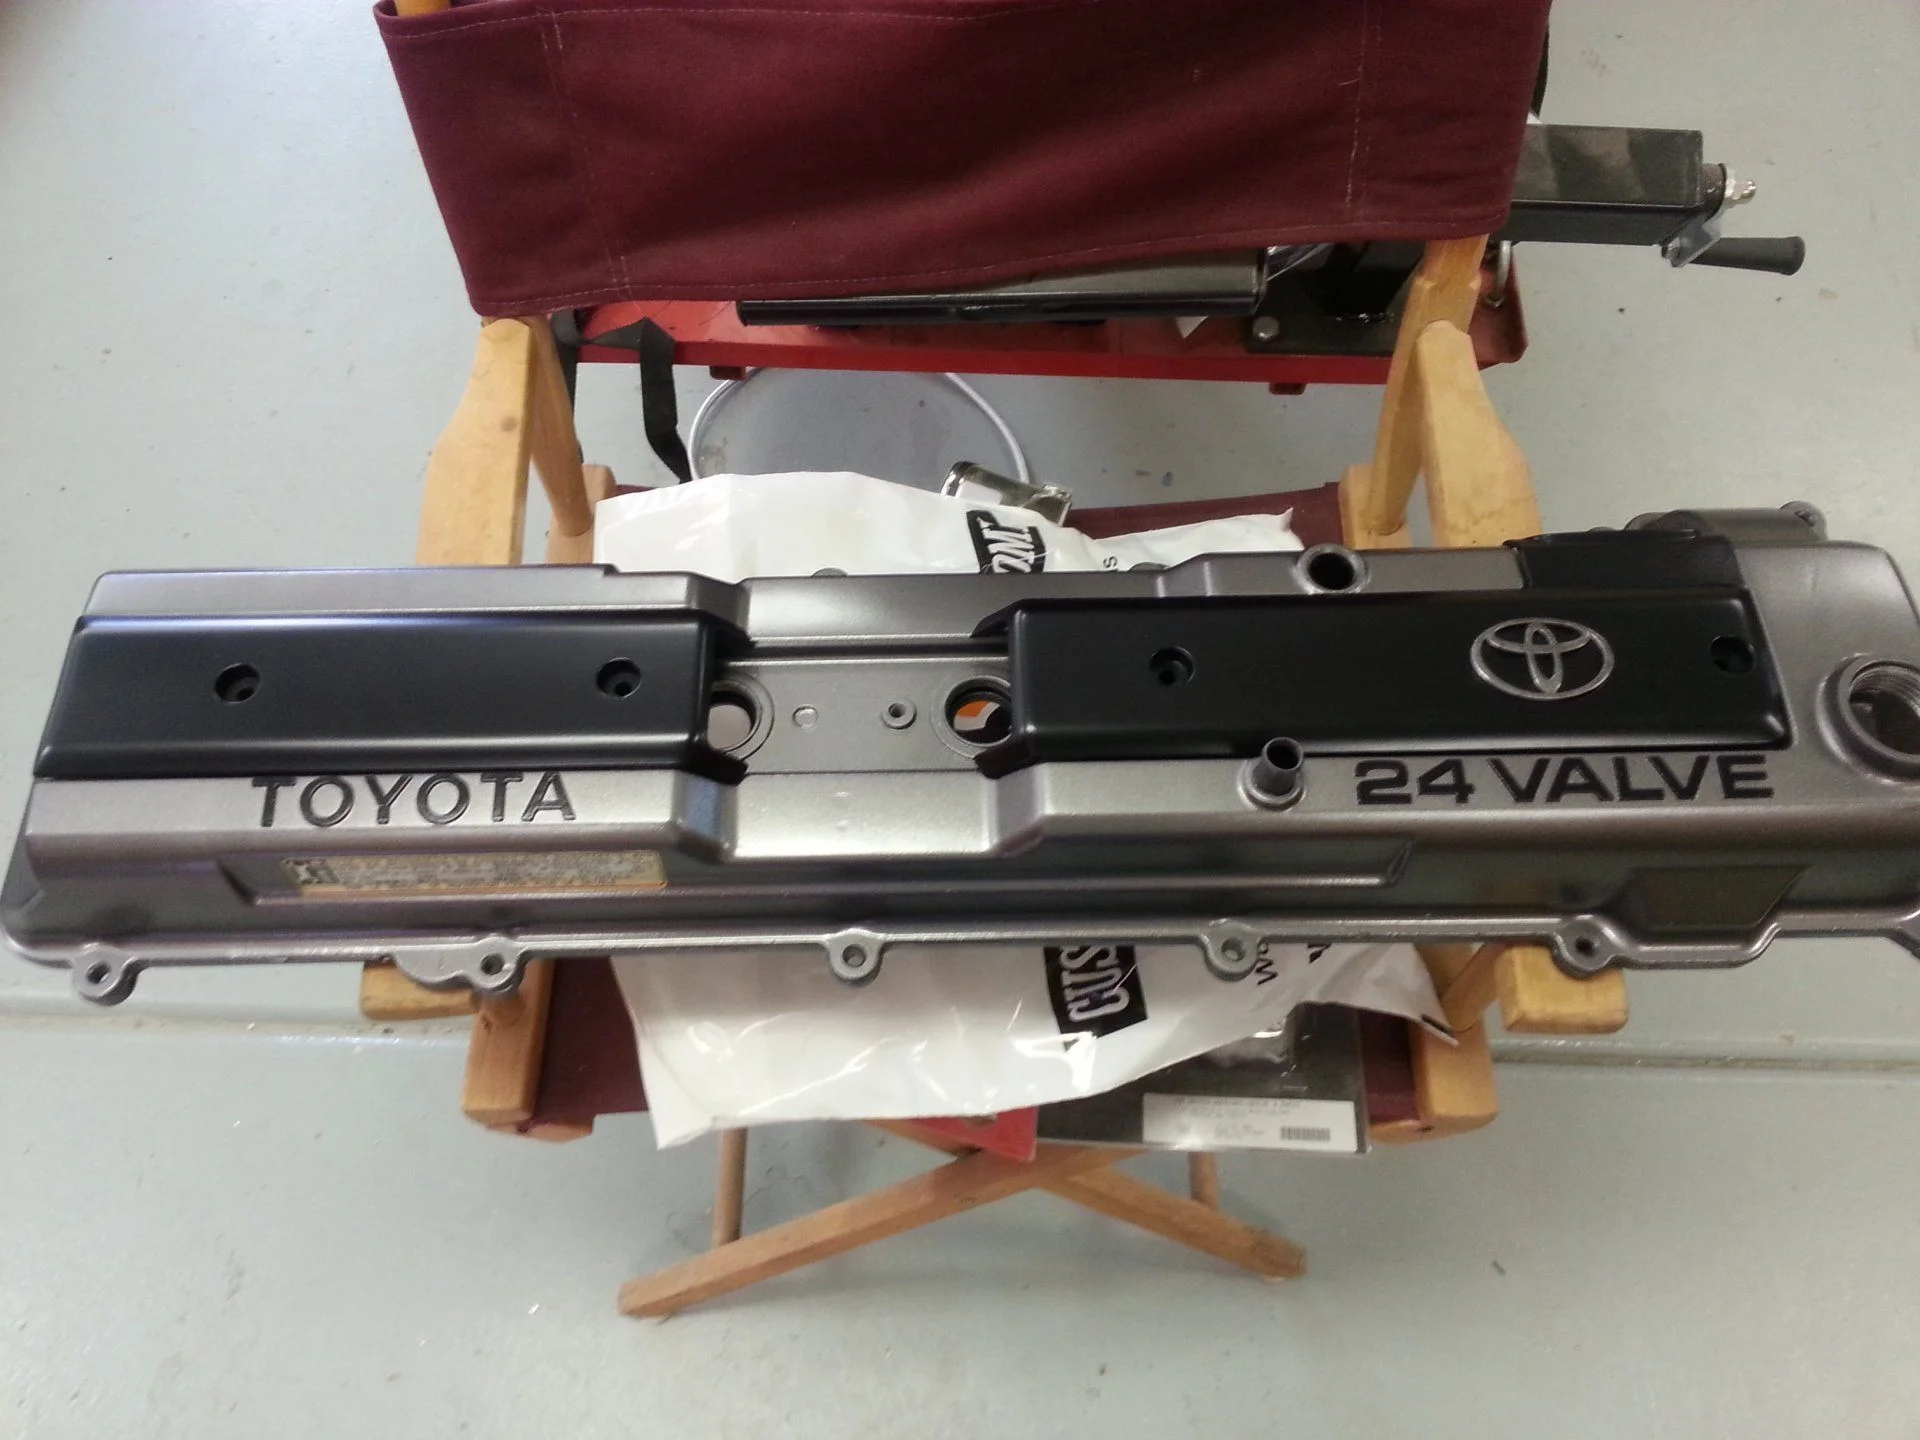
Sanded/primed and painted the valve cover and the plug covers.
Nice new look
After cleaning and sanding the Valve cover a coat of GunMetal silver and the plug covers in...
Ready for new plugs/wires/cap/gasket and rotor. Did the distributor shaft seal at this time as well.
The top end cleaned up nicely.
Next, oil pump o-ring and front main seal.
Finally took it off road!
First time ever wheeling for me. Went to 5 mile pass with some friends, drove up to the jeep mine.
The old boy took to it like the laughing buddha to a bowl of rice.
An after shot:

First time ever wheeling for me. Went to 5 mile pass with some friends, drove up to the jeep mine.
The old boy took to it like the laughing buddha to a bowl of rice.
An after shot:
hamishpotter
SILVER Star
After last weekends cleaning session and a week in the bike shop with no new drops on the floor it was time to start addressing the sources.
First on the agenda was to replace the bad oil pressure sender that was causing the gauge to fluctuate. Pulled the air box and the front heat shield to get to the little bugger.
I sized the fitting to be 14mm and grabbed the stubby wrench but the old one was just hand tight and spun right out. Compared the new one to the old just in case.
Installed the new one and snugged it good. Looks nice way down in there.
Now on to valve cover gasket and spark plug tube seals. Managed to get enough room to lay the throttle body aside without disconnecting the cables and some room at the back by unbolting the heater control valve from the firewall. Underneath it was not bad for 23 years. Several of the spark tube seals shattered either before or during the valve cover lift off. Spent more than an hour with the shop vac and a 1/2" nozzle getting fragments out.
Not bad for a 23 year old
Inside the cam area looked pretty good. Three of the old spark tube seals stayed in the head...
Pulled the remaining seals and cleaned up the cover and laid it out for installing the new seals. Some scrap teak blocks to level / elevate it, some RTV and a 1 1/4" and 1 3/8" socket to seat the new seals.
Ready to install new seals
Placed the valve cover on a pair of teak scrap to make it stable and level. A bit of RTV around...
The ball end of my hammer work well to apply the thin layer of RTV before seating. The old seals had sealant ridges so adding some would slightly lubricate the seal for installing and secure the seal.
Helping Hammer
Used the ball end of one of my hammers to hold the seal as I added a very thin layer of RTV
New seal seated to the bottom of the cavity.
New seal seated
The original seals showed signs of being seated in a sealant so i repeated the process wiping...
Excess sealant wiped clean.
New seal seated
I seated the new seals to the bottom of the recess which left them below the surface on this...
Sanded/primed and painted the valve cover and the plug covers.
Nice new look
After cleaning and sanding the Valve cover a coat of GunMetal silver and the plug covers in...
Ready for new plugs/wires/cap/gasket and rotor. Did the distributor shaft seal at this time as well.
The top end cleaned up nicely.
Next, oil pump o-ring and front main seal.
Mind sharing the paint color you used? If I pop off the valve cover I'm considering copying your paint scheme if you don't mind - that looks sweet. Also how much extra horsepower does that add?
I have a big problem guys...I'm new to the forums but need some helpWhat did you do with your 80 this weekend: maintenance, fix, wheel, nothing, new mod??
Me:
Checked air in tires
Change oil&filter 180,000
Fill gas tank
Waiting on box of parts from Beno
My fj80 starts after 20 min shuts down it won't start till after...please help
A mobile mechanic checked and tried the coil and the ignitor... But it didn't fix the problem
My fj80 starts after 20 min shuts down it won't start till after...please help
Start a new thread. Seriously.