I have used both the old and new timers and at first I preferred the old for their simplicity and ease of use but the biggest advantage to the new timers is that they are reoccuring. Meaning you can set it once and forget it and it will start up at the same time(s) / day(s) forever until you reprogram it or disconnect the power supply
Navigation
Install the app
How to install the app on iOS
Follow along with the video below to see how to install our site as a web app on your home screen.
Note: This feature may not be available in some browsers.
More options
Style variation
You are using an out of date browser. It may not display this or other websites correctly.
You should upgrade or use an alternative browser.
You should upgrade or use an alternative browser.
Webasto install HDJ81 (1 Viewer)
- Thread starter crushers
- Start date
This site may earn a commission from merchant affiliate
links, including eBay, Amazon, Skimlinks, and others.
More options
Who Replied?I have used both the old and new timers and at first I preferred the old for their simplicity and ease of use but the biggest advantage to the new timers is that they are reoccuring. Meaning you can set it once and forget it and it will start up at the same time(s) / day(s) forever until you reprogram it or disconnect the power supply
The command start functionality is big for me, I don't daily drive the LC most of the time, and use is sporadic. The new timer sounds perfect for something you use routinely though.
I don't mind the old style 7 day timer - it works, just not ideal. I would really like command start functionality for the Webasto for unplanned use.
This year I have a plug in at my office so dual pad heaters (one for engine, one for trans) and the Webasto. Considering a trickle charger as well. Truck shouldn't be able to tell the difference between -40 and summer.
This year I have a plug in at my office so dual pad heaters (one for engine, one for trans) and the Webasto. Considering a trickle charger as well. Truck shouldn't be able to tell the difference between -40 and summer.
I don't mind the old style 7 day timer - it works, just not ideal. I would really like command start functionality for the Webasto for unplanned use.
This year I have a plug in at my office so dual pad heaters (one for engine, one for trans) and the Webasto. Considering a trickle charger as well. Truck shouldn't be able to tell the difference between -40 and summer.
Ground pulse to pin #7 on the timer activates it same as if you hit the "on" button on the face, FYI.
I think this is the same conclusion I'm coming to. Next question would be which controller to get.
There's the old style rectangular unit that a lot of people seem to use:
View attachment 1193596
And the newer oval style unit:
View attachment 1193597
It seems really difficult to determine which controllers are compatible with which heaters online. I'm not even 100% sure the oval unit pictured above works with the TSL-17.
I have that round remote on my truck and just got it not sure how to set it. I wanted to set up custom days Monday-Saturday I set the time each day but when I went to my truck today it was cold. Not sure why. Was wondering if anyone knows where I can see a video on setting it or where a Manuel for it could be found. I look online and it's always for heater bunks. Any help would be great
I have that round remote on my truck and just got it not sure how to set it. I wanted to set up custom days Monday-Saturday I set the time each day but when I went to my truck today it was cold. Not sure why. Was wondering if anyone knows where I can see a video on setting it or where a Manuel for it could be found. I look online and it's always for heater bunks. Any help would be great
file:///C:/Users/IanB/Downloads/im_om_smartemp_control_fx_en_web_100214.pdf
DanS HJ-45
SILVER Star
file:///C:/Users/IanB/Downloads/im_om_smartemp_control_fx_en_web_100214.pdf
The one on your hard drive isn't real helpful to other folks.
Here's the link to Webasto's site: SmarTemp Control fx - SmarTemp Control fx
Dan
Great thread! I'm going to be installing a Webasto in my LH drive FJ60 that's been converted to a 1HDT so not as straight forward as the installs outlined in this thread. I would prefer to install on the pass side of the engine bay. I'm also removing the rear heater to install BMW seats. Can I just connect the Webasto to where the rear heater was connected in the engine bay or is there a chance that the fluid would not flow as expected? Is there a backflow or something like that in the heater core/cabin to ensure that the Webasto pump will not be circulating fluid in the wrong direction?
Thanks for any input.
Thanks for any input.
So I've been going through the process of piecing together a 'budget' Webasto install, and thought I'd impart the one piece of advice I've learned through the whole ordeal - buy a kit. I found a bare-bones unit from a VW Touareg from Lithuania for around $200 shipped. Seems like a good deal no? Factor in all the misc pieces, often sources from foreign countries for $$ shipping, and it starts to add up. Here are all the pieces I've had to purchase, most of them either specialized (McMaster Carr, Grainger), or from overseas. It all comes close to if not more than the price of a used, pre-cobbled, tested kit. And as I've now found out, the VW version comes with a control unit that was built by VW and meant to interface with their ECU. So now add $150 for a new unit from... Hungary I think?? Also, that means I will be spending several more weeks for shipping. Hooray.

There are a few more things I've learned along the way that might actually help anyone looking to replace malfunctioning parts for much cheaper - for instance there is a Volvo water pump that bolts directly to the webasto (pictured) but does not carry the Webasto price tag. I'll impart that info once I verify it all works. Also, I should have this all put together just in time for summer!
There are a few more things I've learned along the way that might actually help anyone looking to replace malfunctioning parts for much cheaper - for instance there is a Volvo water pump that bolts directly to the webasto (pictured) but does not carry the Webasto price tag. I'll impart that info once I verify it all works. Also, I should have this all put together just in time for summer!
Seeing as this has become the definitive coolant heater install thread I thought I'd add my 2 cents on the heater fan wiring. I installed an Espar kit in my bj46. The install is detailed here-
84 bj46 long term maintenance, repair and upgrade- making it mine.
Needless to say it's a tight fit in s 40 series! The Espar unit has an output to switch a relay for the heater blower when the coolant reaches 30*c. They also sell a Blower Control Module which differs from a simple relay in one important aspect regarding battery life. It incorporates a potentiometer or something similar allowing one to have the cab heater blower running as low as desired- thus increasing battery life. Also it's wired in conjunction with the own heater switch. This unit could also be used with the webssto heater as well.
For the time being I've decided to use a SPDT relay wired to switch the power to the heater switch between the original + that requires the key to be in the run position to the cigarette lighter + that operates with the key in the ACC position.
With the key in the ACC position and the heater switch is on (either high or low) when the coolant reaches 30*c the relay will be activated by the Espar, closing the normally open position and suppling power to the blower via the lighter circuit. When I start the car and the key is on the run position the blower system will return to the original circuit (NC position on the relay.)
Of course this requires the key to be in the ignition however it would be just as easy to use power from an unswitched source. I'm just using that circuit because it's available and already fused.
Pete
Last edited:
So I'm starting to think seriously about creating my wiring harness. I'm also looking to tie everything in to the keyless entry system. I stumbled upon this, which seems like it just might work for what I am looking to do:
Free Shipping DC 12V Programmable Timer Switch Trigger Cycle Time Delay Relay Module Board LED Buzzer 10 Million Times Life!-in Integrated Circuits from Electronic Components & Supplies on Aliexpress.com | Alibaba Group
The original plan was to somehow use the remote start to signal the webasto, but there is just too much going on (rpm monitoring, gear selector position, brake monitoring, etc.). So the plan is to intercept the signal for the trunk release instead. That signal will start the timer and the relay will close, providing the start signal to the Webasto.
I am also looking to wire the unit into the cabin blower fan... For now I think I will simply bypass the resistor pack and run full speed (just an hour or two for cold morning starts), but eventually the plan is to control it with a thermostat, and maybe find a more efficient way of moving air so as not to drain the battery. Anyone know roughly how much time I can run the fan before the battery dies? I'm also curious if anyone has feedback on the timer setup.
Well I finally got all the parts together and took some time this weekend to do the install... And it works!
I made brackets that attach only to stock mounting points - no drilling. I also tapped the Webasto body for M8 bolts.
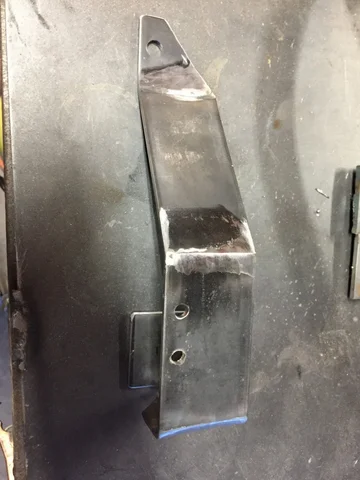
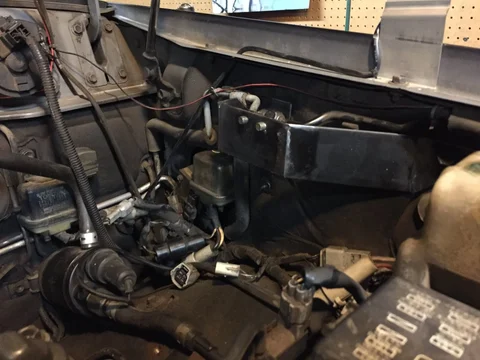
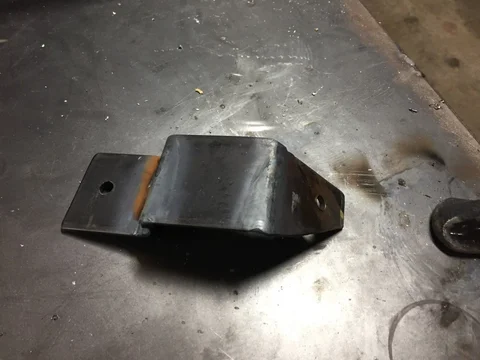
This is the water pump from a Volvo. It is cheaper than a real Webasto unit but still has a horizontal intake (which was necessary for my mounting position). It fits perfectly on the webasto (even the clamp seems to be made for it).
VOLVO S80 V60 V70 XC60 XC70 FORD GALAXY MONDEO MK4 S-MAX WATER CIRCULATION PUMP | eBay

The fuel pump pictured was a cheap knockoff 5kw dosing pump that seems to be doing fine so far. I used this to mount it: McMaster-Carr
My engine was becoming a mess of wires so I also opted to install a bussmann to power the unit. Wires were connected with weatherpacks.
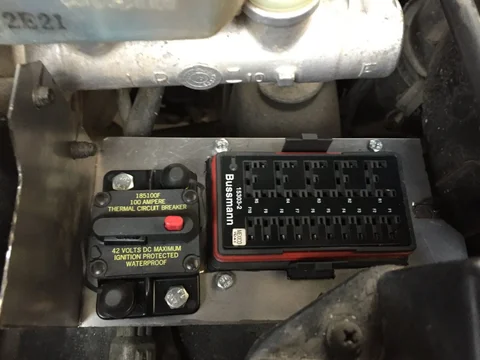
I made brackets that attach only to stock mounting points - no drilling. I also tapped the Webasto body for M8 bolts.


This is the water pump from a Volvo. It is cheaper than a real Webasto unit but still has a horizontal intake (which was necessary for my mounting position). It fits perfectly on the webasto (even the clamp seems to be made for it).
VOLVO S80 V60 V70 XC60 XC70 FORD GALAXY MONDEO MK4 S-MAX WATER CIRCULATION PUMP | eBay

The fuel pump pictured was a cheap knockoff 5kw dosing pump that seems to be doing fine so far. I used this to mount it: McMaster-Carr
My engine was becoming a mess of wires so I also opted to install a bussmann to power the unit. Wires were connected with weatherpacks.

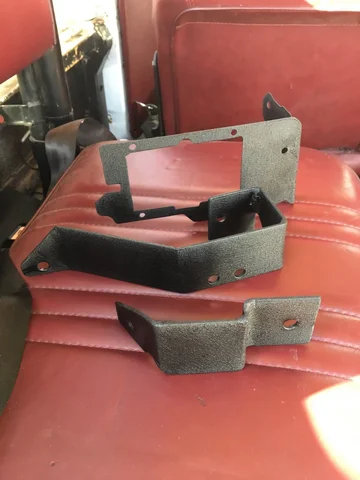
Had all the brackets powder coated.
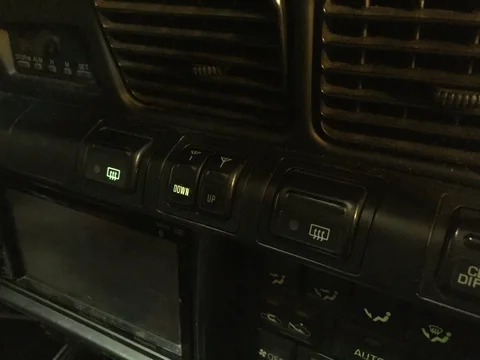
Installed a Toyota defrost toggle in one of the blanks, and wired it up (its the one with the working backlight). Still waiting for this so I can wire it all in to the remote entry system:
Free Shipping DC 12V Programmable Timer Switch Trigger Cycle Time Delay Relay Module Board LED Buzzer 10 Million Times Life!-in Integrated Circuits from Electronic Components & Supplies on Aliexpress.com | Alibaba Group
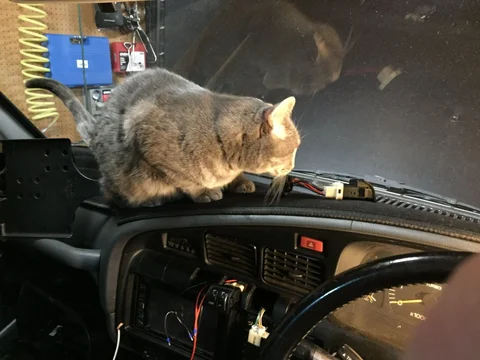
And heres the exhaust routing:

I got the Webasto from Lituania for pretty cheap, but it came with a controller that was specifically meant to operate with a Volkswagen ECU. So I purchased one of these: Aftermarket controller for Webasto Thermo Top Z ,C, E DIESEL- Parking heater | eBay
It has the pin for operating the cabin fan. I have yet to wire that up but its next on the list.
Here' everything together (although much cleaner now that I routed all the wiring).

Also, if you need the main Webasto connector, I believe these are the parts (still in shipping so I can't verify). If you order one of the ebay kits it may not come with the seals for whatever wire gauge you used, so it may be best to roll your own. Learned this the hard way.
Mouser #: 571-965906-5
Mfr. #: 965906-5
Desc.: Automotive Connectors MQS BUCHS-KONT EDS
Mouser #: 571-1-967616-1
Mfr. #: 1-967616-1
Desc.: Automotive Connectors HSG PLG 2X03C F/H BLK
Mouser #: 571-967067-1
Mfr. #: 967067-1
Desc.: Automotive Connectors WIRE SEAL 24-18AWG
Mouser #: 571-963530-1
Mfr. #: 963530-1
Desc.: Automotive Connectors WIRE SEAL
**EDIT**
Forgot to mention, the connector for the fuel pump is a Bosch EV1.
And for the fuel line splice, this: PARKER Barbed Union Tee, Brass, 3/8" x 3/8" x 1/4" Barb Size, Brass - 2GUG4|224-8-8-6 - Grainger
EDIT - The power connectors mentioned worked fine. The brass t for the coolant worked, but is incorrect. The lines are really something like 12mm but 1/2 inch should do the trick in freedom units.

Installed a Toyota defrost toggle in one of the blanks, and wired it up (its the one with the working backlight). Still waiting for this so I can wire it all in to the remote entry system:
Free Shipping DC 12V Programmable Timer Switch Trigger Cycle Time Delay Relay Module Board LED Buzzer 10 Million Times Life!-in Integrated Circuits from Electronic Components & Supplies on Aliexpress.com | Alibaba Group


And heres the exhaust routing:

I got the Webasto from Lituania for pretty cheap, but it came with a controller that was specifically meant to operate with a Volkswagen ECU. So I purchased one of these: Aftermarket controller for Webasto Thermo Top Z ,C, E DIESEL- Parking heater | eBay
It has the pin for operating the cabin fan. I have yet to wire that up but its next on the list.
Here' everything together (although much cleaner now that I routed all the wiring).

Also, if you need the main Webasto connector, I believe these are the parts (still in shipping so I can't verify). If you order one of the ebay kits it may not come with the seals for whatever wire gauge you used, so it may be best to roll your own. Learned this the hard way.
Mouser #: 571-965906-5
Mfr. #: 965906-5
Desc.: Automotive Connectors MQS BUCHS-KONT EDS
Mouser #: 571-1-967616-1
Mfr. #: 1-967616-1
Desc.: Automotive Connectors HSG PLG 2X03C F/H BLK
Mouser #: 571-967067-1
Mfr. #: 967067-1
Desc.: Automotive Connectors WIRE SEAL 24-18AWG
Mouser #: 571-963530-1
Mfr. #: 963530-1
Desc.: Automotive Connectors WIRE SEAL
**EDIT**
Forgot to mention, the connector for the fuel pump is a Bosch EV1.
And for the fuel line splice, this: PARKER Barbed Union Tee, Brass, 3/8" x 3/8" x 1/4" Barb Size, Brass - 2GUG4|224-8-8-6 - Grainger
EDIT - The power connectors mentioned worked fine. The brass t for the coolant worked, but is incorrect. The lines are really something like 12mm but 1/2 inch should do the trick in freedom units.
Last edited:
Thanks for following up with such a thoughtful and complete post! Congratulations on getting your system up and running.Had all the brackets powder coated.
View attachment 1415426
Installed a Toyota defrost toggle in one of the blanks, and wired it up (its the one with the working backlight). Still waiting for this so I can wire it all in to the remote entry system:
Free Shipping DC 12V Programmable Timer Switch Trigger Cycle Time Delay Relay Module Board LED Buzzer 10 Million Times Life!-in Integrated Circuits from Electronic Components & Supplies on Aliexpress.com | Alibaba Group
View attachment 1415427 View attachment 1415423
And heres the exhaust routing:
View attachment 1415424
I got the Webasto from Lituania for pretty cheap, but it came with a controller that was specifically meant to operate with a Volkswagen ECU. So I purchased one of these: Aftermarket controller for Webasto Thermo Top Z ,C, E DIESEL- Parking heater | eBay
It has the pin for operating the cabin fan. I have yet to wire that up but its next on the list.
Here' everything together (although much cleaner now that I routed all the wiring).
View attachment 1415425
Also, if you need the main Webasto connector, I believe these are the parts (still in shipping so I can't verify). If you order one of the ebay kits it may not come with the seals for whatever wire gauge you used, so it may be best to roll your own. Learned this the hard way.
Mouser #: 571-965906-5
Mfr. #: 965906-5
Desc.: Automotive Connectors MQS BUCHS-KONT EDS
Mouser #: 571-1-967616-1
Mfr. #: 1-967616-1
Desc.: Automotive Connectors HSG PLG 2X03C F/H BLK
Mouser #: 571-967067-1
Mfr. #: 967067-1
Desc.: Automotive Connectors WIRE SEAL 24-18AWG
Mouser #: 571-963530-1
Mfr. #: 963530-1
Desc.: Automotive Connectors WIRE SEAL
**EDIT**
Forgot to mention, the connector for the fuel pump is a Bosch EV1.
And for the fuel line splice, this: PARKER Barbed Union Tee, Brass, 3/8" x 3/8" x 1/4" Barb Size, Brass - 2GUG4|224-8-8-6 - Grainger
Let us know how the trunk release/remote start works out, very creative.
Thanks for following up with such a thoughtful and complete post! Congratulations on getting your system up and running.
Let us know how the trunk release/remote start works out, very creative.
Thanks! I was able to find the line for the trunk opener. It took me an embarrassingly long time to figure out that it connects to ground instead of sending voltage. So it was looking like my plan would fail, since that little chinese timer expects positive voltage in order to trigger. Another thing I didnt realize is that it is only configurable to 999 seconds. Thats something like 16 minutes, not long enough to get any substantial heat.
I dug up the manual for the remote system and found that I can configure it to latch until I turn the ignition on. The webasto also expects positive voltage to start, so I ended up wiring the trunk opener as the ground connection for a relay coil. So now it triggers a positive connection to the Webasto.
I have to see how much i like this current configuration. The only way to cancel the Webasto is to physically turn the ignition to on. I may see if there is another timer out there that runs longer than 999 seconds. I am also entertaining the idea of building something with an Arduino or something similar. That way I can potentially wire it up to a thermostat, cellular module, wifi module, etc.
In the meantime, I'm trying to figure out how I can connect it to a blower fan. Hoping I can apply positive voltage and bypass any relays in the climate control system.
Ok, having some problems getting the blower fan to work. Thought I'd cross link my thread here, in case one of you smart diesel guys might know what's going on. Basically it is popping 30A fuses when I try to apply direct power to the fan.
Operating blower motors without keys/ignition on
Operating blower motors without keys/ignition on
Blower shouldn't pop 30a fuses unless your wired backwards. Try applying power to the switch or resister coil.Ok, having some problems getting the blower fan to work. Thought I'd cross link my thread here, in case one of you smart diesel guys might know what's going on. Basically it is popping 30A fuses when I try to apply direct power to the fan.
Operating blower motors without keys/ignition on
Last edited:
@Pacer I don't think its a polarity issue since the fan works fine when connected directly to the battery. I would much rather use a low amp signal to trigger the switch as you said. I'll admit I'm not all that great at reading the Toyota electrical schematics or electrical engineering in general, so I'm opting to isolate the fan with a dpdt relay. Pretty sure that will work fine, but if anyone knows where I can tap into the Toyota switch I'd be all ears, as that would be ideal.
Got it all figured out. Used a buck converter to drop the fan to 5v. The whole setup only draws ~1.2 amps.


Got my hands on a brand new thermo top unit locally for 700$. The guy was nice enough to trow in a used Air Top 2000st with all the bits needed for free!!
The challenge for me was the previously installed ARB compressor in the location that everyone installs theirs. I was trying to avoid having to relocate it and all the plumbing and wiring that comes with it.
By slightly adjusting the angle of the compressor and the air outlet, I managed to squeeze the Webasto between the fuel filter and the compressor.

I welded a simple piece of 3/16 steel to the fuel filter bracket

I also bent a couple chunks of 1/8 aluminum plate to create heat deflectors the protect vacuum and brake lines from exhaust heat. looks terrible, but it is invisible when the heater is in place.


The challenge for me was the previously installed ARB compressor in the location that everyone installs theirs. I was trying to avoid having to relocate it and all the plumbing and wiring that comes with it.
By slightly adjusting the angle of the compressor and the air outlet, I managed to squeeze the Webasto between the fuel filter and the compressor.
I welded a simple piece of 3/16 steel to the fuel filter bracket
I also bent a couple chunks of 1/8 aluminum plate to create heat deflectors the protect vacuum and brake lines from exhaust heat. looks terrible, but it is invisible when the heater is in place.
Similar threads
Users who are viewing this thread
Total: 2 (members: 0, guests: 2)
