The Great Gazoo from 1972!

This site may earn a commission from merchant affiliate
links, including eBay, Amazon, Skimlinks, and others.

Doin' some stuff and drinkin some beerz...primer gun was giving me s***. I hope to finish it in the AM.
ForumRunner_20120115_020004.webp
ForumRunner_20120115_020024.webp
ForumRunner_20120115_020038.webp
 
Straighened the bib and put some goo on it.

ForumRunner_20120116_160517.webp

Also put some glazing putty on my blemishes. I am pretty happy with the results of the bodywork. :bounce:

ForumRunner_20120116_160537.webp

I am off on Thursday and Friday so I hope to have everything sanded and ready for the final coat of primer on Friday. I guess I will have more to do on the bib but I am getting close to drpping the rest of this stuff off for paint.
ForumRunner_20120116_160517.webp
ForumRunner_20120116_160537.webp
 
Boy oh boy am I sick of sanding.
I got everything done today and ready for the next round of primer. Bib and the other hood even.
I put everything outside and cleaned the dusty shop out again in preparation for putting the paint "booth" back up and I looked outside and it had started to rain.

I hustled to get everything back inside. Bare metal and water don't mix :crybaby:

I wiped everything down and am waiting for it to air dry the rest of the way. Then I am going to wipe it down with lacquer thinner in an attempt to abate the onset of rust. It is supposed to rain off and on for the next few days so I will be unable to prime that stuff since everything that is in the way has to sit in the driveway while I paint. Not like another few days on this project is going to matter. :doh:
 
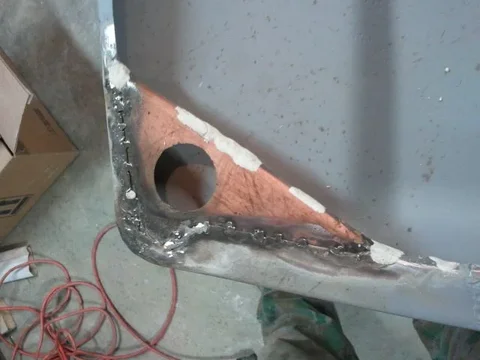
Got the braces welded back in the split hood. Used some POR15 epoxy to fill some holes in them. The original welds were about as ugly as mine!


2012-02-01 11.41.40.webp


View attachment 2012-02-01 11.41.18.jpg

Sent from my thing with Woody's junk.

2012-02-01 11.41.40.webp
 
So if you have never used that POR15 epoxy, I recommend it. Dried in a few hours rock hard and I shaped and feathered it with a die grinder. Time will tell. Hopefully it will not shrink or crack but it looks good right now.

I have a quarter size spot that I just filled some pin holes with glazing that needs a quick sanding. If the rain abates on Saturday I will prime.

I am off Monday morning so I hope to carry the front panels for paint then.

Sent from my thing with Woody's junk.
 
Excellent work. I'm not looking forward to the hours and hours of sanding ahead of me... Did you use a DA for any of it? Or just all by hand?
 
I admire your determination :cheers:
 
Excellent work. I'm not looking forward to the hours and hours of sanding ahead of me... Did you use a DA for any of it? Or just all by hand?
When I put any filler, I hit it with a DA first to get it manageable and flat (basically knock it down) then blocked it with 150 grit. Then I would add filled to any low spots and block it again. Any really small blemishes or pin holes or small divots I used glazing putty. Finally finishing up with 220.

I also got one of these jitterbugs at Harbor Freight for $30:
http://imageshack.us
Since the 40 has so many relatively flat areas it came in useful.
The other thing I used were the medium and fine grit sanding sponges. They were useful for little rounded areas like the corners of the hood and sanding out any orange peel after priming.

This is the DA I got:
http://imageshack.us
Also $30 from HF. I have really put it to use and it has finally worn out after quite a bit of abuse. One of the bearing inside has some slop giving it bad vibration. It was worth every penny and it is the first of my cheap HF airtools to bite the dust. I keep them oiled and all have been sturdy enough for my shop.
 
When I put any filler, I hit it with a DA first to get it manageable and flat (basically knock it down) then blocked it with 150 grit. Then I would add filled to any low spots and block it again. Any really small blemishes or pin holes or small divots I used glazing putty. Finally finishing up with 220.

Cool... Can't beat 2 air sanders for $60! I think I'll do the same... I love those block sponges too
 
jetranger said:
Cool... Can't beat 2 air sanders for $60! I think I'll do the same... I love those block sponges too

I also have the 6 or seven piece block set. Glad I got that and found it cheap on Amazon.

But no more of that...I finished priming tonight and will drop off the clip at the painter Monday :bounce:

Sent from my thing with Woody's junk.
 
So I think I have decided on gauges. Autometer ES series from Summit (unless Ican get a better price as Summit is not far south on I75.


I have room for the electric speedo and tach, then four small ones - oil pressure, water temp, amps and then fuel to the right of the Metal Tech gauge panel I got at GSMTR last year. I have to figure out the sending unit and fuel gauge since I have an old rear Confer and a stock tank I want to run on the same gauge with a switch.

Today I got a few small bits media blasted to paint and started repairing a couple of rear emblems I got at the Trollhole swap meet. Also, my windshield arrived so that will go in as soon as I have a free couple hours and once that is in I will hang the tan Eshan top on there for the first time. I am on the verge of getting the zippers replaced before install but it will be a while before it gets out side so I can hang on a bit I guess and wait for them to break. :doh:
 
Last edited:
:confused: why would you use an aftermarket cluster for a ground-up resto ?
 
Because it is not all stock. I am running an H55, a 2F and am going to put aftermarket seats (probably from a Sebring) in there too. :flamingo:

And because I want to.

BTW - the front bits have been dropped off for paint as of 11AM Eastern :bounce:
 
Last edited:
Have you looked at speedhut.com for gauges? I have them in mine and love them. They also have a programmable fuel gauge that will work with any sender

Sent from my iPhone using IH8MUD
 

Users who are viewing this thread

Back
Top Bottom