Re Birth BT60

This site may earn a commission from merchant affiliate
links, including eBay, Amazon, Skimlinks, and others.

Easy on the pics there Doc, the list is long enough as is! :doh:
Lookin good though, and you'll get yours soon enough Trapper, I am really bustin down on that list, I got another 4 done this weekend! :cheers:

It fit like a glove only had to ream one of the mounting holes with a hone, didn't even get out a drill bit. Just cut the opening deburred the edge and the one mounting hole and viola good to go. Excellent workmanship Kevin. Glad to know the QP are comming and that Trapper will soon have his, I know Ingrid is turning green as we speak. Again thanks to you from crusier nuts across the land. :D:clap::beer:
 
Looking good!! Just did the 2Lo mod this weekend myself. Really easy and I can't wait to get to use it.

Im with you carp it will be nice to shift it when the wheels are back on and connected to the driveshaf's. But I can sit in the bare floor and shift it going vroom vroom just like when I was a kid. Glad John did'nt know how to work the camera. :o:o:o:)
 
Still going

Well it's been two months not two weeks and still not a sign of the diffs, the guy may be good but he sure is slow, but then so am I and John. Must be a southern thing. Got some work done and took a couple of pic's will post tomorrow. It's late and I am tired, but got the new tie rod ends installed and ready for remouunt. Dropped the stock gas tank and pulled the sending unit. Installed new sending unit in the new 44 gallon tank (pic's coming) boy that thing is sure different than ther orginal and so much thicker. The sending unit had to have the wire arm to the float cut and an 135mm extension added. No biggie didn't even think to take a photo of the extension realised that I had no photo after install. Note to any one ordering the new Man a fre 44 gallon tank, the sending unit does not line up with the mounting holes in the tank the tank is drilled slightly different than the sending unit. Just had to enlarge the opening on three holes and all was good to go. Used a 5/16 drill bit and reamed a little then no problem all fit fine. Waiting on the diffs so that the body lift can be placed then will mount the tank. More to follow and pic's tomorrow.
 
If it's the tank they're selling now, it's a 40 gal (150 L), if it's the same one I just got... Different from the earlier version they were selling.

Is the one you have made by Longranger Automotive, in Oz ?
 
If it's the tank they're selling now, it's a 40 gal (150 L), if it's the same one I just got... Different from the earlier version they were selling.

Is the one you have made by Longranger Automotive, in Oz ?

No this tank is the new one made in the usa. According to Man a Fre.

New tank is on the right and the old one is on the left.

DSC_0046small.webp
DSC_0046small.webp
 
Last edited:
Still Going

In this shot you see how much greater depth there is between the new tank forground,and the old tank.

DSC_0048small.webp


Also good shot of the mounting bracket, looks like it will hold the tank alright.
DSC_0048small.webp
 
sending unit

You can see here the two holes in the sending unit that had to be enlarged to fit the new tank. No biggie just agrivating to have to modify a piece that should be standard.

DSC_0052small.webp


And I did get the new tie rod ends installed waiting for the front end to attatch.

DSC_0055small.webp


And we saw more rust in the firwall behind the fender but turned out just to be leaves. (Thank god I am tired of finding little rusty spots)

DSC_0056small.webp

That's about it going to work on the BT today but doubt if any thing photo worthy will occur just sanding and welding in rust spots. :beer::cheers:
DSC_0052small.webp
DSC_0055small.webp
DSC_0056small.webp
 
Hi Doc,

These larger gas tanks are made in Australia by Longranger Automotive. longrangerautomotive.com.au

I have the same tank waiting for install too.

Steve at MAF once said they were going to have some tanks fabbed here, but then ended up with these...

either way, they're well made... Just the hole issue bugs me. For $925, the damn thing should be perfect!

S.

I do so agree, at that price they should have gotten it right. But as I said no biggie to correct.
 
Doc, have you installed your tank yet ? As expected, instructions are minimal -- How'd you hook up your vent hoses, if you've installed already.

S.
 
Tank install

Waiting for John on some welding in relation to the roof and the undercariage. Will then coat the underside prior to install of the gas tank. Note that two of the lines are on the far side and will be router over the tank. Plan is to rough out the length and fittings and then lift the tank into close alignment with jacks hook up the hoses and then raise the tank the last 6 yo 8 inches and secure. Will post up pic's for sure. But now just waiting on my paint guru (John)to tell me it's time to assemble again.
 
OK, Doc, Thank you...

And of course, going through the hardware and brass fittings, I find MAF shorted me on a couple... May want to check yours before the tank is in mid-air...
 
Missing Fittings

When I was putting in the sensor checked the associated hardware and just felt that there was not enoughf to do the job. However I was pushed for time and did not dry fit the hoses and associated brass parts at that time. Will do so long before I get that heavy sob up on a jack. Should be able to source the parts missing form a local source but still again if they are missing that is a shame:bang: for the price of the unit. Keep on wheelin Doc:cheers:
 
stopped

Wow it's been over a month and havent heard if John has gotten the welding done and ready to reassemble. Will check this week where oh where has the time gone. :D
 
Nice work. The access door in the back door is great.
 
Nice work. The access door in the back door is great.

Kevin makes side pannels as well and at the rate he and I are progressing I may still get new sides in before it's running again. Any way check out wagon gear in the vendors section. But I warn you don't be in a hurry.
 
Long break

Sorry for the long break but there have been more problems in the life of myself and my friend(who's shop and expertise are required for this build) than carter has pills. Any Way

1. Spike the kit had all the fittings to hook up the tank and the plumbing looks like it will be a simple issue once the tank is raised into position. Got it all hooked up just waiting on a couple of issues to put in place. sorry but did not get any pic's of the plumbing install this trip I will do so on the tank install section.

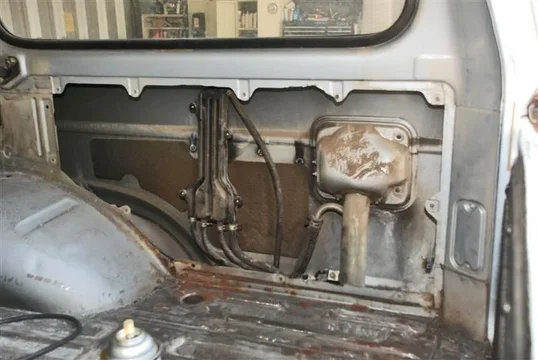
2. Kevin at Wagon Gear let me know that my Quarters are on the way so I went ahead and cut out the braces and went to get the new hoses to relocated the vent thingie. Pic's

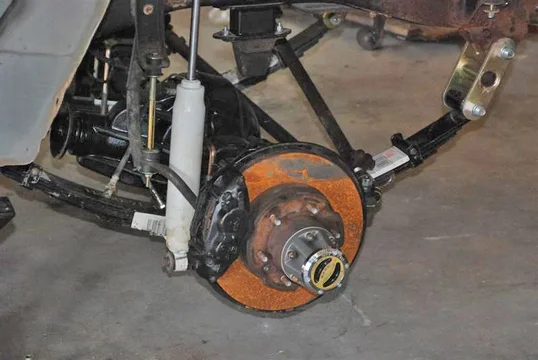
3. Big news is the lift kit install and the axles are back under the rig. Now if we can just find the lug nuts(don't know how they grew legs) we can at least roll her around the shop to finish the body lift and the painting.

So here are some new pic's of some progress at least! DSC_0051 (Medium)c.webp

DSC_0052 (Medium)c.webp
DSC_0051 (Medium)c.webp
DSC_0052 (Medium)c.webp
 
and going

Cutting out the braces was easy just a few seconds with a cut off wheel and air compresor and gone then smothed with a grinder. Piece of cake. The lift that I purchased was before I found mud and therefore not what I might have ordered now. But I had it so I installed it. SOR Heavy 3 inch kit. Photos's follow the axels have been compleatly redone with all new bearings and lockers rear and auburn limited slip in the front. DSC_0005 (Medium)c.webp

DSC_0007 (Medium)c.webp

DSC_0008 (Medium)c.webp
DSC_0005 (Medium)c.webp
DSC_0007 (Medium)c.webp
DSC_0008 (Medium)c.webp
 

Users who are viewing this thread

Back
Top Bottom