Love the center console. That is pretty sweet.
Navigation
Install the app
How to install the app on iOS
Follow along with the video below to see how to install our site as a web app on your home screen.
Note: This feature may not be available in some browsers.
More options
Style variation
You are using an out of date browser. It may not display this or other websites correctly.
You should upgrade or use an alternative browser.
You should upgrade or use an alternative browser.
Gary's Cruiser Build
- Thread starter Cruising Canuck
- Start date
This site may earn a commission from merchant affiliate
links, including eBay, Amazon, Skimlinks, and others.
More options
Who Replied?Great thread man, I'm loving the brown color scheme. Keep the posts coming.
- Thread starter
- #123
I'm working on finishing up the rear bumper. Just sanding it down to re paint.
The clamps that hold the swingouts in place didn't have a cap, so I added one.
Good waste of a morning


The clamps that hold the swingouts in place didn't have a cap, so I added one.
Good waste of a morning


- Thread starter
- #124
I got my fireplace working this weekend. Which allowed me a high enough temp to paint. So I got the bumper painter. Can't wait to install it this week


- Thread starter
- #125
I got my first big winter project completed. Rear bumper mods done and painted, wired and installed.

I used some grip tape on my ladder rungs, and some led lights for the license plate. My swingout post caps turned out great. I'm really happy with how this bumper turned out.

Then I took the truck for its first drive of the season.


I used some grip tape on my ladder rungs, and some led lights for the license plate. My swingout post caps turned out great. I'm really happy with how this bumper turned out.

Then I took the truck for its first drive of the season.

Looks sweet!
Now you need to get on that roof rack so your ladder doesnt look out of place!
Just what I need to build for my rig... any plans/drawings or threads you can point me at?
Now you need to get on that roof rack so your ladder doesnt look out of place!
Just what I need to build for my rig... any plans/drawings or threads you can point me at?
- Thread starter
- #127
Looks sweet!
Now you need to get on that roof rack so your ladder doesnt look out of place!
Just what I need to build for my rig... any plans/drawings or threads you can point me at?
Haha, yeah the ladder looks really stupid without a rack, I'll soon have the rack done.
No plans or drawings, I bought reevesci's prototype bumper for a good price and then modified it to my needs. The rear bumpers are too complex, and would require too much time for me to build from scratch.
I have a lot of admiration for anyone that can fabricate something like that from scratch.
- Thread starter
- #128
I've got my kitchen 90% done. I just need to put some protective coating on the wood and paint some things black.
It turned out wicked, but is a bit heavier than I thought it would be.


It turned out wicked, but is a bit heavier than I thought it would be.


- Thread starter
- #129
2 updates,
I got put my roof rack up, just to see how it looks. It turned out okay, I need to reinforce the one side for the awning, and add a wind deflector.
I also got time off work, so my plan is to head to the Yukon in September, I'm looking for recommendations for things to see along the way


I got put my roof rack up, just to see how it looks. It turned out okay, I need to reinforce the one side for the awning, and add a wind deflector.
I also got time off work, so my plan is to head to the Yukon in September, I'm looking for recommendations for things to see along the way


- Thread starter
- #130
I welded a wind deflector onto my roof rack, and reinforced the one side for an awning. It's pretty much done now. I just need to clean it up and paint it.

Put the final product on the scale, It should be very strong for its weight

Next up I am going to tackle the cargo area. It's a total mess

Put the final product on the scale, It should be very strong for its weight
Next up I am going to tackle the cargo area. It's a total mess
- Thread starter
- #131
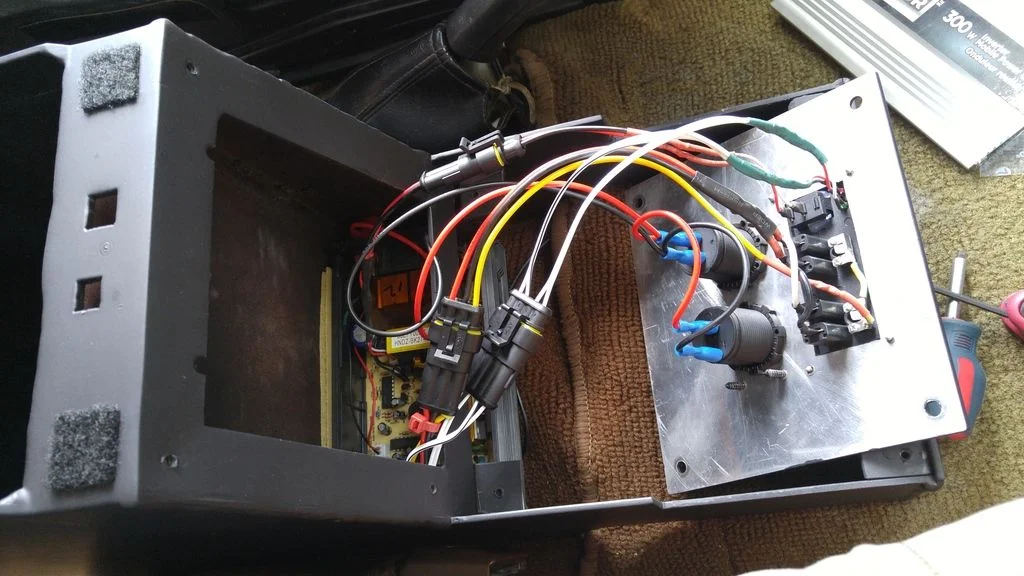
I'm going to do a quick update on how I wired my center console. I got some Deutsch connectors to finish it. But I feel like they are too big, so I am going to get another connector to finish it.
I used a small cheap inverter, 300W. I only plan on using it to charge batteries and blow up an air mattress or 2. This process will not work for huge inverters, you will need to run a dedicated wire and relay from the battery.


The power source for the console is the old cigarette lighter, I decided I do not want to use that one anymore so I cut the wire to it and ran it to my console instead.


On a side note, for adding clean wiring to the cruisers, I like to use the fuse box (Its a tight squeeze to remove it from the dash, just be patient and don't force it), instead of splicing and creating rats nests. You can pull out these tabs and unused connectors in the fuse box.

The finger is placed right on the tab you have to push to release. Use a tiny flathead and press from the front while pulling the wire out the back.
I piggy backed off an unused load to power my seats (the picture below shows the blade I soldered to, it's the red wire on the left). It gives the added protection of a fuse and allows you to be wired to the ignition so a draw doesn't drain your battery.

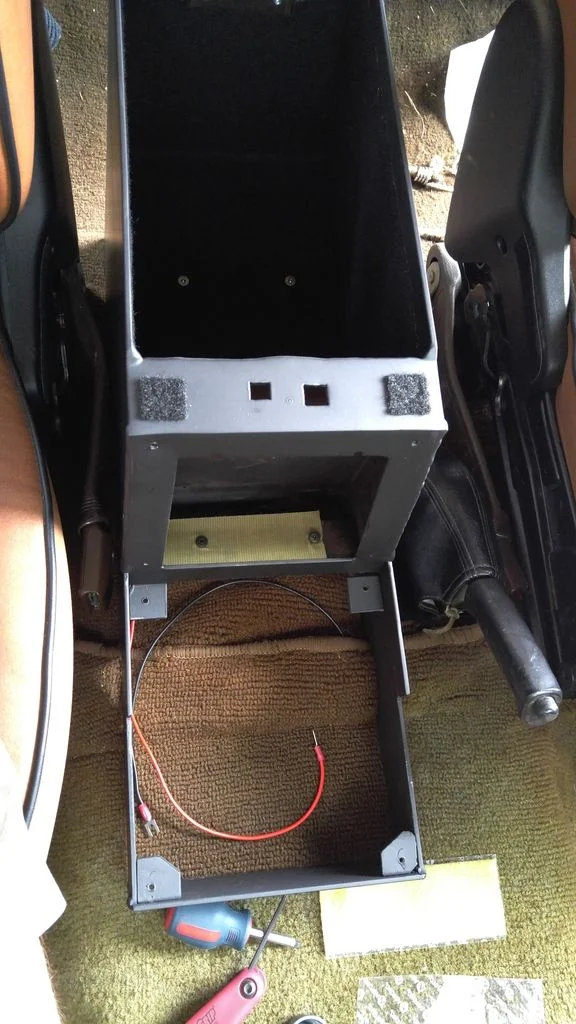
After I got my power source established, I ran the wire in the wire tunnel along the door sill and under the drivers seat, to the center console.
This is a general idea of how my inverter will sit in the console, I just need to wire in some plugs to connect its face back to the motherboard, and hook up the ground and power lead to the screws on the back.

I used a small cheap inverter, 300W. I only plan on using it to charge batteries and blow up an air mattress or 2. This process will not work for huge inverters, you will need to run a dedicated wire and relay from the battery.
The power source for the console is the old cigarette lighter, I decided I do not want to use that one anymore so I cut the wire to it and ran it to my console instead.
On a side note, for adding clean wiring to the cruisers, I like to use the fuse box (Its a tight squeeze to remove it from the dash, just be patient and don't force it), instead of splicing and creating rats nests. You can pull out these tabs and unused connectors in the fuse box.
The finger is placed right on the tab you have to push to release. Use a tiny flathead and press from the front while pulling the wire out the back.
I piggy backed off an unused load to power my seats (the picture below shows the blade I soldered to, it's the red wire on the left). It gives the added protection of a fuse and allows you to be wired to the ignition so a draw doesn't drain your battery.
After I got my power source established, I ran the wire in the wire tunnel along the door sill and under the drivers seat, to the center console.
This is a general idea of how my inverter will sit in the console, I just need to wire in some plugs to connect its face back to the motherboard, and hook up the ground and power lead to the screws on the back.
- Thread starter
- #132
My land cruiser has had an action packer sitting in the back for the last 25 years. It has done its job very well. But I decided I want more room in the back, so I bought a case to throw up on the roof rack. It's a Nanuk case, made in Canada.

Sits perfectly in the roof rack

It's got about the same volume as the action packer, it just sits nice and flat.
I need to update the tool kit, Thats next on the list. This is a general Idea of what was in there


I am going to buy a separate waterproof bag for my various fluids. I don't like the idea of storing them horizontally
Sits perfectly in the roof rack
It's got about the same volume as the action packer, it just sits nice and flat.
I need to update the tool kit, Thats next on the list. This is a general Idea of what was in there
I am going to buy a separate waterproof bag for my various fluids. I don't like the idea of storing them horizontally
TLC Norway
woodwelder
Nice case, low profile keeps things organized.
- Thread starter
- #134
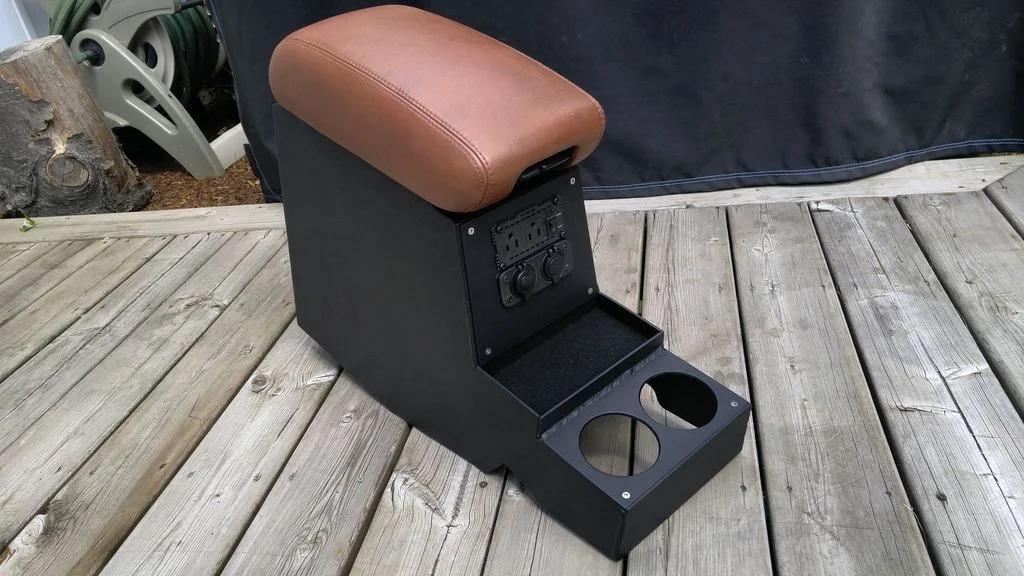
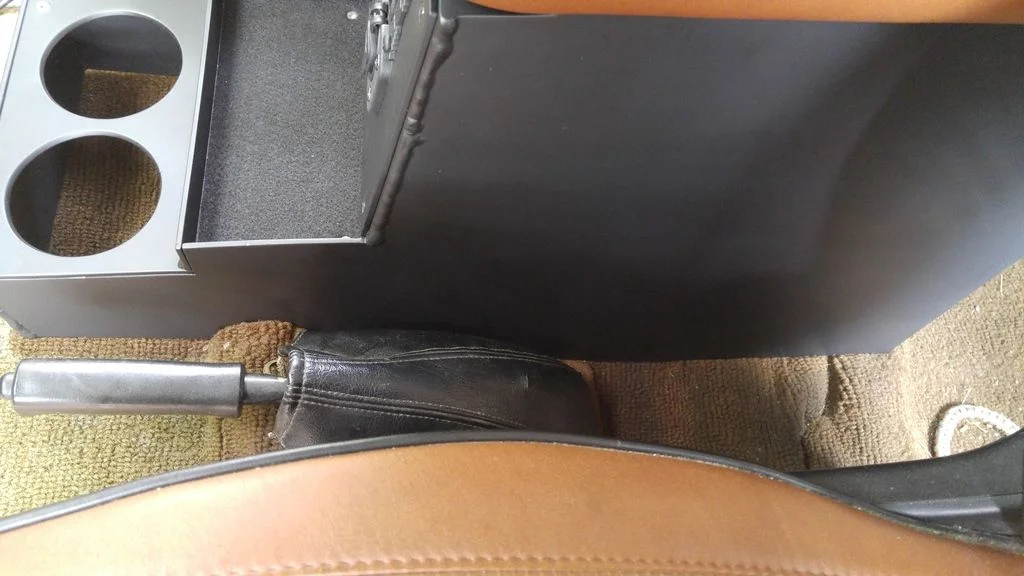
Finished the center console finally. I am really happy with how it turned out


The install uses all the original mounting locations. I used felt to line the inside and the front tray. These old diesels are vibe machines.
I tried to flush mount all the hardware
And for some reason a bunch of my photos won't link. I guess I will have to find another way to post them


The install uses all the original mounting locations. I used felt to line the inside and the front tray. These old diesels are vibe machines.
I tried to flush mount all the hardware
And for some reason a bunch of my photos won't link. I guess I will have to find another way to post them
Last edited:
- Thread starter
- #135
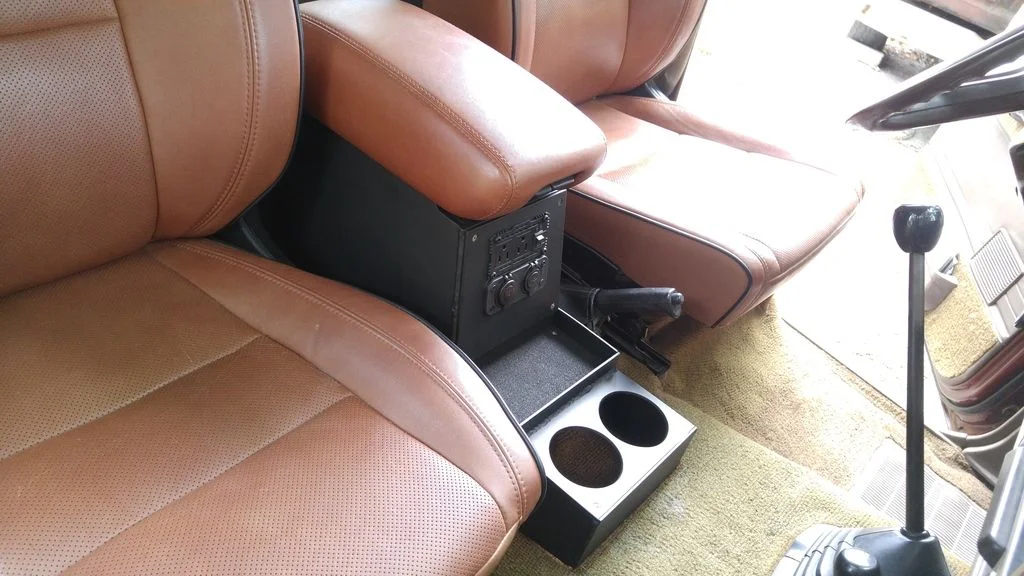
Okay, I figured out how to use the gallery on mud. So here are the pics of the console installed
I followed the floor contours with the console, so that it wasn't just a box sitting on the factory brackets
The wiring is a mess, I had a free night so I completed it with what I had laying around.


I followed the floor contours with the console, so that it wasn't just a box sitting on the factory brackets
The wiring is a mess, I had a free night so I completed it with what I had laying around.
- Joined
- Jul 22, 2012
- Threads
- 585
- Messages
- 16,471
- Location
- Winter Park, Florida
- Website
- www.cruisermatts.com
Why don't you just put the fluids in better containers?
CaptClose
SILVER Star
Awesome build man!
TLC Norway
woodwelder
GREAT!! Having the sockets from the converter like that is sweet!
Good build, mate!
Good build, mate!
- Thread starter
- #139
Why don't you just put the fluids in better containers?
I didn't think of that. I guess I like to use the original container, so I know what fluids are in each container.
- Thread starter
- #140
I've been working on the cargo area. Its a total mess

I bought some end of the roll carpet, I plan on getting a complete carpet kit at some point, but for now I just needed something in the back

I built some panels out of poly ethylene. Seemed like a good material, there is a place up the street that recycles it, so 4x8 sheets are farely cheap.


As I was building the panels I found a big problem with poly ethylene, it expands with heat alot. This tailgate piece was flush, then it went all wavey. I guess the next step is to just make some aluminum panels.

Similar threads
Users who are viewing this thread
Total: 1 (members: 0, guests: 1)