
Navigation
Install the app
How to install the app on iOS
Follow along with the video below to see how to install our site as a web app on your home screen.
Note: This feature may not be available in some browsers.
More options
Style variation
You are using an out of date browser. It may not display this or other websites correctly.
You should upgrade or use an alternative browser.
You should upgrade or use an alternative browser.
Build Evolution of a Land Cruiser: My 80's build thread
- Thread starter jcardona1
- Start date
Member Builds and Stories
This site may earn a commission from merchant affiliate
links, including eBay, Amazon, Skimlinks, and others.
I'm amazed by all your pics of wheeling and yours is the ONLY truck WITHOUT a boatload of body damage and the fact that it doesn't have an exo on it. That says a LOT for the operator!
Amen. He doesn't even have a transfer case skid which makes no sense to meI'm amazed by all your pics of wheeling and yours is the ONLY truck WITHOUT a boatload of body damage and the fact that it doesn't have an exo on it. That says a LOT for the operator!
- Thread starter
- #2,404
Amen. He doesn't even have a transfer case skid which makes no sense to me
I'm waiting for the creepersleeper version to be sold again! Tried to buy one from BIOR, but he doesn't make the integrated cross member/skid combo anymore. I should take a picture of my paper thin OEM skid, it's in pretty rough shape. I suppose I could make one, but I'm lazy.
I just would hate to crack that aluminum caseI'm waiting for the creepersleeper version to be sold again! Tried to buy one from BIOR, but he doesn't make the integrated cross member/skid combo anymore. I should take a picture of my paper thin OEM skid, it's in pretty rough shape. I suppose I could make one, but I'm lazy.
Creeper's skid is pretty nice. I have a 1.5 gen of his (he was going through some s*** and his dad had the jig and made mine for me). I've managed to bend it, but still very functional and protective. I know the jig has moved on but maybe knolly or threeeyed can figure something out.I'm waiting for the creepersleeper version to be sold again! Tried to buy one from BIOR, but he doesn't make the integrated cross member/skid combo anymore. I should take a picture of my paper thin OEM skid, it's in pretty rough shape. I suppose I could make one, but I'm lazy.
- Thread starter
- #2,407
Amen. He doesn't even have a transfer case skid which makes no sense to me
See! Still got a few miles left in hey. Made a noble effort so far.
- Joined
- Sep 11, 2006
- Threads
- 117
- Messages
- 899
- Location
- Central Coast California(Orcutt)
- Website
- www.facebook.com
I love my cruisin off road skid. Frame rail to frame rail belly skid!
- Thread starter
- #2,409
DEER VALLEY
This past weekend the wife and I made a solo run down to Deer Valley because my wheeling buddy @AMMO doesn't like Land Cruisers anymore. Local guys probably know the trail well. You'll also remember this one of the 40-something trails that were closed over 5yrs ago due to environmental concerns. Thanks to the hard work local clubs and organizations in cooperation with Forest Service, this trail is finally open for use. Previously the north side of the trail had been closed off due to litigation.
I've always wanted to run this trail as I heard it's one of the good ones in the area. We ran the trail north to south, from highway 88 to highway 4. Then took the scenic drive over Ebbett's Pass. Never driven this stretch of highway 4 before and gotta say it was absolutely breathtaking. Highly recommended for a lazy Sunday drive especially with the fall colors.
The trail itself was actually difficult. I underestimated just how tough this little trail was. And we supposedly ran it going the easy way. The first 4~5 miles are pretty mellow, a few rock gardens here and there. But the last mile (or the first depending on which direction you run it) are no joke if you avoid all the bypasses. I didn't bypass any obstacles and almost had to bust out the winch when I got myself wedged in between a few boulders. Running this section of the trail uphill (south to north) would be quite the challenge. I'd rate this trail on par if not tougher than Barrett Lake.
All in all, glad to have yet another trail in the area and look forward to running this one again. Deer Valley from the north side straight into Slick Rock on the other side of the highway would make for an awesome day of wheeling.
Couple videos. This first one is towards the beginning of the trail. Cool little frame twister half pipe thing. Tire fully stuffed on one side, hanging in the air on the other. Had to engage lockers to keep moving when I lost traction.
And towards the end you can see why I really need that damn diff protection (and 40s") )
)


This past weekend the wife and I made a solo run down to Deer Valley because my wheeling buddy @AMMO doesn't like Land Cruisers anymore. Local guys probably know the trail well. You'll also remember this one of the 40-something trails that were closed over 5yrs ago due to environmental concerns. Thanks to the hard work local clubs and organizations in cooperation with Forest Service, this trail is finally open for use. Previously the north side of the trail had been closed off due to litigation.
I've always wanted to run this trail as I heard it's one of the good ones in the area. We ran the trail north to south, from highway 88 to highway 4. Then took the scenic drive over Ebbett's Pass. Never driven this stretch of highway 4 before and gotta say it was absolutely breathtaking. Highly recommended for a lazy Sunday drive especially with the fall colors.
The trail itself was actually difficult. I underestimated just how tough this little trail was. And we supposedly ran it going the easy way. The first 4~5 miles are pretty mellow, a few rock gardens here and there. But the last mile (or the first depending on which direction you run it) are no joke if you avoid all the bypasses. I didn't bypass any obstacles and almost had to bust out the winch when I got myself wedged in between a few boulders. Running this section of the trail uphill (south to north) would be quite the challenge. I'd rate this trail on par if not tougher than Barrett Lake.
All in all, glad to have yet another trail in the area and look forward to running this one again. Deer Valley from the north side straight into Slick Rock on the other side of the highway would make for an awesome day of wheeling.
Couple videos. This first one is towards the beginning of the trail. Cool little frame twister half pipe thing. Tire fully stuffed on one side, hanging in the air on the other. Had to engage lockers to keep moving when I lost traction.
And towards the end you can see why I really need that damn diff protection (and 40s
)
- Thread starter
- #2,410


- Thread starter
- #2,411
PANHARD RELOCATION
So, back when I did my Ruffstuff swaybar I had to redo the panhard. At the time I went with a heim joint in the factory axle mount. Fine, but the factory panhard mount has a captive nut inside the bracket and there is no way to access it. This meant I had to use the factory metric bolt (17mm I think?). This meant you won't find any heims & misalingment spacers that will fit the metric bolt. I tried drilling out a few spacers and this worked for a bit, but they would quickly get destroyed and the heim would flop around the factory bolt. Not good.
Not sure where to go from here so I just cut the whole thing off. I used an aftermarket panhard bracket and modified it to fit. The nice thing is I was able to raise the panhard at the axle as well, hopefully improving the suspension geometry. These all continue to be bandaid fixes until the day I redo the rear suspension.
After cutting out the stock bracket and smoothing out the base.

Building a new base to accommodate the new bracket.

New bracket in place.


Painted it silver because apparently I never have black spray paint despite having 30+ cans at any given time. A lot flatter than before which should be a good thing

So, back when I did my Ruffstuff swaybar I had to redo the panhard. At the time I went with a heim joint in the factory axle mount. Fine, but the factory panhard mount has a captive nut inside the bracket and there is no way to access it. This meant I had to use the factory metric bolt (17mm I think?). This meant you won't find any heims & misalingment spacers that will fit the metric bolt. I tried drilling out a few spacers and this worked for a bit, but they would quickly get destroyed and the heim would flop around the factory bolt. Not good.
Not sure where to go from here so I just cut the whole thing off. I used an aftermarket panhard bracket and modified it to fit. The nice thing is I was able to raise the panhard at the axle as well, hopefully improving the suspension geometry. These all continue to be bandaid fixes until the day I redo the rear suspension.
After cutting out the stock bracket and smoothing out the base.
Building a new base to accommodate the new bracket.
New bracket in place.
Painted it silver because apparently I never have black spray paint despite having 30+ cans at any given time. A lot flatter than before which should be a good thing
DEER VALLEY
This past weekend the wife and I made a solo run down to Deer Valley because my wheeling buddy @AMMO doesn't like Land Cruisers anymore. Local guys probably know the trail well. You'll also remember this one of the 40-something trails that were closed over 5yrs ago due to environmental concerns. Thanks to the hard work local clubs and organizations in cooperation with Forest Service, this trail is finally open for use. Previously the north side of the trail had been closed off due to litigation.
I've always wanted to run this trail as I heard it's one of the good ones in the area. We ran the trail north to south, from highway 88 to highway 4. Then took the scenic drive over Ebbett's Pass. Never driven this stretch of highway 4 before and gotta say it was absolutely breathtaking. Highly recommended for a lazy Sunday drive especially with the fall colors.
The trail itself was actually difficult. I underestimated just how tough this little trail was. And we supposedly ran it going the easy way. The first 4~5 miles are pretty mellow, a few rock gardens here and there. But the last mile (or the first depending on which direction you run it) are no joke if you avoid all the bypasses. I didn't bypass any obstacles and almost had to bust out the winch when I got myself wedged in between a few boulders. Running this section of the trail uphill (south to north) would be quite the challenge. I'd rate this trail on par if not tougher than Barrett Lake.
All in all, glad to have yet another trail in the area and look forward to running this one again. Deer Valley from the north side straight into Slick Rock on the other side of the highway would make for an awesome day of wheeling.
Couple videos. This first one is towards the beginning of the trail. Cool little frame twister half pipe thing. Tire fully stuffed on one side, hanging in the air on the other. Had to engage lockers to keep moving when I lost traction.
And towards the end you can see why I really need that damn diff protection (and 40s
@jcardona1, yeah you passed me and my buddy camping out at the second creek crossing from 88-4.
Always wanted to say wassup and tried to wave you down but you were going pretty fast (couldn’t miss your 80 from a mile away as you gave me a lot of inspiration on my build) but maybe you though I was a psycho. Lol
Deer valley is a fantastic run! We went from 4 to upper blue lake and around the pass ontop if mountain then to the 88.
It was pretty crazy out there with the amount of 80’s we saw including yours on the trail (6 in total including ours). It’s good to see more 80’s on the trail!
- Thread starter
- #2,413
@jcardona1, yeah you passed me and my buddy camping out at the second creek crossing from 88-4.
Always wanted to say wassup and tried to wave you down but you were going pretty fast (couldn’t miss your 80 from a mile away as you gave me a lot of inspiration on my build) but maybe you though I was a psycho. Lol
Deer valley is a fantastic run! We went from 4 to upper blue lake and around the pass ontop if mountain then to the 88.
It was pretty crazy out there with the amount of 80’s we saw including yours on the trail (6 in total including ours). It’s good to see more 80’s on the trail!
View attachment 1551689
Ah man, bummer! I only saw what looked like a white Bronco camped next to the creek. I did see another white 80 with rock rings parked after the gatekeeper on the 4 side, guessing that wasn't you guys? Surprised I missed you guys, I must have been on autopilot. Next time just run out screaming
- Thread starter
- #2,414
Slowly starting to collect parts and get ready for the redo of the rear suspension. My plan is to copy what Nukegoat did, but tweak as needed to make the geometry work for my setup. This will entail triangulated lower links on a crossmember and a wishbone upper on a large uniball joint. I will also ditch the coils/shocks and run coilovers that will most likely end up poking thru the floorboards. I purchased a DC rear shaft a few months ago so I will use this opportunity to set the pinion correctly and also get a bit more ground clearance under the diff.
To start, I ran the numbers on my current setup. As expected, it's really bad due to the very short, steep factory links on our [lifted] trucks. 15º of oversteer (Roll Axis Angle in screenshot below). You want to be slightly negative (understeer) to make it more predictable and easier to manage on the road. Nukegoat ended up with about -1º after redoing his setup which just about right. Oversteer causes the truck to wander all over the road. As the body leans, the links 'twist' the axle causing it to steer in different directions. This is the sloppy feeling you typically encounter with lifted trucks.
*NOTE* Keep in mind my Roll Center Height is different than most because I raised my panhard at the axle and lowered it at the frame (see earlier posts).
I don't think many of us realize just how bad the geometry gets on an 80 once you add a lift probably because the stiff front end helps tame some of it.
- Thread starter
- #2,415
Been working on a few small projects and haven't updated this thread so here goes:
NAVIGATION
Decided to join the 21st century and put a real navigation system even though I really don't need it and might not use it. Still cool to have I guess. I had an old Nexus 7 tablet just laying around so why not?
Started with the Panavise 75136-597 mount that goes behind the dash under the radio.
I then attached a Ram Mounts base (RAM-B-101U).
And lastly, to hold the Nexus 7 I used a Ram Mounts RAM-HOL-TAB18U.
Offline navigation is Gaia GPS which is a really slick program. Love the multiple layers. I spent several days loading and mapping out all of my local trails and way points. Ton of work but now it's fully synced to my account. However Gaia runs like dogsh1t on this old tablet, super laggy. It runs silky smooth on my Samsung Galaxy S8 so maybe I just need to upgrade to a new tablet with more horsepower.
Here is a picture of the setup. The trail you see on the screen is Hell Hole with Rubicon in the background:

All my local trails (the big body of water is Lake Tahoe)

NAVIGATION
Decided to join the 21st century and put a real navigation system even though I really don't need it and might not use it. Still cool to have I guess. I had an old Nexus 7 tablet just laying around so why not?
Started with the Panavise 75136-597 mount that goes behind the dash under the radio.
I then attached a Ram Mounts base (RAM-B-101U).
And lastly, to hold the Nexus 7 I used a Ram Mounts RAM-HOL-TAB18U.
Offline navigation is Gaia GPS which is a really slick program. Love the multiple layers. I spent several days loading and mapping out all of my local trails and way points. Ton of work but now it's fully synced to my account. However Gaia runs like dogsh1t on this old tablet, super laggy. It runs silky smooth on my Samsung Galaxy S8 so maybe I just need to upgrade to a new tablet with more horsepower.
Here is a picture of the setup. The trail you see on the screen is Hell Hole with Rubicon in the background:
All my local trails (the big body of water is Lake Tahoe)
- Thread starter
- #2,416
REAR QUARTER PANEL ARMOR
This is not going to be everybody's cup of tea so purists might wanna turn back now.
For the past few years I've been wanting some rear quarter panel armor similar to what you see on the various Jeep platforms. Anybody who wheels their 80 will probably have a few scars and dents on her big ass by now, maybe even a few broken taillights. Mine is not as bad as the dents Nukegoat and 2fpower have earned but it's starting to get a few dents that will get worse over time. Yeah she's a wheeler, but I still want to keep the truck in decent shape for as long as possible.
Earliest version I've seen of this was Action Jackson's rig with the squared off diamond plate. Not the best looking but it got the job done. The challenge with the 80 is that curvy behind she has. Because of all the bends and contours I knew I would have to leave it to the professionals. I'm sure any DIY version would have looked pretty bad.
I reached out to a few local places until I found a guy willing to take on the job (MetalCraft Innovations in the Sacramento area). After a few months of trying to make schedules work I was finally able to get the truck in his shop. After letting him know what i wanted and doing some cardboard mock ups he drew it up in his fancy software program:
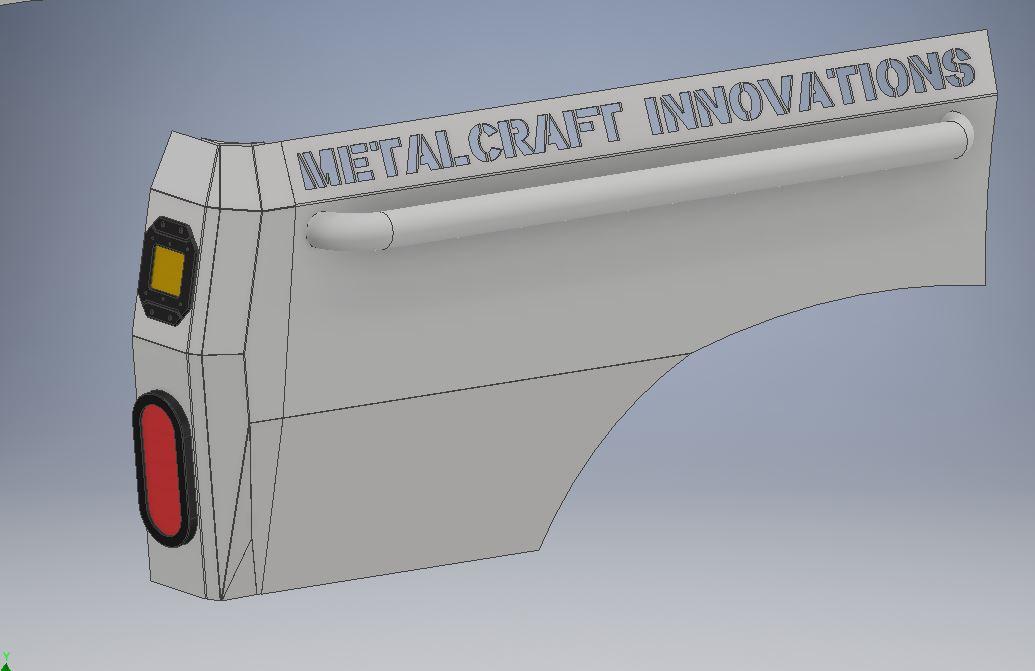
The panel would end up being 10ga plate, a little over 1/8" similar to the Jeep armor. I think it will be plenty strong. After all, this is isn't built to protect the truck from a high speed collision. It's to keep the paper thin factory sheet metal from denting by merely rubbing up against a rock or a tree. The rub rail give it just a bit more room as well to hopefully avoid breaking the sliding rear windows.
I knew I wanted the factory taillights gone for sure as one was already cracked. In it's place went oval LED trailer lights (from RuffStuff) and a flush mount 2x2 China LED pod. The yellow pod is used for the turn signals. I will be mounting another set of flush-mount LEDs in the tailgate to serve as backup lights, similar to what Apounder did.
Before I get on to the pics, just want to give props to Mitchell at MetalCraft Innovations. He was great to work with and highly recommend him. He normally builds Jeep parts but if you take a look at his website you can see his fabwork is top notch. It is still TBD if he will be able to make these a production piece as there is a considerable amount of massaging needed to make the bends just right. Also, mine is more of a one-off as my fenders have had several inches trimmed away.
Despite that though, he said he could make some more sets, maybe even offer a DIY version. But don't expect these to be $199 like the XJ quarter panel armor from the JC Whitney catalog. It's just one guy in a small shop making stuff by hand. I'd suggest reaching out to Mitchell if you're interested and see what he can do (website link with contact info above).
Enough rambling, on to the pics. Over the next few weeks I will be unbolting these for the first time for paint. Thinking of going with a rattle can finish, similar gray color as my front bumper. I'll post updated pics here whenever that happens.
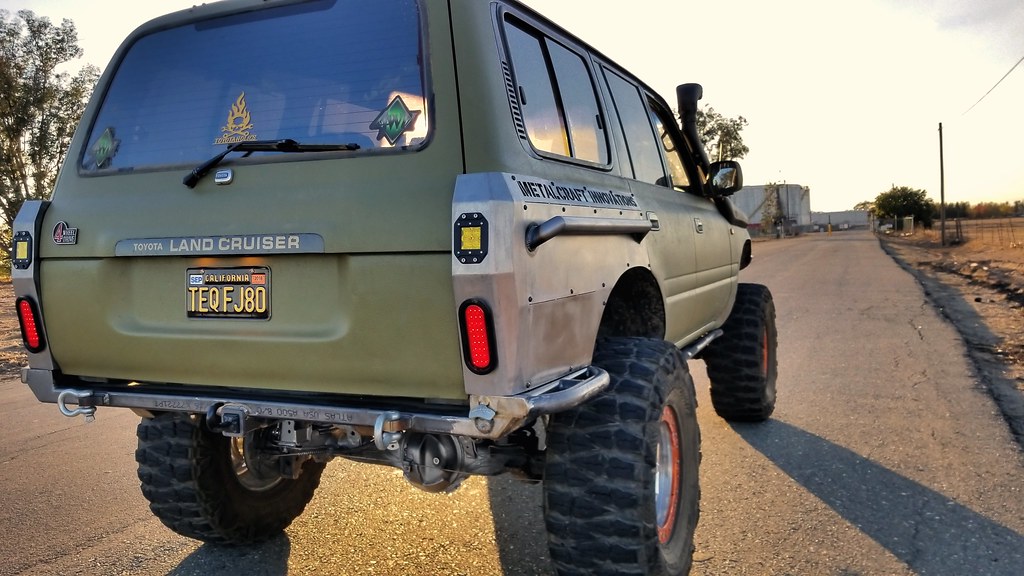
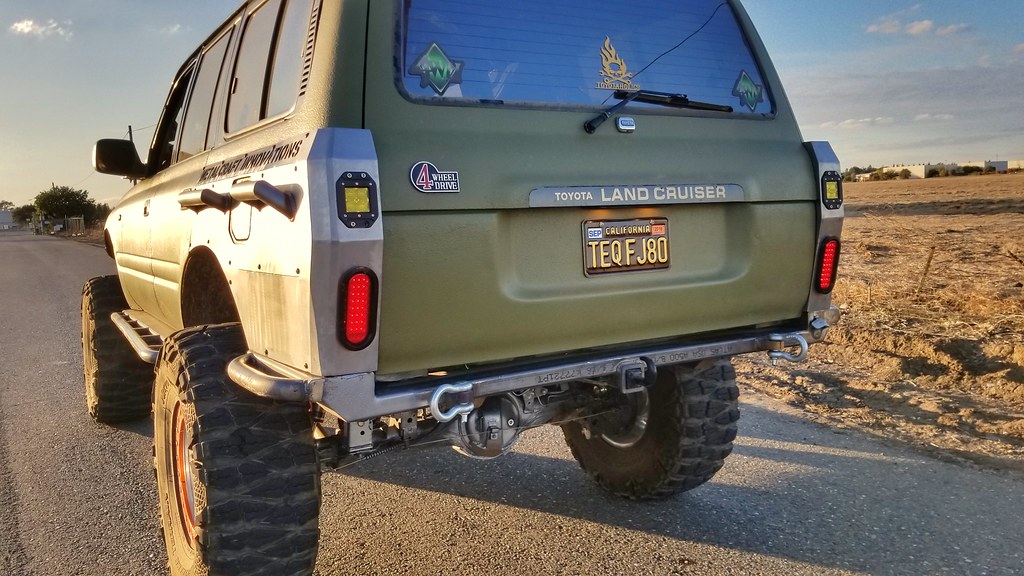
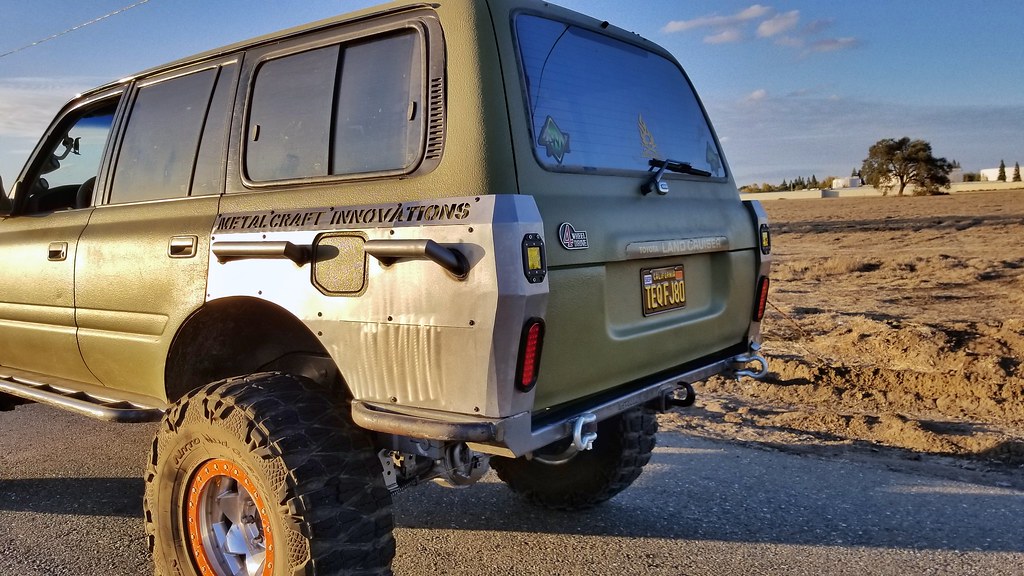

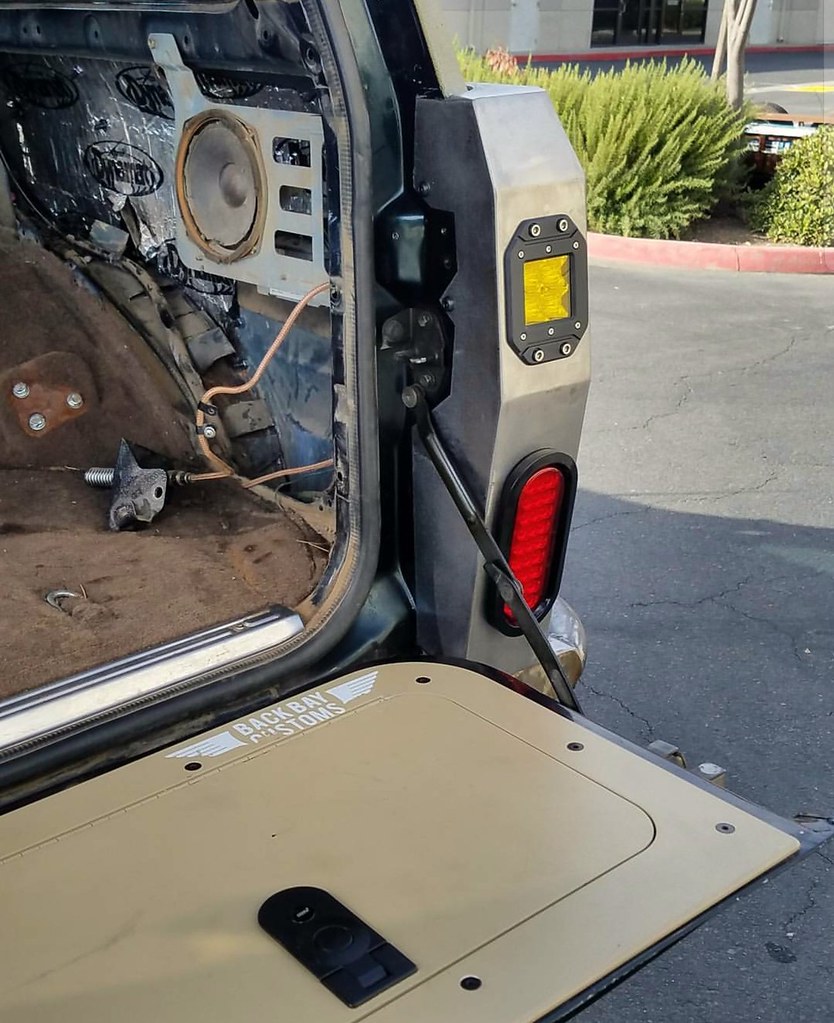
Added some LED reverse lights in the tailgate and a pair of LED side marker lights. Here is the final painted result:


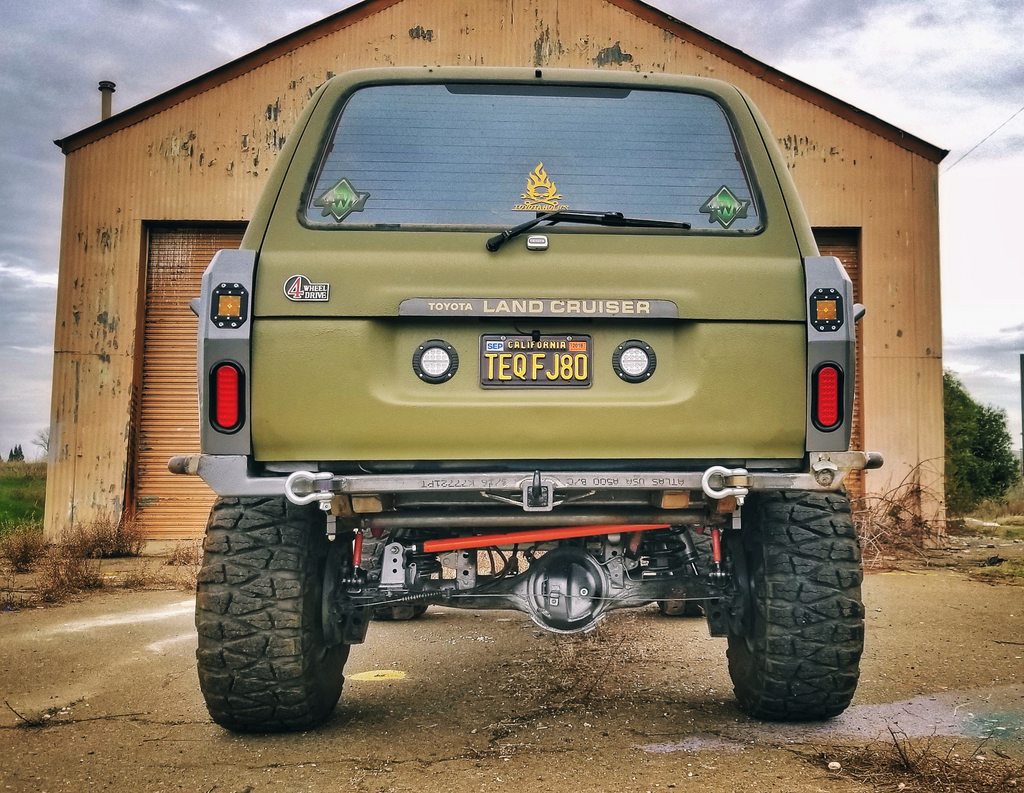

This is not going to be everybody's cup of tea so purists might wanna turn back now.
For the past few years I've been wanting some rear quarter panel armor similar to what you see on the various Jeep platforms. Anybody who wheels their 80 will probably have a few scars and dents on her big ass by now, maybe even a few broken taillights. Mine is not as bad as the dents Nukegoat and 2fpower have earned but it's starting to get a few dents that will get worse over time. Yeah she's a wheeler, but I still want to keep the truck in decent shape for as long as possible.
Earliest version I've seen of this was Action Jackson's rig with the squared off diamond plate. Not the best looking but it got the job done. The challenge with the 80 is that curvy behind she has. Because of all the bends and contours I knew I would have to leave it to the professionals. I'm sure any DIY version would have looked pretty bad.
I reached out to a few local places until I found a guy willing to take on the job (MetalCraft Innovations in the Sacramento area). After a few months of trying to make schedules work I was finally able to get the truck in his shop. After letting him know what i wanted and doing some cardboard mock ups he drew it up in his fancy software program:
The panel would end up being 10ga plate, a little over 1/8" similar to the Jeep armor. I think it will be plenty strong. After all, this is isn't built to protect the truck from a high speed collision. It's to keep the paper thin factory sheet metal from denting by merely rubbing up against a rock or a tree. The rub rail give it just a bit more room as well to hopefully avoid breaking the sliding rear windows.
I knew I wanted the factory taillights gone for sure as one was already cracked. In it's place went oval LED trailer lights (from RuffStuff) and a flush mount 2x2 China LED pod. The yellow pod is used for the turn signals. I will be mounting another set of flush-mount LEDs in the tailgate to serve as backup lights, similar to what Apounder did.
Before I get on to the pics, just want to give props to Mitchell at MetalCraft Innovations. He was great to work with and highly recommend him. He normally builds Jeep parts but if you take a look at his website you can see his fabwork is top notch. It is still TBD if he will be able to make these a production piece as there is a considerable amount of massaging needed to make the bends just right. Also, mine is more of a one-off as my fenders have had several inches trimmed away.
Despite that though, he said he could make some more sets, maybe even offer a DIY version. But don't expect these to be $199 like the XJ quarter panel armor from the JC Whitney catalog. It's just one guy in a small shop making stuff by hand. I'd suggest reaching out to Mitchell if you're interested and see what he can do (website link with contact info above).
Enough rambling, on to the pics. Over the next few weeks I will be unbolting these for the first time for paint. Thinking of going with a rattle can finish, similar gray color as my front bumper. I'll post updated pics here whenever that happens.
Added some LED reverse lights in the tailgate and a pair of LED side marker lights. Here is the final painted result:
I have tested both Samsung and Apple and apple runs much faster than the Samsung. The only Advantage I saw with the Samsung is it didn't limit the size of the files you downloaded for the apple doesBeen working on a few small projects and haven't updated this thread so here goes:
NAVIGATION
Decided to join the 21st century and put a real navigation system even though I really don't need it and might not use it. Still cool to have I guess. I had an old Nexus 7 tablet just laying around so why not?
Started with the Panavise 75136-597 mount that goes behind the dash under the radio.
I then attached a Ram Mounts base (RAM-B-101U).
And lastly, to hold the Nexus 7 I used a Ram Mounts RAM-HOL-TAB18U.
Offline navigation is Gaia GPS which is a really slick program. Love the multiple layers. I spent several days loading and mapping out all of my local trails and way points. Ton of work but now it's fully synced to my account. However Gaia runs like dogsh1t on this old tablet, super laggy. It runs silky smooth on my Samsung Galaxy S8 so maybe I just need to upgrade to a new tablet with more horsepower.
Here is a picture of the setup. The trail you see on the screen is Hell Hole with Rubicon in the background:
All my local trails (the big body of water is Lake Tahoe)
- Thread starter
- #2,418
12V DOMETIC FRIDGE
During the holidays I received a nice chunk of Amazon gift cards from work. Instead of doing the selfless thing and giving them out as gifts I decided to treat myself and bought a few things which I probably never would have otherwise. One of those was a 12v electric fridge.
I always viewed this as a nice-to-have vs a necessity because these days we rarely find the time to go camping let alone go for more than a night or two. But still, dealing with ice chests and soggy food is not fun. Doesn't matter how good your cooler is - ice will melt regardless.
So I splurged and bought a fridge. Ended up with a Dometic CFX-65W. Long term durability of these little refrigerators always makes me nervous but Dometic has a pretty good reputation in the outdoor world.
Here it is sitting in the sliding tray for my old Pelican 65qt cooler.

The Dometic, while having the same capacity as my old Pelican cooler has a much smaller footprint as the Dometic is quite taller. So I made a new sliding tray. The Dometic has 4 captive nuts underneath which helps keep it more secure. That means the tiedown straps on the handles don't have to be super tight and you can avoid causing damage to the handles.
The new sliding tray:

I also relocated the entire thing to the passenger side to help with weight distribution (gas tank and my fat ass on the driver's side). I put it as close as I could to the 4x4Labs water can basket.

And the new sliding setup. The existing drawer slides I have are longer than the Dometic. That means they will really extend and get the fridge completely outside of the rear cabin which is nice.
For power, I currently have it plugged into the line from when I had the Puma compressor a few years back. Still need to test it out and see what it does to may battery after running for a day or two. But I make pick up a set of 100w solar panels on Amazon as cheap insurance for the longer trips.

During the holidays I received a nice chunk of Amazon gift cards from work. Instead of doing the selfless thing and giving them out as gifts I decided to treat myself and bought a few things which I probably never would have otherwise. One of those was a 12v electric fridge.
I always viewed this as a nice-to-have vs a necessity because these days we rarely find the time to go camping let alone go for more than a night or two. But still, dealing with ice chests and soggy food is not fun. Doesn't matter how good your cooler is - ice will melt regardless.
So I splurged and bought a fridge. Ended up with a Dometic CFX-65W. Long term durability of these little refrigerators always makes me nervous but Dometic has a pretty good reputation in the outdoor world.
Here it is sitting in the sliding tray for my old Pelican 65qt cooler.
The Dometic, while having the same capacity as my old Pelican cooler has a much smaller footprint as the Dometic is quite taller. So I made a new sliding tray. The Dometic has 4 captive nuts underneath which helps keep it more secure. That means the tiedown straps on the handles don't have to be super tight and you can avoid causing damage to the handles.
The new sliding tray:
I also relocated the entire thing to the passenger side to help with weight distribution (gas tank and my fat ass on the driver's side). I put it as close as I could to the 4x4Labs water can basket.
And the new sliding setup. The existing drawer slides I have are longer than the Dometic. That means they will really extend and get the fridge completely outside of the rear cabin which is nice.
For power, I currently have it plugged into the line from when I had the Puma compressor a few years back. Still need to test it out and see what it does to may battery after running for a day or two. But I make pick up a set of 100w solar panels on Amazon as cheap insurance for the longer trips.
Last edited:
12V DOMETIC FRIDGE
During the holidays I received a nice chunk of Amazon gift cards from work. Instead of doing the selfless thing and giving them out as gifts I decided to treat myself and bought a few things which I probably never would have otherwise. One of those was a 12v electric fridge.
I always viewed this as a nice-to-have vs a necessity because these days we rarely find the time to go camping let alone go for more than a night or two. But still, dealing with ice chests and soggy food is not fun. Doesn't matter how good your cooler is - ice will melt regardless.
So I splurged and bought a fridge. Ended up with a Dometic CFX-65W. Long term durability of these little refrigerators always makes me nervous but Dometic has a pretty good reputation in the outdoor world.
Here it is sitting in the sliding tray for my old Pelican 65qt cooler.
The Dometic, while having the same capacity as my old Pelican cooler has a much smaller footprint as the Dometic is quite taller. So I made a new sliding tray. The Dometic has 4 captive nuts underneath which helps keep it more secure. That means the tiedown straps on the handles don't have to be super tight and you can avoid causing damage to the handles.
The new sliding tray:
I also relocated the entire thing to the passenger side to help with weight distribution (gas tank and my fat ass on the driver's side). I put it as close as I could to the 4x4Labs water can basket.
And the new sliding setup. The existing drawer slides I have are longer than the Dometic. That means they will really extend and get the fridge completely outside of the rear cabin which is nice.
For power, I currently have it plugged into the line from when I had the Puma compressor a few years back. Still need to test it out and see what it does to may battery after running for a day or two. But I make pick up a set of 100w solar panels on Amazon as cheap insurance for the longer trips.
I steal that same little shovel from my kids every time I go on a trip.
Saw a picture of your rig in Toyota 4wd magazine... well a early pic, before your linked front end; however, you made it into readers rigs.
Congrats.
Congrats.