I came here looking for rocker carnage pics. 
Navigation
Install the app
How to install the app on iOS
Follow along with the video below to see how to install our site as a web app on your home screen.
Note: This feature may not be available in some browsers.
More options
Style variation
You are using an out of date browser. It may not display this or other websites correctly.
You should upgrade or use an alternative browser.
You should upgrade or use an alternative browser.
DJWUZJ Build out thread
- Thread starter DJWUZJ
- Start date
This site may earn a commission from merchant affiliate
links, including eBay, Amazon, Skimlinks, and others.
More options
Who Replied?- Thread starter
- #22
Found some scars on the bumper too when I washed the mud off... Good excuse for a new bumper also 8).


Yeah, bumper is obviously totaled. Rocker is not too regrettable at least. Build on!
Looks like you bent the hell out of your trailer hitch. It is bent up and covered in mud . . . impressive hit!
- Thread starter
- #26
Looks like you bent the hell out of your trailer hitch. It is bent up and covered in mud . . . impressive hit!
Thanks! Love using the hitch as a skid until the rear is upgraded. Saved my bumper a few times.
Based on this bend, Reese tow powers should not be used as a jacking point. Entire rear was suspended on this at a muddy hole. Front wheels busted her loose and got her through!
Last edited:
- Thread starter
- #27
I took advantage of the Cyber Monday $500 Metal Tech Cyber Monday sale... It's the only way us folks on the a East Coast can eat shipping ($300).
Package arrived a day early and they looked sweet!

As luck would have it, we had some nice 75* weather that came through and I went to work bolting them up. I followed others' advice with strapping them to a 2x4 and jockeying into place. Passenger side took half as long as the drivers side once I got the hang of it.
The next day I noticed some rubbing... After unbolting, adjusting, and bolting them back up 3 times, I still couldn't get the middle bracket to get enough clearance. In frustration, I took a hammer and a piece of bar stock to 'nudge' the floor up. No more rattles!

I really dig the design... Good mix between step and tube sliders. The down side is that now in just going to want more lift... Will post more photos and comparisons in days ahead.

Next step will be to make some new mud flaps, and maybe add a bit of grip tape on the inside of the tube portion.


Package arrived a day early and they looked sweet!

As luck would have it, we had some nice 75* weather that came through and I went to work bolting them up. I followed others' advice with strapping them to a 2x4 and jockeying into place. Passenger side took half as long as the drivers side once I got the hang of it.
The next day I noticed some rubbing... After unbolting, adjusting, and bolting them back up 3 times, I still couldn't get the middle bracket to get enough clearance. In frustration, I took a hammer and a piece of bar stock to 'nudge' the floor up. No more rattles!

I really dig the design... Good mix between step and tube sliders. The down side is that now in just going to want more lift... Will post more photos and comparisons in days ahead.

Next step will be to make some new mud flaps, and maybe add a bit of grip tape on the inside of the tube portion.
- Thread starter
- #28
Tonight I installed a set of PFran LED's. They are such a wicked improvement it's crazy.
I won't go into the details that others have shared, but rather some insights:
- Nirtle gloves do not provide protection against blowing fuses. I'd suggest removing before install (located in passenger kick panel)
- don't button up the covers until you check that they work. I had two map lights reversed polarity, and all 4 doors needed attention.
- for the doors, the plugs had some wiggle in then. I played with the prongs to get a better connection.
- for the map light, I went with red on the passenger, and white on drivers. This way the can paint her nails without distracting my night driving.

Added Bonus: by combining the white map light, and spare map light, I was able to throw these in my license plate lights. They Fit, and no smoke yet, so I guess I'm good to go!
I was contemplating courtesy lights for the sliders, but the LED upgrade in the doors is more then adequate IMO.

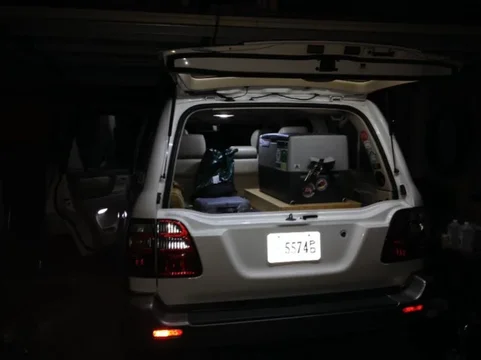
They also perfectly match my already installed LED strip across the hatch.

This improvement got me curious about upgrading headlights/fog lamps. 9011 and 9012's are standing by, along with the itch for a light bar.


I won't go into the details that others have shared, but rather some insights:
- Nirtle gloves do not provide protection against blowing fuses. I'd suggest removing before install (located in passenger kick panel)
- don't button up the covers until you check that they work. I had two map lights reversed polarity, and all 4 doors needed attention.
- for the doors, the plugs had some wiggle in then. I played with the prongs to get a better connection.
- for the map light, I went with red on the passenger, and white on drivers. This way the
 can paint her nails without distracting my night driving.
Added Bonus: by combining the white map light, and spare map light, I was able to throw these in my license plate lights. They Fit, and no smoke yet, so I guess I'm good to go!
I was contemplating courtesy lights for the sliders, but the LED upgrade in the doors is more then adequate IMO.

They also perfectly match my already installed LED strip across the hatch.

This improvement got me curious about upgrading headlights/fog lamps. 9011 and 9012's are standing by, along with the itch for a light bar.
- Thread starter
- #29
One of the biggest (only) downsides to adding sliders for me is having to remove the front mud guards. Here is what I did:
Link: https://forum.ih8mud.com/showpost.php?p=8986133&postcount=2408
Step 1: Throw OEM Front Mud Flap in Vice
Step 2: Use blocks of wood (or whatever) and clamp to flap around creases/bends
Step 3. Apply heat via heat gun and massage ABS into place with a big screwdriver, bar stock, or whatever you have handy, while also adjusting clamps to tighten plastic around OEM flap
Step 4: Drill holes while clamped together and trace outline
Step 5: Unclamp and rough cut with tin snips
Step 6: Throw them on a belt sander to finish edges, and clean up.
Here is the passenger side bolted on
Slightly larger than stock, and fit well. In all it took about 1.5 hrs with 2 completely failed attempts, and 2 with imperfections.
Last edited:
- Thread starter
- #30
Upgraded to 9011 and 9012 bulbs. Upgrades are on the left, OEM on the right. Not a scientific test with the crappy picture below, but for $80 on amazon, I think it's a decent venture to improve lighting.

Last edited:
Even with the "crappy" picture there's a noticeable difference. Even if it is from the camera glare being worse on the improved side  looks good man
 looks good man
- Thread starter
- #32
Last year I picked up just a simple hand held CB that really didn't give me the range neded on the trails (shocker).
Not all is lost since it accepts a CB cable, so I finally got around to installation.
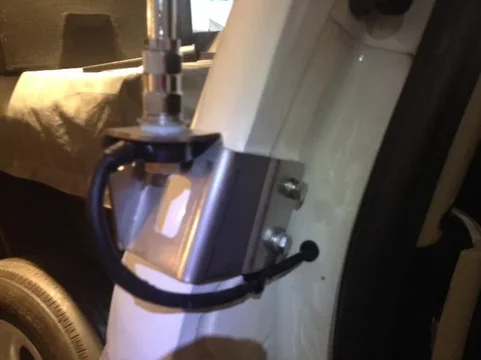
I used a LabRak mount which after seeing some in CO, I had to have. On top is a 3' FireStik II, followed by a spring, and then a push and twist quick disconnect. For the cable, I used an 18' Fire Ring.

This does require soldering (only one quick drop to secure the center coax to the pin in the adapter) but allows for a super clean install.
Wire was fed through the back, and zig zagged under the carpet. I got to the 2nd row and ran it on top of the floor (still under weather techs) and then up to a hole I drilled next to the 12v outlet in the console where both plug in.
Haven't had a chance to play, but picked up lots of activity in a quick 15 minute trip to the store.

Not all is lost since it accepts a CB cable, so I finally got around to installation.
I used a LabRak mount which after seeing some in CO, I had to have. On top is a 3' FireStik II, followed by a spring, and then a push and twist quick disconnect. For the cable, I used an 18' Fire Ring.

This does require soldering (only one quick drop to secure the center coax to the pin in the adapter) but allows for a super clean install.
Wire was fed through the back, and zig zagged under the carpet. I got to the 2nd row and ran it on top of the floor (still under weather techs) and then up to a hole I drilled next to the 12v outlet in the console where both plug in.
Haven't had a chance to play, but picked up lots of activity in a quick 15 minute trip to the store.
Last edited:
- Thread starter
- #33
Finally got around to doing some updates on my "kitchen drawer." Installed an 18" cutting board that folds out from sliding table on. 12" hinge.

Finally got around to doing some updates on my "kitchen drawer." Installed an 18" cutting board that folds out from sliding table on. 12" hinge.
Sweet!
- Thread starter
- #35
Uwharrie was not easy on the Hundy:
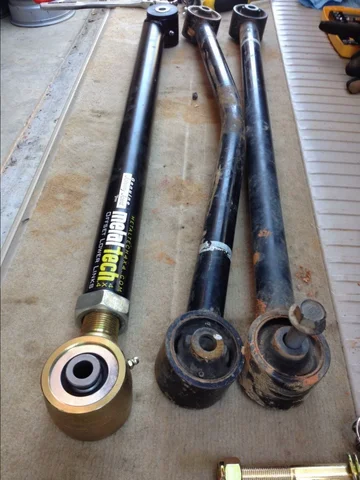
1 LCA destroyed
1 rear bumper dented
3 alloys with rock damage
2 BFG AT's with significant sidewall chunks
Still need to try to figure out whats up with my ATRAC, because it didnt engage once despite the conscious effort to get it to do so.
Step one to getting her back to normal was completed today - Metal Tech LCA Install. Click here for write-up on product/process.

Wheel/Tire situation will be fixed next week The Commemorative (destroyed) LCA is now hanging in my garage as a souvenir/reminder of our 1:30AM blacksmith shop in a group camp trying to pound it back out.

1 LCA destroyed
1 rear bumper dented
3 alloys with rock damage
2 BFG AT's with significant sidewall chunks
Still need to try to figure out whats up with my ATRAC, because it didnt engage once despite the conscious effort to get it to do so.
Step one to getting her back to normal was completed today - Metal Tech LCA Install. Click here for write-up on product/process.

Wheel/Tire situation will be fixed next week
Last edited:
ElHefe
SILVER Star
Any updates? This is an excellent, essentials-first build. I'm digging it.
(Subscribed)
(Subscribed)
- Thread starter
- #37
Thanks @ElHefe! As my terrible luck would have it, everything is on hold. I had a long list of things to do before this year's HIH but I ended up having a traumatic knee injury, and anything build related will need to wait until the winter.
I'm working on a Trailer Build that took most of my attention, but have a rear bumper waiting for install. 34" tires wont fit in the factory tire carrier, so no long distance travel until that goes on.
Once I'm back on my feet, I'm going to 863's or 864's, and adding ICON VS shocks for added rear travel. Would really like to re-gear, but again thats pushed out to 2015 now.
fireball
SILVER Star
Very sorry to hear about this! Heal up soon and let us know if we can be of any help!
Get better Derek....
Best.
Lt. Dan.

Best.
Lt. Dan.

- Thread starter
- #40
Similar threads
Users who are viewing this thread
Total: 1 (members: 0, guests: 1)

