Speaking of wiring, I tried wiring the illumination on my extra gauges from the dash light, but the lights are very dim on the aftermarket gauges. What's a good way to do this?
Navigation
Install the app
How to install the app on iOS
Follow along with the video below to see how to install our site as a web app on your home screen.
Note: This feature may not be available in some browsers.
More options
Style variation
You are using an out of date browser. It may not display this or other websites correctly.
You should upgrade or use an alternative browser.
You should upgrade or use an alternative browser.
Clusters, Gauges, Speedo & Odo meters
- Thread starter bj40green
- Start date
This site may earn a commission from merchant affiliate
links, including eBay, Amazon, Skimlinks, and others.
More options
Who Replied?bj40green
Tssss, tssss
- Thread starter
- #202
You can try bulbs with a higher wattage but.... higher wattage means more heath which can cause plastics to get soft or even melt.
Nowadays a lot of those little bulbs are available in white LED but I'm not up to date with that. Google is your friend.


Hope this helps a bit,
Rudi
Nowadays a lot of those little bulbs are available in white LED but I'm not up to date with that. Google is your friend.
Hope this helps a bit,
Rudi
Last edited:
It's like I'm not getting a 12V source where I tapped into the little dash illumination lamps (not in the cluster)
I can check the voltage sometime. There was a bullet connector I used for the extra gauges. Thanks.
bj40green
Tssss, tssss
- Thread starter
- #206
When you do voltage check.... check also the color code on the wire so I can look it up in the diagram if you're on the right wire.
The correct wire to tap in is the wire from the light switch to the barrel connector on the back of the cluster. The color code is red / black stripe.
Good luck,
Rudi
The correct wire to tap in is the wire from the light switch to the barrel connector on the back of the cluster. The color code is red / black stripe.
Good luck,
Rudi
I used these splice connectors. Very easy to use, put wires in, squeeze with plier and fold lip to close.
View attachment 671605
NOOOÖÖ

sorry, Rudi, I respect that you know a lot about wiring, but those things are the debbil - single-handedly the most abominable wiring device ever invented

please folks, do yourself and all subsequent owners the favor to use proper butt splices or soldered connections - or better yet, refrain from any ill-fated DIY electrical inventions in the first place
bj40green
Tssss, tssss
- Thread starter
- #208
NOOOÖÖ
sorry, Rudi, I respect that you know a lot about wiring, but those things are the debbil - single-handedly the most abominable wiring device ever invented
please folks, do yourself and all subsequent owners the favor to use proper butt splices or soldered connections - or better yet, refrain from any ill-fated DIY electrical inventions in the first place
Hi Claudia,
Unfortunately I don't share your opinion.
I've been in electric and electronics for many, many years. I don't say how much because then you figure out how old I am and that's a big secret. Just kidding....
I've been using those connectors in all kind of low and high voltage installations for as long as they exist.
These 3M Scotchlok IDC560 connectors are very, very good. In Europe they are (different model, different color code) even approved for house wiring installations. They are also available in fire retardant, waterproof, et cetera. The trick is to pick the right model. There is a whole assortment of these connectors. I showed the most common one for use in small wires installations. This is the RUN & TAP model where the RUN "knife" is a bit wider than the TAP "knife".
The RUN opening (where I showed the black wire) is for AWG 14 and the TAP opening is for AWG 16-18.
Most common mistake is that people use the wrong splice for the job. Trying to make a splice in a AWG 12 or 10 wire using this blue one. When doing so you cut the the strands without knowing which can lead to all kind of problems.
Anyway... if you don't feel happy with those splice connectors....
don't use them, but to say that "those things are the debbil - single-handedly the most abominable wiring device ever invented
" is a bit too strong. Unless you're referring to the "made in china" ones. In that case I agree with you.Rudi
Hi Claudia,
Unfortunately I don't share your opinion.
I've been in electric and electronics for many, many years. I don't say how much because then you figure out how old I am and that's a big secret. Just kidding....
I've been using those connectors in all kind of low and high voltage installations for as long as they exist.
These 3M Scotchlok IDC560 connectors are very, very good. In Europe they are (different model, different color code) even approved for house wiring installations. They are also available in fire retardant, waterproof, et cetera. The trick is to pick the right model. There is a whole assortment of these connectors. I showed the most common one for use in small wires installations. This is the RUN & TAP model where the RUN "knife" is a bit wider than the TAP "knife".
The RUN opening (where I showed the black wire) is for AWG 14 and the TAP opening is for AWG 16-18.
Most common mistake is that people use the wrong splice for the job. Trying to make a splice in a AWG 12 or 10 wire using this blue one. When doing so you cut the the strands without knowing which can lead to all kind of problems.
Anyway... if you don't feel happy with those splice connectors....
don't use them, but to say that "those things are the debbil - single-handedly the most abominable wiring device ever invented
Rudi
Gee I could easily have written what Claudia wrote myself Rudi.
Thanks for the info on their intricacies.
I may have to reconsider my policy of removing every one of them I see.

PS. I guess I must have experience only of the poor quality ones or ones that have been installed incorrectly. (That wouldn't surprise me.)
Gee I could easily have written what Claudia wrote myself Rudi.
Thanks for the info on their intricacies.
I may have to reconsider my policy of removing every one of them I see.
PS. I guess I must have experience only of the poor quality ones or ones that have been installed incorrectly. (That wouldn't surprise me.)
What he said
")
They work ok when they are new but as soon as a little mouist appears they are the source for all kind of bad things.
I have had luck with those connectors too. They tend to ruin the wiring and loose the connection when moisture is around. I can't say anything for warm climates, but in Canadian environment with temperatures way bellow zero, allot of snow and of course moisture, plus the road salt, those connectors fails within a year. I had used them on 2 of my vehicles, but by now have removed every single of them and solder in place.
They may work much better in the South, but not up here in the North. There is another option of having low quality ones in stores as in today's market manufactures not often care about the quality and just overflow the market with cheap Chinese products, but the ones I used are the only available in stores here.
They may work much better in the South, but not up here in the North. There is another option of having low quality ones in stores as in today's market manufactures not often care about the quality and just overflow the market with cheap Chinese products, but the ones I used are the only available in stores here.
Coolerman
SILVER Star
- Joined
- Jan 5, 2004
- Threads
- 143
- Messages
- 6,766
- Location
- Paint Lick, KY
- Website
- www.globalsoftware-inc.com
Rudi is correct about the 3M brand, they are far better than the cheap ones you buy at Wal-Mart.
However, I also hate those things. If that connection is exposed to moisture, especially salt water from the road, the connection becomes a source for problems.
To be clear, it's not the type of connector that makes these a bad idea on an automobile. IDC (Insulation Displacement Connector) connectors are used industry wide. The phone company uses these, most computer cables use them, the list is endless. What makes this type bad is they allow water to get to the connection.
The solution is simple: If you must use them, use the CORRECT IDC connector. The proper connection for a splice or tap exposed to water, is the kind with the gel in them. This gel surrounds the wire and piercing element and prevents water from entering.
Another thing, these are color coded just like wire nuts, and terminals Red = 22-16ga Blue = 14-16ga Yellow = 12-10ga They are also available as taps ie one side is for a large wire (the source) the other side is for the smaller tap wire.
Here is a link to the complete 3M line of Scotchlok connectors. http://multimedia.3m.com/mws/mediaw...evTSevTSeSSSSSS--&fn=19_Comm_Products_v05.pdf
Here is a link to where to buy them: http://www.grainger.com/Grainger/in...nnectors/electrical/3m/ecatalog/N-8i0Z1z13nwd Page two on that site has the gel filled version of the tap type connector that Rudi used.
You can also use dielectric grease in the IDC connectors without the gel to make them water resistant. I personally will not use these connectors on ANY connection that is critical like brake/turn or trailer connections which is exactly where most people use them.
I checked the voltage and I'm getting 5 volts which explains the dim bulbs. It looks like I need to go off the switch as opposed to the dash illumination lights I'm currently using.
PS. I guess I must have experience only of the poor quality ones or ones that have been installed incorrectly. (That wouldn't surprise me.)
this is my experience exactly
EVERY single wiring problem I encountered right after buying my truck turned out to be related to this style of connector
and I have it on good authority of a genuine Toyota service manager at a large and respected facility that they hate them as well - even on newer vehicles 
Last edited:
When you do voltage check.... check also the color code on the wire so I can look it up in the diagram if you're on the right wire.
The correct wire to tap in is the wire from the light switch to the barrel connector on the back of the cluster. The color code is red / black stripe.
Good luck,
Rudi
Rudi,
I checked the wire color and what I had done was to tap in line with the bullet connectors to the illumination lamp on the bottom of the dash next to the vent on the drivers side. It's a little green lamp. One side of the wire is red/white and the other is red/black. I simply wired in 2 extra gauge lamps in line. I'm only getting 5 volts out of it. Thanks for the help.
bj40green
Tssss, tssss
- Thread starter
- #216
Hi Toyotaman,
The Red/White wire is the wire that goes to the dimmer switch (High beam / Low beam). This wire is 12V when you switch on your headlights.
The Red/Black wire is the wire that goes to the cluster meter lights and the heather light. This wire can be dimable via a rheostat if you have that option on your truck. This wire is between 4 and 12V depending on the position of the dimmer/rheostat.
You want to connect the extra gauges to this Red/Black wire and ground and not to the Red/White wire. This way the gauges run equal to the cluster meters and should have more or less the same brightness.
Rudi
Thanks!
Hi, Rudi. Just thought I'd pop in and appreciate the breadth of technical expertise and know-how you lend to all of us, by means of this incredible thread.
Way to go, pardner!
Way to go, pardner!
bj40green
Tssss, tssss
- Thread starter
- #220
Hi, Rudi. Just thought I'd pop in and appreciate the breadth of technical expertise and know-how you lend to all of us, by means of this incredible thread.
Way to go, pardner!
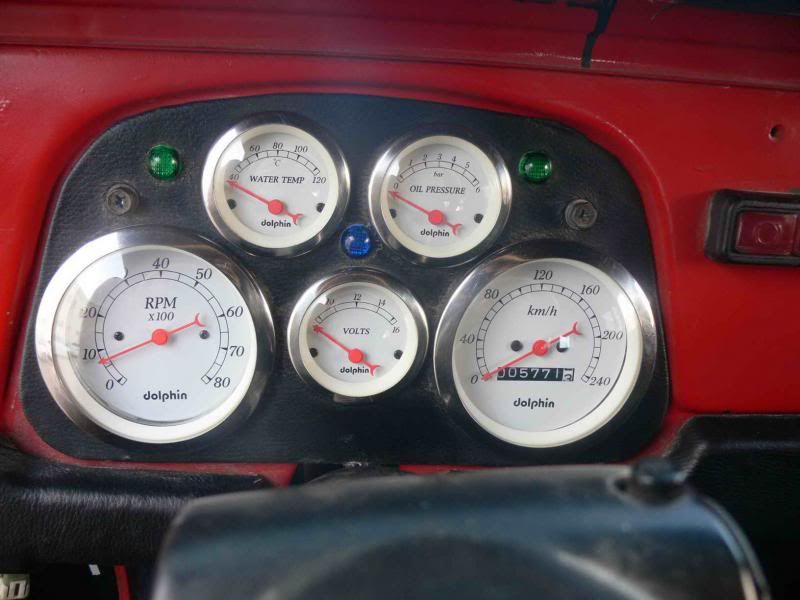
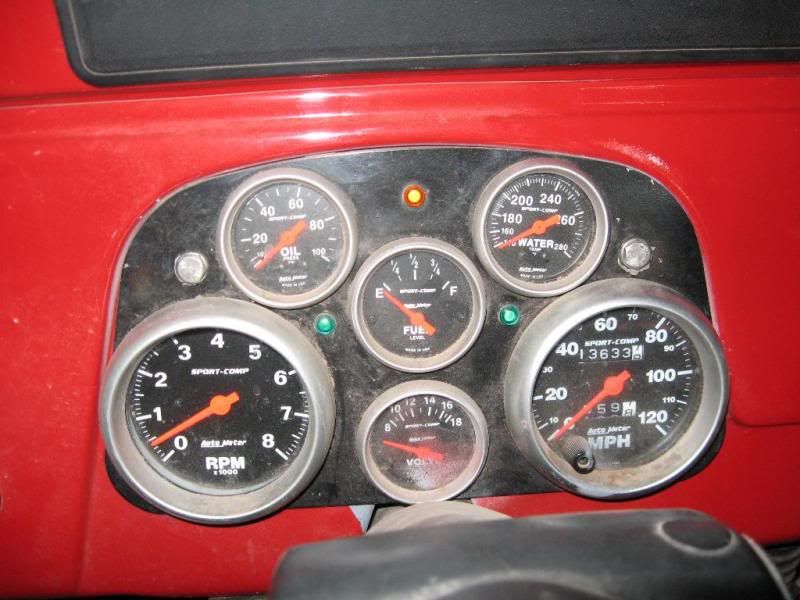
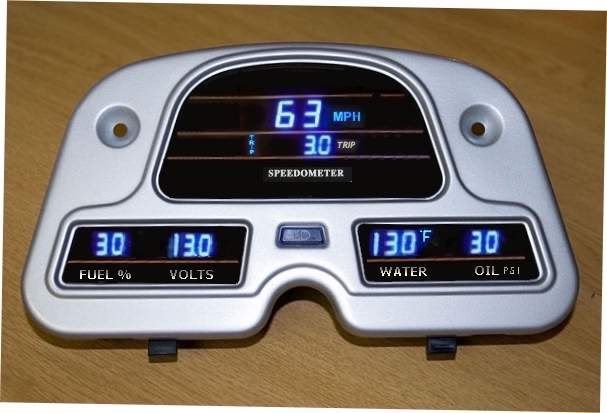
Hi Fouad,
Thanks for the kind words. I'm very curious about your plans for your PHANTOM cluster.
In case you go away (which I hope not) from the OEM cluster............ here are some pics
[URL="http://i1112.photobucket.com/albums/k490/ruud_coco/Toyota%2040%20series%20clusters%20custom%20build/guage-panel-2-9-12.jpg"][URL="http://i1112.photobucket.com/albums/k490/ruud_coco/Toyota%2040%20series%20clusters%20custom%20build/guage-panel-2-9-12.jpg"][URL="http://i1112.photobucket.com/albums/k490/ruud_coco/Toyota%2040%20series%20clusters%20custom%20build/guage-panel-2-9-12.jpg"][URL="http://i1112.photobucket.com/albums/k490/ruud_coco/Toyota%2040%20series%20clusters%20custom%20build/guage-panel-2-9-12.jpg"]
 [/URL][/URL][/URL][/URL]
[URL="http://i1112.photobucket.com/albums/k490/ruud_coco/Toyota%2040%20series%20clusters%20custom%20build/DSCN0139-gauge.jpg"][URL="http://i1112.photobucket.com/albums/k490/ruud_coco/Toyota%2040%20series%20clusters%20custom%20build/DSCN0139-gauge.jpg"][URL="http://i1112.photobucket.com/albums/k490/ruud_coco/Toyota%2040%20series%20clusters%20custom%20build/DSCN0139-gauge.jpg"][URL="http://i1112.photobucket.com/albums/k490/ruud_coco/Toyota%2040%20series%20clusters%20custom%20build/DSCN0139-gauge.jpg"]
 [/URL][/URL][/URL][/URL]
[URL="http://i1112.photobucket.com/albums/k490/ruud_coco/Toyota%2040%20series%20clusters%20custom%20build/DSC04438.jpg"][URL="http://i1112.photobucket.com/albums/k490/ruud_coco/Toyota%2040%20series%20clusters%20custom%20build/DSC04438.jpg"][URL="http://i1112.photobucket.com/albums/k490/ruud_coco/Toyota%2040%20series%20clusters%20custom%20build/DSC04438.jpg"]
 [/URL][/URL][/URL]
[URL="http://i1112.photobucket.com/albums/k490/ruud_coco/Toyota%2040%20series%20clusters%20custom%20build/cluster600.jpg"][URL="http://i1112.photobucket.com/albums/k490/ruud_coco/Toyota%2040%20series%20clusters%20custom%20build/cluster600.jpg"][URL="http://i1112.photobucket.com/albums/k490/ruud_coco/Toyota%2040%20series%20clusters%20custom%20build/cluster600.jpg"]
 [/URL][/URL][/URL]
[URL="http://i1112.photobucket.com/albums/k490/ruud_coco/Toyota%2040%20series%20clusters%20custom%20build/IMG_2333.jpg"][URL="http://i1112.photobucket.com/albums/k490/ruud_coco/Toyota%2040%20series%20clusters%20custom%20build/IMG_2333.jpg"][URL="http://i1112.photobucket.com/albums/k490/ruud_coco/Toyota%2040%20series%20clusters%20custom%20build/IMG_2333.jpg"]
 [/URL][/URL][/URL]
[URL="http://i1112.photobucket.com/albums/k490/ruud_coco/Toyota%2040%20series%20clusters%20custom%20build/P1080765_resize.jpg"][URL="http://i1112.photobucket.com/albums/k490/ruud_coco/Toyota%2040%20series%20clusters%20custom%20build/P1080765_resize.jpg"][URL="http://i1112.photobucket.com/albums/k490/ruud_coco/Toyota%2040%20series%20clusters%20custom%20build/P1080765_resize.jpg"]
 [/URL][/URL][/URL]
[URL="http://i1112.photobucket.com/albums/k490/ruud_coco/Toyota%2040%20series%20clusters%20custom%20build/img_0417a.jpg"][URL="http://i1112.photobucket.com/albums/k490/ruud_coco/Toyota%2040%20series%20clusters%20custom%20build/img_0417a.jpg"][URL="http://i1112.photobucket.com/albums/k490/ruud_coco/Toyota%2040%20series%20clusters%20custom%20build/img_0417a.jpg"]
 [/URL][/URL][/URL]
[URL="http://i1112.photobucket.com/albums/k490/ruud_coco/Toyota%2040%20series%20clusters%20custom%20build/vendor1.jpg"][URL="http://i1112.photobucket.com/albums/k490/ruud_coco/Toyota%2040%20series%20clusters%20custom%20build/vendor1.jpg"][URL="http://i1112.photobucket.com/albums/k490/ruud_coco/Toyota%2040%20series%20clusters%20custom%20build/vendor1.jpg"]
 [/URL][/URL][/URL]
In case you want to put in a OEM style tacho meter......


here is a link: -► https://forum.ih8mud.com/merchandis...ters-your-40-series-landcruiser-fj-bj-hj.html
Rudi
Similar threads
Users who are viewing this thread
Total: 1 (members: 0, guests: 1)