I've heard that putting some sort of water mark/logo/some identifiable feature that ties to your name/profile that clearly makes it yours in a corner (or really any location you want) can help with these sort of things going forward. I think watermarks are the most difficult to remove and would clearly show an altered image. Most folks I know that do this generally use the @instagram name/business (simple @boxrocket or whatever you want to use, don't gotta be all about the @). Seems to work in the detailing industry as there are always non-legit guys trying to rob professional photos to make themselves look better.
Navigation
Install the app
How to install the app on iOS
Follow along with the video below to see how to install our site as a web app on your home screen.
Note: This feature may not be available in some browsers.
More options
Style variation
You are using an out of date browser. It may not display this or other websites correctly.
You should upgrade or use an alternative browser.
You should upgrade or use an alternative browser.
Builds Box Rocket 1995 FZJ80 Build
- Thread starter Box Rocket
- Start date
This site may earn a commission from merchant affiliate
links, including eBay, Amazon, Skimlinks, and others.
More options
Who Replied?Box Rocket
SILVER Star
- Thread starter
- #842
I use watermarks all the time and include a copyright. Maybe it helps but I still have images stolen all the time.I've heard that putting some sort of water mark/logo/some identifiable feature that ties to your name/profile that clearly makes it yours in a corner (or really any location you want) can help with these sort of things going forward. I think watermarks are the most difficult to remove and would clearly show an altered image. Most folks I know that do this generally use the @instagram name/business (simple @boxrocket or whatever you want to use, don't gotta be all about the @). Seems to work in the detailing industry as there are always non-legit guys trying to rob professional photos to make themselves look better.
Dirty Koala
SILVER Star
Just let me know when.Maybe I can get @Dirty Koala to head out with me sometime soon since he has the LP9s on one of his 80s.
Box Rocket
SILVER Star
- Thread starter
- #844
Soon hopefully. I'm working on a new route for the 2021 Slinky run and will need to go prerun.Just let me know when.
Delta VS
Supporting Vendor
If you're that close, may as well stop by?!?Soon hopefully. I'm working on a new route for the 2021 Slinky run and will need to go prerun.
Dirty Koala
SILVER Star
Sweet, maybe I should swap out that brake line sooner rather than later then.Soon hopefully. I'm working on a new route for the 2021 Slinky run and will need to go prerun.
Delta VS
Supporting Vendor
At this point, why bother? May as well “control the variables” and have a solid idea of what the first failure will be this trip.Sweet, maybe I should swap out that brake line sooner rather than later then.
When and where is this Slinky run? I may see if it fits into my schedule.Soon hopefully. I'm working on a new route for the 2021 Slinky run and will need to go prerun.
Box Rocket
SILVER Star
- Thread starter
- #849
Not set in stone yet, but we usually plan it for the days leading up to Cruise Moab and finish our route in Moab in time for the event.When and where is this Slinky run? I may see if it fits into my schedule.
Box Rocket
SILVER Star
- Thread starter
- #850
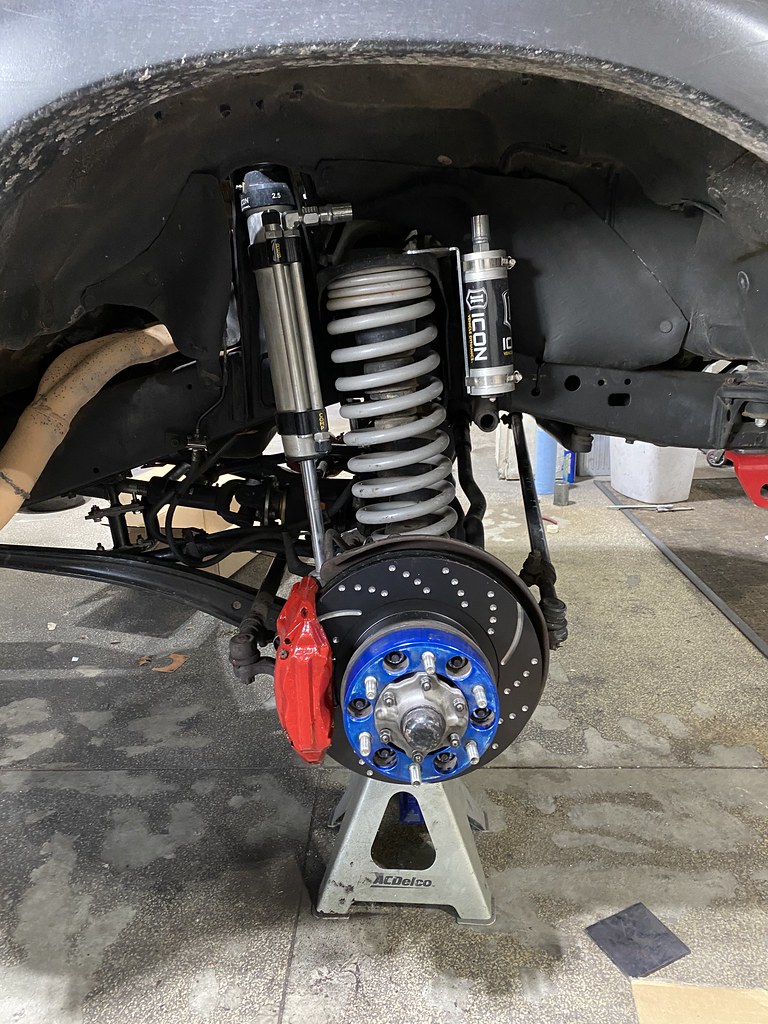
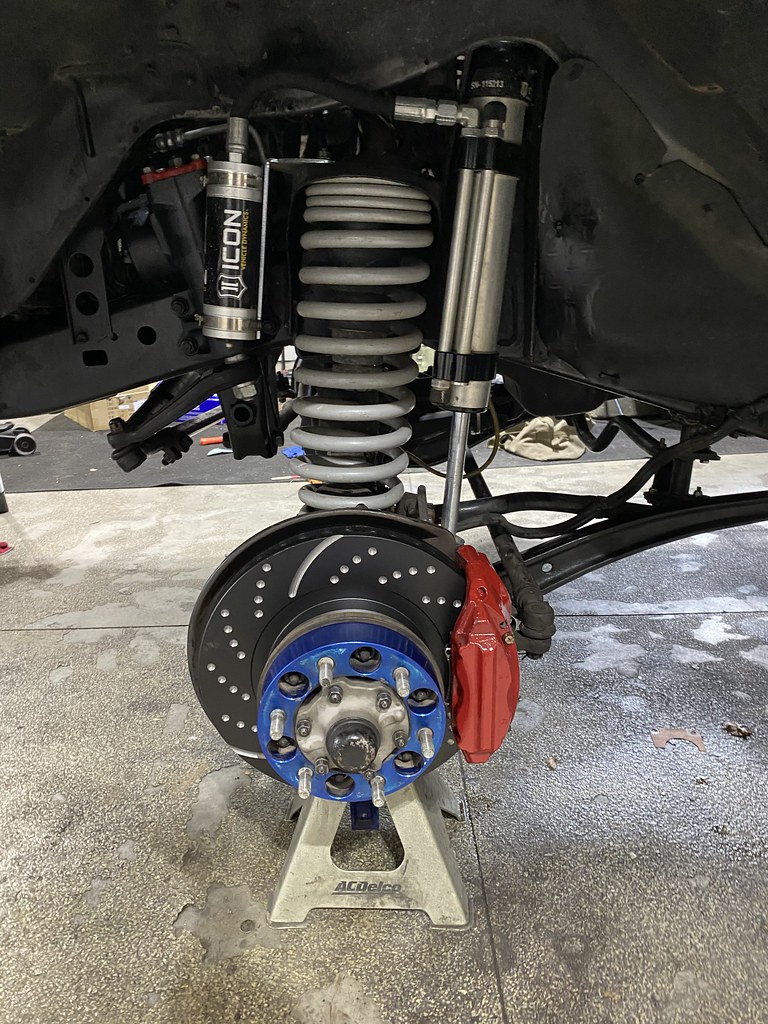
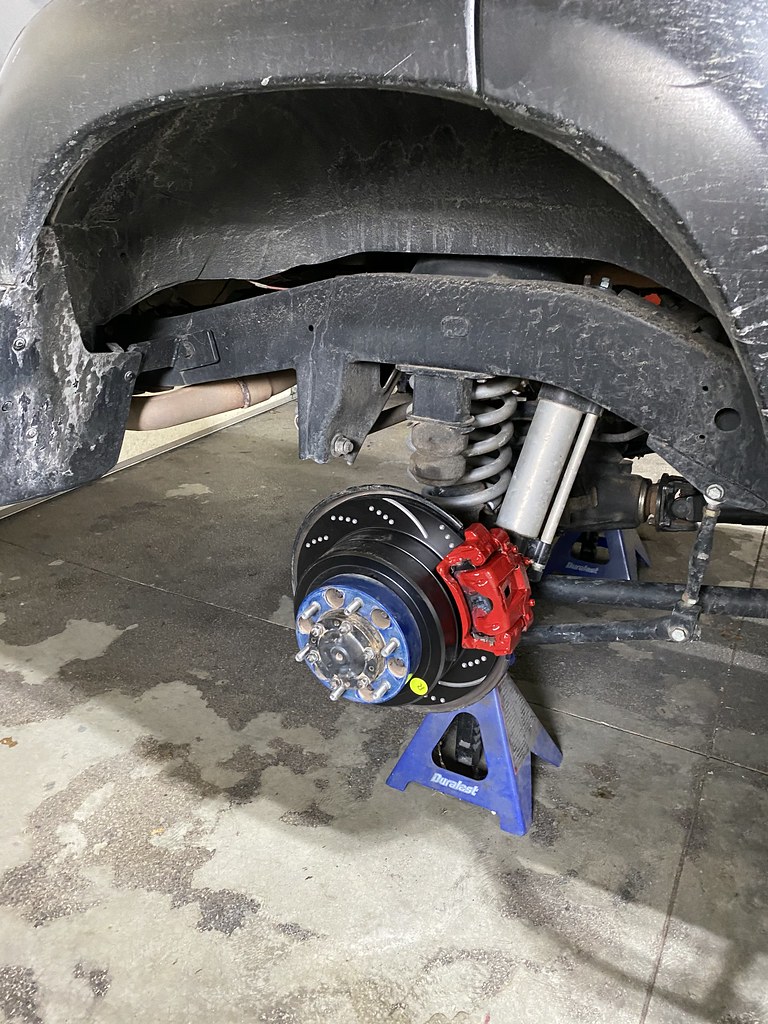
Brakes were done last weekend. EBC dimpled/grooved rotors, OEM Calipers with Hawk Green pads. Also installed a Seiken Brake Booster. Feels a bit better than the stock rotors and pads but nothing scientific to report.
 Untitled by Adam Tolman, on Flickr
 Untitled by Adam Tolman, on Flickr
 Untitled by Adam Tolman, on Flickr
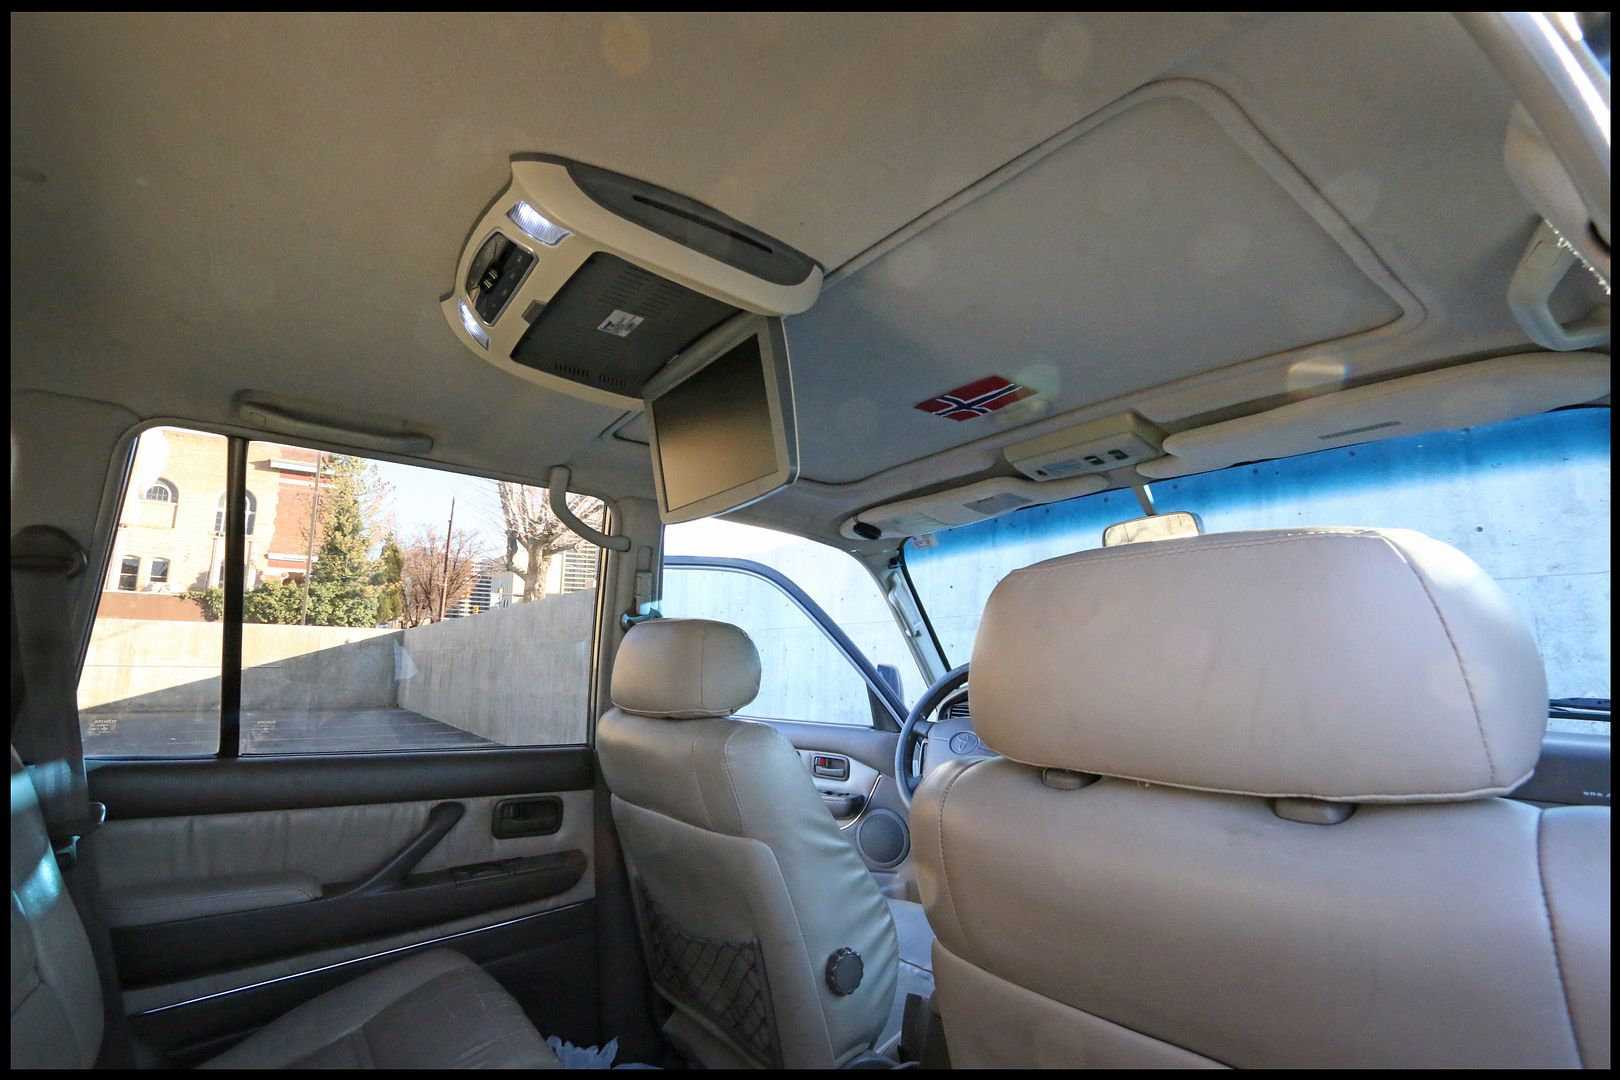
Untitled by Adam Tolman, on FlickrUntitled by Adam Tolman, on FlickrUntitled by Adam Tolman, on FlickrWhat drop down unit is that? I’ve got 3 kids that need entertainment on long drivesBig props to Ratio AV for some help with interior goodies last night. New Pioneer touchscreen DVD/HD Radio deck in the dash with Bluetooth. As well as a dropdown DVD (10.3" display) with wireless headphones in the back for the kids. The overhead unit is 1080p with SD Card, USB, RCA and HDMI ports. Long trips will be nice moving forward. Pretty pumped about it all and looking forward to trying it out.
.
.
Bluetooth mic on the A-pillar
.
.
.


Box Rocket
SILVER Star
- Thread starter
- #852
The brand is Farenheit. I'm sure they have a newer model than the one I got.What drop down unit is that? I’ve got 3 kids that need entertainment on long drives
Box Rocket
SILVER Star
- Thread starter
- #853
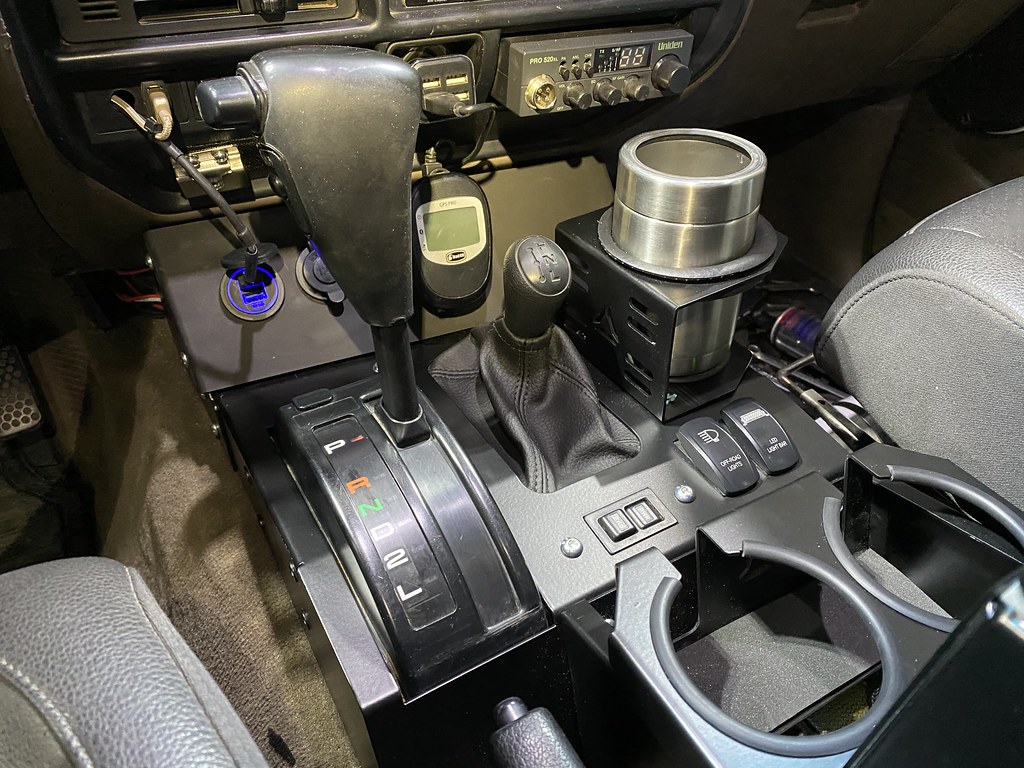
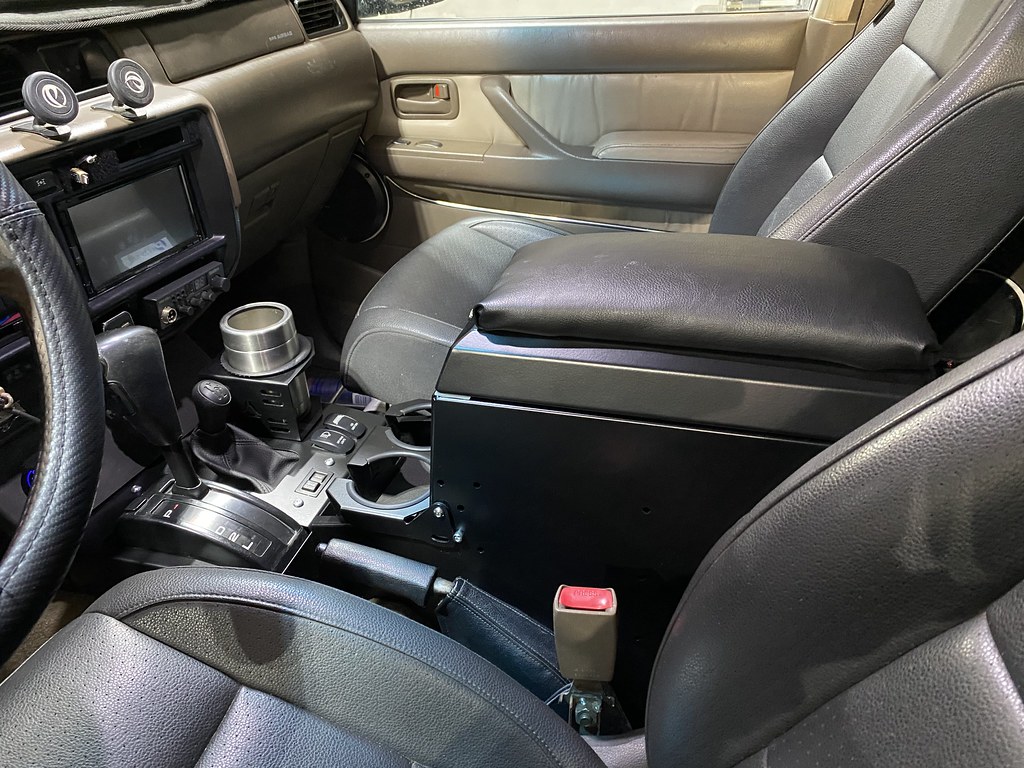
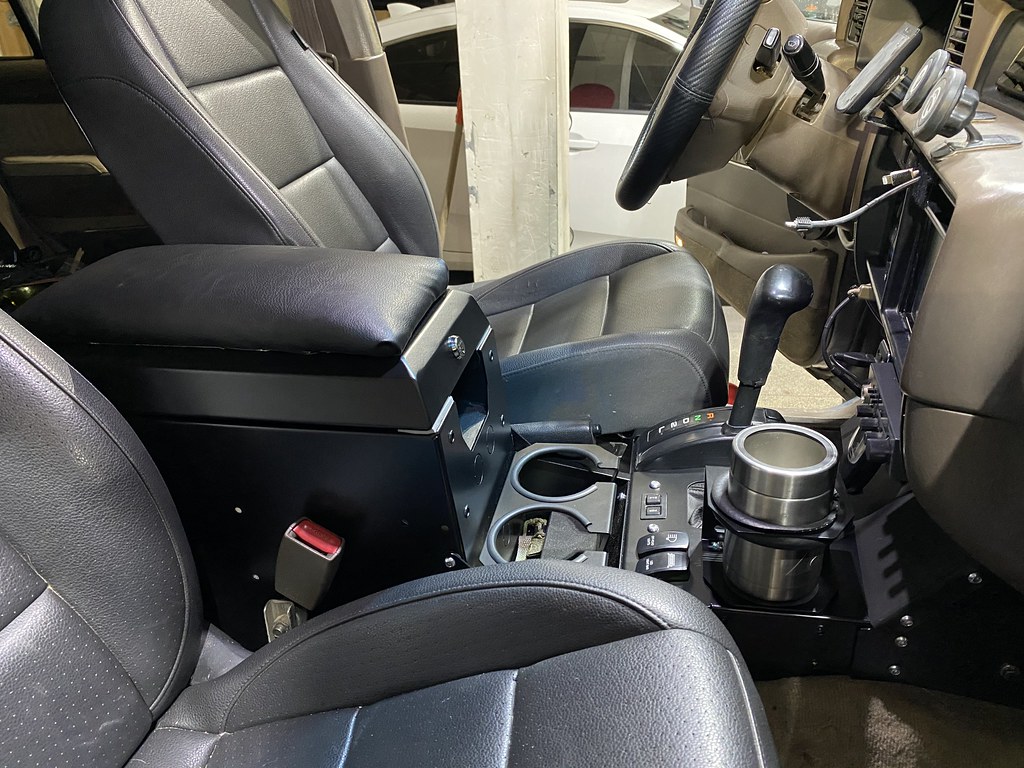
Delta console installed.
 Delta Console by Adam Tolman, on Flickr
 Delta Console by Adam Tolman, on Flickr
 Delta Console by Adam Tolman, on Flickr
Delta Console by Adam Tolman, on FlickrDelta Console by Adam Tolman, on FlickrDelta Console by Adam Tolman, on FlickrMan, there is going to be some serious cupholder envy going around now...
Box Rocket
SILVER Star
- Thread starter
- #855
Yeah I dig the cupholders. I have had the 3D printed ones that a lot of people on here use, but these hold onto the drinks better. I was always tipping drinks with the 3D printed ones unless they fit snug in the cupholder.Man, there is going to be some serious cupholder envy going around now...
I chose to use the double cupholder up front but it can also go on the back of the console, or you can add another one so you have 4 cupholders on the main console and there are spots for two additional ones on the shifter console. I'm using one on the top of the shifter console and you could theoretically add another to each side of the shifter console for a total of 5 for the front passengers! Don't know who would need that many up front but its an option.
The console looks sharp with the black seats.
I dig the brake color setup. Murica!
I dig the brake color setup. Murica!
Box Rocket
SILVER Star
- Thread starter
- #857
Need to do a few updates for the sake of documenting the build.
First off, after having the EBC/Hawk brakes for a couple months now I can say that I like the setup. I do think it's an nice upgrade from stock, but it isn't a massive change. I don't have any hard data that show braking distance has improved but the seat of the pants feel is that the brakes bite a bit harder than stock, but don't expect these to feel like sports car brakes.
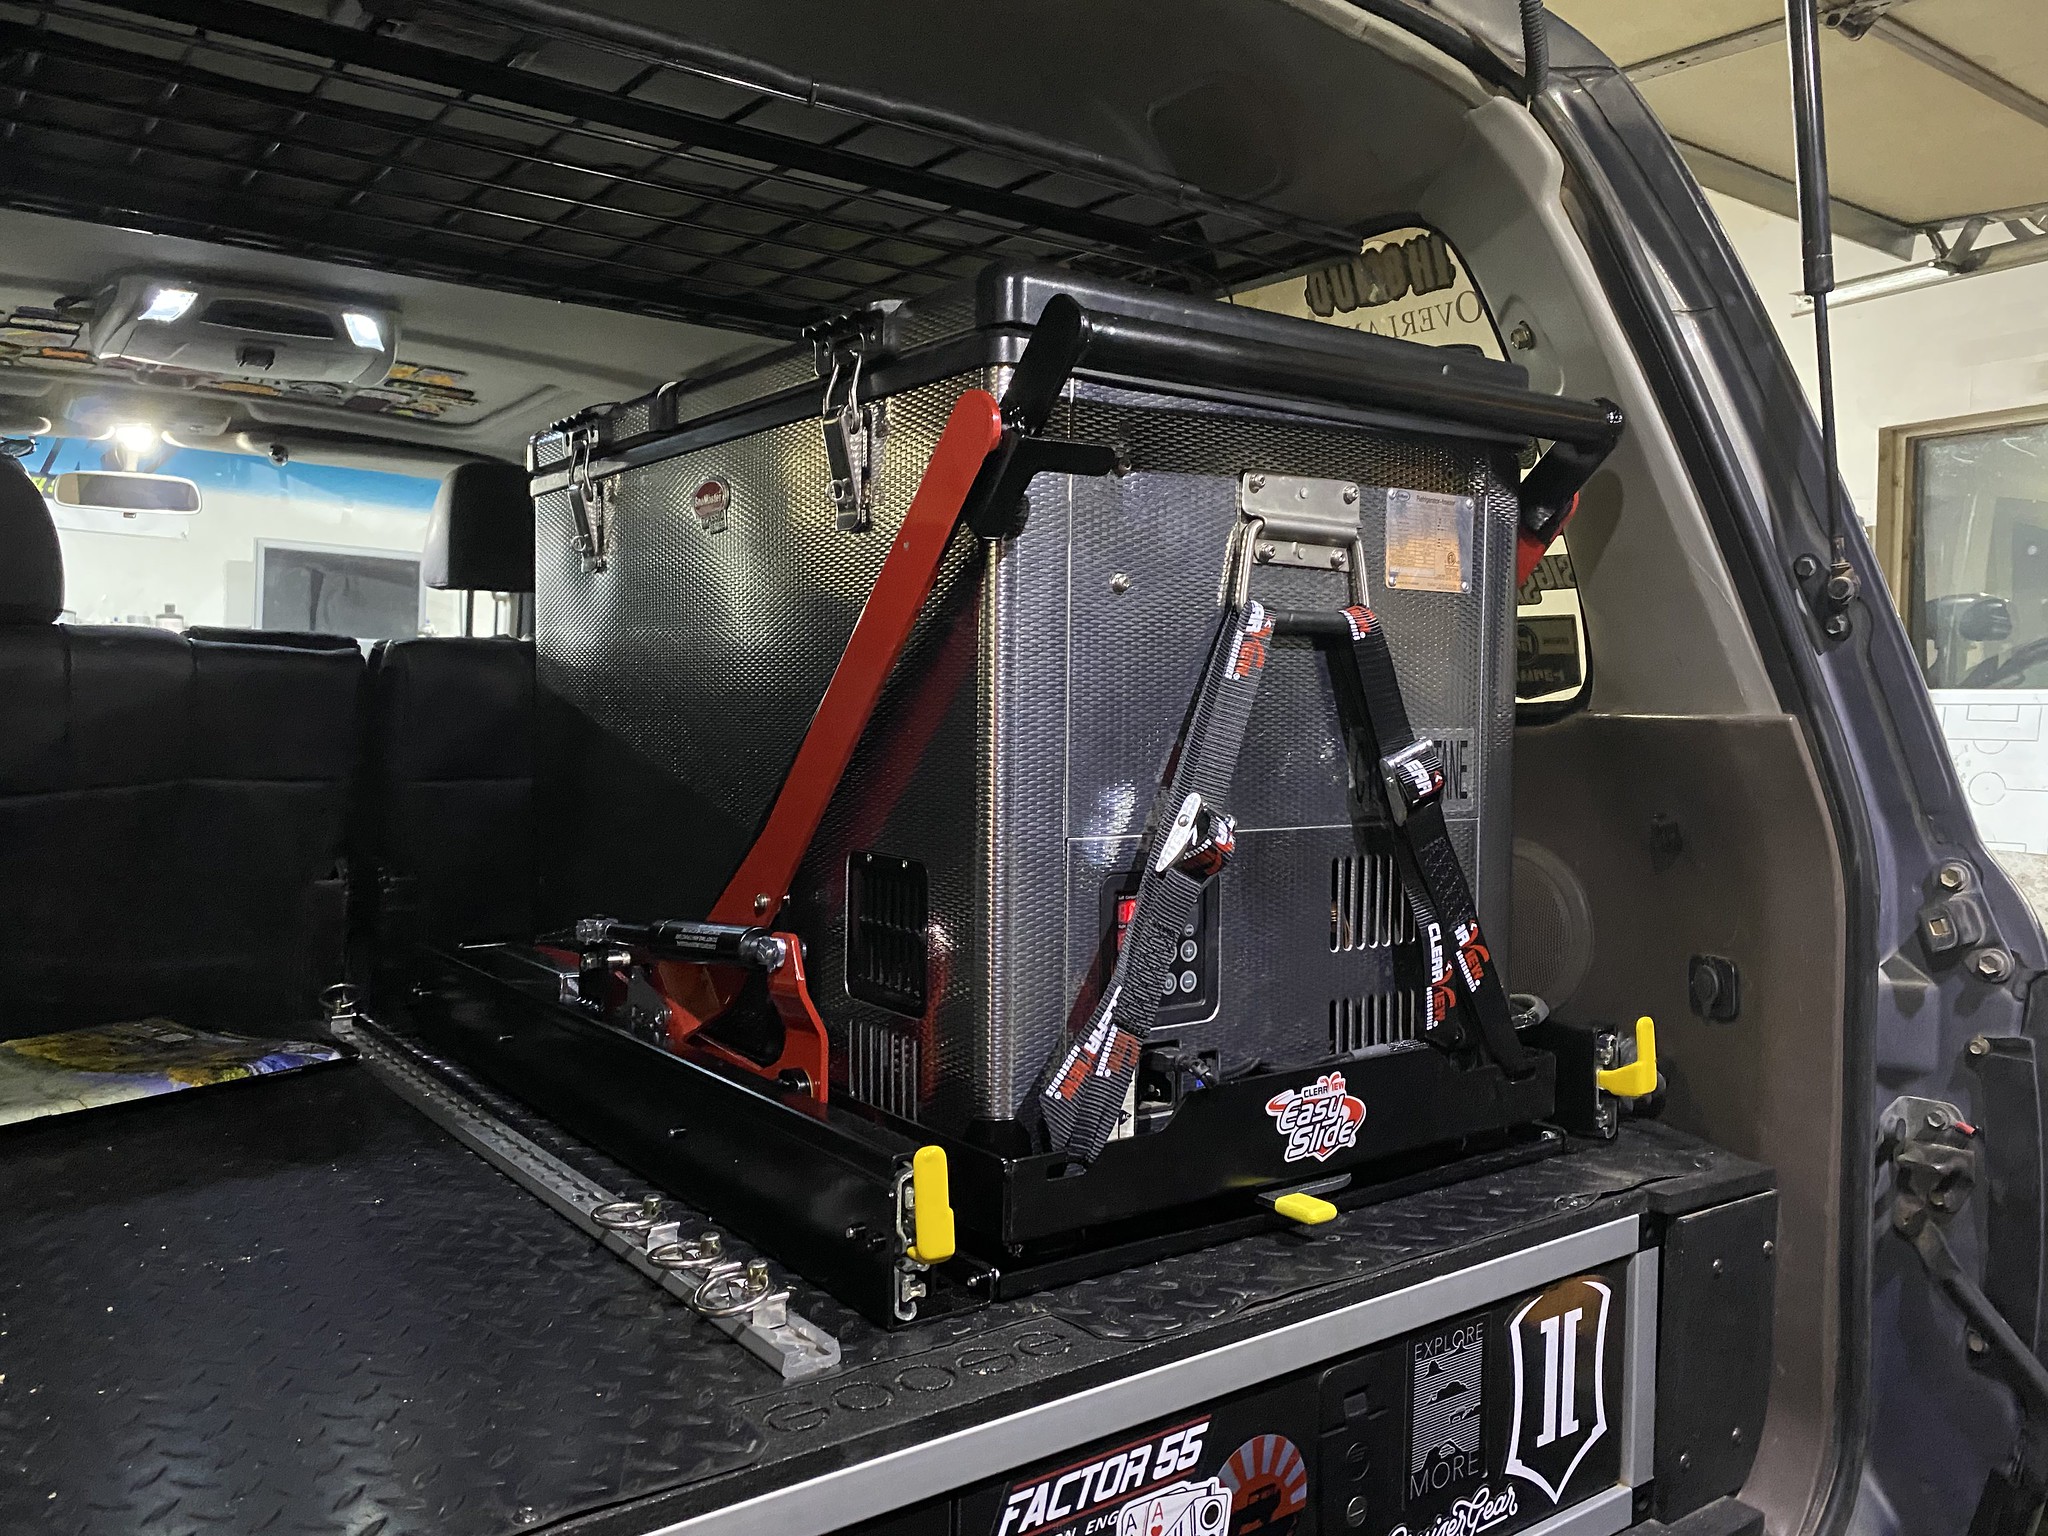
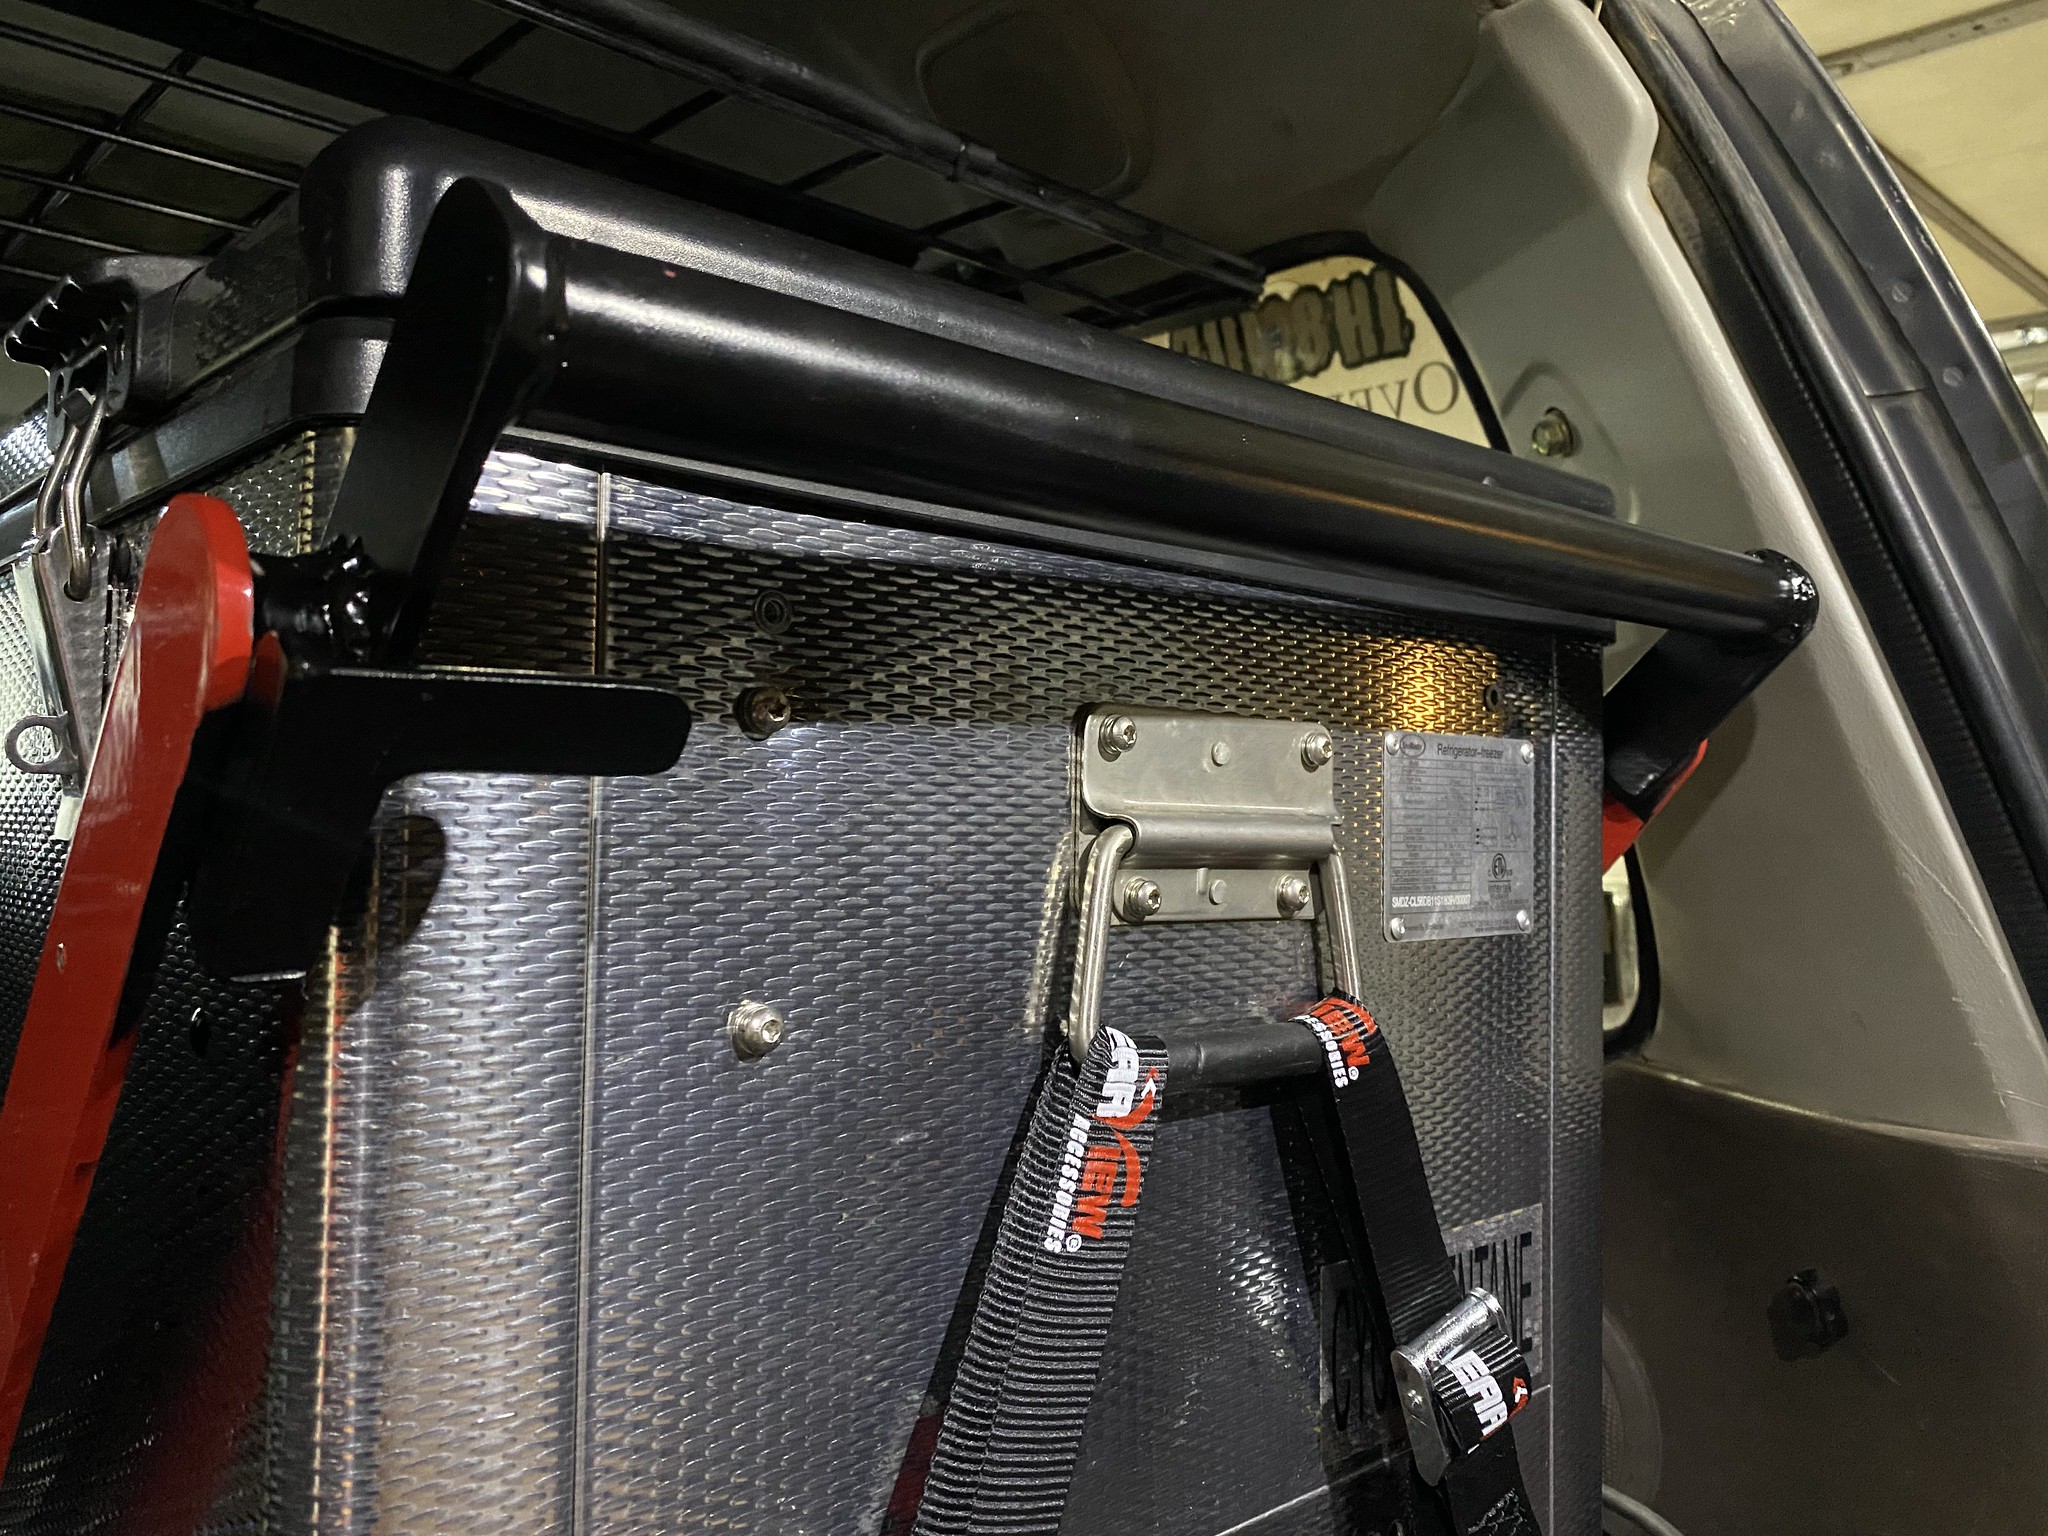
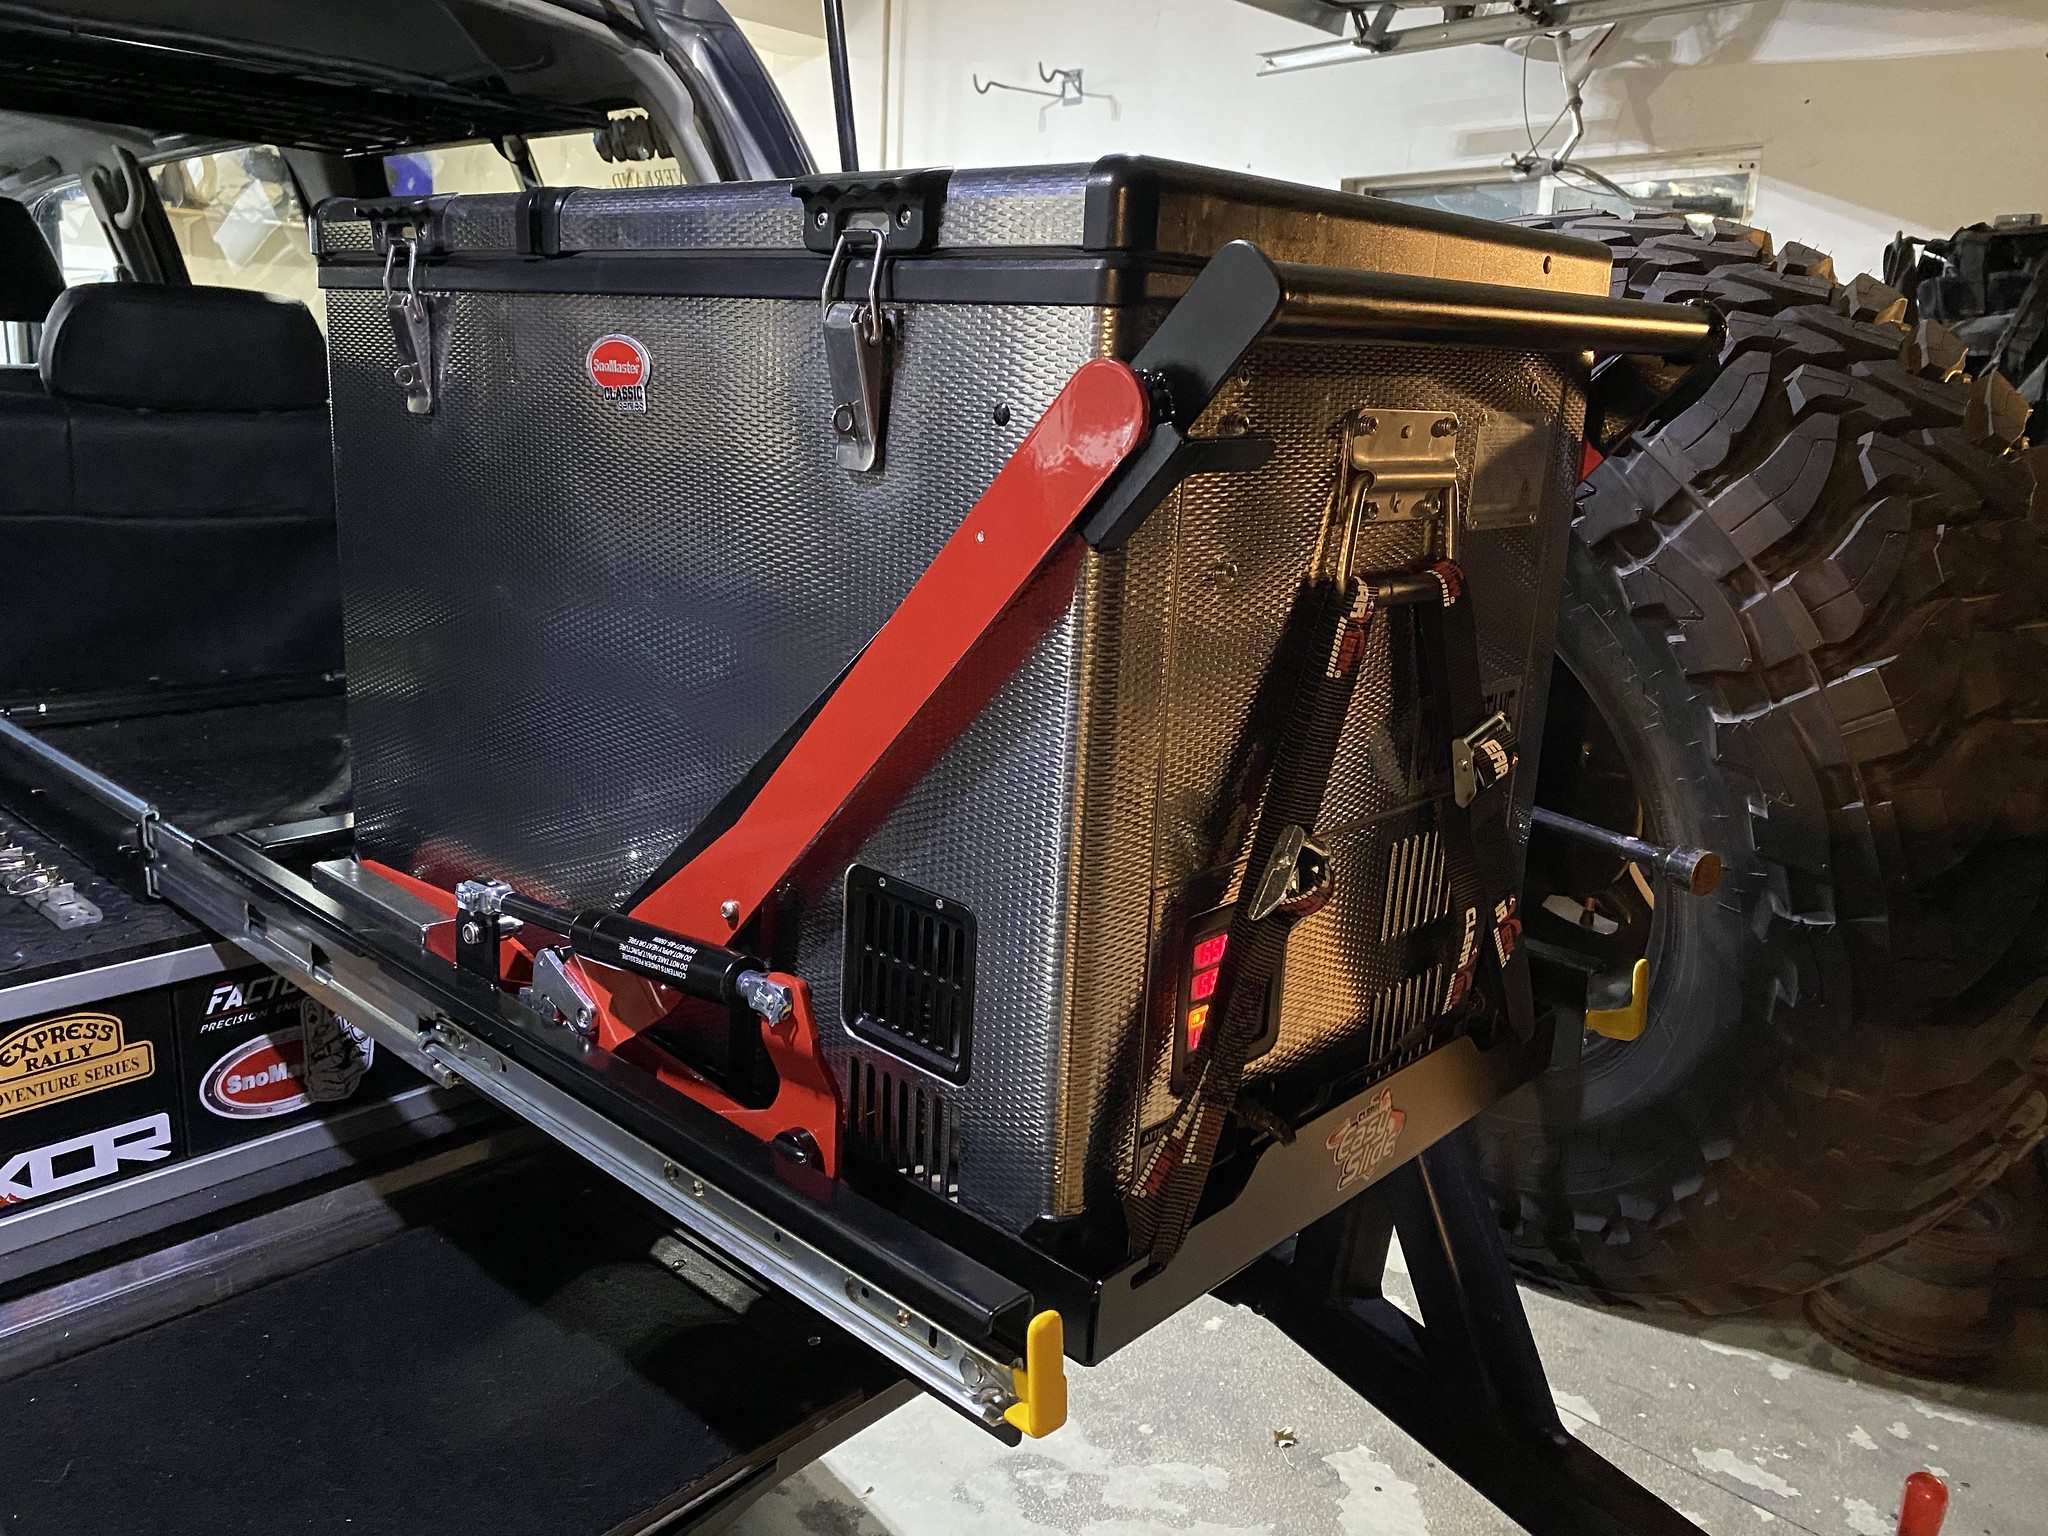
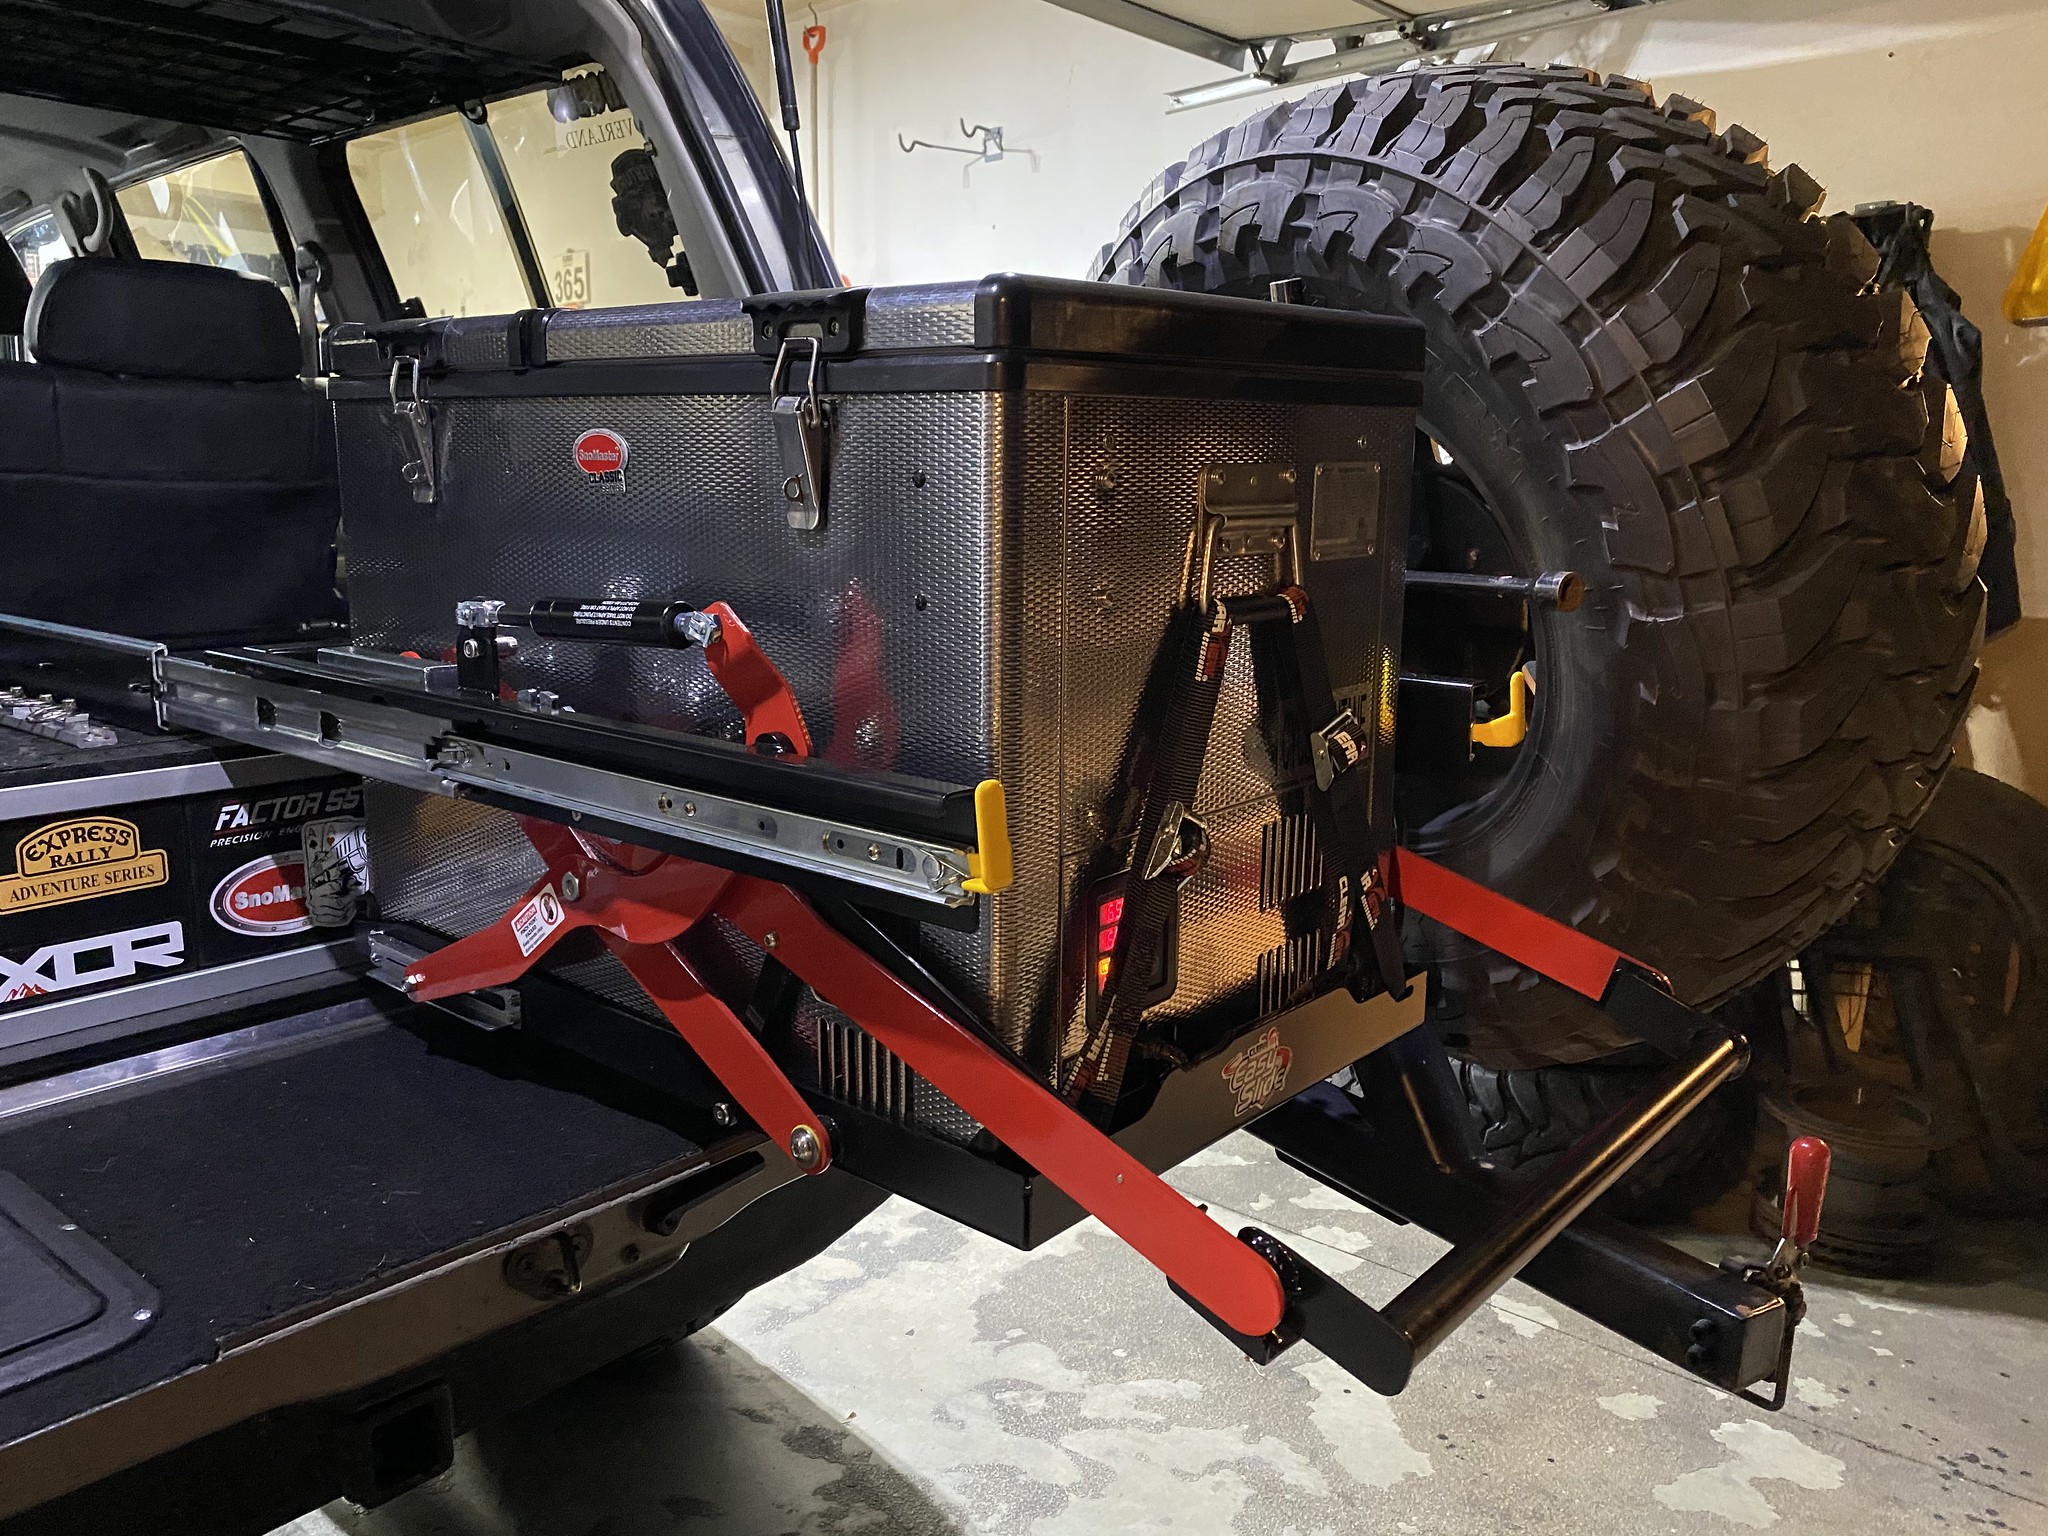
I posted this upgrade in the "what did you do to your 80 this weekend" thread but didn't add it here. If you look back a couple pages you'll see the MSA fridge drop slide I added this past summer. It's a really nice slide and very heavy duty. The one thing I didn't like was that the handle arm rotates up and over the top of the fridge. The fridge needs to be able to drop at least 10" for the arm to fully rotate past the top of the fridge. Since my drawers are only 8" tall the handle couldn't fully rotate out of the way so the handle was partially in the way of opening the fridge. It wasn't a huge issue, but an annoyance all the same.
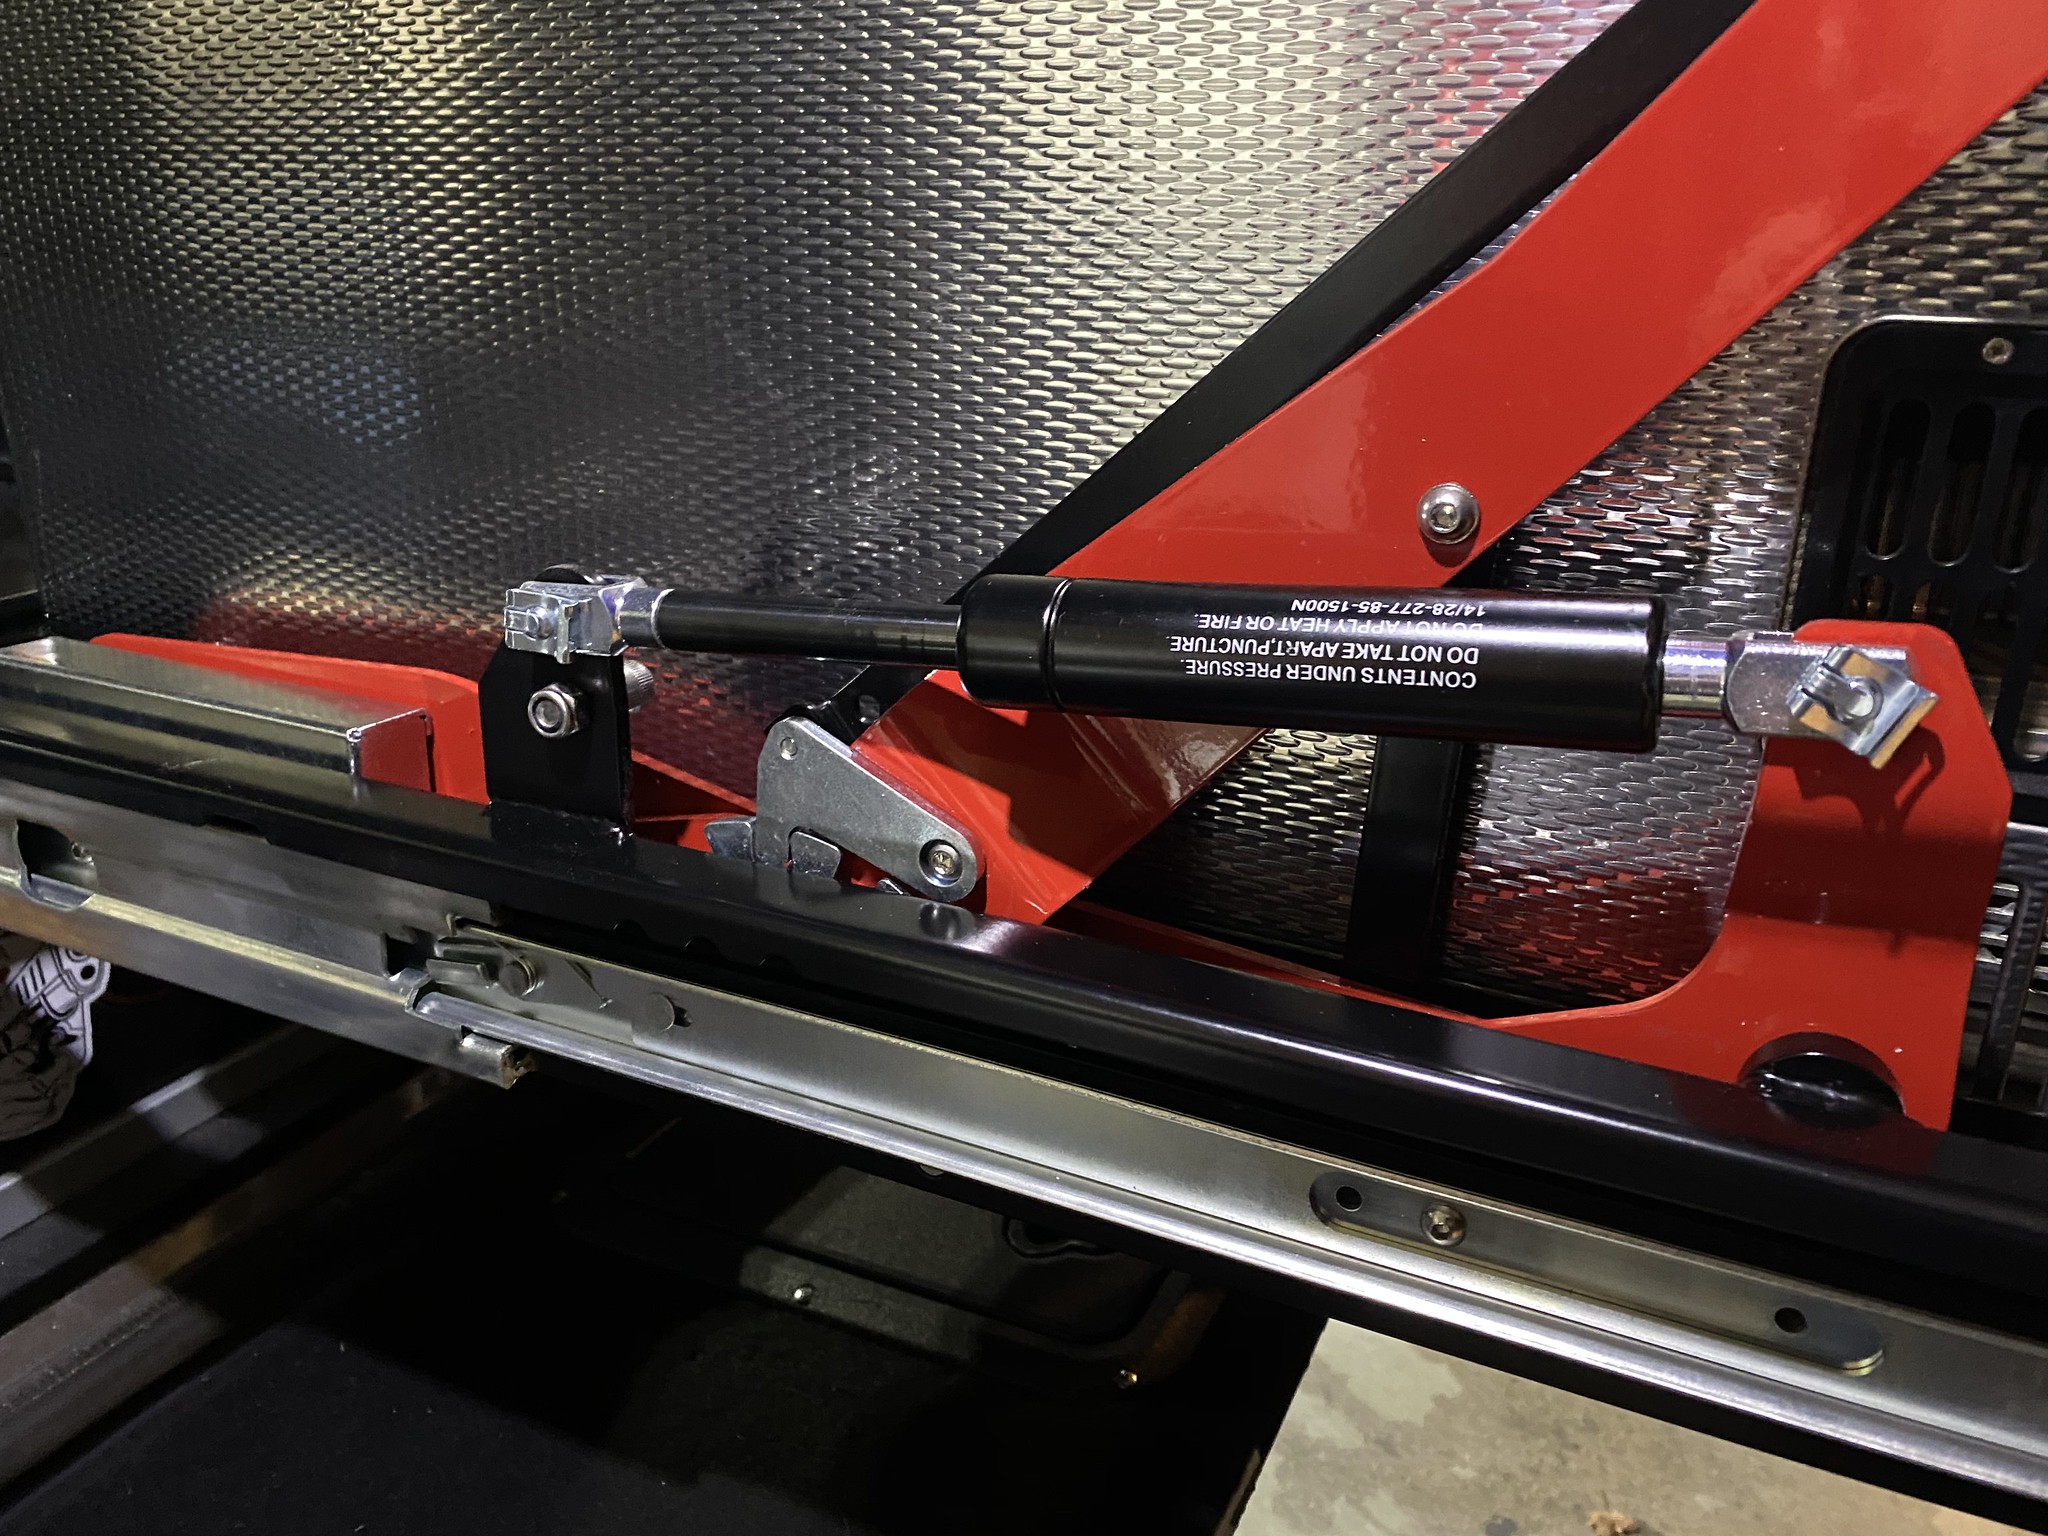
So I sold the MSA slide and instead purchased a Clearview Easy Slide. This slide is also extremely heavy duty but the handle rotates down instead of up so it would not be in the way of opening the fridge. The vendor I ordered from told me which model was the correct one to fit my fridge. They were correct that it was the right model based on the footprint of the fridge but did not take into account the height of the fridge. So....the handle could not close all the way because it would contact the side of the fridge. This meant modifying the handle along with the handle release lever. They both needed to be extended about 2.5". Fortunately I have a welder and was able to make the modifications without too much trouble. For someone that didn't have the tools needed this would render the slide useless until they could get it to someone who could modify it or exchange it for a larger model slide. The Slide model is the ES150-PLUS. My fridge is a Snomaster CL52D. If you have this fridge you'll want to order the slide model larger than the 150-PLUS to avoid needing to modify anything.
 Untitled by Adam Tolman, on Flickr
This is after making the modifications to the handle. The end of the red arm is where the original handle was. You can see the part I added painted black.
 Untitled by Adam Tolman, on Flickr
 Untitled by Adam Tolman, on Flickr
 Untitled by Adam Tolman, on Flickr
 Untitled by Adam Tolman, on Flickr
 Untitled by Adam Tolman, on Flickr
 Untitled by Adam Tolman, on Flickr
I really like this slide despite needing to modify it. It works great and is very solid. One thing it has that the MSA did not is a secondard lock (yellow handle under the center of the slide that can be seen when it's closed). This lock when engaged holds it all very solid and still so there is no movement or rattling. The slide and drop mechanism is smooth and easy to use.
First off, after having the EBC/Hawk brakes for a couple months now I can say that I like the setup. I do think it's an nice upgrade from stock, but it isn't a massive change. I don't have any hard data that show braking distance has improved but the seat of the pants feel is that the brakes bite a bit harder than stock, but don't expect these to feel like sports car brakes.
I posted this upgrade in the "what did you do to your 80 this weekend" thread but didn't add it here. If you look back a couple pages you'll see the MSA fridge drop slide I added this past summer. It's a really nice slide and very heavy duty. The one thing I didn't like was that the handle arm rotates up and over the top of the fridge. The fridge needs to be able to drop at least 10" for the arm to fully rotate past the top of the fridge. Since my drawers are only 8" tall the handle couldn't fully rotate out of the way so the handle was partially in the way of opening the fridge. It wasn't a huge issue, but an annoyance all the same.
So I sold the MSA slide and instead purchased a Clearview Easy Slide. This slide is also extremely heavy duty but the handle rotates down instead of up so it would not be in the way of opening the fridge. The vendor I ordered from told me which model was the correct one to fit my fridge. They were correct that it was the right model based on the footprint of the fridge but did not take into account the height of the fridge. So....the handle could not close all the way because it would contact the side of the fridge. This meant modifying the handle along with the handle release lever. They both needed to be extended about 2.5". Fortunately I have a welder and was able to make the modifications without too much trouble. For someone that didn't have the tools needed this would render the slide useless until they could get it to someone who could modify it or exchange it for a larger model slide. The Slide model is the ES150-PLUS. My fridge is a Snomaster CL52D. If you have this fridge you'll want to order the slide model larger than the 150-PLUS to avoid needing to modify anything.
Untitled by Adam Tolman, on FlickrThis is after making the modifications to the handle. The end of the red arm is where the original handle was. You can see the part I added painted black.
Untitled by Adam Tolman, on FlickrUntitled by Adam Tolman, on FlickrUntitled by Adam Tolman, on FlickrUntitled by Adam Tolman, on FlickrUntitled by Adam Tolman, on FlickrUntitled by Adam Tolman, on FlickrI really like this slide despite needing to modify it. It works great and is very solid. One thing it has that the MSA did not is a secondard lock (yellow handle under the center of the slide that can be seen when it's closed). This lock when engaged holds it all very solid and still so there is no movement or rattling. The slide and drop mechanism is smooth and easy to use.
Box Rocket
SILVER Star
- Thread starter
- #858
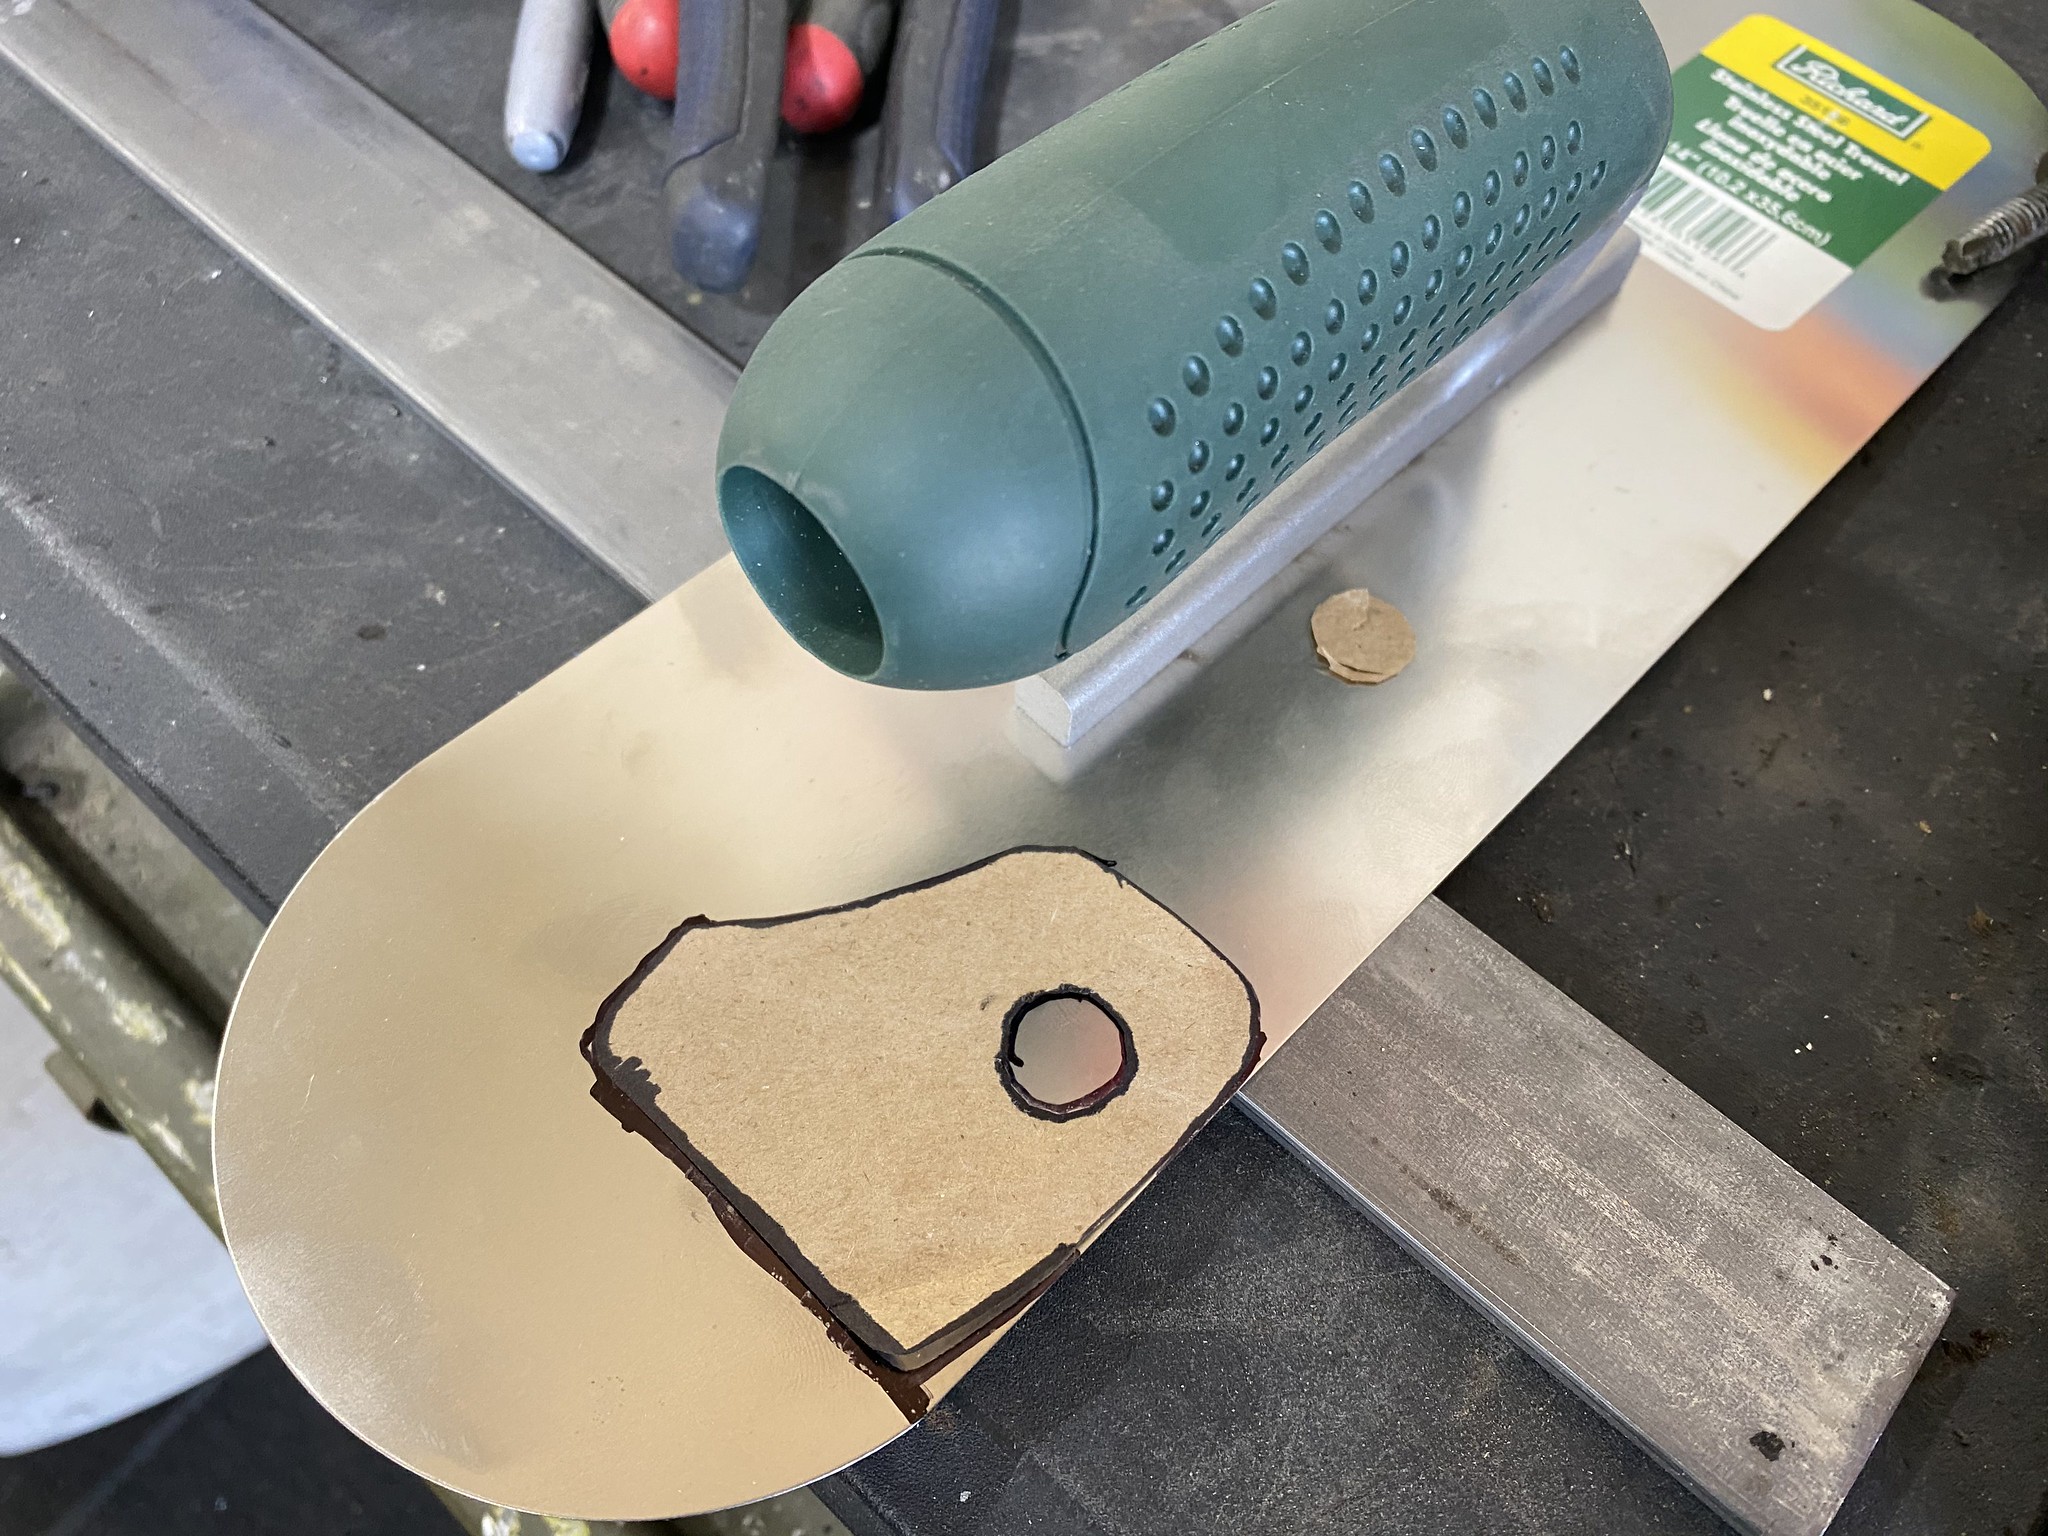
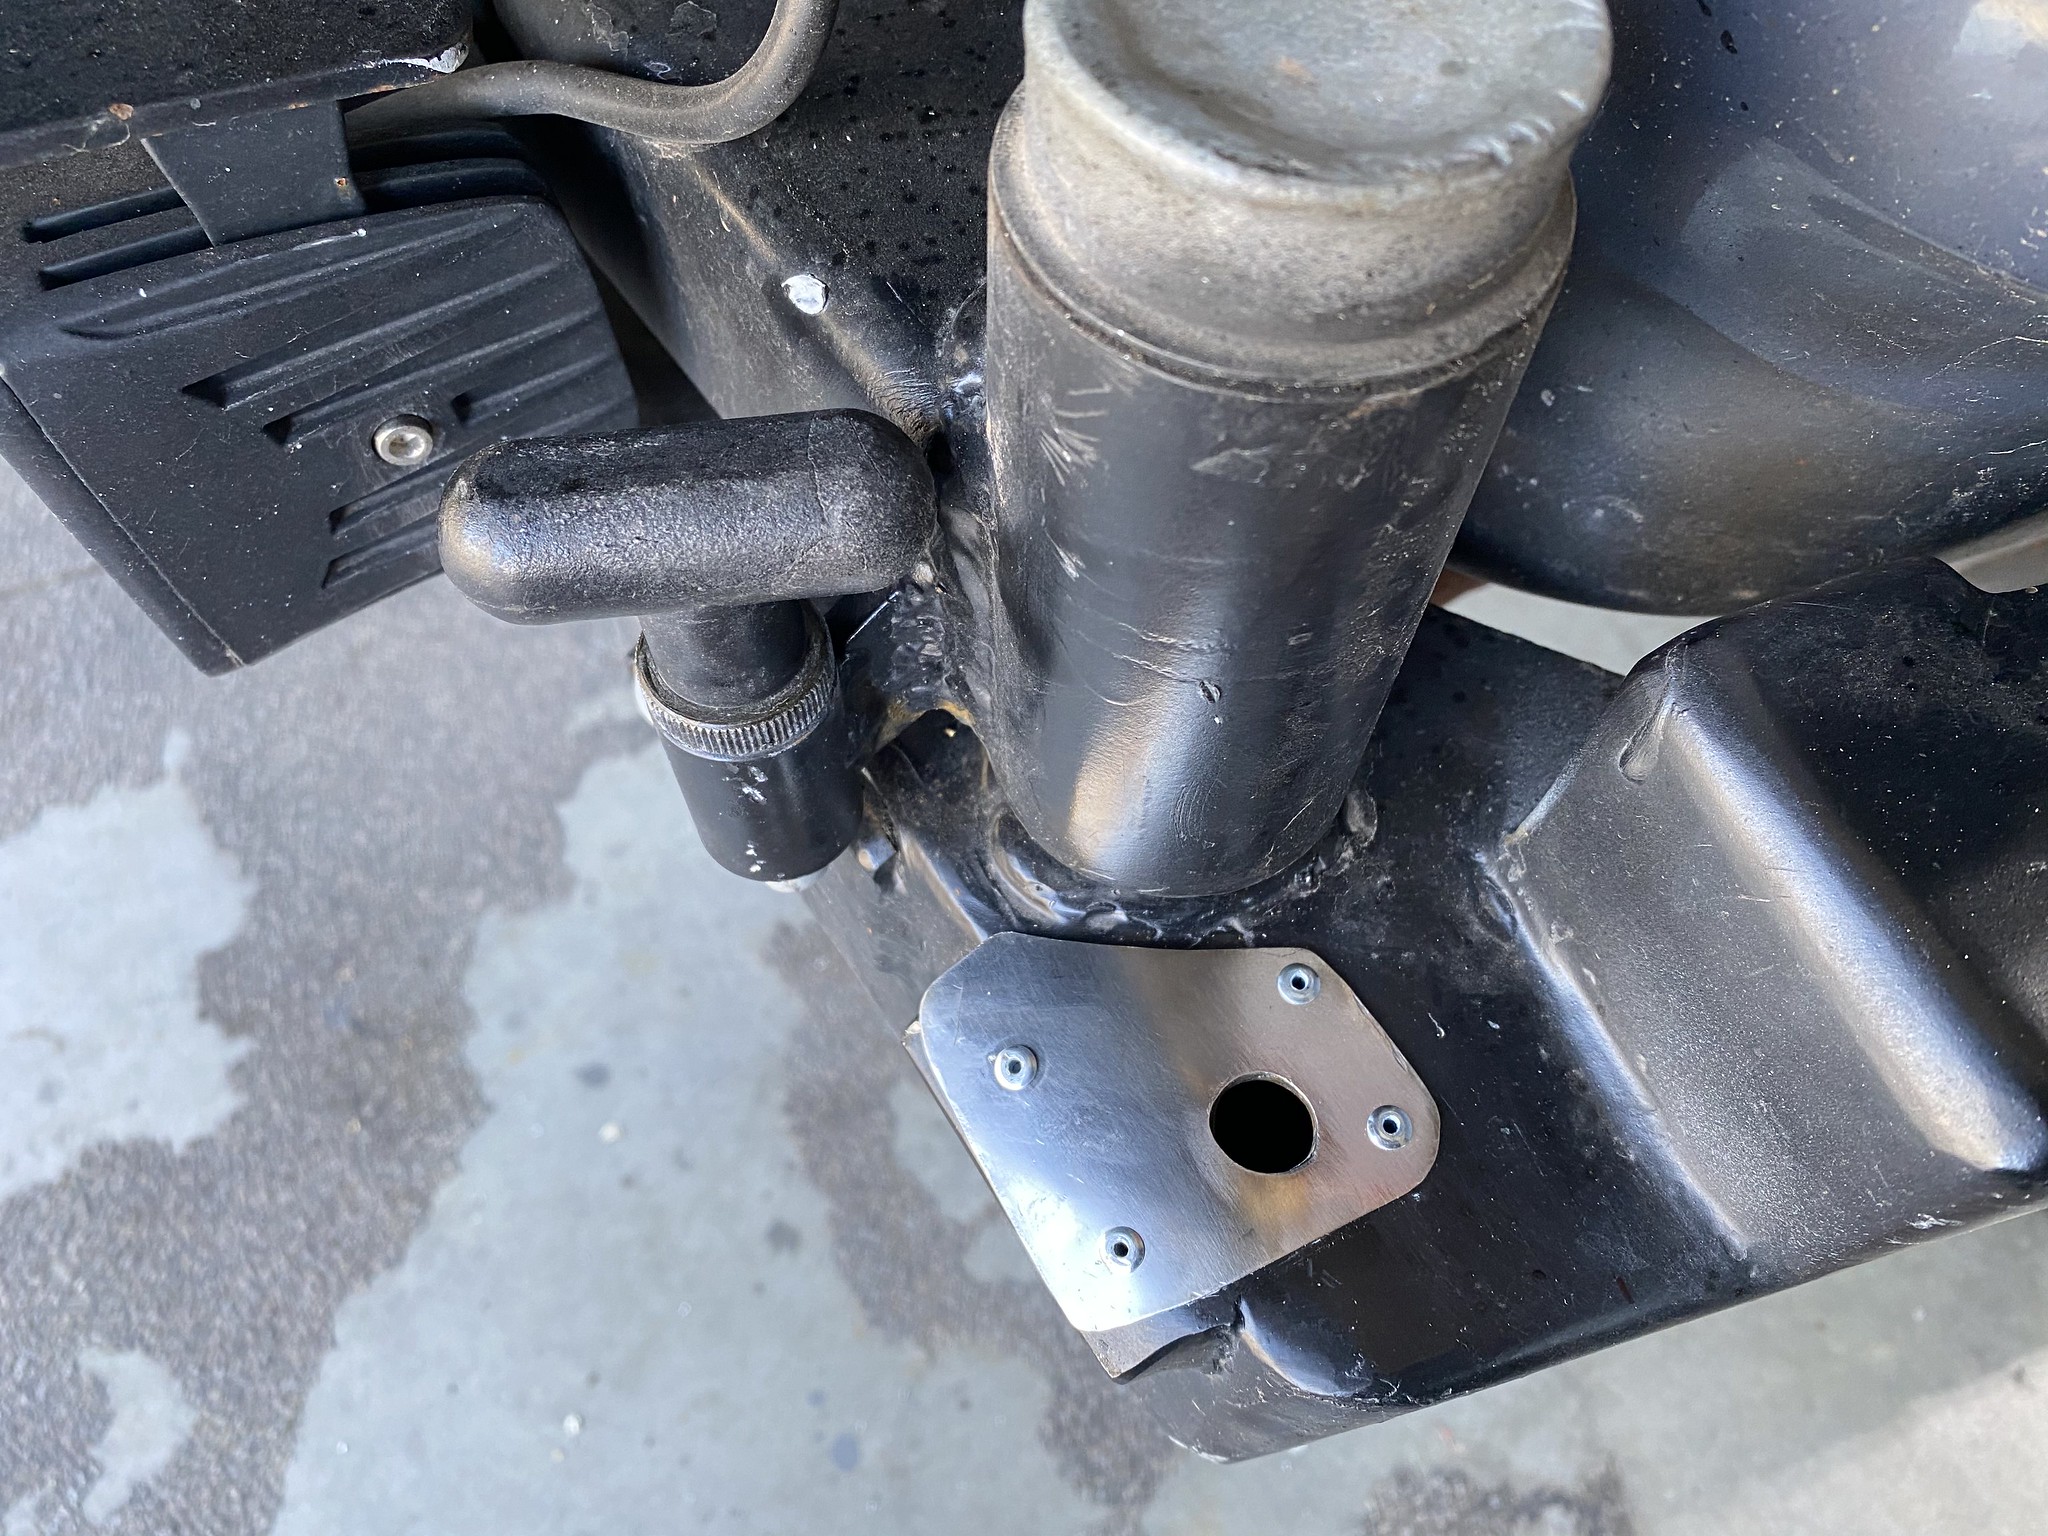
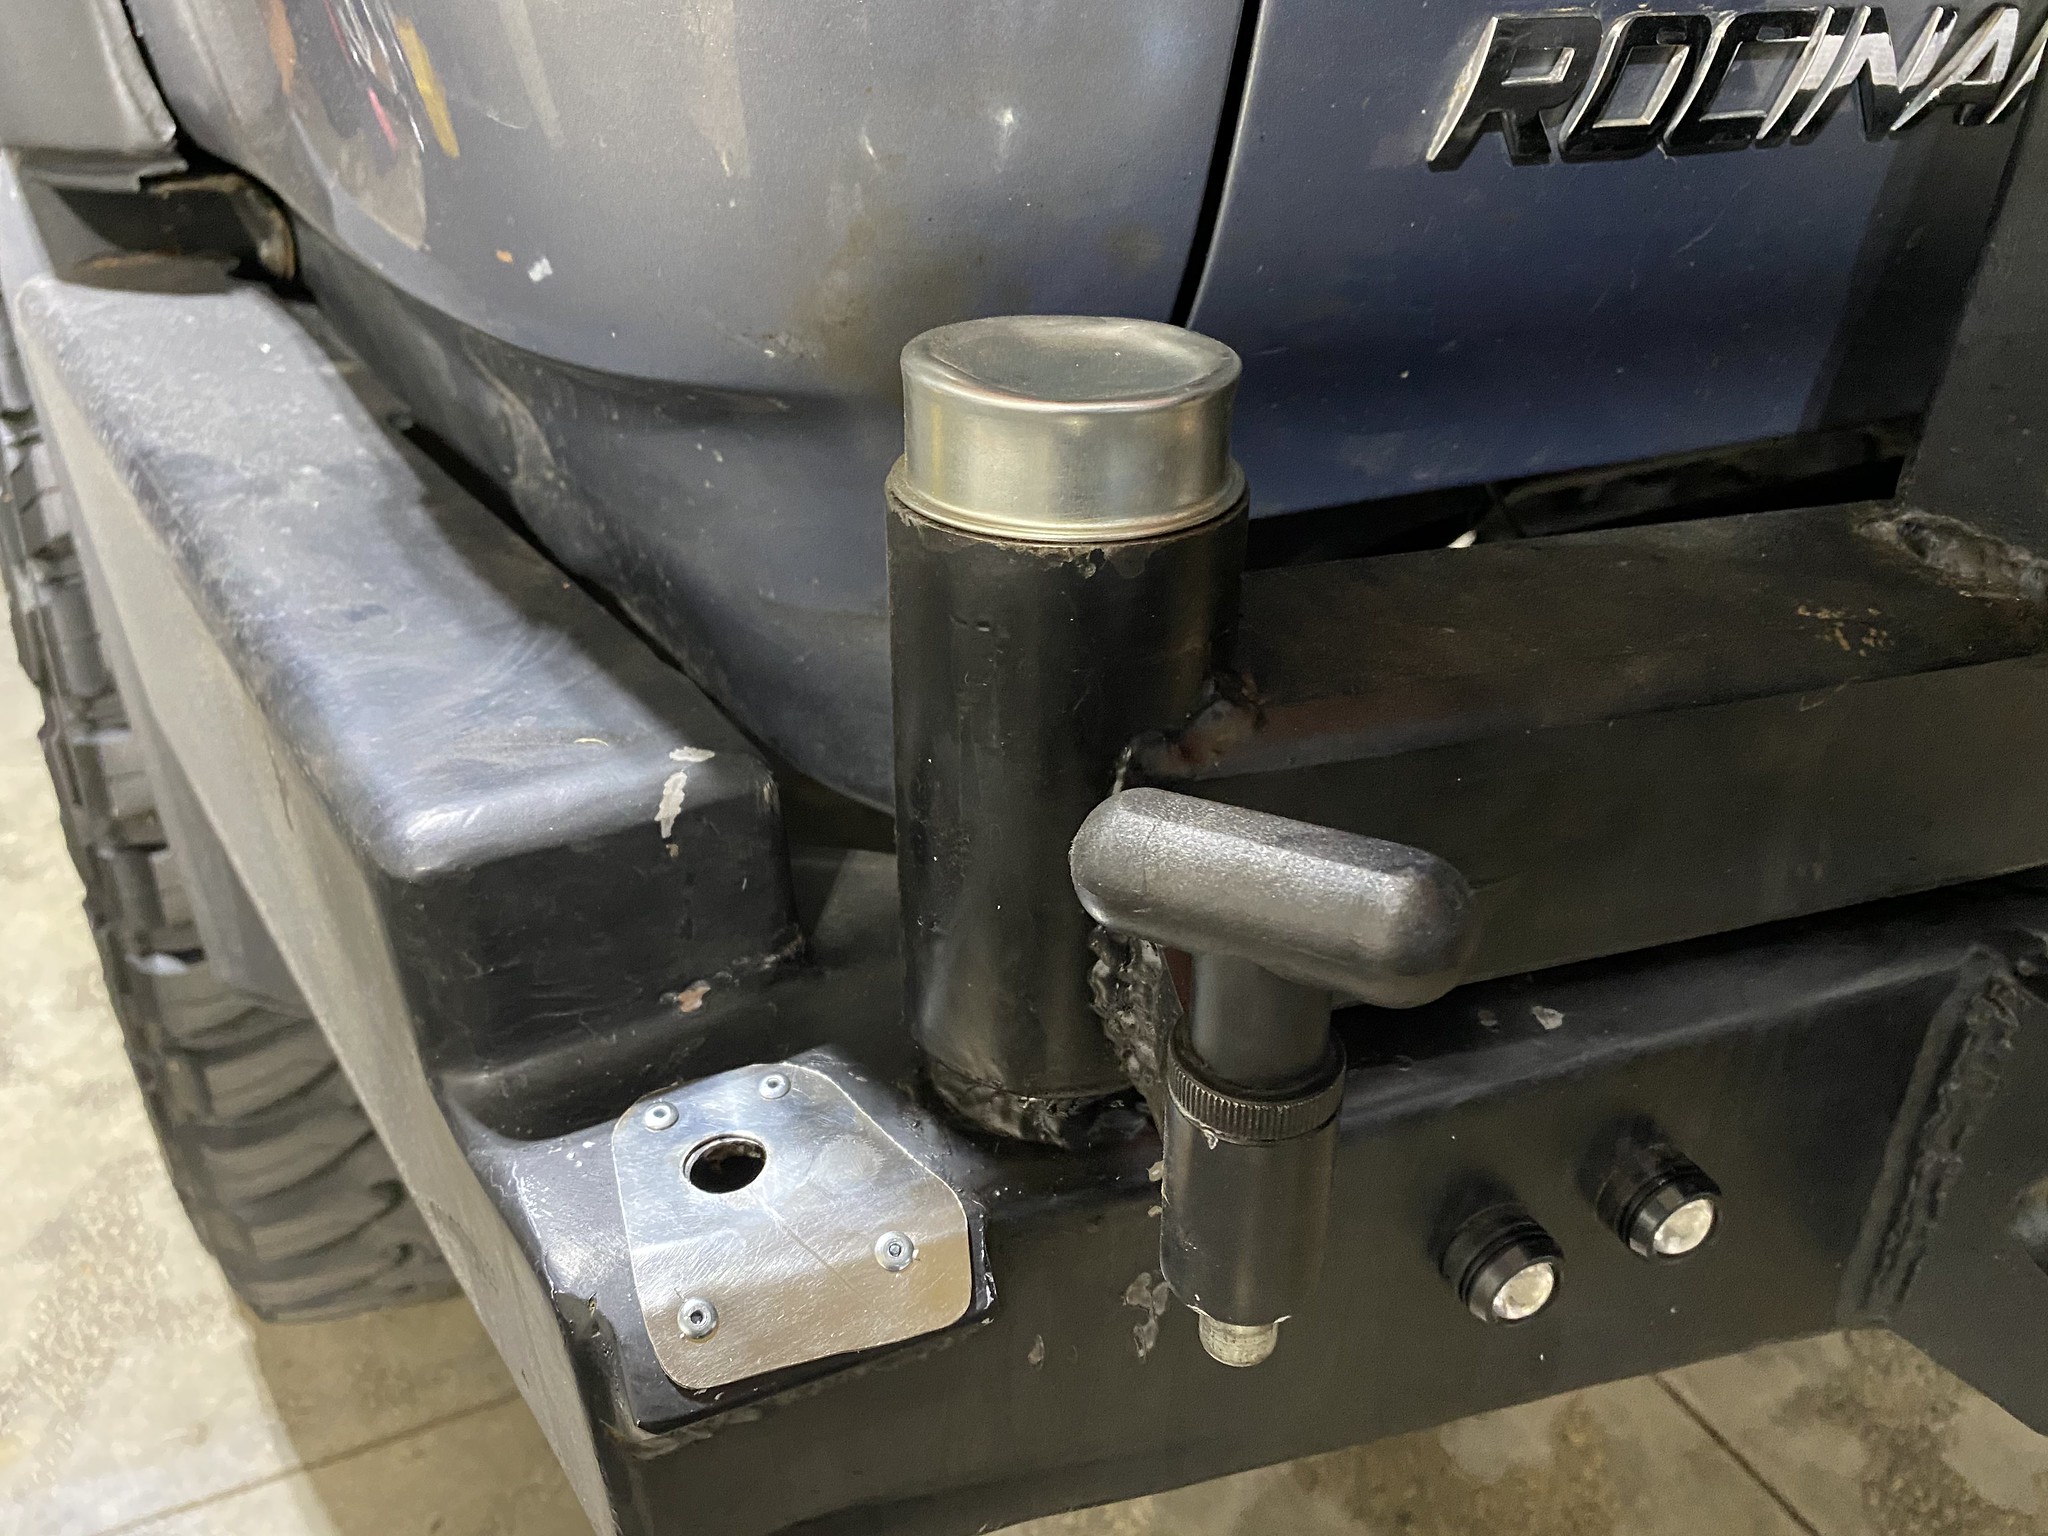
The most recent update is a minor mod I did last night to add some stainless guide plates for the lock pins on my rear swingouts. I couldn't find any stainless plate locally so I had to get creative and I purchased a stainless trowel and cut out what I needed from the trowel. Doing this by hand (freehand) with simple tools isn't necessarily the cleanest result but it works.
 Untitled by Adam Tolman, on Flickr
 Untitled by Adam Tolman, on Flickr
 Untitled by Adam Tolman, on Flickr
Untitled by Adam Tolman, on FlickrUntitled by Adam Tolman, on FlickrUntitled by Adam Tolman, on FlickrHoly smokes. please tell me where to get this bumper........
jkeithw
Supporting Vendor
that reminds me of my art school years... LOLThe most recent update is a minor mod I did last night to add some stainless guide plates for the lock pins on my rear swingouts. I couldn't find any stainless plate locally so I had to get creative and I purchased a stainless trowel and cut out what I needed from the trowel. Doing this by hand (freehand) with simple tools isn't necessarily the cleanest result but it works.
Similar threads
Users who are viewing this thread
Total: 1 (members: 0, guests: 1)