Navigation
Install the app
How to install the app on iOS
Follow along with the video below to see how to install our site as a web app on your home screen.
Note: This feature may not be available in some browsers.
More options
Style variation
You are using an out of date browser. It may not display this or other websites correctly.
You should upgrade or use an alternative browser.
You should upgrade or use an alternative browser.
81 BJ42 - I have to bring it home and pass inspection
- Thread starter Awl_TEQ
- Start date
This site may earn a commission from merchant affiliate
links, including eBay, Amazon, Skimlinks, and others.
More options
Who Replied?Those are nice. Are they made by Koito?
I vote you drill all the holes to put all the lights.
Then...add lights as needed.
Amps shmamps, you can biuld a double alternater bracket easy
Then...add lights as needed.
Amps shmamps, you can biuld a double alternater bracket easy
DanS HJ-45
SILVER Star
build a bull bar type thing. I think you'll be fine mounting them right in the center but I don't like how close they are together. Is clearance from your winch going to be an issue?
I also do not like the look of lights just under the factory ones.
I agree with cooling but at the same time I have never had issues and not to mention there are guys running 3 lightforce 240s on the front of their cruisers in Aus not having cooling issues.
I also do not like the look of lights just under the factory ones.
I agree with cooling but at the same time I have never had issues and not to mention there are guys running 3 lightforce 240s on the front of their cruisers in Aus not having cooling issues.
crushers
post ho
drill, doesn't mean you have to use them.
plus, it seems LED is all the rage these days so a nice 15" across the top, your purdy fogs down under or outer top main beam.
done.
so what is going to be the price on the main beam when completed?
plus, it seems LED is all the rage these days so a nice 15" across the top, your purdy fogs down under or outer top main beam.
done.
so what is going to be the price on the main beam when completed?
Awl_TEQ
Supporting Vendor
- Thread starter
- #650
ForealBoreal said:build a bull bar type thing. I think you'll be fine mounting them right in the center but I don't like how close they are together. Is clearance from your winch going to be an issue?
I also do not like the look of lights just under the factory ones.
I agree with cooling but at the same time I have never had issues and not to mention there are guys running 3 lightforce 240s on the front of their cruisers in Aus not having cooling issues.
They would be fine in the middle but I think they are too big in proportion to the bumper. At least on the screen, might be different on the truck. Not sure about where they are in relation to the headlights. It will be test fitted before full weld and powder. Might have to drill more holes.
Can't wait to see that bumper! What d'ya figure the weight will be?
Let me know if you are interested in making one more as a weld together kit, I'd be interested.
Let me know if you are interested in making one more as a weld together kit, I'd be interested.

Chamba
Too short. Too long. Just right: the 43
Kevin,
I read this article and tought of you.
http://blog.hemmings.com/index.php/...ernie-adamss-dwarf-1939-chevrolet/?refer=news
When are you going to make a 7/10 scale BJ42? I'd bet dollars to doughnuts we could get it written up in Hemmings, and you could then take your rightful place in the upper eschelon of gearhead craftsman.
Josh
One common thing I've noticed about almost every bumper design aside from the stock or straight bar types is that they all seem to seriously block the dumb headlights . Why do that ?? Can't anyone make a design that would protect the nose of the 40 in an animal strike and not interfere with turn signals and headlights ?
Good score on the fog lights , those are too cool .
Sarge
Good score on the fog lights , those are too cool .
Sarge
I think the bumper looks great.... But on this truck with everything else looking stock I think it might be cool to have the ends of the bumper curve in reminiscent of the OEM unit rather than the flat bent style you have going. The flat bend is done out of convenience usually. The curve would really kick the design into new territory as opposed to looking like what is already out there. Kinda like if the original bumper could actually bump stuff.
Just my $.02.
Pete
Just my $.02.
Pete
Awl_TEQ
Supporting Vendor
- Thread starter
- #656
Been working too many hours lately. Not much energy left at the end of the day to work on the 42. Just signed up for Cruise Moab so I'd better get her on the road and the bugs worked out.
To that end...
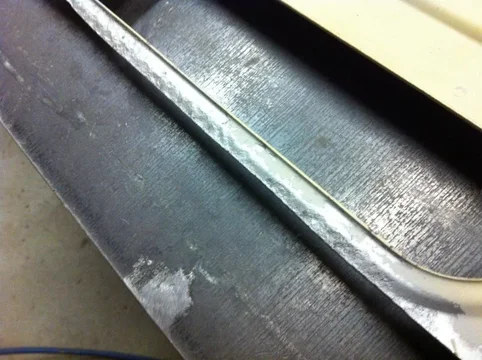
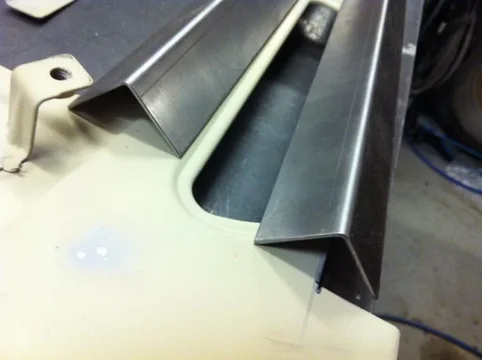
When last we saw the 42 I had opened up the bib and decided to fix it. I cut out the rust which fortunately was just getting to the two rad openings. If left to rust a little longer I would have had more work in replicating the edges of the openings. As it is I had only to make two angles, one from 16 ga for the outer layer (shoulda been 18 ga actually) and one from 14 ga for the inner layer. I simply made them both 24" long and roughly 1.5"x1.5" each.

I then took it to the shop where we have a bigger bead blast cabinet. I blasted the rust away from the weld area. Very important when the remaining material is so thin to have no contamination to fight with while welding. I also "fogged" the remainder of the bib to essentially "sand" the finish for primer adhesion. I did take any rusty spots down to metal. You eagle eyed lurkers will see the rust apparent in the bottom left. That was hidden under the end of the inner angle when I was blasting.

The backside is pitted but the front is good.


To that end...
When last we saw the 42 I had opened up the bib and decided to fix it. I cut out the rust which fortunately was just getting to the two rad openings. If left to rust a little longer I would have had more work in replicating the edges of the openings. As it is I had only to make two angles, one from 16 ga for the outer layer (shoulda been 18 ga actually) and one from 14 ga for the inner layer. I simply made them both 24" long and roughly 1.5"x1.5" each.

I then took it to the shop where we have a bigger bead blast cabinet. I blasted the rust away from the weld area. Very important when the remaining material is so thin to have no contamination to fight with while welding. I also "fogged" the remainder of the bib to essentially "sand" the finish for primer adhesion. I did take any rusty spots down to metal. You eagle eyed lurkers will see the rust apparent in the bottom left. That was hidden under the end of the inner angle when I was blasting.

The backside is pitted but the front is good.

I think the bumper looks great.... But on this truck with everything else looking stock I think it might be cool to have the ends of the bumper curve in reminiscent of the OEM unit rather than the flat bent style you have going. The flat bend is done out of convenience usually. The curve would really kick the design into new territory as opposed to looking like what is already out there. Kinda like if the original bumper could actually bump stuff.
Just my $.02.
Pete
That would be way cool!
On my bib one of the plastic headlamp adjusting sockets broke. Anyone replaced these before? Is there a Toyota part# for it?
Awl_TEQ
Supporting Vendor
- Thread starter
- #659
This was the worst spot. It blew a hole when I was welding it but I was using the Silicone Bronze filler rod with the TIG and just filled it up again.

The two angles

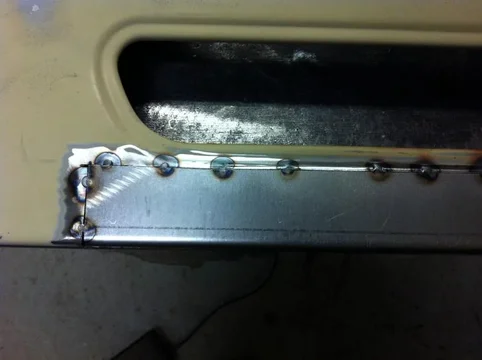
Hello, may name is Kevin and I have a clamp fetish.
I clamped it down to a flat surface and spent a half hour trimming the 16 ga angle to fit as flush as possible to the cut I made with the grinder.


The two angles

Hello, may name is Kevin and I have a clamp fetish.
I clamped it down to a flat surface and spent a half hour trimming the 16 ga angle to fit as flush as possible to the cut I made with the grinder.

Similar threads
Users who are viewing this thread
Total: 1 (members: 0, guests: 1)


