Not sure how accurate 95-97 land cruisers not having the 2 plugs is. Mines a 06/94 and it has both plugs. Unless they’re for something completely different. Seems to fit both passenger and drivers side

Follow along with the video below to see how to install our site as a web app on your home screen.
Note: This feature may not be available in some browsers.
This site may earn a commission from merchant affiliate
links, including eBay, Amazon, Skimlinks, and others.
i'm working on installing that dorman kit, tied into oem harness... any chance you can share how you wired them up? I am struggling with how to tie the two elements together.I used the Dorman kit from Summit tied to oem seat harness and switches and they work great. In all of my seat heat switch searching I ended up with a couple of extra horizontal switches if anyone's looking for switches.

big time thank you, even answered my question about the red-blue wire
") muchas gracias!
muchas gracias!No problem. Initially I 'rewired' then on how I thought they should go because the way it is didn't make any sense to me. When I did that it backfed voltage through the switch on low and both lights lit up and then on high it would just pop the fuse instantly since it was wired straight to ground essentially.big time thank you, even answered my question about the red-blue wire
No problem. Initially I 'rewired' then on how I thought they should go because the way it is didn't make any sense to me. When I did that it backfed voltage through the switch on low and both lights lit up and then on high it would just pop the fuse instantly since it was wired straight to ground essentially.
I don't know that. Looking at the schematic doesn't appear so. I would maybe do a Texas twist on the wires and hook it up not installed completely and test it. If you blow some fuses or let the smoke out, you know it before your seat is all back together.do you know if the he heating elements have a polarity?
Trying to work out if there is an orientation of the elements on your drawing (in terms of + or -)
I bought some of the vertical switches a long time ago from cruiserparts.net and I finally tackled this job. But there were still some unanswered questions that weren't really addressed on this thread (at least not according to my feeble brain), so I was hoping to shed a little bit of light on the things that confused me.
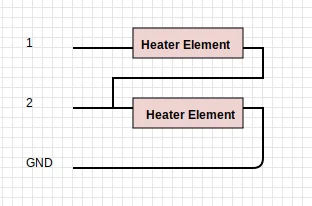
First, according to this (http://forum.ih8mud.com/attachments/seat-heater-electrical-diagram-pdf.460604), the seat heaters are connected in parallel when the switch is HI (each sees the full 12V), and in series when the switch is LO (each sees only 6V). There are two extra connections to be made to the under-seat connector, in addition to the ground. When switched to HI, the pins are connected to:
1 GND
2 +12V
When switched to LO, the pins are are:
1 +12V
2 Open Circuit
So you can wire the aftermarket heaters to be in parallel/series like:
In HI, the voltage at pin 2 reaches both heaters and they are both independently grounded. In LO, the voltage travels through the top heater, then the bottom, then to GND.
Also, I wanted to put new pins in the connector on the seat, and I searched for exactly what kind of pins they are (and a part number). Using this (https://forum.ih8mud.com/attachments/connectors-pdf.915794/), I found that the pins are of the 2.3II type (since the pin is 2.3mm across), and that you can buy one from Toyota using part number 82998-12330. But they're quite expensive and include a pigtail. I just wanted the pin itself, and I found this (Amazon.com: Automotive Connectors 090Ii Non Sld Tab(Sq 0.3-0.5): Automotive) if you want 5 or this (Amazon.com: Automotive Connectors 090II NON SLD TAB(SQ 0.3-0.5) (50 pieces): Automotive) if you want 50 of them. The 2.3II pin is the same as a 090II pin (they're also .090 inches across).
I hope that helps!
Not sure if I'm reading your question right, but I plugged in my switch, and using a test light on each individual seat connector pin watched for the light to illuminate when switching the switch to high/ low/ off.In your schematic, any chance you know what position in the plug pins 1 and 2 correspond to?
@Somebodyelse5 did you buy male terminals for the empty pin postions from the dealer, or somewhere else? i found some dead links to non-toyota parts on Amazon but can't find anything similar. i see butt connectors in that pic but i'm assuming you cut those off?

Glad you got it sorted out! It's rewarding to get a project done, especially when it heats your buttThanks @Somebodyelse5!
I installed new leather and cushions a few months ago (with the help of MUD forums) and happened to put the same Dorman heater elements in while I was at it. I just needed to wire it.
I took Somebodyelse5’s directions to a local car electrician and he said that he wasn’t 100% sure if doing it this way provided “modulation” and that he couldn’t risk messing up something with my cruiser. He would only finish the install with the Dorman kit switches. He did say if it was his car he would try this way though because he understands using the OEM switches is important and the wiring looked correct.
So I have zero banana skills and I successfully completed this mod today, and SEEMS to be working. Seats took a few minutes to heat up, but they are working as intended.
For the zero banana people out there like me that have never done wiring before, here are a few tips I learned today:
That’s about it. I will update if there are any issues with the install. First time I’ve ever had seat heaters in a car!
- Buy quality electrical tape ($5) and some crimps at Home Depot to connect the wires. You’ll need a wire stripper too if you don’t have.
- When you strip the wire, make sure you are not damaging the wire. I kept doing this and had to recut the wire shorter to redo it.
- I ordered one OEM terminal wire (82998-12330) from the stealership and the pin contacts mentioned by Somebodyelse5. The pins came quick less than a week and were a perfect match. However, doing it again I would have just bought 4 OEM pins because it’s already connected to a wire and that’s 4 less ways I can mess up. About $5 a piece is an ok price to pay to avoid the opportunity to mess things up, I think.
- The stock Dorman kit comes with fuses in line. I cut those out of the kit and added them in one of the connections for each seat. I‘ve heard there is already a fuse in the rear heater circuit, but I felt better about adding them in this way.
- Be very carful tapping into the wire coming out from pin 3. You don’t have much room for error. I used this method to tap into that wire.
- Because soldering seemed hard, I used the crimping method for all the other connections. Then wrapped each connection with electrical tape.
View attachment 2930807