
- Joined
- Jul 5, 2010
- Threads
- 13
- Messages
- 310
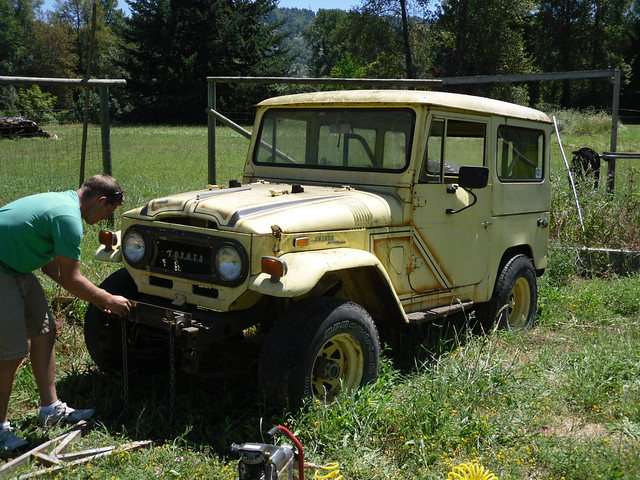
So a couple of months ago my buddy (a fellow mud member) calls me up to tell me he has found a great cruiser and I should buy it. I wasn't really looking and he had done this to me a couple of times before over the past year. I guess he had softened me up a little because for some reason I told him to jump on this one for me. It was a 1970, relatively straight and most importantly "rust free". It was somebody else's V8 swap project before the current seller bought it to cannibalize sheet metal for his '62. It sounded like a decent machine and I ended up getting it for $1400. It's interesting what a little spur of the moment decision can lead to.
It took about 2 weeks before my friend and I could find time to head out and pick it up. Only then did we realize that the rig was over 1000 miles away! It seems both the seller (also a mud member) and my friend were both playing the craigslist game with my friend using a site to search for cruisers within a 500 mile radius and the seller posting to every conceivable craigslist area he figured a buyer might be willing to drive from. I'm in St. George Utah and the cruiser was in Roseburg Oregon. We added a stop in Boise to visit family and get some rest and 2.5 days and 2300+ miles later I had my project.
Hooking up for the flat tow home (not me in the photo). This is how it must have sat for a couple of years based on how deep the tires had sunk into the dirt. Gotta love those stripes.

Yeah, that's not the right place for an engine, I know. Because we were flat towing it home we had to get a little creative with how we packed everything up.

Stance sits a little funky with the engine in the cab. The mismatched wheels are actually two halves of matching sets. The other wheels are in the engine bay. Uncut fenders by the way.

I think in total I ended up with one full cruiser -- 80% of what I need to complete this one and another 20% of duplicate or not applicable parts. Hopefully I can sell some of this stuff off and offset the cost of the project, which, when you include the cost of gas to go get it, is adding up fast.

It turns out the cruiser basically was "rust free". Sure, every cruiser has a medium thick coat of surface rust everywhere (don't they?), but under the gas tank was the only place I could find that had actually rusted through.

Don't worry though, I won't be getting off too easy. There are dents all over the place on this thing. This is my first real body work project and I guess we'll see how good I do when it's all finished.

Here's another dent at the rear quarter panel.

I've got to say thanks to my buddy for all his help so far. Initially the cruiser was even parked at his place for a lot of the teardown.
What you see in the background is only about half of the cruisers that he owned at the time. Fortunately for me he had a few parts I could scavenge to get me closer to 100% complete. Hopefully I can return the favor (when I know better what I have left over).
Nothing really out of the ordinary to report about the teardown process. I broke about 50% of the bolts trying to get them out (which is actually preferrable if it's just a nut on the other side). I got pretty sick of drilling out and tapping the rest, though. I've since had more time to see what damage the PO's have done I can see that it's not over yet.

Here's a pic during the teardown process.
Certainly the most interesting thing to happen so far has been dropping an angle grinder on my foot. I was trying to scavenge a steering box mount off of a mostly parted out frame and working around some brake lines I lost my grip somehow. The grinder fell and bounced right off my sandalled foot. It wasn't untill several seconds lateer that I thought "that was a spinning angle grinder that just bounced off my foot, I ought to check that out". Sure enough, got me. Let that be a lesson to you -- always wear the proper protection. It took 8 stitches to fix me up again and now I have a big black scar across the top of my foot. Or, as I like to say, "I have cruiser in my blood" (because I'm pretty sure come of the stuff that's causing my scar to be black is actually landcruiser).

I found a decent set of 4 BFG Muds on craigslist. They were listed as 33x9.5x15's but ended up being 10.5's. A little additional persistence turned up a 5th. That makes 3 sets tires and wheels now.

I like the angle of this shot. New shoes on. Firewall is the final color. I'll be painting it myself using the Ace Hardware Rust Stop tintable paint. The color is custom, but basically just a medium grey. I'm hoping for a more modern version of what might have been a factory color and not for "that looks like primer".

Here it is with the engine in, ready to come home.

Home at last. My garage looks like someone lit a bomb off in the cruiser and parts got scattered everywhere. There will be no parking in the garage for a while. I live in an HOA so I can't even leave the cruiser in the driveway overnight, much less make a mess of the yard. I guess this is kind of a stealth build.

I do pull it out on the good days for some sun.
I've straightened out the dents and done most of the welding I plan to do. I've re-caulked the drip rail, fabricated some new door limiter mounts, put on some lift shackles, refreshed tons of parts that aren't installed yet and am about halfway through stripping off that hideous yellow repaint with rattle can stripes. The original color looks to have been seafoam green. I've decided against installing the 4 speed in favor of keeping the 3 on the tree (it came with both transmissions). I've also got a factory PTO on the 3 speed that I won't be using. Anyway, here's a couple more pics of my progress.


And the reason I'm doing all this? Because I can't wait to take this little guy out in it.


I'm shooting for Christmas. I've still got a ways to go and it's going to take a lot of work, especially with the days being so short. Heck, I don't even know if the motor I have will run yet. I think I have most the critical parts accumulated to get it on the road now, which is good. I can't wait to see what it will look like painted. Not to mention get it on the trail.
Sorry for the long post, but hey, at least I included pictures.
It took about 2 weeks before my friend and I could find time to head out and pick it up. Only then did we realize that the rig was over 1000 miles away! It seems both the seller (also a mud member) and my friend were both playing the craigslist game with my friend using a site to search for cruisers within a 500 mile radius and the seller posting to every conceivable craigslist area he figured a buyer might be willing to drive from. I'm in St. George Utah and the cruiser was in Roseburg Oregon. We added a stop in Boise to visit family and get some rest and 2.5 days and 2300+ miles later I had my project.
Hooking up for the flat tow home (not me in the photo). This is how it must have sat for a couple of years based on how deep the tires had sunk into the dirt. Gotta love those stripes.
Yeah, that's not the right place for an engine, I know. Because we were flat towing it home we had to get a little creative with how we packed everything up.
Stance sits a little funky with the engine in the cab. The mismatched wheels are actually two halves of matching sets. The other wheels are in the engine bay. Uncut fenders by the way.
I think in total I ended up with one full cruiser -- 80% of what I need to complete this one and another 20% of duplicate or not applicable parts. Hopefully I can sell some of this stuff off and offset the cost of the project, which, when you include the cost of gas to go get it, is adding up fast.
It turns out the cruiser basically was "rust free". Sure, every cruiser has a medium thick coat of surface rust everywhere (don't they?), but under the gas tank was the only place I could find that had actually rusted through.
Don't worry though, I won't be getting off too easy. There are dents all over the place on this thing. This is my first real body work project and I guess we'll see how good I do when it's all finished.
Here's another dent at the rear quarter panel.
I've got to say thanks to my buddy for all his help so far. Initially the cruiser was even parked at his place for a lot of the teardown.
What you see in the background is only about half of the cruisers that he owned at the time. Fortunately for me he had a few parts I could scavenge to get me closer to 100% complete. Hopefully I can return the favor (when I know better what I have left over).
Nothing really out of the ordinary to report about the teardown process. I broke about 50% of the bolts trying to get them out (which is actually preferrable if it's just a nut on the other side). I got pretty sick of drilling out and tapping the rest, though. I've since had more time to see what damage the PO's have done I can see that it's not over yet.
Here's a pic during the teardown process.
Certainly the most interesting thing to happen so far has been dropping an angle grinder on my foot. I was trying to scavenge a steering box mount off of a mostly parted out frame and working around some brake lines I lost my grip somehow. The grinder fell and bounced right off my sandalled foot. It wasn't untill several seconds lateer that I thought "that was a spinning angle grinder that just bounced off my foot, I ought to check that out". Sure enough, got me. Let that be a lesson to you -- always wear the proper protection. It took 8 stitches to fix me up again and now I have a big black scar across the top of my foot. Or, as I like to say, "I have cruiser in my blood" (because I'm pretty sure come of the stuff that's causing my scar to be black is actually landcruiser).
I found a decent set of 4 BFG Muds on craigslist. They were listed as 33x9.5x15's but ended up being 10.5's. A little additional persistence turned up a 5th. That makes 3 sets tires and wheels now.
I like the angle of this shot. New shoes on. Firewall is the final color. I'll be painting it myself using the Ace Hardware Rust Stop tintable paint. The color is custom, but basically just a medium grey. I'm hoping for a more modern version of what might have been a factory color and not for "that looks like primer".
Here it is with the engine in, ready to come home.
Home at last. My garage looks like someone lit a bomb off in the cruiser and parts got scattered everywhere. There will be no parking in the garage for a while. I live in an HOA so I can't even leave the cruiser in the driveway overnight, much less make a mess of the yard. I guess this is kind of a stealth build.
I do pull it out on the good days for some sun.
I've straightened out the dents and done most of the welding I plan to do. I've re-caulked the drip rail, fabricated some new door limiter mounts, put on some lift shackles, refreshed tons of parts that aren't installed yet and am about halfway through stripping off that hideous yellow repaint with rattle can stripes. The original color looks to have been seafoam green. I've decided against installing the 4 speed in favor of keeping the 3 on the tree (it came with both transmissions). I've also got a factory PTO on the 3 speed that I won't be using. Anyway, here's a couple more pics of my progress.
And the reason I'm doing all this? Because I can't wait to take this little guy out in it.
I'm shooting for Christmas. I've still got a ways to go and it's going to take a lot of work, especially with the days being so short. Heck, I don't even know if the motor I have will run yet. I think I have most the critical parts accumulated to get it on the road now, which is good. I can't wait to see what it will look like painted. Not to mention get it on the trail.
Sorry for the long post, but hey, at least I included pictures.
Last edited:

")
 ...pens and pencils and kids this young dont normally mix very well


")


