Rusty quarter panel bubbles (1 Viewer)

This site may earn a commission from merchant affiliate
links, including eBay, Amazon, Skimlinks, and others.

Joined
Nov 11, 2017
Threads
3
Messages
41
Location
Oregon
Hey guys, I hate making a new thread but I couldn't find anything on this.


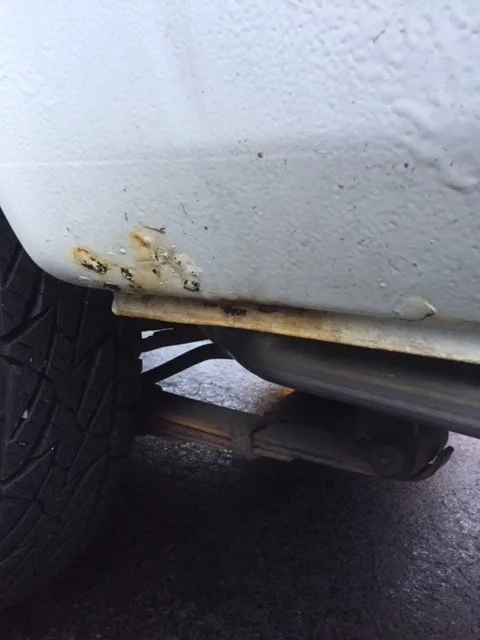
So I noticed some paint bubbles (Not metal rust bubbles) forming when I first bought the truck when I pressed on them they had a rusty smelling and colored water come out of them (gross).

I then sanded the quarter panel and por15'd and painted. I was patting myself on the back for a week or so then I looked and the paint was bubbling again.... F.


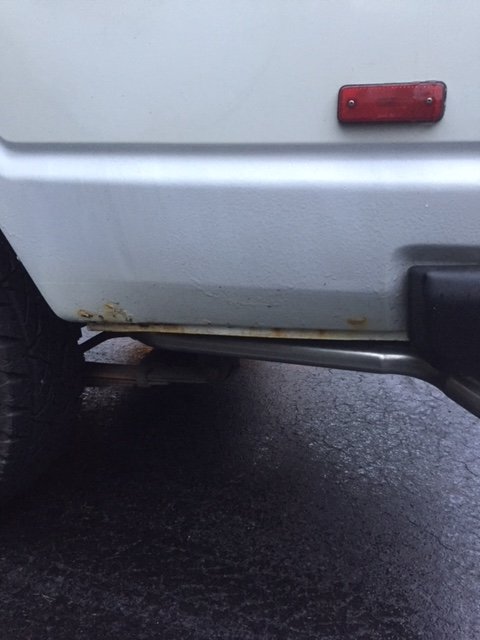
My uncle said that maybe when I started the car because the exhaust pipe (Modified due to the lift kit by a previous owner) was coming out right at the seam of the panel, and maybe condensation was getting up behind it...


SO I went and had the exhaust pipe cut and reconfigured to come out under the bumper like it does stock.


Any ideas of why there may be rust there? or how to mitigate it? When I sanded and painted the metal was clean, and its almost like there is a gap in between the paint on the car and the actual metal of the body...


Rust attracts water like a sponge, and salty rust attracts water like a vacuum cleaner. Wet rust will continue to billow and swell and feed itself with more water and oxygen lifting up more paint as it slowly turns steel back into dirt.

You've got to either dig ALL the rust out with a tiny screwdriver & Ospho phosphoric acid or cut out the rust hole & patch it. As long as the rust remains open to the atmosphere and wet— it won't stop doing what rust does best.
 
the only problem I see with that idea is that I don't actually have and pitting from rust in the metal. Would that make a difference? last time I got in there it was pretty smooth metal...
 
Last edited:
Have you removed the interior panel and looked down inside the panel? When I first got my truck it had a gallon or more of water inside the quarter. The tire throws it up in there if there is a crack in the wheel well seam. Pull the body plug or even better drill drain holes on the inside bottom panel if you have water inside. But don't be in denial that is RUST. Get a grinder and grind til shiny. if you grind holes in it l or it gets too thin you have to cut it out to get to solid metal to work with. Plan on using filler, primer and paint to get it back.
 
I don’t understand... you’re saying that the sheet metal is clean under the paint? That seems hard to believe. Paint doesn’t rust, so metal is oxidizing somewhere. I’d like to see you take the panel to bare metal again and take a look.

Also, like @g-man said, you gotta look inside the panel and clean it out. That will give you an idea of what’s going on. There are drain holes located in the pinch welds along the bottom of the panel, make sure they’re clean and clear. They let water drain out of the panels.

As @OSS mentioned, you have to cut, scrape and grind out all the rusted metal and weld in clean patches. It’s the only way to stop the spread.

See my thread:

Oh nooooo..... RUST!
 
Last edited:
Ok sounds good. I will take the advice. I must not have been vigilant enough the first time.

Any specific brand suggestions for
- primer
- filler
- paint?
 
Devil is in the detail when doing the prep work.. If you plan to take down to bare metal again then I would prep everything, Ospho it after you have taken down to ensure it is clean of the rust, then prime over.. Think Primer/Filler/Paint you can choose whatever variant you want.

I recommend wearing a mask and cleaning up any drips on concrete immediately with water if you use the Ospho (easy to find at Lowe's HomeDepot as Prep & Etch concrete cleaner, big blue-ish bottle). When weather warms up for me I plan on tackling my other panels rust with new metal but while I am in there I am going to ospho everything then once the new panel is in I plan to undercoat the inside of the panel to ensure that I dont get any rust/water inside the panel like I occasionally do now.
 
  • Like
Reactions: OSS
I love your uncles ferry tales, rust is a private thing, you don't share it with others.
 
Devil is in the detail when doing the prep work.. If you plan to take down to bare metal again then I would prep everything, Ospho it after you have taken down to ensure it is clean of the rust, then prime over.. Think Primer/Filler/Paint you can choose whatever variant you want.

I recommend wearing a mask and cleaning up any drips on concrete immediately with water if you use the Ospho (easy to find at Lowe's HomeDepot as Prep & Etch concrete cleaner, big blue-ish bottle). When weather warms up for me I plan on tackling my other panels rust with new metal but while I am in there I am going to ospho everything then once the new panel is in I plan to undercoat the inside of the panel to ensure that I dont get any rust/water inside the panel like I occasionally do now.


Ok I will get the Ospho stuff... I just looked inside the panel through the jack hatch and saw some condensation, but no water build up.

Can anyone tell me where the drain plugs are that were talked about previously?


Could it be worth drilling my own drain plugs underneath the quarter panel?
 
Look under the truck at the inside vertical panel where it comes down to the pinch weld. About 3 inches from the wheel well. Try to keep this drivers side wheel well dry inside. There a electrical connections to the rear lights at the back and a connection to the fuel sender in the forward section down low. When these corrode you will have problems.
 
I do not believe in POR-15. Rust can still happen under it, and then appear. When you grind you find it much larger than what the appeared location is.

Removing rust is not as simple as grinding it off. All the pin holes, pocks, etc need to be rust removed using a chemical. Like a gel rust remover, then a wire brush. At the very end I use a rust converter incase something is missed. Or you can blast the surface with a fine grit soda blaster. Which may also get the minor rust out.

POR may work on heavy rust on a frame or such, but I do not feel it works on sheet metal. I used POR 100% all over my cruiser, ten years ago.

I also know a lot of this rust comes from the inside out. Get on the inside and see what is going on, also spray some rust check, or grown oil, LPS 3 or something good in there to prevent rust.

But remember Mr. Yota built these trucks with s***ty metal, and did not help matters with bare metal in the seams. They are built to rust. Oil the heck out of it. And if you can (like me) don't drive it in the winter...
 
Ok I will get the Ospho stuff... I just looked inside the panel through the jack hatch and saw some condensation, but no water build up.

Can anyone tell me where the drain plugs are that were talked about previously?


Could it be worth drilling my own drain plugs underneath the quarter panel?
You need to look further down into the wheel well cavity to see as the water usually pools down below. Not an easy task to get in there and see what is going on. You will know you have water in your quarters if you suddenly have condensation on the inside of the windows back there for no reason.
 
Alright, I am going to get started on this. Not a fun realization mid winter in Oregon.


Here is a list I have compiled from all of your advice, Please let me know if I should change or add anything:


Step one- Grind, and sand, and put rust remover gel in the pock marks and wire brush them

Step Two- Ospho wiped on affected area

Step three- Rust converter Spray on surface in case I missed something

Step four- Primer

Step five- Filler

Step six- Paint
 
Without removing the affected areas completely that is about as best as you are going to get, so yes those steps sound about right. When you are taking the paint/rust down on the affected area DO NOT use a flap disc. This will burn through metal and potentially make things worse in those areas depending on how thin the metal already is. Instead use a scrotch brite pad on a wheel, or as my buddy calls them Hamburgers. They aren't scotch brite specific but basically they are an abrasive pad specifically made for your 4 1/2" angle grinder. They zap through paint and rust pretty quickly without actually cutting into the metal.

Here are the ones I usually get from HF. 4-1/2 in. Polycarbide Abrasive Wheel
 
I'd go with

1.grind down to clean metal.

2 Rust converter if needed or other metal prep. If you are patching in large areas or panels with bare metal that don't require filler you should etch prime these large areas of metal. otherwise....

3 Filler...yes filler adheres well to bare metal. Use as large a squeegee as you can to cover the area. Also smear in large smears as apposed to lots of small "mounds" of filler together.

4. Sand...start with 80 grit and working down to 320. DA works well here

5. guide coat or light spray of black or gray spray can paint. This is just a dusting of paint.

6. light sanding with a stiff sanding block to find low spots. You are investigating here not just blindly scrubbing away.

7. More filler

8. More sanding. again 80/120/220/320 using DA sander.

9. repeat steps 5 thru 8 maybe up to 3 times if necesary, check by wetting and looking down the car with a light.

EDIT: additional step that is optional here ..before primer, glaze putty or dolphin glaze to go over any tiny pock holes in the filler. again light sanding. If you use dolphin glaze mix in 1 or 2 percent hardener or it will just stay sticky. It goes on smooth compared to glaze putty which can has more of a muddy texture and harder to work with.

10. 2k primer

11. Sand lightly by hand front to back 320. No DA here as they leave swirl marks.

12. Wet sand 400

13. Wet sand 600, wash area. tape off. use paper to cover large areas.

EDIT: step 13.5..prep the area to be sprayed. take an air nozzle and spray off any dust. Try not to stir things up in the air too much. Wait a few minutes then tack rag the surface. You'll prob need 3 to 6 tack rags for an entire vehicle depending on how particular you are. prob just one for the quarter. Then apply wax and grease remover to the surface with a lint free cloth. apply some of this to the rag and wipe evenly across the surface. Then before it dries, wipe across the wet area with a dry lint free cloth. Continue this over the entire area change cloth often. Now you have removed all finger prints and wax and grease and dust. Don't touch the work area and get ready to spray.

14. Base coat maybe 2 coats or until covered well

15. Clear coat with high solid clear 3 to 4 coats.

16. wait about a week or 2 for paint to cure

17. Wet sand with 1000/1200/1500 changing paper often.

18. wash clean

19. Buff with meguires ultra cut at about 1200 rpms with a clean wool buffing head. Be careful if you haven't done this before too much pressure on esp. on body lines or tight fitting areas where you're turning the buffer sideways can burn through the clear.

EDIT. 20. Hand glaze. Not only will it add a final finish. It can be used on a rag to remove dried rubbing compound from door wells etc.
 
Last edited:
So I did some digging, and you all were right. I got a ton of silty mud out of both QP's

I also found this in one of them.... Does anyone recognize what this might go to?


If I don't have the expertise, or money yet to truly do a good job repairing both sides, and resealing (I assume thats what y'all would do??)the pinch welds at the bottom, how should I treat the rust so that it doesn't get worse for the next couple years?


Thanks!
 

Users who are viewing this thread

Back
Top Bottom