Old Air Hurricane Install (1 Viewer)

This site may earn a commission from merchant affiliate
links, including eBay, Amazon, Skimlinks, and others.

Honger

Joel, TLCA #21509
Supporting Vendor
GOLD Star
SILVER Star
Joined
Aug 11, 2005
Threads
87
Messages
3,337
Location
Peoria, AZ
So one thing I've found a bit frustrating is the dearth of AC install threads around these parts. There's a pretty good Old Air one and a Vintage Air one I can't seem to find again, but that's about it. I've scoured the site for the little tidbits here and there... a pic, a mention of the unit, etc.

I chose the Old Air Hurricane based on @jetranger and @imabigbangkindaguy's usage and install. In addition, the fact that Jonathan Ward used it for his 1st and 2nd Gen ICON's played a factor.

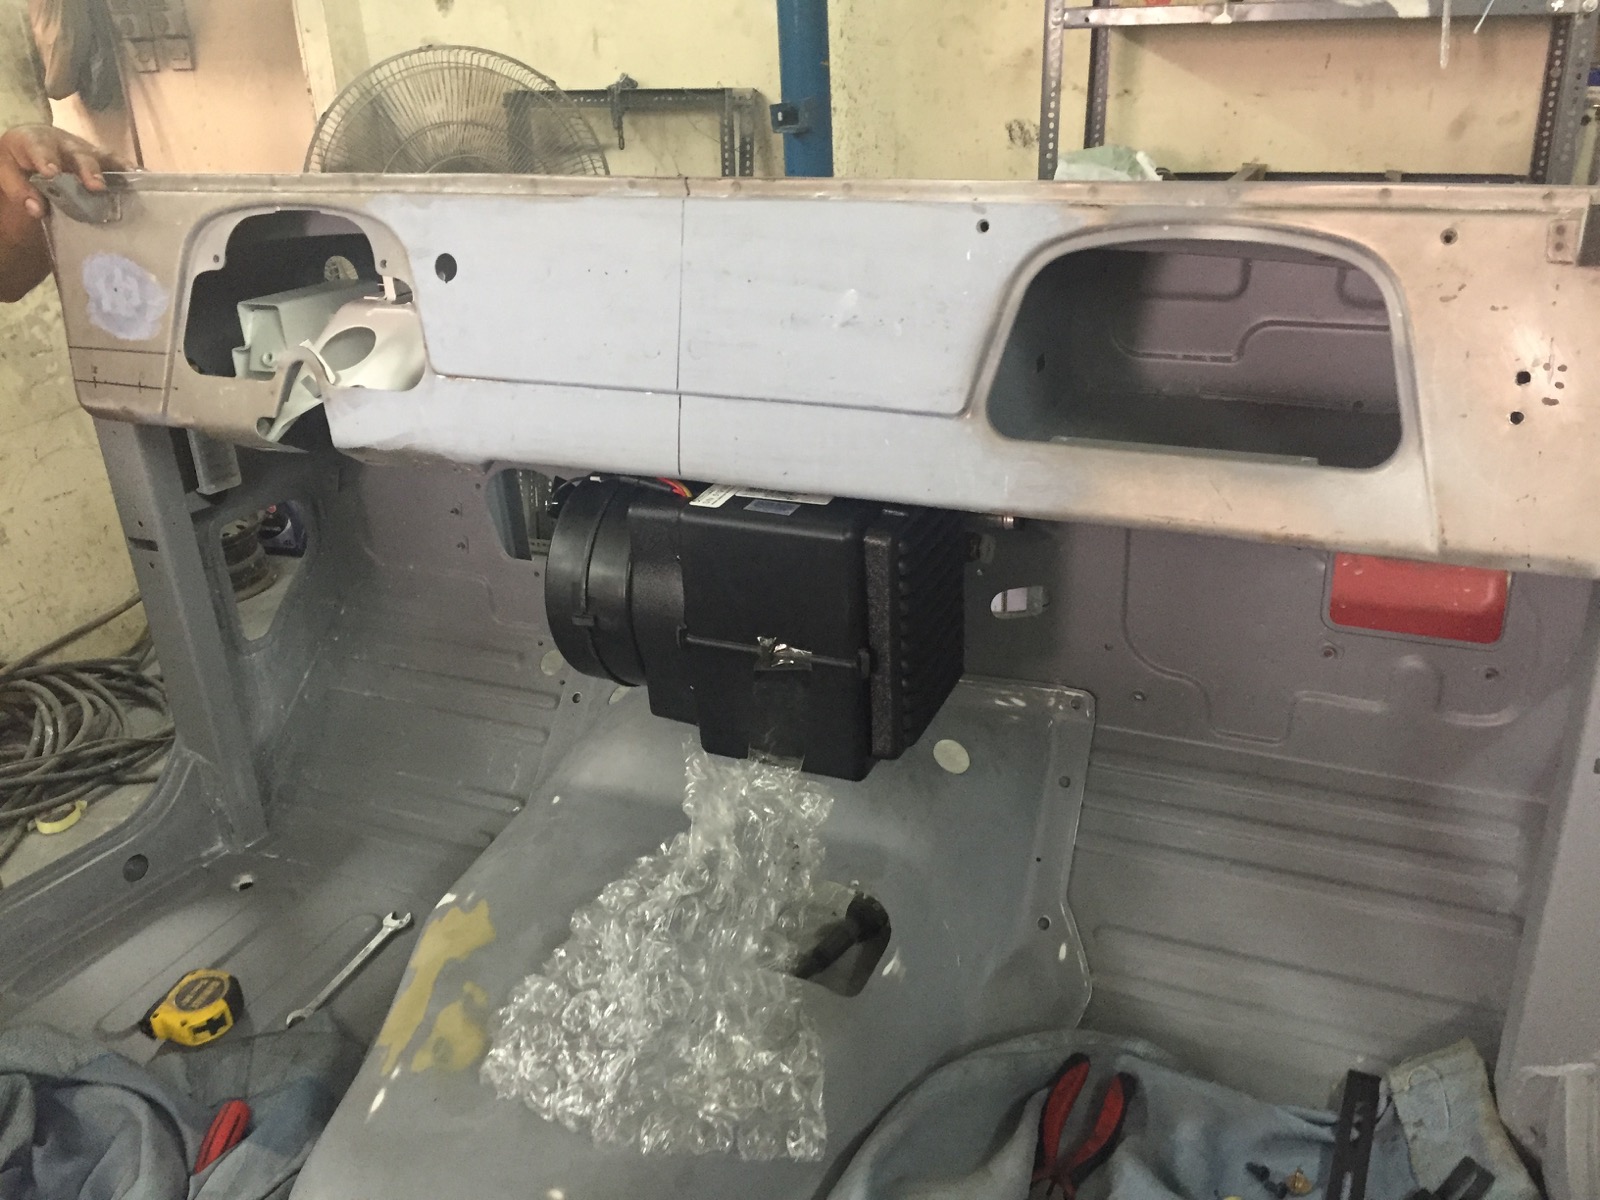
I've gone with the 2100 unit. The hot water and refrigerant lines exit the side and will pass through the firewall. I've purchased a bulkhead fitting to pass the hoses through.

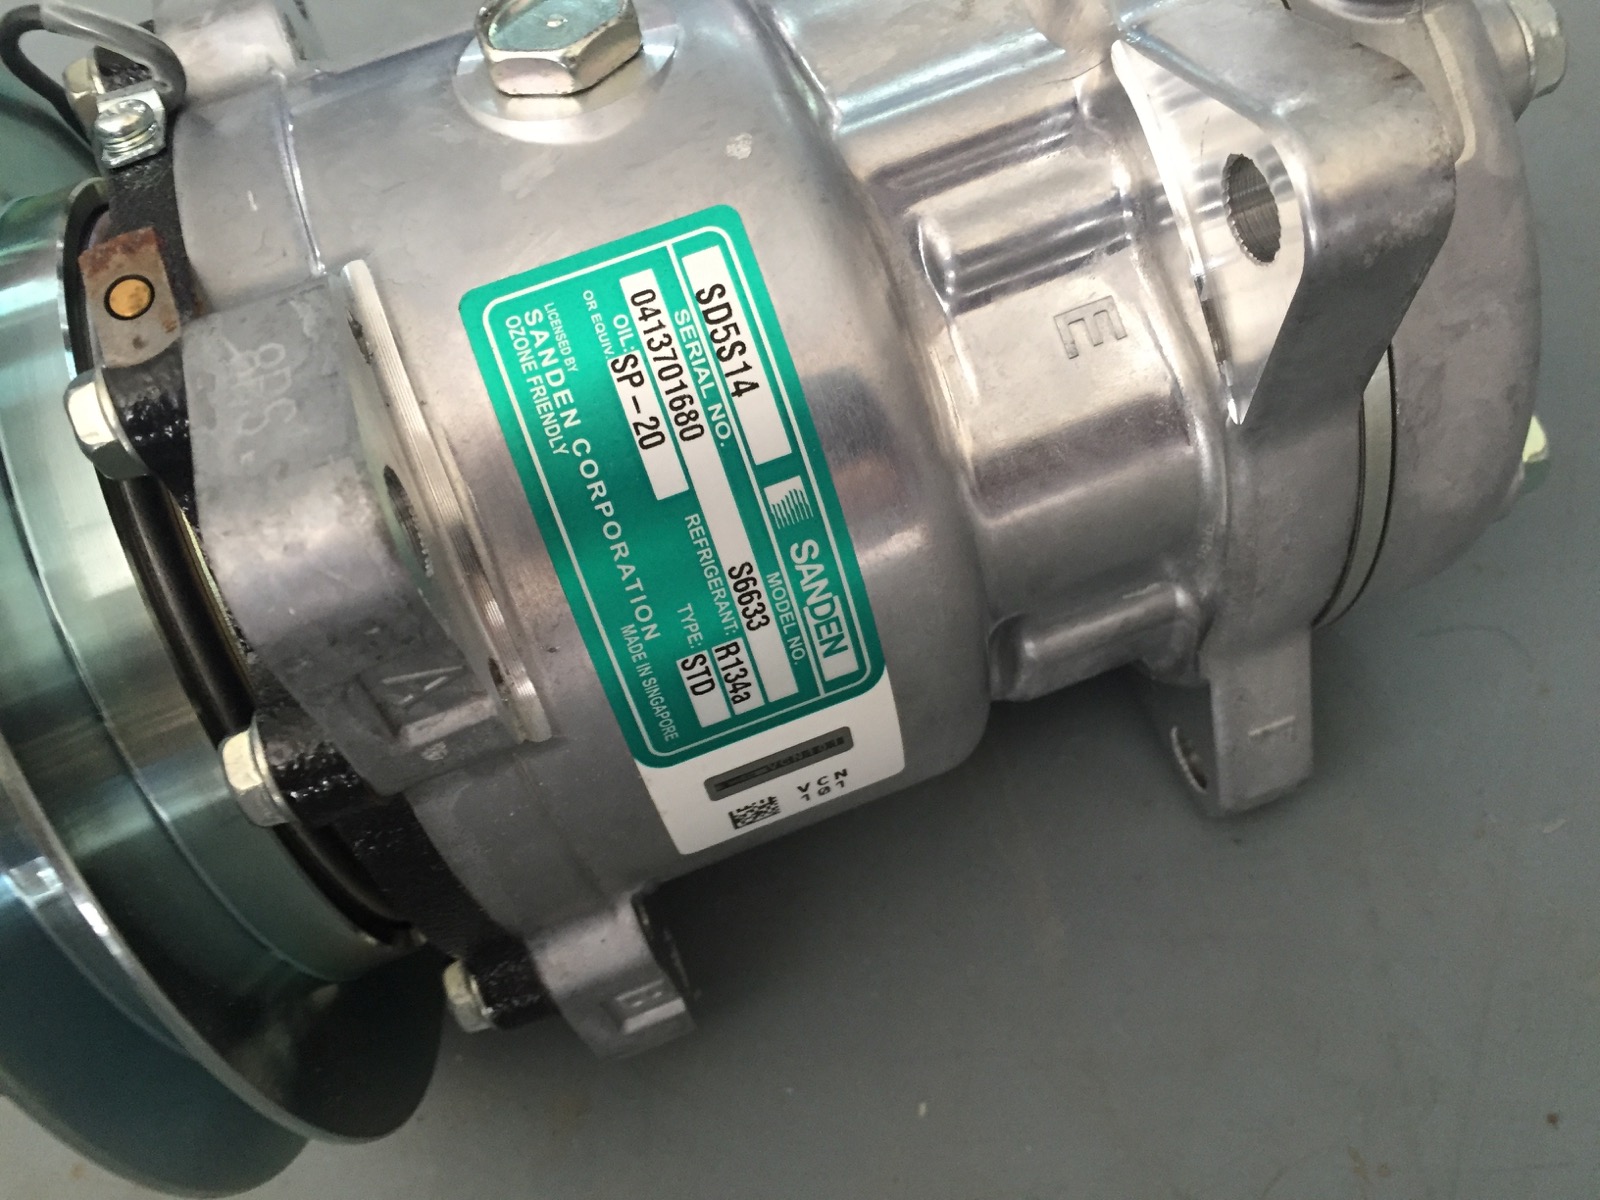
So here's the bare unit.

127acunit.jpg


128acunit.jpg


129acunit.jpg


I wasn't happy with the louvers offered by Old Air. I really liked the ones that I'd seen ICON using, so I called them. Their parts department was really cool. They use Vintage Air Billet Aluminum louvers and they gave me the part number from Summit (where they get theirs). I picked a slightly different style... but the quality on these is amazing!

130louver.jpg


If you'd like any other pictures/photos of anything chime in. Now's the time for me to take photos of the kit in an uninstalled condition.

I'll keep this updated as I go with copious install photos.
 
My other progress on this issue is a compressor mount. I don't want the local fab-shop special to mount an AC Compressor. I do plan on using one of the local AC shops for the compressor, condenser, and drier. I want them to have a handy place to mount the compressor though.

So I went hunting locally for the 2F AC mounts and came up short. Luckily Georg at Valley Hybrids responded to my pleas and found me the motor mount. Thanks @orangefj45!

131motormount.jpg


And @beno snagged me the pulley and some tensioning bracket parts that should help me get a compressor installed correctly.

A truly international effort going on here!
 
I used the FJ60 mount on my FJ40 also. I had to adjust the battery bracket to move the battery back a little, which caused me to have to move the charcoal canister back a little also. I really like the way it all turned out.
 
Glad I could help influence you! Just starting to get hot here in Vegas and looking forward to the summer with my AC unit!
 
This is very timely for me. I'm looking at the exact same unit and will be in Dallas next week so was going to take a look at what they had in person. I wasn't impressed with the looks of other systems on the market, so this seemed like the best choice, but there is limited info on installs in 40's. Please post pics of how you run your duct work.
 
I used the FJ60 mount on my FJ40 also. I had to adjust the battery bracket to move the battery back a little, which caused me to have to move the charcoal canister back a little also. I really like the way it all turned out.

Do you have pictures? I'd really like to see how you adjusted the battery tray. Also, was your power steering on the same side or your alternator? My power steering is on the passenger side which complicates things a bit... most NA trucks had the alternator on the passenger side.

Do you have links to the parts you got?

Sure!

Old Air Hurricane 2100 - Inside Kit

Old Air Bulkhead Fitting

Vintage Air Proline Louver 499211
(I bought 4... please don't judge me about how much I spent on louvers)

Glad I could help influence you! Just starting to get hot here in Vegas and looking forward to the summer with my AC unit!

Are you driving it regularly then? I'm really interested to hear your thoughts on the AC in daily use. I expect mine will struggle a bit more than yours with the crazy humidity here.

This is very timely for me. I'm looking at the exact same unit and will be in Dallas next week so was going to take a look at what they had in person. I wasn't impressed with the looks of other systems on the market, so this seemed like the best choice, but there is limited info on installs in 40's. Please post pics of how you run your duct work.

The ductwork doesn't look like it'll be too bad. I think the right-most louver will be hardest to run too since the glovebox is in the way.

My current plan for the dash is as follows:
134dash.jpg


The black circles are to scale.

For reference, here's my original dash. The white spots are slips of paper I cut to size.
135dashorig.jpg


I'd welcome any input on my proposed dash layout changes.
 
I like the layout and based on the time I have spent fixing PO wiring, I think you'll have enough room to run the duct work to 3 no problem. As you mentioned the glove box side is a bit more of an issue. Since you're already making so many changes to the dash, I would just notch out a passage way for the duct at the top rear of the glove box high up. It should go nicely along there and you won't see it unless you're looking directly in the glove box since it would be near the back. My 78 has the lower dash pads, so moving the headlight switch low enough would be problematic.
I did like the re-purposing of the radio cut-out as shown in the other Old Air thread you referenced, but of course that doesn't use the same style louvers that you've selected.
 
Do you have pictures? I'd really like to see how you adjusted the battery tray. Also, was your power steering on the same side or your alternator? My power steering is on the passenger side which complicates things a bit... most NA trucks had the alternator on the passenger side.

There are some pics in the first link and on page 2 of my build thread (2nd link below).

AC compressor bracket

The Long Slow Build - 1980 FJ40

Power steering is on the driver side and you'll see the alternator above the AC on the passenger side. I don't remember exactly how we modified the battery tray but I know we heated & bent the existing support bracket and had to cut & re weld at least one of the supports. I'd have to look to be sure, but I'm using the original holes on the rear, I think, and using a different hole in frame on the front. Truck is at the shop or I'd go take more pics. I'll try to run by there.
 
Man I will be following this thread for sure since I need to do the same with my project! I was originally thinking of using the same unit but I'm leaning toward using the gen IV unit from Vintage Air. Icon will be going to this unit because of increased air flow but I'm now not sure if that will be needed for my smallish cab. I know I will be losing pretty much my whole glove box with either unit.
 
I like the layout and based on the time I have spent fixing PO wiring, I think you'll have enough room to run the duct work to 3 no problem. As you mentioned the glove box side is a bit more of an issue. Since you're already making so many changes to the dash, I would just notch out a passage way for the duct at the top rear of the glove box high up. It should go nicely along there and you won't see it unless you're looking directly in the glove box since it would be near the back. My 78 has the lower dash pads, so moving the headlight switch low enough would be problematic.
I did like the re-purposing of the radio cut-out as shown in the other Old Air thread you referenced, but of course that doesn't use the same style louvers that you've selected.

Notching out a passage through the glovebox is one of the ideas I have. I'm tempted to run under the glovebox along the firewall as well. Once I've got the 40 back in my hands I'll test a few ideas.

I'm very glad I don't have the dash pads. Makes this much easier to sort out.

Do you have pictures? I'd really like to see how you adjusted the battery tray. Also, was your power steering on the same side or your alternator? My power steering is on the passenger side which complicates things a bit... most NA trucks had the alternator on the passenger side.

There are some pics in the first link and on page 2 of my build thread (2nd link below).

AC compressor bracket

The Long Slow Build - 1980 FJ40

Power steering is on the driver side and you'll see the alternator above the AC on the passenger side. I don't remember exactly how we modified the battery tray but I know we heated & bent the existing support bracket and had to cut & re weld at least one of the supports. I'd have to look to be sure, but I'm using the original holes on the rear, I think, and using a different hole in frame on the front. Truck is at the shop or I'd go take more pics. I'll try to run by there.

Great links!

Here's another recent thread where both you and I posted some additional photos of the stock 2F compressor brackets.
FJ40 2F AIR CONDITIONING COMPRESSOR BRACKET location

Man I will be following this thread for sure since I need to do the same with my project! I was originally thinking of using the same unit but I'm leaning toward using the gen IV unit from Vintage Air. Icon will be going to this unit because of increased air flow but I'm now not sure if that will be needed for my smallish cab. I know I will be losing pretty much my whole glove box with either unit.

Yeah, a week after ordering my Old Air unit I saw that he was going to Vintage Air Gen IV.

A big priority for me was NOT losing my glove box. I'm attached to it for some reason.

My parts from Beno are nearly here, so a quick update when they get here.
 
I cringed when I saw the proposed big round holes drilled in the dash, but it's your truck. A Vintage Air install doesn't hurt the truck in any way.
 
I cringed when I saw the proposed big round holes drilled in the dash, but it's your truck. A Vintage Air install doesn't hurt the truck in any way.

I hear ya... I do. The flip side is that I cringe when I see how much passenger footwell space is consumed by the Vintage Air units (and OEM). Getting the louvers up in the dash just seems more intuitive... and beneficial in terms of spreading the airflow.
 
@beno hooked me up with the idle pulley I needed for the stock compressor mount... as well as the NA-spec alternator mount that has the integrated tensioner for the AC compressor. Since my PS pump is located above the AC compressor location, I'm not sure if I'll be able to use it. But I was blown away how easily Beno managed to find these parts when I struggled to find anything locally...

143idlepulley.jpg

144mounts.jpg
 
Do you have pictures? I'd really like to see how you adjusted the battery tray. Also, was your power steering on the same side or your alternator? My power steering is on the passenger side which complicates things a bit... most NA trucks had the alternator on the passenger side.


Sure!

Old Air Hurricane 2100 - Inside Kit

Old Air Bulkhead Fitting

Vintage Air Proline Louver 499211
(I bought 4... please don't judge me about how much I spent on louvers)


Are you driving it regularly then? I'm really interested to hear your thoughts on the AC in daily use. I expect mine will struggle a bit more than yours with the crazy humidity here.


The ductwork doesn't look like it'll be too bad. I think the right-most louver will be hardest to run too since the glovebox is in the way.

My current plan for the dash is as follows:
134dash.jpg


The black circles are to scale.

For reference, here's my original dash. The white spots are slips of paper I cut to size.
135dashorig.jpg


I'd welcome any input on my proposed dash layout changes.


Sweet!. I'm stealing your ideas........
 
Keep posting! This thread will be a good reference in the future. I want A/C in my 45 if I ever get that project dusted off!
 
Sweet!. I'm stealing your ideas........

Please do! And improve on them as you go for the rest of us. =)

Keep posting! This thread will be a good reference in the future. I want A/C in my 45 if I ever get that project dusted off!

Here ya go...

One of the first suggestions I have is to draw up some layouts for how you want your dash to look and the layout of switches and AC vents. I threw together a bunch of options, most of which aren't worth sharing. The first option I settled on was this...

164dashoption1.jpg


But upon working with the truck this won't work. The AC vents between the speedo cluster and glovebox conflicted with the pre-existing ducting for the defroster vents. So I came up with Option 2 as follows...

165dashoption2.jpg


This nearly worked. My main goals were to keep a somewhat stock aesthetic using push/pull switches laid out in an intuitive manner. I didn't want a mission control look... just the functional requirements. I also wanted to keep the bottom area of the dash clear of any cruft... even to the point of eliminating the radio slot.

So the next step was to use the physical switches, AC unit, and ducting to mock up the arrangement prior to drilling holes. So, first thing is first, mount the AC main unit (evaporator).

The guys in the shop wanted to use the mounting brackets that came with the Hurricane unit and weld captured nuts into the firewall to correspond with those brackets. The Hurricane brackets aren't the best, and would have results in somewhat wonky mounting.

I proposed a mounting plate that would utilize the factor heater mounting points...

157factoryheat.jpg


The plate would have three holes for the AC to mount to and then four holes to correspond to the factory heater holes. Two of the bolts through the firewall would be squarely behind the AC unit though and very hard to access. So the metal guy in the shop welded two bolts directly into the plate that will be secured from inside the engine bay. You can see them sticking out of the plate in the following photo. We drilled the threads out of the passenger side mounting points so these would just slide right through and into the firewall. (kind of a rough explanation, but it makes the AC easy to install and remove).

156acplate.jpg


It was situated to hug the firewall as close as possible... and fit up into the dash as much as possible. And here it is installed with the plate.

158acinstalled.jpg


With that done we had to mock up vent and switch locations... even going so far as to pull in some duct tubes to ensure space and routing would work out.

155ducttest.jpg


And lots of measure, mark, re-measure, re-mark going on...

159layout.jpg


The vents on the far sides of the dash were easy to locate... here's the driver's side far-left vent along with light switches.

160lightswitches.jpg


On the passenger side we had to move the side of the glovebox inward a bit to allow the vent to be centered in that little area on the far right of the dash... sorry, didn't grab any photos of that.l

In the middle I had to move the vents all the way to a side-by-side arrangement. This was due to a combination of issues involving the pre-existing defrost vents, the depth of the various switches behind the dash, and the location of the main AC unit and it's associated connection points for the ducting.

Here's what we ended up with...

163dashnotes.jpg


It really looks like I'm going to get everything to fit.

My current challenge is selecting a compressor, condenser, and drier to wrap up the AC system. Heat won't be done for now... just not a big concern here. =)
 
Thanks for posting all of the details. It's great to see the progression as well as the changes you've made (and why).
 
I bought the Hurricane kit with the interior equipment only. I planned on trying to source the compressor, condenser, and drier locally... as well as the plumping and charing.

There's a slick shop in Dubai called Ampex that does AC installs on any/every car. When I walked back in their shop looking for the foreman to help me source parts I saw a 60's-era Cadillac as well as some 70's era Mercedes convertible. They were installing the whole systems including interior evaporator/blower/vents. I'd found the right shop.

I told them what size condenser I needed and they grabbed the closest match (14" x 18" x .86") from a nice stack...

175condenser.jpg


I'd planned to grab a Sanden R134a compressor and even had a model number picked out from my research on the web. The foreman said the one I had selected was too small and really meant for 4-cylinder cars. I showed him a pic of the FJ40 and he knew the engine type/size and pointed me to this larger Sanden compressor... he even knew I needed a pullet for the larger type of v-belt.

167compressor.jpg


168compressor.jpg


The mounting tabs on this don't line up with the motor-mount compressor bracket. The shop is actually restoring another person's 40 that has a Sanden retrofitted to the mount. They copied that retrofit for mine.

174motor.jpg


The pulley lines up. But I'm wondering if there is a better way to retrofit this compressor to the mount. Fab something up? Any thoughts?
 
So the shop that sold me the compressor, condenser, and drier did a great job with the AC. They handled the truck with care and I'm quite pleased with the install.

They have plenty of other cars of various makes, model, and vintage...
189acshop.jpg


The body shop had installed the Old Air bulkhead fitting into the heater delete plate quite neatly.
190bulkhead.jpg


A top-down view of the AC plumbing to the compressor, condenser, and drier.
191plumbing.jpg


And from the compressor back to the bulkhead fitting.
192plumbing.jpg


And here's inside the truck along the firewall. They insulated the cold supply line so that it wouldn't collect moisture and drip inside the truck. They did a great job following my input on a t-fitting into the cowl drain hose. Very neatly done. Though the drain line from the AC is somewhat kinked in this photo.
193firewall.jpg


And a final photo looking upward into all the ducting above the unit. It's all quite tight, but they managed to get all 4 vents ducted along with the stock defroster tubes.
194ducts.jpg


I'll be updating this thread with my findings regarding temps from the AC. If anyone has specific questions or picture requests let me know.

Man, adding an AC sure clutters up the free space under the 40's hood.
 

Users who are viewing this thread

Back
Top Bottom