Builds Intro: Ugly Betty(so far)

This site may earn a commission from merchant affiliate
links, including eBay, Amazon, Skimlinks, and others.

Sweet color. Thanks for posting the Donaldson website. I too like the snorkel set up.

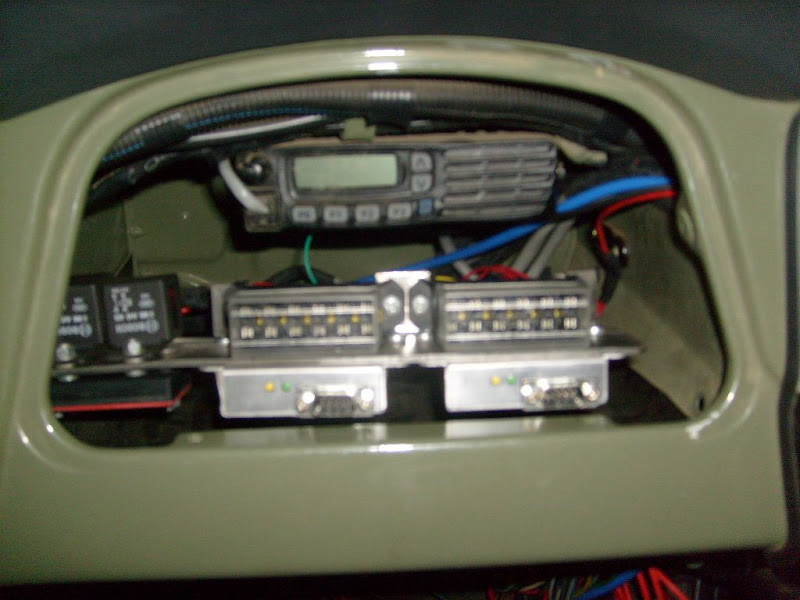
I got the snorkle with the truck and the head was one of those ugly but very effective Donaldson precleaner types, which I did not like. I finally gave up trying to buy just a Safari head only,from the local Safari agent as they just refused point blank and insisted that I have to buy the complete snorkle kit. I then went back to the Donaldson agent and found the head in those pics, that looks just like(close enough to) the Safari one.I then also found out that those rubber bends and elbows are also Donaldson products that are freely available. Air Filtration I will probably never bother to buy another expensive Safari snorkle again ...

:cheers:
 
Thanks guys !

Wayne, any time ! :cheers:


The conversion took about 4 months in total and although I would love to take some credit I cannot.It was done by a lurker member and friend(Mark Watson), with myself just trying to micro manage.After plenty of homework we agreed on a few ground-rules which at times made things difficult and caused delays.We also changed our minds a few times resulting in further R&D and therefore delays but at the end the result has eclipsed even my wildest expectations. Some pics to show how it happened ...


The long 3B H55F fine(21) spline inputshaft which together with the longer 3B bellhousing turned out to be a real blessing :cool:


Inhouse made adapter to mate the H55F to the 1UZ motor leaving the gbox on the same plane and in the same spot on the OEM cross-member.


The new inhouse custom flywheel


One of the "rules" was no drilling or welding on either the chassis or the tub.This meant the old engine mounts were removed by drilling out the rivets. Another requirement was that the entire conversion had to be reversable(if ever needed/wanted) so we retained all the old parts ..


My chassis had been hotdipped galved so all exposed areas were sprayed with cold galv before being topcoated.


The new OEM-ish looking engine mounts


The motor was hand- picked(including starting & running it etc) in Japan and mine had only done 76 000 kms. It was stripped, inspected,


all major seals replaced including timing belt etc etc and then powder coated and assembled, ready for the install ...


Does Mr Yoda make a purdy motor or what ?


To be continued ..:cheers:
 
Last edited:
Damn, clean install. Your going to have to remove your diesel badge from the grill now! ;p At least you stuck with a Toyota engine, man it's still one of my favourite builds here. :clap:
 
Thanks guys, much appreciated !


Test fitting a dummie motor/hollow block is one thing but the real thing when fully assembled presented a few clrearance issues.While the old 3B was tall , skinny but quite heave the 1UZ was lighter, shorter and fatter. I didn't want the COG to be adversely affected but also didn't want the plane of the Gbox to be altered.


While the viscous fan on the 3b was off-centered, it was not as much off centered as the one on the 1UZ. The viscous fan was not negotiable as I am not a disciple of electric fans - to my mind a decent viscous fan sitting properly inside a decent shroud cannot be beat for efficiency.


The outlet on the bottom tank of the OEM radiator had to be relocated to the other side and at the same time we had it recored.


Initially I wanted to stay with the old 3B rubber engine mounts for various reasons but then I found some info that the HDJ 80 series mounts are actually beefier and stronger.Their bolt pattern also matched the offset of the 3b ones perfectly and they gave us about 10mm of much needed height, so it did not take much to convince Mark and after swapping them out the results were amazing ...

Before


After


Before


After


Before


After


Before


After


:cheers:
 
nothing but pro work there bud ...

Amen! Beautiful...:beer:


Damn, clean install. Your going to have to remove your diesel badge from the grill now! ;p At least you stuck with a Toyota engine, man it's still one of my favourite builds here. :clap:

That's funny, I was thinking the same thing. :wrench:
 
With the mounting decided we could move on to the headers and zaursts. I have an aussie Long Ranger LRT so the conventional 2 into 1 was never going to work.However I am also not a fan of "exhaust slapping" usually the result of true dual exhaust systems. The original headers didn't give us the exit we needed because I wanted the zaursts over and on the outside of the frame so ....


Nice and high out of harms way ...


To deal with the potential slapping we eventually settled on a balance pipe as opposed to a x-pipe ...


Which also presented its own problems when you are aiming for 75% of the main pipe diameter


Either way we had to create space by modifying the already custom over sized sump


not a thing of beauty but here we went for function rather than looks ...


5 mm alu heat shields above the mufflers ...


all fitted using only the existing OEM captive nuts


The new surge tank and high pressure external pump ..


Pardon the dust but the Transvaal highveld gets like that in winter


:cheers:
 
Originally I was keen on using the OEM ECU but eventually I came to my senses and we went with http://www.spitronics.co.za/ units.


For reliabillity and that OEM look we decided to use the original Lexus engine loom as opposed to wiring up a complete new loom.I didn't want any new or larger holes in the firewall though so the original beast was stripped of all the wires that had become obsolete due to the Spitronics ECU.


The new skinny version


The new Lexus grommet was a perfect fit to replace the old 3B grommet for that OEM look and feel


We also did the same with Olive's original wiring loom as we were now free to retain the old gauges and instruments - if we had gone with the OEM ECU this would have been a nightmare.


Instead it allowed us to get creative. The OEM sedimenter light became a low oil pressure warning light reading off the OEM Lexus sensor via the Spitronics ECU - The original oil pressure gauge was however retained via the oem wiring and OEM sensor.In order to fit both sensors we used the oil filter housing from a 3UZ which has the std oil cooler pipes - just blank one and voila 2 sensors. We also retained the water temp sensor from the 3B in order to keep that gauge working.The old glow light became the alt light to get some load onto the alt - strangely enough it always seems to correspond with the time it takes the fuel pump to "prime" before the Spitronics steps in and kills the pump untill the motor starts - nice feature of that system .


Almost ready to go back


The headers and balance pipe were Ceramic coated to get rid of as much heat as possible ..


Here you can see the 2 oil pressure sensors


The safest and driest place for the 2 ECUs and the rest of the electrickery.We also relocated all the fuel injector resistors from the loom in order that bush diagnostics no longer involves the need to start stripping the loom ..


Neat and very easy to get to , even with the laptop ...


:cheers:
 
For the input-shaft we created a new resting place - pres-fitted into the new flywheel. The spacer containing the spigot/pilot bearing

S6301528.JPG


For the clutch we eventually ended up at at Toyota. The 3B had a 260mm clutch but we had some space.The 1FZ 105 has a 300 mm clutch but it is coarse spline - the only other 300 mm option was Isuzu but .... However the 1FZ 79 has a 275mm clutch(although course spline) and the 1HZ has a 275mm clutch including the rather heavy HZJ80R. That is exactly what we got but in Exedy form ...

S6301532.JPG


After being dynamically balanced

S6301537.JPG


I am not an electric fan fan and wanted a viscous fan from the start. The only one that fitted was a 2UZ Fan after getting trimmed 10 mm and dynamically balanced .

S6301550.JPG


S6301563.JPG


S8001564.JPG


The new shroud

S6301565.JPG


S6301567.JPG


:cheers:
 
Last edited:
I just wanted to say that this is one of my favorite cruisers of all time-great job.
Couple of questions..
What type of material did you use for the top? I am trying to find some canvas looking material that won't stretch or fade too quickly. How do you like it? Also, what is the bag on the tire? Looks a bit like a trasharoo.. Thanks.

Thanks, much appreciated.

The material is known in these parts as DR250 HD Ripstop canvas.It is widely used by quality tent manufacturers around here. I love an open top 40 in the summer - nothing beats it. Yes it is a sparewheel mounted garbage bag container - a must if you want to follow the rule of "leaving nothing but tracks and footprints behind "

:cheers:
 
Love your build up, i hope mine ends up somewhere as good as yours!
Was your BJ42 originally green? i've been stripping mine lately and found it to be a darker green than the "olive grey"
 
Thanks, much appreciated.

The material is known in these parts as DR250 HD Ripstop canvas.It is widely used by quality tent manufacturers around here. I love an open top 40 in the summer - nothing beats it. Yes it is a sparewheel mounted garbage bag container - a must if you want to follow the rule of "leaving nothing but tracks and footprints behind "

:cheers:

Was the sparewheel trash container purchased or is it custom? If purchased, where can I find one? :grinpimp:
 
@ Jim Land: Many thanks for your pictures as they come as if sent. I will definately be doing something like that in the future and the "hinged idea" is wicked. Thanks for posting.At the moment I am in a race against time to get her ready for another "legends" trip in 3 weeks time :cheers:

@ awramenko: Thanks, she was originalyy Beige/Fawn in colour.


@ squint: I bought it from a company here in ZA called Camp Cover. I think they have an outlet in Aussie. Jackelberry also sells them :cheers::cheers:
 
Whenever the weather "allows" I continue to work on getting the roof back on ..

Empty hard top panels back on after all these years

DSC_0052.JPG


New hardware and the bottom rubber strip/cushioning I made from quality rubber

DSC_0054.JPG


I used the same rubber to make some pads to fill the gaps at the top sill(the PO used seem sealer) but I want this top to be easily removable when needed

DSC_0057.JPG


DSC_0063.JPG


DSC_0065.JPG


New leather upholstery for the door panels - I am undecided on the lighter colour and the stitching pattern.At least I used new OEM door rubbers - they were a much better fit than the ambi door rubbers ..

DSC_0076.JPG


DSC_0080.JPG


New ambi door rubbers

DSC_0066.JPG


With all doors and glass fitted as of this afternoon ..


DSC_0083.JPG


DSC_0082.JPG


Now for the new rain-gutter and the roof nightmare ...

:meh:
 

Users who are viewing this thread

Back
Top Bottom