Builds HJ45 Cab On HZJ80 Chassis

This site may earn a commission from merchant affiliate
links, including eBay, Amazon, Skimlinks, and others.

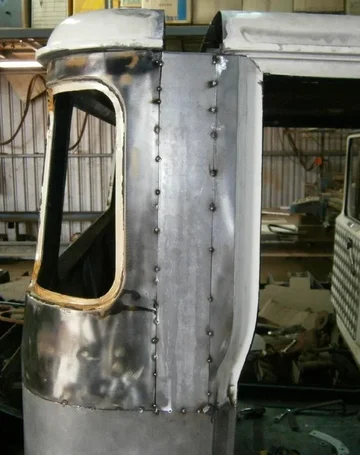
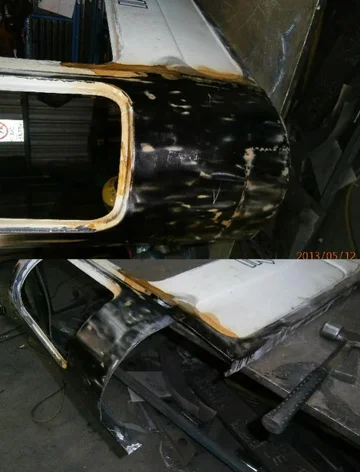
I figured that the best place to split the window section was just next to the body line that runs up parallel with the door opening. For the inside, I chose to seperate just off the corner of the pillar fold so I can get full access behind the weld join of the 75mm extension.
New rear cab upper 4.webp
I braced the forward section before cutting free in order to keep the opening square and parallel.
New rear cab upper 5.webp
When it was apart, I liberally sprayed the inside folded surfaces with rustroy. As I was there, I sprayed the outside also, which is why it looks a bit purple. I measured 150mm off the flange face as my repair corners are 150mm wide, its bout an inch below the tapered radius on the factory join.
New rear cab upper 6.webp
Then I threw it on the cab, centralised it, took over 100 measurements and then tacked her in place with the mig. I grabbed the forward part of the window section and tacked it in. I think not too bad an effort for sunday! The next part will be bolting the windscreen panel, roof and maybe the doors to ensure the extension is going to work. I probably wont have time during the week, but will get more done next weekend, so stay tuned!:cheers:

New rear cab upper 4.webp


New rear cab upper 5.webp


New rear cab upper 6.webp
 
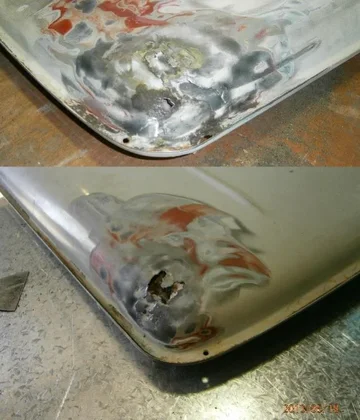
Cheers Pacer, I am happy with the progress I am making and enjoy posting it. Anyhoo, on Friday night I bolted the windscreen panel on and started to remove the cruddy green carpet on the roof. The carpet was kwik-gripped down over the entire panel and was quite a pain to remove. Before I cut the roof, I wanted to find out how healthy it was by running a magnet over it. I discovered that the ute's past life as a shooting rig hadn't been too nice to her. The roof had at one stage a large spotlight used by the shooters to site animals. It also had 2 rust "repairs" on each front corners of the roof. Oh well, more rust repair challenges!
Roof Stretch 1.webp
Roof Stretch 2.webp
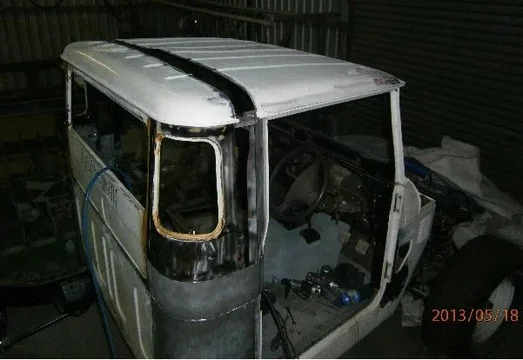
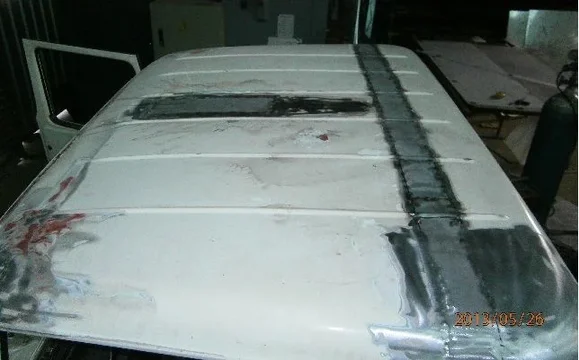
After measuring and checking a hundred times, I marked the cut with masking tape and took the 5" to it. Without wasting any time, I threw the both roof sections on and bolted it down.
Roof Stretch 3.webp
More to follow.....

Roof Stretch 1.webp


Roof Stretch 2.webp


Roof Stretch 3.webp
 
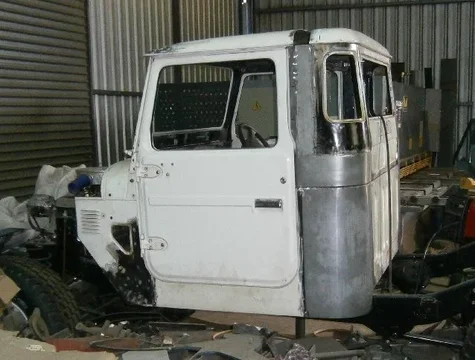
With the roof seperated and bolted down, I wanted to put the doors back on to make sure the cab was still square. After bolting them on, I was happy with the gap around the door and proceded to make the fill in pieces for the cab's window panel and tacked them in.
Roof Stretch 6.webp
This is how it looks with both sides filled in and the doors on and closed.......
Roof Stretch 5.webp
Roof Stretch 4.webp
At this stage the next part will be the fill-in section of the roof, for which I will most likely make a blade and die for the workshops press or use the bead roller. I still want to TIG the 75mm pieces in especially when they are to be butt-welded so i can hammer and dolly when necessary. I will continue to MIG tack and stitch the panels as it is quick and easy. Stay tuned for more updates! :cheers:

Roof Stretch 4.webp


Roof Stretch 5.webp


Roof Stretch 6.webp
 
I still want to TIG the 75mm pieces in especially when they are to be butt-welded so i can hammer and dolly when necessary. I will continue to MIG tack and stitch the panels as it is quick and easy.

As you are an experienced welder, would you care to explain a bit more about the pros/cos of MIG vs. TIG for sheet metal work? I used MIG on my truck but it seems to me TIG makes for nicer, smaller, weld beads - which may mean less panel distortion. I'm looking to buy a welder and am leaning towards TIG.
 
Thanks Wongtsenhin, I do try :D. Henry james, I prefer to use the TIG because the welds are little bit more malleable when hammer work is required on the panel. Some prefer using MIG on panels as its quick and easy. Because the cruiser is at my work I have access to many different welding machines but if I only had a MIG it would probably make do for the butt welds. The MIG I am using for the floor, trans tunnel, interior sections is running .6mm wire which leaves a nice thin weld bead but, like you said, can leave more panel distortion. Those areas, to me don't really need laser perfect straightness and a little bit of warp can be dealt with.There is plenty of stuff online regarding pros and cons of each but it comes down to personal preference I guess. Hope that answered your question!
 
Henry, the main cons to using a tig in this instance would be the time spent in prepping the steel and the actual welding procedure takes slightly longer. To weld thin steel you need a machine that can go as low as 10 amps. TIG weld joins should be very clean as any impurities on either side of the weld join will be sucked through, compared with the Mig which can most of the time weld through light rust, thin paint, oil, galv and zinc coatings, etc. I can pick and choose because I weld thin and heavy metal for a living and have access to almost everything at my work. Hope that answered it for ya!
 
Henry, the main cons to using a tig in this instance would be the time spent in prepping the steel and the actual welding procedure takes slightly longer. To weld thin steel you need a machine that can go as low as 10 amps. TIG weld joins should be very clean as any impurities on either side of the weld join will be sucked through, compared with the Mig which can most of the time weld through light rust, thin paint, oil, galv and zinc coatings, etc. I can pick and choose because I weld thin and heavy metal for a living and have access to almost everything at my work. Hope that answered it for ya!

Yes, thank you. I appreciate that you took the time to reply in detail. :beer:
 
Another Weekend over, another step closer to completion! :cheers: to everyone's praise for the cruiser, will keep loading the fotos as I make progress! This last weekend I spent filling the 75mm void in the roof. I started out by setting up the two parts of the roof to allow for the rubber seal and equalling the gap at the join. Then I began forming the two gutter pressings out of 1.15 zinc. With those tacked on and effectively holding the forward and rear parts of the roof square, I moved straight to forming the two outer corners with the slow radius and return fold to the gutter. These parts also had to incorporate the first of the roof bead/folds. I discovered that these beads in this roof aren't parallel which made me rethink the whole bead roller and press-stamp idea. So, instead of the bead roller I decided the roof beads could be done by hand!
Roof Fill In 1.webp
As you might notice, there is two cuts made to the radius of the rear section, this is because, where I cut it is actually in front of the radius on the part that still has a taper. Oh well, more hammer forming and welding were required! With the two corners in, I went to work forming the centre section of the fill-in
Roof Fill In 2.webp
This is pretty much how I formed every bead, on a squared block with a panel hammer! Slow but satisfying work:D
With the panel filled in, I cut out the average fill-in pieces of what was once a directional spotlight and replaced with an english wheeled piece of .95 zinc.
Roof Fill In 3.webp
I also had to shrink the panel between the spotlight cut-out and my 75mm fill-in as the previous owner's welds were too hot and caused the panel to warp quite badly. Another challenge! Still have the two rusted front corners to fill in this weekend and hopefully will get the outer sheetmetal butt joins welded with the TIG! Stay tuned for more.....

Roof Fill In 1.webp


Roof Fill In 2.webp


Roof Fill In 3.webp
 
Awesome work!

I've been watching this come together and am always amazed at the finish you are able to achieve. I can only imagine that you give each detail a lot of thought before commencing anything.

I've been inspired so much I've been making calls to the QLD DOT about doing something similar with the 45 cab I have in storage, but don't tell the :princess:.
 
about doing something similar with the 45 cab I have in storage, but don't tell the :princess:.

I told her. She said to ship it to me.

You've got skills, Rocket.

Remarkable.

Love to have what you're building, but know there's not enough life left to acquire the level of experience.....and I profess sheet metal as an income source, to some degree.

Nice work.
 
More Progress made this weekend.... Hoo-rah! I finally have the chance to TIG the seams on the 75mm stretch. Because the weld joins needed to be fairly straight after welding, I stitched the joins up and staggered them to help even the distortion out. I also planished and cooled the stitches where necessary with air and water. I found that almost every inch of weld required a bit of hammer and dolly work afterwards anyway. But, as planned none of the welds cracked while I was forming them, even when I had sanded them down. This is what it looked like once I stitched the joins up and the rough spacing I set them to.
Roof Stretch 9.webp
Roof Stretch 7.webp
After I welded the joins, roof corners and centre panel in, I sanded and sprayed it with zinc to stop any rust growing on the bare steel, as the whole idea is to remove rust not encourage it.
Roof Stretch 8.webp
I am quite happy how the panels came out, with a fair bit of hammering 90% of the heat deformation was worked flat. The panels will probably need a small amount of filler but nowhere near the amount used on it by Previous Owners. Anyway, next step is to begin forming the interior panel structure and spot welding the mouldings to the exterior skin (For this I intend to use a 240v sheet metal spot welder I have at work.) I am thinking about mounting a overhead console to house my stereo's head unit and will most likely form some hat channels to run the length of the roof on the inside. This will both strengthen the roof panel and help hold its shape better. Stay tuned for more......

Roof Stretch 7.webp


Roof Stretch 8.webp


Roof Stretch 9.webp
 
Awesome work, subscribed. Keep the pictures coming, they are motivating me to get out to the shop.
 
It doesn't look like you've stretched it at all.

Which is a compliment!

Cab extensions often look like hack jobs with no fore thought of how its all going to look. Unless you had a stock cab next to it, it would be hard to pick the extra you've added.

Keep it up, its inspiring work.
 
Really awesome work, very inspiring! I have an old G60 Patrol Ute I have considered doing this to. That is, stretching the cab and repairing roof rot! Great work, keep it up!

Cheers
 
Thanks to all for the encouraging messages! More progress has been made this week to the roof. During the week I folded up some top-hat sections that will help to strengthen the roof a little bit and provide the mounting for a centre overhead console. The only real hurdle was how to create such a long and even radius in the formed sections. The solution was to shrink the top centre flat section of the pressing with the oxy torch.
Roof Panel Hat Sections 1.webp
If you look close enough the sections don't sit flat on the beam. I managed to get all 4 almost perfectly formed to suit the roof panel's original curve. I then cut the excess channel off the sections and capped them closed.
Roof Panel Hat Sections 2.webp
To attach to the roof, I decided to punch holes into the channel flanges to plug-weld them. I also used some high strength urethane sikaflex in between the welds to help seal and stick the channels firmly.
Roof Panel Hat Sections 3.webp
Not much chance of these coming loose now! The two centre ones will eventually hold the console while the outer two will help hold the roof lining in. For the lining I am considering smooth black vinyl but haven't made my mind up as yet. The next part of the project will involve adding bracing for the interior of the rear wall and completing the structure. Stay tuned for more.....

Roof Panel Hat Sections 1.webp


Roof Panel Hat Sections 2.webp


Roof Panel Hat Sections 3.webp
 

Users who are viewing this thread

Back
Top Bottom