Builds HJ45 Cab On HZJ80 Chassis

This site may earn a commission from merchant affiliate
links, including eBay, Amazon, Skimlinks, and others.

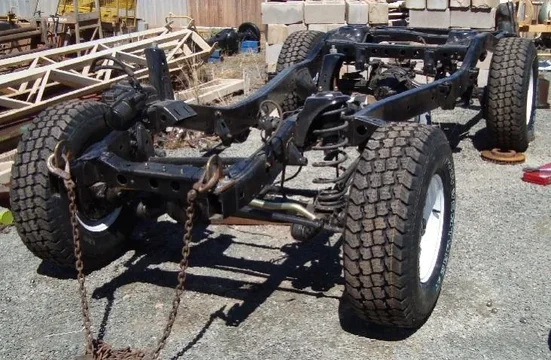
This week i finally got my rear calipers delivered and i threw the new pads in them and bolted them on.
80 Rear brakes 5.webp
80 Rear brakes 6.webp
I also bought some road style tyres and ROH sunraisers for the cruiser and put them on aswell
80serieschassis Reassembly 3.webp
Looks like i wont be stripping the 45 down for the conversion until next year:frown:. Oh well, I still have a few bits I want to do anyway, like the leaking pinion seals on both diffs, possibly a swivel hub seal kit for the front,etc. Still plenty to do!!
80 Rear brakes 5.webp
80 Rear brakes 6.webp
80serieschassis Reassembly 3.webp
 
Next year is only (about) 55 days away. :p

Looks like i wont be stripping the 45 down for the conversion until next year:frown:. Oh well, I still have a few bits I want to do anyway, like the leaking pinion seals on both diffs, possibly a swivel hub seal kit for the front,etc. Still plenty to do!!
 
Yeah very true D'Animal the year has flown, I just can't wait to start gettin into the real fun stuff!! Like the rust repairs/Exhaust/tray tub fabrication and of course, driving down the road when she is all done!!
 
While I have a little bit of time before the major part of the biuld, i thought i mite aswell see what the cab would look like with +75mm in it. Looks easy enough, haven't made me mind up yet though.
Extended Cab Combined photo.webp
Hopefully this coming week i will have the rear LSD centre back in the diff casing, so i can install the new axle seals, hub seals and pour some lube back into it.
Extended Cab Combined photo.webp
 
Thought about adding 75mm in the cowl as well?
 
yeah mate the pictures do not do rockets work justice he is one pedantic doe eyed limp wristed tailgunner:flipoff2:

So you like him then? :D
 
Yes my cab does D'Animal, it has a body seam from the sill to the upper cab flange. Piss off greg, oh and for those of you who haven't realised it yet, i work with gregrobo. And he is a dumb, rough, leather-glad donut puncher......... just kiddin. anyway, back to the build topic now.... Don't know about 125 in the width just yet, but at this stage i am looking into it.
 
Rocket if you do widen it I will be watching with even keener eyes. I suspect the biggest hurdle will be the legalities, which of course vary state to state.

I have some sketches here of how best to widen/lengthen/heighten a 45/47 cab if you want them. My version is not straight forward of course but it will keep all the proportions right.
 
A little bigger 45 series cab definately looks better. My hat off to you for thinking of making it wider, as I am walking with that same idea in my head for my 45. But it's a sh2tload of work to do it. Just for interest sake here is my 45 cab that I am busy with. I made it 260mm longer.
DSC_0004.JPG
 
Lookin nice millas, I don't reckon I will widen the cab now, I have a fair bit of work ahead of me just repairing the cab and adding the 75/80mm to the cab's length let alone widening it aswell. Thanks for the offer Cult45 but not this biuld-up.
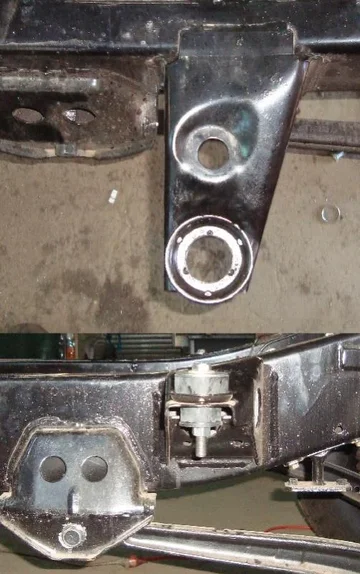
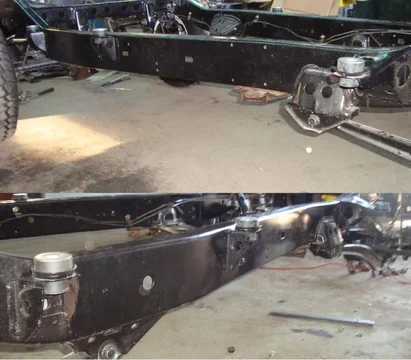
Another weekend, another couple of things done... I opened up the 6 cab mount holes to 37mm I/D to accept the hq/hx rubber mounts and fabbed a jig for the chassis's body mount centres.
Cab Mounts 1.webp
Cab Mounts 2.webp
Cab Mounts 3.webp
The idea is, once i have stripped the 45's cab down, I will add the 75/80mm to the length of the cab's base and then fab/weld/drill the mounts to the jig's centres.
Cab Mounts 1.webp
Cab Mounts 2.webp
Cab Mounts 3.webp
 
I also installed a brand new adjustable rear panhard rod and replaced the seized and buggered LSPV valve and all the rubbers for the linkage to it.
80 LSPV and Panhard.webp
Can't wait to strip the 45 to get down to the real fun! Until then, I have the sway bar for the rear on its way plus some other minor bits to do. :cheers:
80 LSPV and Panhard.webp
 
Looking good Rocket!
 
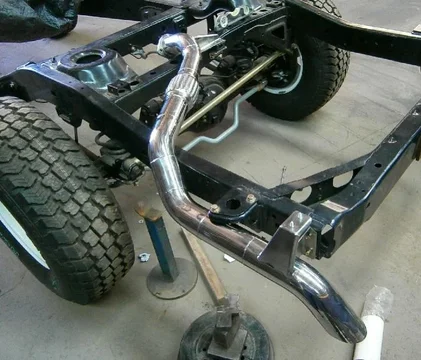
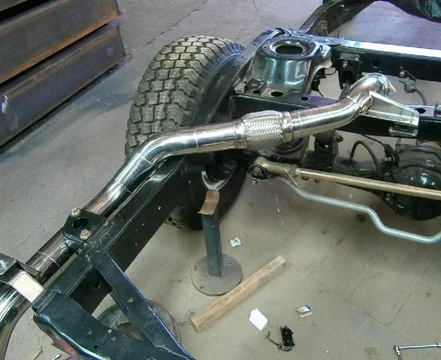
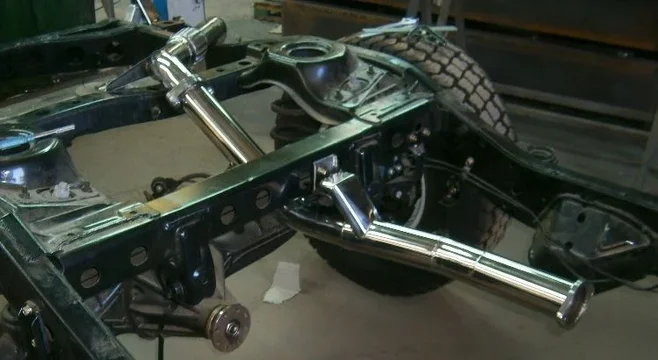
Back from my holiday I decided to fab the rear pipe for the exhaust as it looked like the most time consuming part of m exhaust system. I am putting in a 3" Stainless steel polished system in because it shouldn't rust out unlike the mild steel one on the 45 now:D Another reason for it is I haven't made one out of polished stainless before and would like to. Anyhoo, I dont have much room at work right now for the cab and chassis so I might aswell do this.
Stainless Exhaust Rear 1.webp
Stainless Exhaust Rear 2.webp
Stainless Exhaust Rear 3.webp
All I used for this section was 2x 90 deg and 1x45 deg elbow and a 6" long flexible bellows All out of #304L.The end tip might be a touch too long right now but i can always trim it down. I plan to wrap the pipe where it is close to the chassis and rear tray mount:cheers:
Stainless Exhaust Rear 1.webp
Stainless Exhaust Rear 2.webp
Stainless Exhaust Rear 3.webp
 
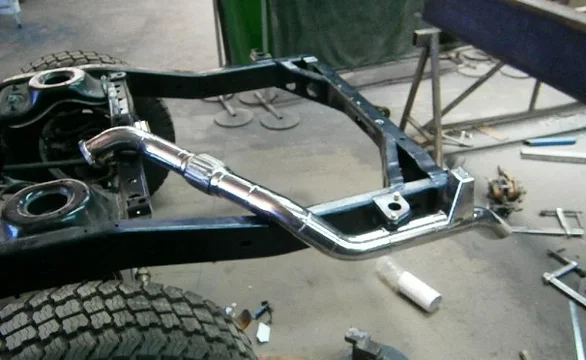
Been A little while since my last post... workin 12hr days cuts into my play time a bit but I managed last weekend to fab the centre piece for my stainless exhaust. It is pretty much the last part that I can fab without the motor and transmission in. So with that done I can move on to other little bits before the biuld. I bought off ebay a brand new set of polished block huggers to finish off my shiny exhaust.
Stainless Exhaust Rear Mid Section 1.webp
Stainless Exhaust Rear Mid Section 2.webp
Stainless Exhaust Hugger pipes.webp
Hopefully I should be closer to stripping the 45 down within the next month or so.........

Stainless Exhaust Rear Mid Section 1.webp


Stainless Exhaust Rear Mid Section 2.webp


Stainless Exhaust Hugger pipes.webp
 
Finally the time is right for the teardown and rebiuld to really start. Last weekend I unbolted and stored the bonnet, guards, Doors and front apron.
45 Strip Down 1.webp
Then proceeded to remove the cab off the chassis.
45 Strip Down 2.webp
With the cab off, I removed the wiring and all the stuff off the firewall. The roof, rear cab panel and windshield surround came off yesterday.
45 Strip Down 3.webp
After Close examination of the underside and the previous owners' try at rust repair I Am thinking about fabricating the entire floor pan from scratch to suit the 80s body mount positions. Which sit further forward to the engine than the 45s

45 Strip Down 1.webp


45 Strip Down 2.webp


45 Strip Down 3.webp
 
Lovin it Rocket, keep it coming.
 
Update. After Screwing around last weekend the motor and gearbox is in! The original gearbox crossmember brackets were too far rearward for use and the motor mounts were in the right centres but wrong orientation. Oh well, had to fab custom mounts, just tacked at the moment but will fully weld in later. Fabbed a custom crossmember and bracketry for gearbox. I will add fotos of them later for now this is how it all sits.
Motor And Box Install.webp
Motor And Box Install 2.webp
Motor And Box Install 3.webp
I will fotos of the tacked-up mounts and crossmember later.... The next steps are exhaust routing and then the cab's floorpan and fitment. Stay Tuned.....

Motor And Box Install.webp


Motor And Box Install 2.webp


Motor And Box Install 3.webp
 

Users who are viewing this thread

Back
Top Bottom