This topic comes up every now and then but I have yet to see a complete parts list with prices and some photos so the purpose of this thread is to compile that information in order to help anyone who is interested in upgrading the front brakes on their HDJ81 to those from a later model Landcruiser / LX450.
My focus is on the what and the why but I’m not going to get into the how part too much. There are plenty of good tech articles describing complete front end rebuilds and there’s no point trying to outdo them. I recommend you read at least one of them before getting into this job unless you already know what you’re doing. There are far more words than most people will want to read, but hopefully the parts list, pricing, and a few photos will be useful.
Thanks to the folks who discovered http://www.1sttoyotaparts.com/ where you can place online orders for genuine Toyota parts at almost reasonable prices! They will ship via USPS to Canada Post and you will end up paying whatever duty Canada Customs charges plus about $5 per box for handling on this end. This is FAR better than whatever brokerage UPS or a similar service will charge and is light years ahead of the outright robbery experienced at Canadian Toyota dealerships.
PARTS LIST
04465-60220 Front Brake Pad Kit (2000 Toyota Landcruiser 100 Series) $56.27
43512-60090 Front Disk (1997 Landcruiser or LX450) 2x $80.14 $160.28
47730-60061 Front Caliper (1997 Landcruiser or LX450) $298.97
47750-60061 Front Caliper (1997 Landcruiser or LX450) $298.97
47781-60061 Backing Plate (1997 Landcruiser or LX450) $47.71
47782-60061 Backing Plate (1997 Landcruiser or LX450) $47.71
Subtotal: $909.91
Shipping: $135.00
Customs + Canada Post Handling: $129.48
TOTAL: $1174.39
As you can see, half of the cost of this job was for the calipers. You need the bigger calipers to use the bigger disks (rotors) but it might be worth trying a wrecker to see if you can find a used set.
Also note that I chose to use the 100 series pads. There is debate about the value of this but I figured that more material should last longer. If you’re using these larger calipers the 100 series pads drop in with no modifications but you will not be able to use the anti-squeal shims. The inner pads have JUST enough room with the pistons fully retracted. It looks like the outer shims might fit but I will probably just wait till next time I’m doing wheel bearings or something like that and stick all the shims in then. Or not. So far they’re silent…
WHY DO THIS?
The stock front brakes on the HDJ81 are mediocre at best. It only took a couple of years for Toyota to realize that and switch to larger parts and they were kind enough to make the whole system interchangeable and bolt-in. By collecting the right parts you can make your front braking system a generation newer.
Again, I won’t waste your time with step-by-step instructions. Figure that out yourself. In my case my front end had been rebuilt a couple of months ago so I didn’t even repack the wheel bearings this time – I just took everything apart and reassembled with the new parts.
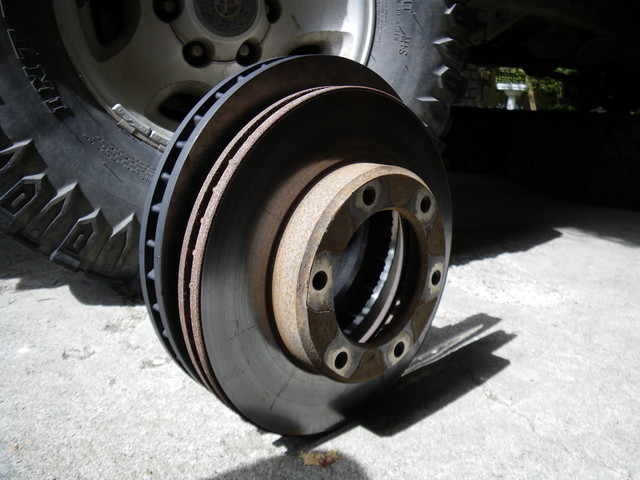
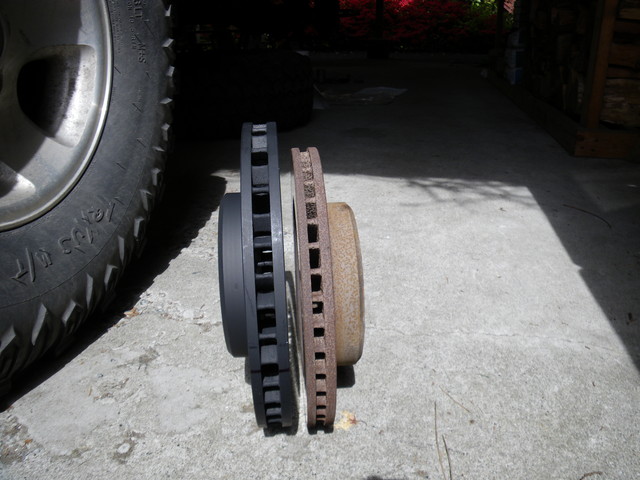
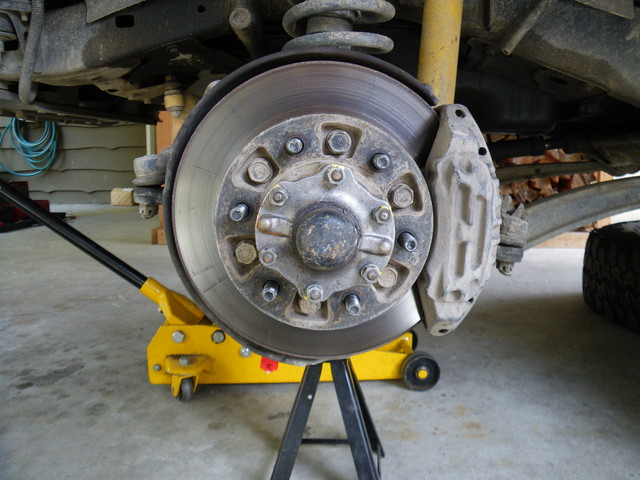
ROTORS
Here’s a couple of shots of the old 11” rotors compared to the new 12” rotors. You can also see how much thicker the new ones are. I didn’t weigh them to compare but there’s a significant difference.
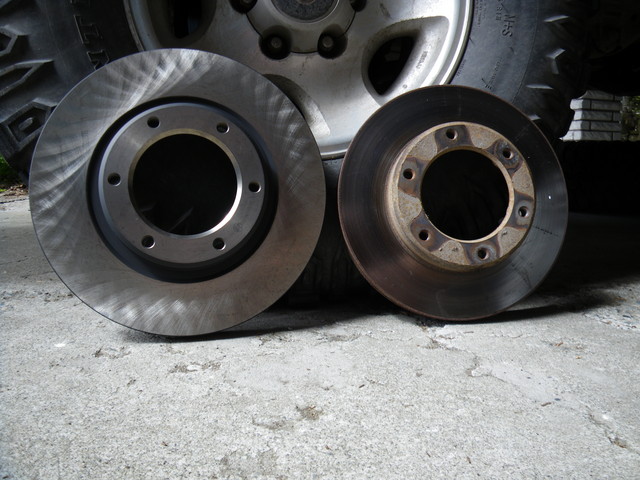
The new rotors will bolt right up in place of the old ones. I found it helpful to break free the mounting bolts while I still had everything on the vehicle. My air compressor is dead so I didn’t have the use of an impact gun but a 2 foot breaker bar with a 17mm socket and a pry bar between wheel studs made it easy. Now that I think about it, an impact gun probably would have just shaken everything and loosened a bunch more dirt, making my life worse.
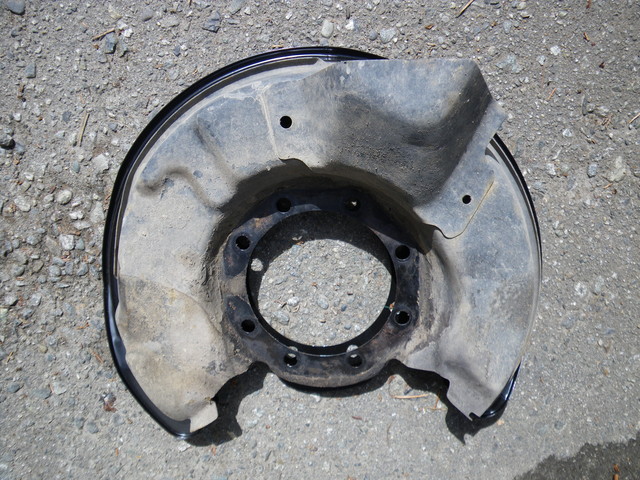
BACKING PLATES
The stock backing plates can be reused but you will need to trim off the lip all the way around. Since new backing plates were less than 10% of the total price, I wasn’t going to waste my time messing around. If you’re doing a budget build and managed to find used calipers then maybe saving another hundred bucks makes more sense.
I also figured that the lip might provide even slightly more protection from rocks, etc, which was another vote for new parts. One interesting difference is that the original backing plates have a scoop to direct air toward the rotor. The new ones don’t.
You can see the new backing plate sticking out behind the old one. Not much bigger, but enough that the old ones won’t fit.
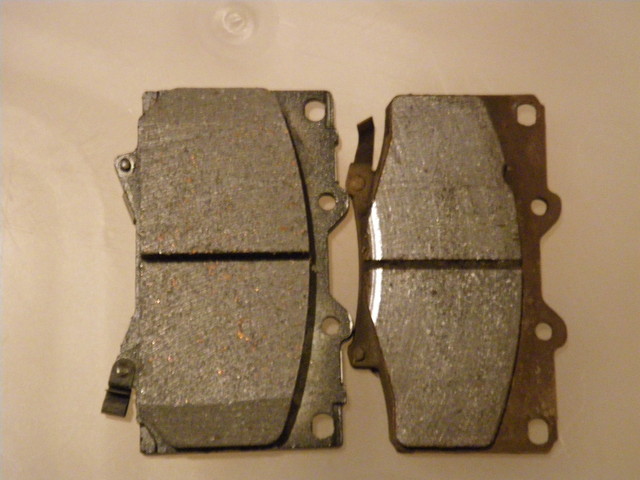
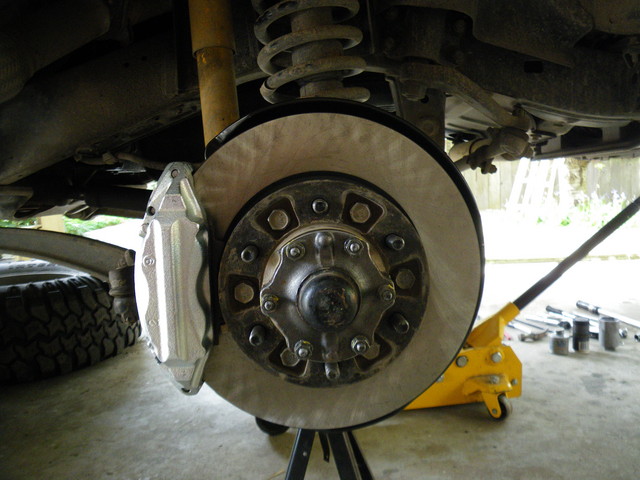
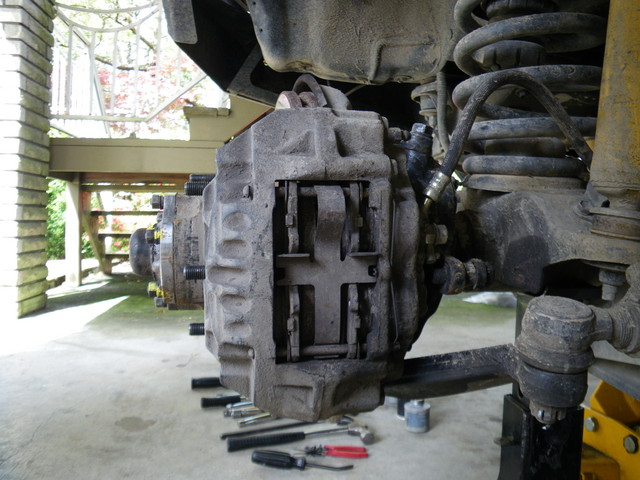
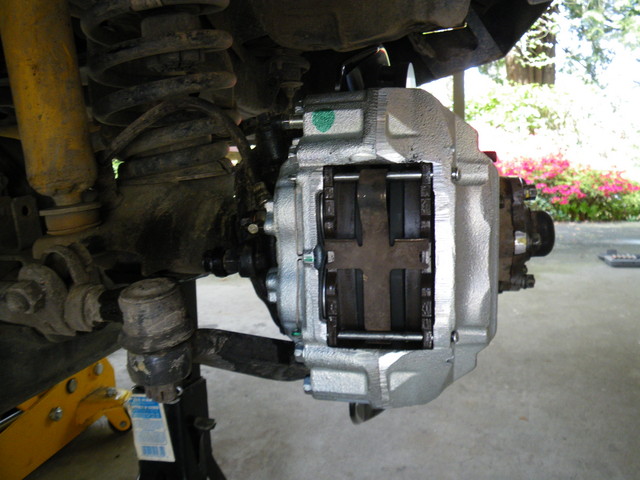
CALIPERS and PADS
The new calipers are direct bolt-in replacements. As I mentioned, they will take the 100 series pads with no modifications, but the anti-squeal shims don’t fit with brand new pads.
This shows the difference between my original 80 series pads (on the right) and a set of cheapo Raybestos 100 series pads. These aren’t the ones I actually installed but they were all I had laying around for a photograph.
The caliper swap gave me a chance to try out my vacuum pump bleeder, which worked incredibly well. Hook it up, pump a few times to get a decent vacuum, then crack the bleeder screw and continue pumping the hand pump as needed to maintain vacuum. It only took about half a master cylinder reservoir worth of fluid to bleed both front calipers completely. The best part was showing the device to my girlfriend and telling her that she had been replaced…

BREAK-IN
In the past I had no idea that you were supposed to break-in a new braking system. I always figured that whatever coating might be on the rotors would burn off and that would be the end of it. After some reading I am convinced that there is validity to the idea of using a brake bedding procedure to deposit an even layer of pad material on the rotors, thereby making for smooth, even braking without vibrations. I also now believe that most of what people attribute to warped rotors is actually a result of an uneven deposit that could have been avoided with a good bedding procedure.
I did something like this: http://www.zeckhausen.com/bedding_in_brakes.htm
In my case it was easy to go slow through a few city blocks until I got to the start of a section of highway (SW Marine Drive heading to UBC in Vancouver) without having to do any real braking or sitting at any stop lights with the brakes clamped. Once on the highway I got up to 100km/h then gave the brakes a moderate stab to warm them up while slowing me down to about 30km/h. Back up to 100, then I just mashed on them to nearly a full stop. I repeated this a few times, which was kind of difficult because of the other traffic and all the bloody cyclists. Bikes and motor vehicles just can’t coexist.
Not liking the idea of rapid cooling, I did gently apply the brakes a few times during the cooling stage. Just enough to generate a bit of heat, but not much at all. From there on out I went another 10 minutes with as little use as possible, and when I had to stop at street lights I made sure not to stay on the brake while sitting. I either kept inching forward or dropped it into Neutral and used the emergency brake to hold me still (yes, mine works very well).
RESULTS
It’s only been a day but it already feels like a different vehicle. The brakes are firm, I think I could actually lock up the MTs, and they seem more resistant to fade. I’ll have a much better chance to test things out in a couple of weeks when I have my boat on top and 500+ pounds in the back.
Now I’m wondering about upgrading the rears….
RANDOM THOUGHTS
My factory 16 inch rims worked perfectly for this job. I’m certain that 15 inch rims wouldn’t allow for these bigger calipers.
Clean everything BEFORE you start disassembly. No matter how many times I do work like this, I never do a good enough job of getting rid of all the dirt ahead of time. This is of particular importance if you plan to do like I did and not bother cleaning and repacking the wheel bearings, etc.
Cone washers can be a hassle. I remember a long time ago when I first encountered these beasts and had one hell of a time getting them out. Since then, I've always reassembled with anti-seize compound all over the outside and inside of the cone washers and now all I have to do is remove the nuts and regular washers then hit around the edges of the drive plate + hub with a brass hammer and the cone washers pop out one by one.
The retaining ring the prevents the drive plate from coming off the end of the axle shaft can also be a pain, particularly getting it back on because there is no place for your snap ring pliers to grab. A traditional circlip has nice little holes for the pliers to go in. When I remove them (only the first time, obviously), I use a small cutoff disk on a Dremel and cut a very small v-groove at the end of each one to give my snap ring pliers a place to seat. You'll be really happy you did this the first time your retaining ring doesn't fly across your driveway, never to be seen again.
There are many techniques for setting the wheel bearing preload. I've always used the "Roger Brown" method (look it up if you’re interested) but this time I tried actually using a fish scale. I ended up with 8 pounds on the fish scale, which seemed to feel pretty much like I used to end up with using the other method. Regardless, I don’t like the idea that you should have "some play", particularly with large tires. The methods I have used in the past have always resulted in no play when a tire is wiggled and I’ve never had a problem with the work I've done in 250,000+ km of driving a Toyota truck.
COMPARISON SHOTS
In this picture you can see that the inner pad is right against the rotor and there is a small gap between the outer pad and the rotor. This is with the pistons fully retracted before I ever bled the system or touched the brake pedal. You might be able to use the outer anti-squeal shim and in a few months maybe the inner too. Personally, I don't care to.
Link to previous thread.
My focus is on the what and the why but I’m not going to get into the how part too much. There are plenty of good tech articles describing complete front end rebuilds and there’s no point trying to outdo them. I recommend you read at least one of them before getting into this job unless you already know what you’re doing. There are far more words than most people will want to read, but hopefully the parts list, pricing, and a few photos will be useful.
Thanks to the folks who discovered http://www.1sttoyotaparts.com/ where you can place online orders for genuine Toyota parts at almost reasonable prices! They will ship via USPS to Canada Post and you will end up paying whatever duty Canada Customs charges plus about $5 per box for handling on this end. This is FAR better than whatever brokerage UPS or a similar service will charge and is light years ahead of the outright robbery experienced at Canadian Toyota dealerships.
PARTS LIST
04465-60220 Front Brake Pad Kit (2000 Toyota Landcruiser 100 Series) $56.27
43512-60090 Front Disk (1997 Landcruiser or LX450) 2x $80.14 $160.28
47730-60061 Front Caliper (1997 Landcruiser or LX450) $298.97
47750-60061 Front Caliper (1997 Landcruiser or LX450) $298.97
47781-60061 Backing Plate (1997 Landcruiser or LX450) $47.71
47782-60061 Backing Plate (1997 Landcruiser or LX450) $47.71
Subtotal: $909.91
Shipping: $135.00
Customs + Canada Post Handling: $129.48
TOTAL: $1174.39
As you can see, half of the cost of this job was for the calipers. You need the bigger calipers to use the bigger disks (rotors) but it might be worth trying a wrecker to see if you can find a used set.
Also note that I chose to use the 100 series pads. There is debate about the value of this but I figured that more material should last longer. If you’re using these larger calipers the 100 series pads drop in with no modifications but you will not be able to use the anti-squeal shims. The inner pads have JUST enough room with the pistons fully retracted. It looks like the outer shims might fit but I will probably just wait till next time I’m doing wheel bearings or something like that and stick all the shims in then. Or not. So far they’re silent…
WHY DO THIS?
The stock front brakes on the HDJ81 are mediocre at best. It only took a couple of years for Toyota to realize that and switch to larger parts and they were kind enough to make the whole system interchangeable and bolt-in. By collecting the right parts you can make your front braking system a generation newer.
Again, I won’t waste your time with step-by-step instructions. Figure that out yourself. In my case my front end had been rebuilt a couple of months ago so I didn’t even repack the wheel bearings this time – I just took everything apart and reassembled with the new parts.
ROTORS
Here’s a couple of shots of the old 11” rotors compared to the new 12” rotors. You can also see how much thicker the new ones are. I didn’t weigh them to compare but there’s a significant difference.
The new rotors will bolt right up in place of the old ones. I found it helpful to break free the mounting bolts while I still had everything on the vehicle. My air compressor is dead so I didn’t have the use of an impact gun but a 2 foot breaker bar with a 17mm socket and a pry bar between wheel studs made it easy. Now that I think about it, an impact gun probably would have just shaken everything and loosened a bunch more dirt, making my life worse.
BACKING PLATES
The stock backing plates can be reused but you will need to trim off the lip all the way around. Since new backing plates were less than 10% of the total price, I wasn’t going to waste my time messing around. If you’re doing a budget build and managed to find used calipers then maybe saving another hundred bucks makes more sense.
I also figured that the lip might provide even slightly more protection from rocks, etc, which was another vote for new parts. One interesting difference is that the original backing plates have a scoop to direct air toward the rotor. The new ones don’t.
You can see the new backing plate sticking out behind the old one. Not much bigger, but enough that the old ones won’t fit.
CALIPERS and PADS
The new calipers are direct bolt-in replacements. As I mentioned, they will take the 100 series pads with no modifications, but the anti-squeal shims don’t fit with brand new pads.
This shows the difference between my original 80 series pads (on the right) and a set of cheapo Raybestos 100 series pads. These aren’t the ones I actually installed but they were all I had laying around for a photograph.
The caliper swap gave me a chance to try out my vacuum pump bleeder, which worked incredibly well. Hook it up, pump a few times to get a decent vacuum, then crack the bleeder screw and continue pumping the hand pump as needed to maintain vacuum. It only took about half a master cylinder reservoir worth of fluid to bleed both front calipers completely. The best part was showing the device to my girlfriend and telling her that she had been replaced…
BREAK-IN
In the past I had no idea that you were supposed to break-in a new braking system. I always figured that whatever coating might be on the rotors would burn off and that would be the end of it. After some reading I am convinced that there is validity to the idea of using a brake bedding procedure to deposit an even layer of pad material on the rotors, thereby making for smooth, even braking without vibrations. I also now believe that most of what people attribute to warped rotors is actually a result of an uneven deposit that could have been avoided with a good bedding procedure.
I did something like this: http://www.zeckhausen.com/bedding_in_brakes.htm
In my case it was easy to go slow through a few city blocks until I got to the start of a section of highway (SW Marine Drive heading to UBC in Vancouver) without having to do any real braking or sitting at any stop lights with the brakes clamped. Once on the highway I got up to 100km/h then gave the brakes a moderate stab to warm them up while slowing me down to about 30km/h. Back up to 100, then I just mashed on them to nearly a full stop. I repeated this a few times, which was kind of difficult because of the other traffic and all the bloody cyclists. Bikes and motor vehicles just can’t coexist.
Not liking the idea of rapid cooling, I did gently apply the brakes a few times during the cooling stage. Just enough to generate a bit of heat, but not much at all. From there on out I went another 10 minutes with as little use as possible, and when I had to stop at street lights I made sure not to stay on the brake while sitting. I either kept inching forward or dropped it into Neutral and used the emergency brake to hold me still (yes, mine works very well).
RESULTS
It’s only been a day but it already feels like a different vehicle. The brakes are firm, I think I could actually lock up the MTs, and they seem more resistant to fade. I’ll have a much better chance to test things out in a couple of weeks when I have my boat on top and 500+ pounds in the back.
Now I’m wondering about upgrading the rears….
RANDOM THOUGHTS
My factory 16 inch rims worked perfectly for this job. I’m certain that 15 inch rims wouldn’t allow for these bigger calipers.
Clean everything BEFORE you start disassembly. No matter how many times I do work like this, I never do a good enough job of getting rid of all the dirt ahead of time. This is of particular importance if you plan to do like I did and not bother cleaning and repacking the wheel bearings, etc.
Cone washers can be a hassle. I remember a long time ago when I first encountered these beasts and had one hell of a time getting them out. Since then, I've always reassembled with anti-seize compound all over the outside and inside of the cone washers and now all I have to do is remove the nuts and regular washers then hit around the edges of the drive plate + hub with a brass hammer and the cone washers pop out one by one.
The retaining ring the prevents the drive plate from coming off the end of the axle shaft can also be a pain, particularly getting it back on because there is no place for your snap ring pliers to grab. A traditional circlip has nice little holes for the pliers to go in. When I remove them (only the first time, obviously), I use a small cutoff disk on a Dremel and cut a very small v-groove at the end of each one to give my snap ring pliers a place to seat. You'll be really happy you did this the first time your retaining ring doesn't fly across your driveway, never to be seen again.
There are many techniques for setting the wheel bearing preload. I've always used the "Roger Brown" method (look it up if you’re interested) but this time I tried actually using a fish scale. I ended up with 8 pounds on the fish scale, which seemed to feel pretty much like I used to end up with using the other method. Regardless, I don’t like the idea that you should have "some play", particularly with large tires. The methods I have used in the past have always resulted in no play when a tire is wiggled and I’ve never had a problem with the work I've done in 250,000+ km of driving a Toyota truck.
COMPARISON SHOTS
In this picture you can see that the inner pad is right against the rotor and there is a small gap between the outer pad and the rotor. This is with the pistons fully retracted before I ever bled the system or touched the brake pedal. You might be able to use the outer anti-squeal shim and in a few months maybe the inner too. Personally, I don't care to.
Link to previous thread.
Last edited:


")
