Navigation
Install the app
How to install the app on iOS
Follow along with the video below to see how to install our site as a web app on your home screen.
Note: This feature may not be available in some browsers.
More options
Style variation
You are using an out of date browser. It may not display this or other websites correctly.
You should upgrade or use an alternative browser.
You should upgrade or use an alternative browser.
For those with torsion bar questions
- Thread starter Gunney
- Start date
This site may earn a commission from merchant affiliate
links, including eBay, Amazon, Skimlinks, and others.
More options
Who Replied?Gunney - excellent write up - and great photos.
Thanks for taking the effort to post this...........
Thanks for taking the effort to post this...........
- Thread starter
- #23
Rear Suspension
 job
job
Time for the back to go up.
I do it a bit differently to some of the guys, I like to have 3 wheels on the ground and only mess with one side (personal preference) so my step by step is a bit different.
STEP 1
Get everything you need together. You cannot do this swap without some kind of lubricating spray (KY isn’t going to cut it) a 22mm ratcheting ring spanner and a strap wrench.

Prep all your suspension bits, no one has ever bothered to post this so this is what the bushing setup should look like on the top of the shock (I suppose you can just copy the shock as you remove it from the vehicle). Also don't be afraid of removing that steel bar compressing the shock, its not going to spring open and take your hand off. just twits one side of the shock one way and the other side the other way and it will pop off. You can put it back on buy just pushing the shock down onto the ground until it has compressed enough.
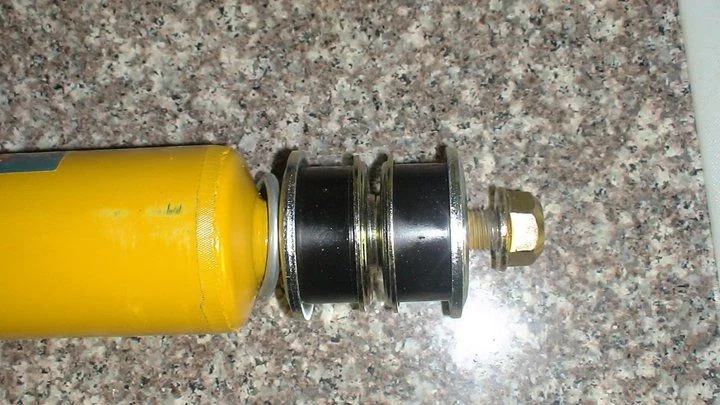
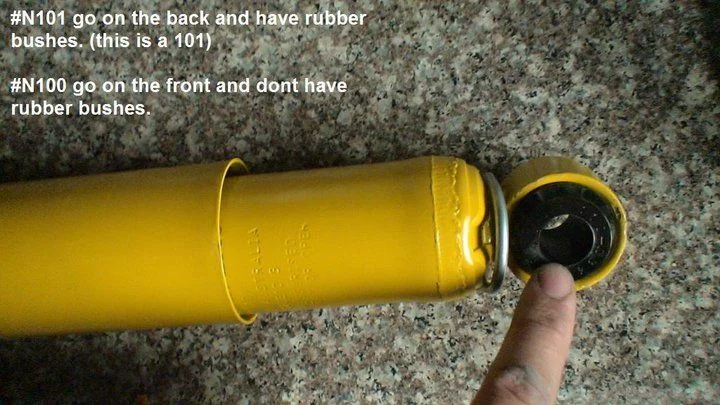
Then you also need to note that the N101 shock goes on the back and has a rubber bushing you have to push into place with a vice, and the N100 goes in the front and has no rubber bushing.
I have taped the coil pack to the top of the coil so I don’t have to fiddle around with it while I am trying to put it in.
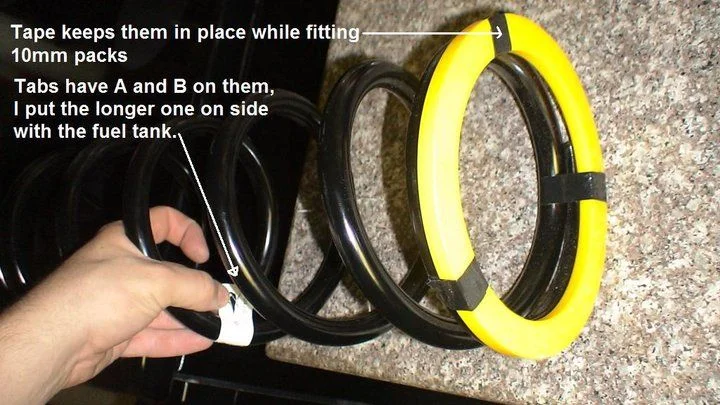
I also got very confused about A and B coils and then where they tagged for use in a LHD or a RHD country so I called a mate and he said “just put the longer one in the side with the gas tank” (so I did)
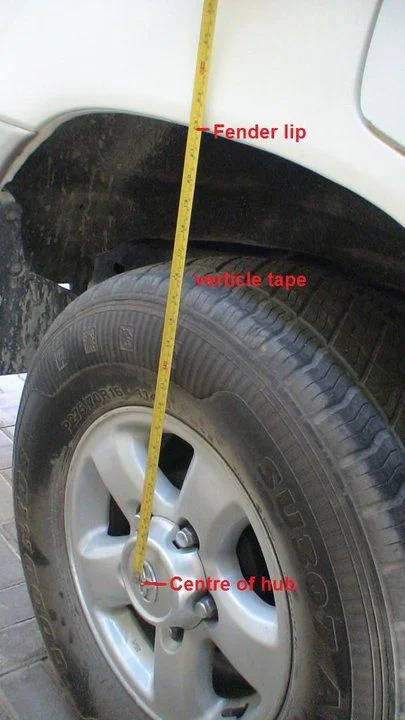
Once your outside take a proper measurement of your stock setup:
STEP 2
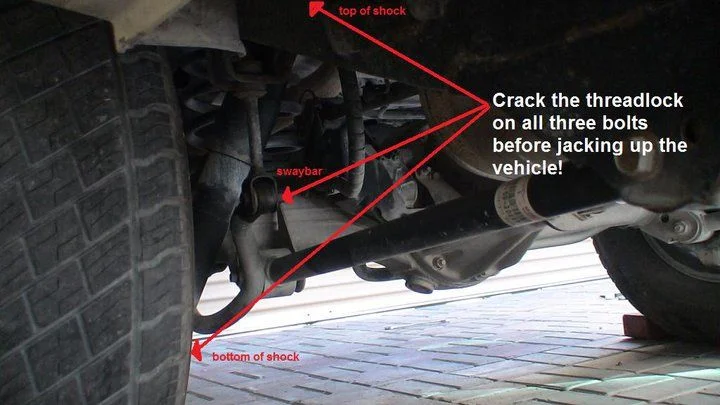
Before you jack up the vehicle, loosen all the bolts that are going to give you a headache, if your spare tyre is in I suggest you remove it (use the opportunity to check it for damage and its pressure). You can use the strap wrench on the top of the shock and just cable tie the 22mm spanner into place. You achieve the same thing, it’s just easier to get some weight behind the strap wrench.
You will also want to completely remove the bolt on the sway bar (the second you start to jack the car up there will be pressure on the joint that will make life difficult. I also loosened the bottom of the shock.
STEP 3
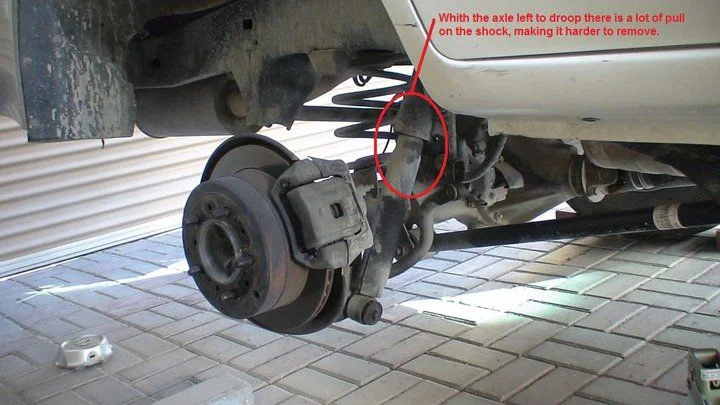
Jack up the car from the chassis (not the axle) and remove the wheel. You will see that the shock is at its full length and its going to be difficult to remove it this way, so put an axle stand under the axle and lower the vehicle back down until the shock is in a neutral position.
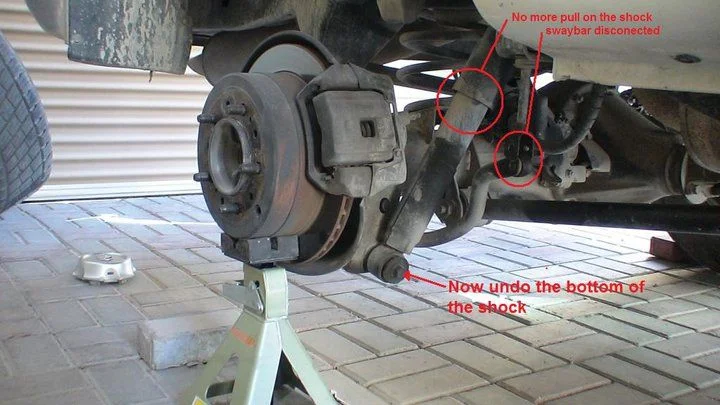
STEP 4
Remove the lower shock bolt and try to pull the shock off its mounting, it
probably won’t come off.
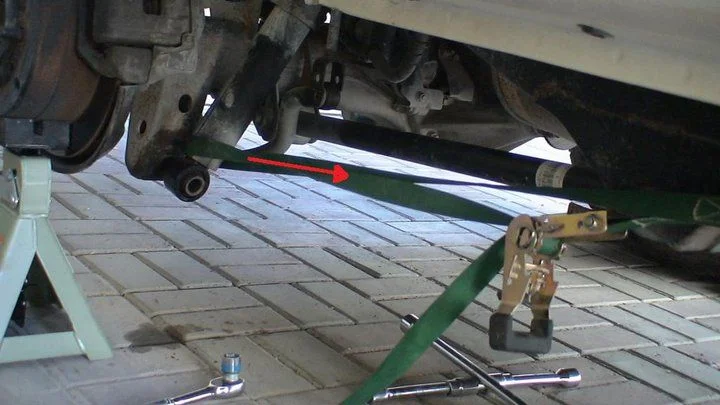
There is a pretty good theory to moving things, if you can “leaver it or jack it, strap it” (don’t read into that) so if it doesn’t come off grab a ratchet strap and use that to get it off, if you don’t have a ratchet strap you can tie a loop of rope, put a spanner in the middle and twist the spanner.
STEP 5
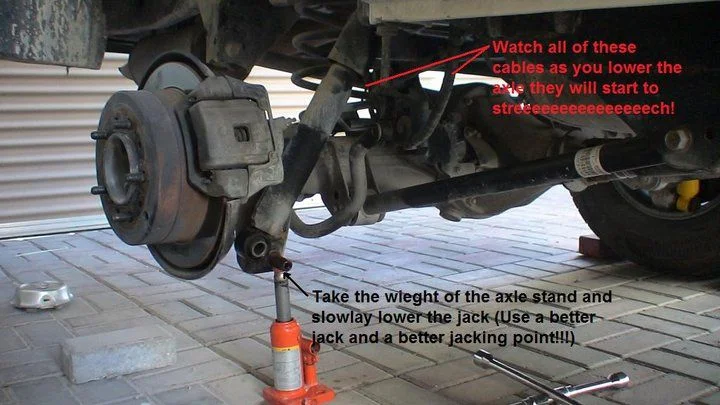
Put a jack under the axle (please use a better jack and jack point than the one I chose) and lift the axle of the jack stand. Remove the jack stand and slowly
lower the axle on the jack…. Make sure you are watching all the cables and wires to make sure you’re not stretching anything.
You should now have enough space to pull out the spring, so go ahead and do that.
Then get that 22mm racketing spanner onto the nut on top of the shock, cable tie the spanner in place and twist the top of the shock by hand to unscrew it.
STEP 6
Reverse the process, installing everything as you go.
then do the other side

jobTime for the back to go up.
I do it a bit differently to some of the guys, I like to have 3 wheels on the ground and only mess with one side (personal preference) so my step by step is a bit different.
STEP 1
Get everything you need together. You cannot do this swap without some kind of lubricating spray (KY isn’t going to cut it) a 22mm ratcheting ring spanner and a strap wrench.
Prep all your suspension bits, no one has ever bothered to post this so this is what the bushing setup should look like on the top of the shock (I suppose you can just copy the shock as you remove it from the vehicle). Also don't be afraid of removing that steel bar compressing the shock, its not going to spring open and take your hand off. just twits one side of the shock one way and the other side the other way and it will pop off. You can put it back on buy just pushing the shock down onto the ground until it has compressed enough.
Then you also need to note that the N101 shock goes on the back and has a rubber bushing you have to push into place with a vice, and the N100 goes in the front and has no rubber bushing.
I have taped the coil pack to the top of the coil so I don’t have to fiddle around with it while I am trying to put it in.
I also got very confused about A and B coils and then where they tagged for use in a LHD or a RHD country so I called a mate and he said “just put the longer one in the side with the gas tank” (so I did)
Once your outside take a proper measurement of your stock setup:
STEP 2
Before you jack up the vehicle, loosen all the bolts that are going to give you a headache, if your spare tyre is in I suggest you remove it (use the opportunity to check it for damage and its pressure). You can use the strap wrench on the top of the shock and just cable tie the 22mm spanner into place. You achieve the same thing, it’s just easier to get some weight behind the strap wrench.
You will also want to completely remove the bolt on the sway bar (the second you start to jack the car up there will be pressure on the joint that will make life difficult. I also loosened the bottom of the shock.
STEP 3
Jack up the car from the chassis (not the axle) and remove the wheel. You will see that the shock is at its full length and its going to be difficult to remove it this way, so put an axle stand under the axle and lower the vehicle back down until the shock is in a neutral position.
STEP 4
Remove the lower shock bolt and try to pull the shock off its mounting, it
probably won’t come off.
There is a pretty good theory to moving things, if you can “leaver it or jack it, strap it” (don’t read into that) so if it doesn’t come off grab a ratchet strap and use that to get it off, if you don’t have a ratchet strap you can tie a loop of rope, put a spanner in the middle and twist the spanner.
STEP 5
Put a jack under the axle (please use a better jack and jack point than the one I chose) and lift the axle of the jack stand. Remove the jack stand and slowly
lower the axle on the jack…. Make sure you are watching all the cables and wires to make sure you’re not stretching anything.
You should now have enough space to pull out the spring, so go ahead and do that.
Then get that 22mm racketing spanner onto the nut on top of the shock, cable tie the spanner in place and twist the top of the shock by hand to unscrew it.
STEP 6
Reverse the process, installing everything as you go.
then do the other side
Last edited:
another great write-up with great pictures! nice job! definitely a hallmark of this DIY!
on step 5, there is a bracket which holds the brake line in the center of the axel at the frame. remove the bolt to free the bracket and you now have extra slack in the brake line to allow the axel to swing freely. I did both left and right at the same time with the frame up on stands so my axle was lower to start with than your method. another reminder: lock the center and chock the front wheels; the e-brake is only on the rear and an open center will defeat the park lock on the trans.
on step 5, there is a bracket which holds the brake line in the center of the axel at the frame. remove the bolt to free the bracket and you now have extra slack in the brake line to allow the axel to swing freely. I did both left and right at the same time with the frame up on stands so my axle was lower to start with than your method. another reminder: lock the center and chock the front wheels; the e-brake is only on the rear and an open center will defeat the park lock on the trans.

VidereStudios
SILVER Star
Excellent write up...thanks Gunney! Now I have something to refer to when I do my suspension in the next year or so.
Sweet write up. Wish it was around when I was figuring out how to do mine.
The book the excerpt from your sig is from is a pretty good one. Have you read it?
The book the excerpt from your sig is from is a pretty good one. Have you read it?
- Thread starter
- #28
I haven't, ill try get my hands on it. - Most of what I have read in the past has in no way been applicable to my experiences and in most cases are written by annalists and not individuals who have found themselves in such situations. The decisions we make in a thousandth of a second they deliberate for years....
Unintended Consequences” by John Ross is my "bible" from an entertainment point of view.
Unintended Consequences” by John Ross is my "bible" from an entertainment point of view.
Last edited:
Do you have any tricks on removing the torsion bars for replacement with aftermarket ones? Also, when replacing the tb with aftermarket ones, how do you determine the amount of "initial twist" to put in the bar? Measurement by droop? Do you install them using a similar procedure to reindexing the bars? (i.e. put the bar in with the adjuster bolt at the end while zip tied like in your picture with the white line?) thanks.
Tricks? PB Blaster, Heat, and Pressure. Get the rear to break free, slide the front - along with the bracket - toward the rear past the captive bolt and then forward and down. You then can get the front loose outside of the vehicle. Regarding heat, just use a propane torch and heat the bracket from the outside to get it to expand around the bar.
Once you have the new TB's in, the re-indexing (if necessary) is pretty easy. I wanted mine set so that I had headroom to torque more when a bumper/winch/dual batts, etc go on. So my initial setting was to have the bolt head flush with the bracket. Honestly, it was just a guess based upon who much the OEM's moved and where I thought the bolt would end up on the new ones. I got the PS right the first time, but had to re-clock the DS because it torqued in too far with the heavier load on the left side.
Once you have the new TB's in, the re-indexing (if necessary) is pretty easy. I wanted mine set so that I had headroom to torque more when a bumper/winch/dual batts, etc go on. So my initial setting was to have the bolt head flush with the bracket. Honestly, it was just a guess based upon who much the OEM's moved and where I thought the bolt would end up on the new ones. I got the PS right the first time, but had to re-clock the DS because it torqued in too far with the heavier load on the left side.
I was under the truck yesterday and i started spraying the bolts that will be involved in the suspension install. (all i have is fluid film at the moment) I have a very very NEWBIE question. I was trying to locate the bolts on the top mount of the rear shock. I couldn't find them from the outside of the truck. Then i went underneath. Are you supposed to go from underneath the truck inside of the frame rail to get to the top of the shock mount??? If this is true, no wonder everyone complains about it.
Here's another question. Hopefully someone can help me here. I'm planning on uninstalling/cutting my ahc suspension in order to install my new suspension. Are the ahc lines going to the shock in the rear similarly connected as that on the front shock? ( i ordered my FSM yesterday but was wondering if anyone could answer this before it gets here)
Here's another question. Hopefully someone can help me here. I'm planning on uninstalling/cutting my ahc suspension in order to install my new suspension. Are the ahc lines going to the shock in the rear similarly connected as that on the front shock? ( i ordered my FSM yesterday but was wondering if anyone could answer this before it gets here)
question 1) - Yes you do have to get at the top rear shock nuts from under the truck unless you cut a hole in the floor of the truck like several people have done on here. Personally I think drilling a big hole is a bit excessive so I didn't cut into my floor. I did however torch off the tops of my old shocks because they were old and I knew I'd never reuse them. They came out easily and I tightened the new shock bolts down by hand relatively easy too. Installing new shocks isn't too bad.
2) I don't have AHC... Someone will chime in... You may want to look up Brocks build thread. He has details on removing and replacing AHC...
2) I don't have AHC... Someone will chime in... You may want to look up Brocks build thread. He has details on removing and replacing AHC...
question 1) - Yes you do have to get at the top rear shock nuts from under the truck unless you cut a hole in the floor of the truck like several people have done on here. Personally I think drilling a big hole is a bit excessive so I didn't cut into my floor. I did however torch off the tops of my old shocks because they were old and I knew I'd never reuse them. They came out easily and I tightened the new shock bolts down by hand relatively easy too. Installing new shocks isn't too bad.
2) I don't have AHC... Someone will chime in... You may want to look up Brocks build thread. He has details on removing and replacing AHC...
Thanks. Brock was fortunate enough to know a lexus tech and had him remove the whole shabang. I should pm him though.
Here's another question. Hopefully someone can help me here. I'm planning on uninstalling/cutting my ahc suspension in order to install my new suspension. Are the ahc lines going to the shock in the rear similarly connected as that on the front shock? ( i ordered my FSM yesterday but was wondering if anyone could answer this before it gets here)
Take a look at Parts Diagrams on Lexuspartsnow.com (Section "Power Train/Chassis" Components 38/39/40 - in particular 40 Illustration #1 of 3).
From Component 40 Illustration 1 it looks like the rear line connects to the top of the shocks pretty much the same as in the front:


check my build thread but YES the lines are on top...loosen nut and then simple o-ring seal holds in place...pop out and is disconnected. Then remove shock...the nut for this is tricky to reach but can be done WITHOUT cutting hole in cargo bed.
You're referring to the 30mm adjusting bolt, correct? Make sure your front tires are off the ground and the truck is supported by jack stands. Spray the bolt threads with PB Blaster and let it sit for a little while. You'll need some leverage to move the bolt, so if you don't have an 18" extension slide a floor jack handle over your wrench/socket handle. Good luck.
") perswasion did the trick.
perswasion did the trick. Users who are viewing this thread
Total: 1 (members: 0, guests: 1)