Builds Finally got my own...Meet BeBe (1 Viewer)

This site may earn a commission from merchant affiliate
links, including eBay, Amazon, Skimlinks, and others.

So got @NLXTACY mirror arm and damn, that is a pretty piece of work!! Went through and took everything apart last night and installed just the mirror. Currently working on extending the pigtail so that I can use the features but for now it is just a mirror. I will post some better pics later. Plan is that I will run the wires for the pigtail (only three) between the windshield gasket and the headliner down to the dash and then from there to their respective items. Version I have has a Ground (black)/12v Hot (Red)/12v Ignition Switched (white with black stripe).

Untitled by Greg Fisicaro, on Flickr

Info on the Gentex GNTX-453 mirror and some good info here on its sibling the GNTX-313.
 
Now on to the other fun task, yet again. Changed the oil this weekend however the RTV trick does not seem to be working as well as last time, which means I need to go find a clean bucket so I can drain and re attempt.

However, can anyone confirm this is the correct PN (90430-18023) for the oil pan gasket. The one I got from NAPA was just a standard hard plastic. Seems I can get a fiber version from Oreilly but any of the synthetic versions have to be special ordered. Local stealership was clueless.
drain plug by Greg Fisicaro, on Flickr
 
See up until a couple of oil changes ago I had continued to reuse the same one over and over without fail/issue. The ill fated change the ring busted and I had to get something else, that something else was the stupid plastic rings (that fit really well on the plug) from NAPA. Apparently though I need either a replaceable fiber or cork one before that.

This time though the drip just does not want to seal with the RTV like last time. So I am going to have to drain the pan into a clean bucket or the old jugs (which I still have) and then let it empty itself overnight and handle after the system has completely drained with some RTV on the plug threads AND around the seat.
 
Well that did not go as planned.
Tried, emphasis on tried, to empty the the pan into the old bottles. Well the drain plug dropped into the funnel blocking the opening and I lost most of oil all over the driveway.

After cleaning up and getting my dirty oil drain catch pan out of the way if was able to see what the deal is. See below.

0A379290-DFE0-4435-89D2-1CCB8BB8A3F7.jpeg


1915E0E4-4A98-4FD7-9BE1-C1508B3939E7.jpeg
 
That dark section at the bottom is a groove that I was unaware of with a dimple/dent on the face of the pan. This is why it will not seal.
 
Checked this morning and seems like things are ok... Since I lost a major of my oil at like 9pm last night I will be getting new oil (YEAH FOR EXTRA COST!!) tonight. Had purchased some black rtv before I started yesterday (previously using blue) and when I pulled the plug yesterday (lol literally) I went ahead and cleaned it up all nice and purdy with some acetone. When I went to install the plug I coated the threads with a light shmear of black rtv and then created a small bead right at the washer. Installed that around 10pm last night and then put a bead all around the edge of the bolt head. Followed the instructions on the RTV tube of doing only finger tight, letting set for 1hr and then tightening to torque spec (went with 33ft/lbs since I never found a confirmed - just toss back and forth between 27ft/lbs and 36ft/lbs so went in between).

This morning I stuck my head under and it did not seem to have leaked at all overnight (no wetness around plug). So after work I will grab some more oil and fill her up later this evening. That dimple in the pan seems to be the main culprit as it is a pretty significant dimple. I am pretty sure others have stated that it is there, along with that drainage line in the threads, but this seems a bit counter-intuitive in design? And as you can see from pics, there is lots of marks on the pan, some low spots, etc. from the PO. I have always torqued and those have pretty much always been there. Guess eventually she will need a whole new pan, until then I will just have to add a bit more procedure to the oil changes.

Oh and my 10/85 truck has the LARGE drain plug. Purchased a small set of plug washers from Autozone that supposedly fit the year but ended up that the M14 is the smaller one. Looks like mine is either a M18 or M22.
 
So while I have been messing with the oil plug I have been finishing up the wiring on the Gentex mirror.

Pigtail came with three wires; 12v hot (red), white with black stripe (ground) and black (ignition). Just got her all programmed to my garage door and tested!! Success. Also just filled the truck up with oil, Costco has the Delo400 on sale for $30 for 3 gallons right now, and just giving it a bit to sit and see if I see a leak.

62C68D28-12DD-4770-A5F4-7D43C52A695F.jpeg


1478A010-D55E-4672-963E-14B0665C4C52.jpeg


F9C7FBA2-51E7-4C66-9CA3-54ABB0DA5A37.jpeg
 
Wife left town for a few days Saturday evening which means that BeBe gets some quality time in the garage!!! Had fun with my sister at the local community festival called Taste of Downtown where most of the restaurants come out and have small booths where you get to sample one of their items. Always a fun event and the ENTIRE community comes out for it as it benefits the local Domestic Violence shelter and group.

So BeBe went into the garage late on Saturday night after all the festivities and also because I was fixing the smashed up bumper of my sisters 2015 Hyundai Santa Fe. Usually ends up being me as I am the more mechanically inclined in the family.

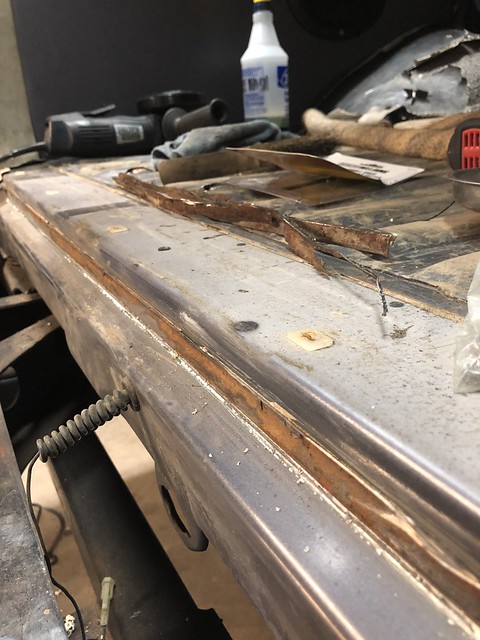
Anyways, so I FINALLY got around to replacing the lower lip on the rear compartment that the parameter seal/gasket attaches to. Mine was completely rusted out in the center for whatever reason and the gasket was no longer sealing so road noise and garbage would eventually get in.

Old rusty stuff. Didn't take a pic of the middle rusted out section apparently. Literally about a foot to 18" of it just crumbled away when I pulled the original gasket.
Untitled by Greg Fisicaro, on Flickr

Spot welds all finally drilled out with my cheapo HF spot weld drillbit.
Untitled by Greg Fisicaro, on Flickr

And the remains of finally getting everything drilled and pulled. Spot welds were every 2.5" and an inch from each edge so plenty of them over the 46" length of steel. As you can see in one pic, there is about a 1/2" break between the piece that starts to curve upwards to the sides and the bottom lip. This was a life saver as 1) it gave me somewhere to level the new piece off of, and 2) didnt require me to do any other structural type welding!

Untitled by Greg Fisicaro, on Flickr

My tac welds are pretty ugly but that is a section that will never be seen so I was not that concerned about them looking good. I primed and painted last night and then let it dry overnight so should be good to install the new surround/parameter gasket from @reevesci tonight after work!

For those wondering, the piece of metal needs to be almost exactly 1/2" edges with a fairly sharp turn. I had a buddy use his pressbrake to bend me a piece that was 3/4" by 3/4" by 20ga and I still had to cut some off with my die grinder.
 
Here's semi finished product with the gasket going on. I was able to find some 3M paintable seam sealer locally so I am gonna pull the gasket so I can put the seam sealer on. Then I hopefully wont have to worry about dealing with this issue again.

Untitled by Greg Fisicaro, on Flickr
 
Made the mistake last night of thinking a small spot of rust was just surface rust near the rear bumper end cap. Of course what I thought was maybe a quarter sized piece of rust turned into this.

E2D706E5-6847-4132-A70D-FD937699CE92.jpeg


6BCB50B0-6076-45D6-B49C-2BE48F7D232B.jpeg
 
Not too bad for two pieces that I spent hours on modeling by hand. No tools or Dolly’s just bending on the end of my wood work bench and with a pair of welding snips.

Still got a bit of work to do and definitely not perfect but good enough for me.
 
Well that did not go as planned.
Tried, emphasis on tried, to empty the the pan into the old bottles. Well the drain plug dropped into the funnel blocking the opening and I lost most of oil all over the driveway.

After cleaning up and getting my dirty oil drain catch pan out of the way if was able to see what the deal is. See below.

View attachment 1747678

View attachment 1747679
My old pan had that too. It’s a rubbery plug. And it had the larger 17mm or 19 hex plug I believe. The new pan is bought years ago used from CruiserParts for my first truck, the ‘84 has the small plug.
 
Last edited:
My old pan had that too. It’s a rubbery plug. And it had the larger 17mm or 19 hex plug I believe. The new pan is bought years ago used from CruiserParts for my first truck, the ‘84 has the small plug.
yeah which is strange because mine is a 10/85 build date if I remember correctly.
 
So I finished up the welding on that piece last night. Ended up being just in time as I was literally laying down my last few tac welds and ran out of welding gas. I am sure that I still have a few pin holes to fix but everything is taken care of for the most part so I treated everything with OsPho and then cleaned it all of and painted. Before I do the full paint job I will go back over certain areas and even stuff out with LIGHT SKINS of bondo.

Also got around to finally swapping @HemiAlex 's carb with my rebuilt carb over the weekend while I was waiting for welds to cool and whatnot. Did a little tuning of my carb last night after everything was said and done and she was happily purring like a kitten. So stoked to have my original carb back on and running well. Sure I will have to do a little tuning here and there over the next few weeks as I drive it more but the OEM AC Pump and the lighter secondary diaphragm spring seems to be helping LOTS. She has some nice pep now that I did not have with my carb previously.
 
Well s***, popped the hood last night to check something and found that my Green/Black VTV is broken again. Looks like we have a dead soldier. Gonna have to find a replacement from somewhere like cruiseryard or something unless I can find a suitable replacement from another vehicle.

This only helps with the choke breaker correct? @OSS @CaptClose
 
Yep... that VTV delays the choke breaker from opening up until after startup. Maybe you’ll run a little rich, but I don’t think you’ll harm anything while you source a replacement.
 

Yup just found that one before looking on here. Gonna put in an order for it. Also put in an order for a CityRacer ICS. After swapping my carb back over from Alex's, I am still having the issue of the high idle. This is after the complete rebuild and a new, OEM, accelerator pump.

Seeing as I didn't have the issue with Alex's carb installed, the only major difference is his was still running the OEM ICS. So gonna try the ICS from CityRacer to see if his is of better quality than the CCOT one I have installed currently. I figure if it was a vacuum leak somewhere, other than the carb itself, I would have had similar symptoms with Alex's
 

Users who are viewing this thread

Back
Top Bottom