Electrolysis Advice

This site may earn a commission from merchant affiliate
links, including eBay, Amazon, Skimlinks, and others.

Just stopped to give a great thread a bump - Ive got more parts 'cooking' today. I went with the suggestion of adding baking powder as the last step to level up the amps more evenly and I picked up some Ospho. Ive got a non cruiser related project that has me debating a larger 'tub' for electrolysis. Might take a trip on down to the habitat and see what I can find!

Thanks Sarca. I'm back in town ready to put my mondo Rubbermaid tank to work.
 
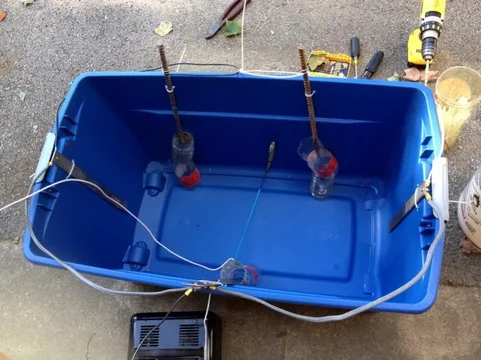
Setting up the big tub today. Need to clean the transmission case and I'm tired of trying to use kerosine and Simple Green.


image-3415525248.jpg

image-4023009352.jpg
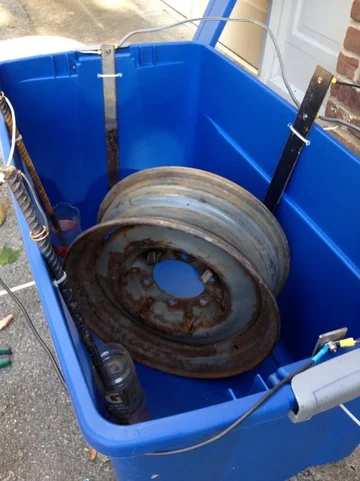
Rubbermaid with Wheels!

Have 5 elements, but the surface area is still small.


image-3660936568.jpg
Flat stock

image-2332790536.jpg
Rebar. Not crazy about this connection.


It's a large tub

image-172622695.jpg
Big enough for a 15" wheel


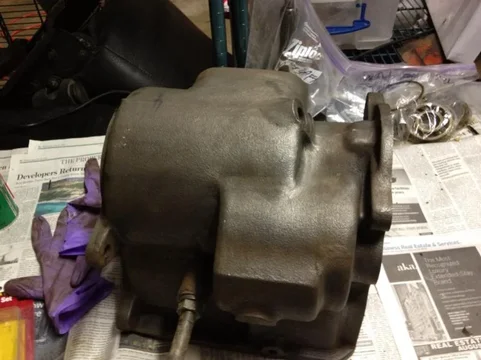
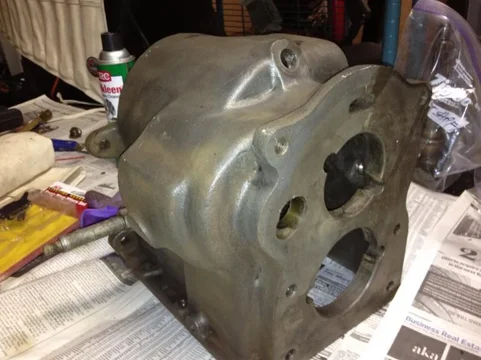
But I'm cleaning a tranny case
image-543233052.jpg
Before

image-189911388.jpg
Before


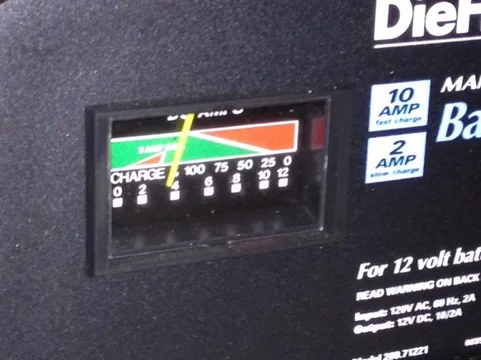
Put in about 1-2 cups of soda ash, and hand stirred. Watched Amps go from 0 up to about 3.5-4. Ideal (so I've been told/read) is 7 amps, so I might add more soda ash.

Tranny is bubbling away.

image-4278425208.jpg
image-3415525248.jpg
image-4023009352.jpg
image-3660936568.jpg
image-2332790536.jpg
image-172622695.jpg
image-543233052.jpg
image-189911388.jpg
image-4278425208.jpg
 
Cant wait to see the results!
 
Results. Much easier to knock off the old paint and grime with a wire brush. Took about 6 hours. I took it out after about 4, cleaned it a bit, and stuck it back in. The one thing that it doesn't get rid of is mud, so that's gotta come off first. Began to do a final clean with brake cleaner, but may need to scrub with some simple green first to get a haze of brown rust/mud off.
image-1300231129.jpg
image-2765027325.jpg
image-3072488138.jpg
image-1300231129.jpg
image-2765027325.jpg
image-3072488138.jpg
 
Last edited:
Looks great, are you going to paint it before you build it or after?
 
Results. Much easier to knock off the old paint and grime with a wire brush. Took about 6 hours. I took it out after about 4, cleaned it a bit, and stuck it back in. The one thing that it doesn't get rid of is mud, so that's gotta come off first. Began to do a final clean with brake cleaner, but may need to scrub with some simple green first to get a haze of brown rust/mud off.

Going to use some POR15 Paint Prep for passivation (learned a new word) on the tranny case, then paint it. Since no sun under there, I'll not top coat it unless someone tells me otherwise.
 
Last edited:
That case is so clean and rust free, it would do quite well with a shot of rattle can etching primer followed by a durable rattle can engine enamel.
 
That case is so clean and rust free, it would do quite well with a shot of rattle can etching primer followed by a durable rattle can engine enamel.

Hmmm, you think? That would save the (expensive) POR for a more permanent piece. I've already put a zinc coating spray on it.
 
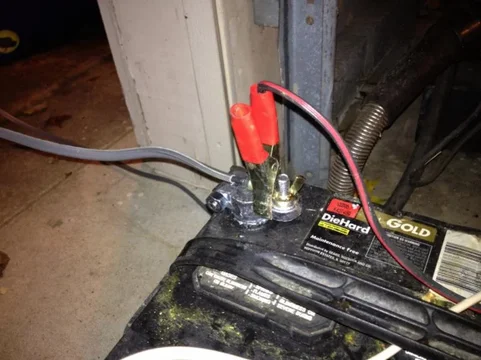
Upgraded my electrolysis vat tonight. Added a 12v battery in parallel with the charger. Read it gives smoother results since it is more pure DC voltage. We shall see.

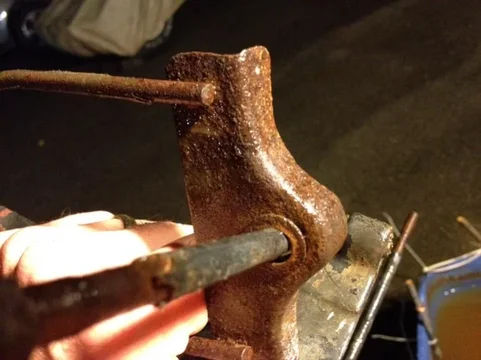
Also used some wing nuts to ease disassembly for cleaning, teardown.

Decided to do this since I was not getting much amperage and was not seeing much hydrogen bubble production.

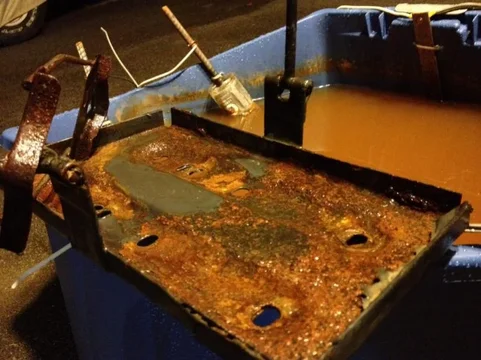
Testing it overnight on the semi-trashed battery tray.


image-731926276.jpg
Battery added


image-2716843826.jpg

image-3941098423.jpg
Cable config


image-3915394791.jpg
On 10amp setting


image-2715859036.jpg
image-2263766325.jpg
image-4103350404.jpg
image-3386271953.jpg
Battery tray test item
image-731926276.jpg
image-2716843826.jpg
image-3941098423.jpg
image-3915394791.jpg
image-2715859036.jpg
image-2263766325.jpg
image-4103350404.jpg
image-3386271953.jpg
 
So winter and work killed my old electrolysis vat. Here's what the process did to my cathode metal:

image.jpg
image.jpg


So I decided to try the carbon fiber route: no corrosion, same conductivity. I found 4 cheap pieces ($9 each, not giving it away, but this stuff is usually 4-5x this cost) in a scrap 6"x8"x 0.045" size. Company name shown below.

We will see if this works well. My surface area for the cathodes is about 4x what I had before. I'll bet it improves the process.


image.jpg
image.jpg
image.jpg


It'll be a few days until I get it setup. Trying to reinforce the new bucket this time so it doesn't collapse.
 
HI Guys Ron here I am new to FJs but not restoration work.
I would like to try and help out with what I know.
Amperage = speed ,Clean new cathodes=speed
Paint = slow grease = slow
EVERYTHING to do with this is about SURFACE area and "line of Sight"
Rust must have a direct line of sight to get from cathode to electrode.
This is the same way Chroming works.
No need for the plastic bottle covers
No need for REBAR.
I would not use stainless not all stainless has the same properties.
Depending on part size and wifes tolerance. Cheapo kiddie pools. Plastic drum.
If you live on a farm, dig a pit. Line with blue tarp. Roll the frame and suspension
tires and all, into the pit and derust everything in line of sight.
Draw backs to electrosis it REMOVES the RUST. That corner brace is junk because no structure left.
Had you used a CONVERTER, then the piece would still be useable.
Good is, that it gets down deep to eat rust and this is good but why remove rust when converting it keeps the part stronger?
My 2 cent's worth.
On the cheap- Plastic tarp can be used inside any structure available or as simple as 3 ladders tied in a triangle.
It is way easier to store a tarp and its 100% custom size. No need to do one part at a time,
Do them all at once.
I have seen battery chargers-old microwave power supplies-small welders,etc... as power.
Pultry netting works great as the rust catcher. Cheap.dont feel bad throwing it out. It also lines the BOTTOM.
Remember "line of sight". Bend your rebar into a L shape. Get as much metal as you can in the container to attract the rust.
If the part has grease or paint prep by pressure washer and degreaser. I also use stripper. Wire brush the rust scabs to speed it up.
After the first part is done remove the part put on a empty soup can in place of where the part was and swap the positive with the neg. on your battery charger.
Now all the crud from your "chicken wire-scrap panels-lawn mower blade-refridgerator grates-concrete wire mesh-a simple nut or bolt."
will REVERSE. All the crud will go to the center piece of scrap and clean your wire and "tank". Now the next part will go much faster.
So when recycling your sacrificial metal it will work like it was new.
The gas that comes from this is Hydrogen and VERY flammable. Work in well vented area and do not put a top on it.
Dont smoke near it and turn off the power supply before messing with anything because loose connections can cause a spark.
After you have gotten a FLASH from a spark as you go inside to change your pants, you'll remember the next time.
Sandblasting-it eats good metal to get to the rust pits and never ever gets it down to a mico clean. So even if you use the power derust
use a converter on it OR primer made for clean metal. Phousphoric acid eats rust. This is why COKE and Tinfoil will get rust off a bumper.
COKE is full of phous acid and crinkled tin foil is a scrubby.
Chrome parts with electrolyses will make the water a poison dont do it.
That nasty water and rust ,as long as you prep the part, is GREAT for your lawn.
Your yard loves rust. Makes it greener then a golf course. Loves that IRON. If you have a garden use rusty metal rods to hold up your plants not wood.
Line of sight and a motorcycle tank with rust.
This is a perfect example of REVERSE electrolysis. Use a metal wire to hang a bolt thru the filler neck
Dont let any part of it touch the tank but be suspended inside of the fuel tank.
Reverse the wires and all the rust from inside the tank will be attracted to the bolt.
When done rinse well-heat gun it dry-then use a SWAB[stick with a rag] and swab in white vinegar
and water solution, this will eat the surface flash rust. It takes a while if you move to slow
let it dry and use a tank sealer. The new gasoline will eat anything raw metal. Including your carberatour.
So remember suface rust is one thing and removal of metal makes for a weaker part.
Cheers
 
@Rustynutz - that's a lot of great, advanced information. You said some things above that I've never heard before in all the electrolysis literature I've read in the past year.

When you talk about a "converter" - what are the converters you are referring to? POR15 type paints?

What are your thoughts on using Carbon Fiber as the electrode?

What metal do you recommend using? Rebar was cheap and available (construction going on around us).
 
What do people do with the leftover solution? Seems to me that there must be some potentially nasty and toxic stuff in there.

It's probably better than when it rains after you've wire wheeled something in your driveway and all the powdered paint, rust, and grease flows down the storm gutter. At least if you pour it in your grass, the earth breaks it down/holds it.

And, as the post above by RustyNutz says, the grass loves the iron.


...via IH8MUD app
 
NOT a chemist but think maybe the washing soda is a base and similar to putting lime or potash on the grass-which I think is in some fertilizers.
 
I've only done a very limited amount of this-I did a motorcycle tank years ago and just hung a long bolt through the filler and had plastic around the hole to insulate my clamp with the other lead clamped right to the tank using a battery charger for power. It took a long time but I may have had weak electrolyte or low current-figuring the entire surface of the tank of a street bike was getting done. Maybe the electrode was a bit small but not much room for much else down that hole.
 
Anyone use this method for gas tank cleaning? If so, how would you go about setting things up? If possible pictures would be helpful.
From my limited experiments, you can do a tank, but I personally wouldn't like not being able to thoroughly clean the inside once done. It cleans the metal (converts the rust) but it still needs some friction to remove all that converted gunk.

Once I got a sand blasting rig, I stopped using electrolysis.
 

Users who are viewing this thread

Back
Top Bottom