DHracers 72 Build.

This site may earn a commission from merchant affiliate
links, including eBay, Amazon, Skimlinks, and others.

Man I miss that, Sold my DH bike, Had a sweet Turner DHR, Was thinking about going pro until I started riding with Derek Nobman at some of the races and thought, after shattering my tibia, breaking most of my fingers, tearing shoulder ligaments and ripping my hand open I said going pro at 35 is not smart, (Didn't do any of that riding with Derek) Hey did you do the National at Windum?


Yep! Derek because he is so big carries this thing we call "Nobmentum" he can just keep his speed so well its crazy.!
I raced Windham! what a crazy race that was.. pretty disorganized up there.
I qualified pretty decent considering they never counted me down at the start... they "forgot".. then my chain broke right at the top so I had to cruise down but I seem to do well without a chain and I think I qualified 7th?... then in the final run I was having a pretty good run then flatted about half way down ... not a great race thats for sure!
 
motor cleanup

Well this weekend I ended up going on a training weekend.. find myself training a lot more as the race season starts coming around...
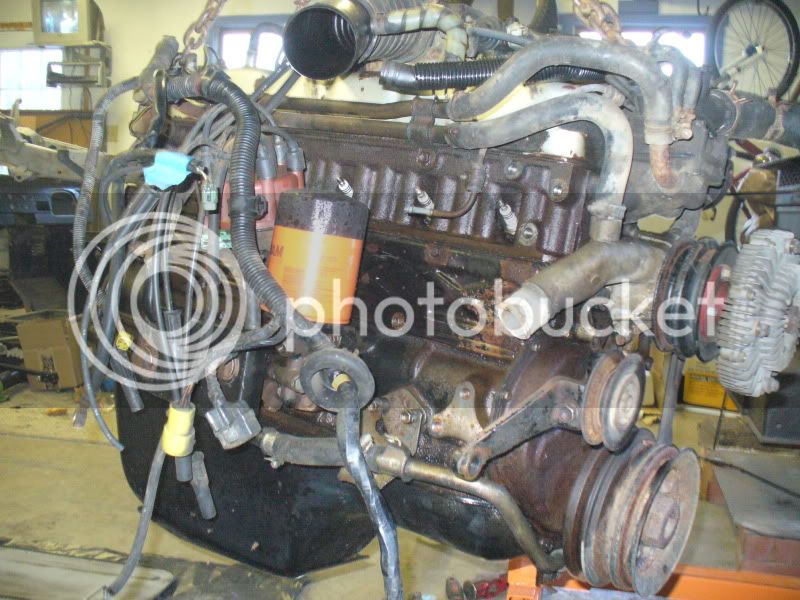
I did get a chance to cleanup the garage a bit and start pulling the motor apart!
Its a pretty scary project.. but as I dig into it a bit I think it will be ok!.
The plan is to replace gaskets and repaint a bit.. just clean it up a bit.
I don't think I need to replace bearings and such.. I may look at replacing seals while I'm here..

P1020751-1.jpg


P1020843.jpg


P1020845.jpg

Yuck.. so much gunk..!! I may have to dig into this motor a bit more than I thought.

P1020823.jpg

my buddy cleaning up his bike..

P1020824.jpg

Got my wheels back from sandblasters!... although now I'm thinking I may want to try paint the insides of the black wheels white and leave it with the black lip?

What do you think?.. I have seen my black wheels before with a sort of polished inside and black lip and it looks pretty good.. I think having it white inside would look just as good.. and with the blue it would go well..
 
Engine rebuild???

Ok so now that I'm pulling the motor apart I'm finding more and more that I just want to do a complete rebuild... I think the head needs rebuilding for sure.. there seems to be a lot of rust. The exhaust seems like it had a leak and I know why... seems like it corroded on the face and was leaking out..
Also one of the push rods looks a little bent at the rocker arm..hmm anybody know if the push rods are the same through all year F motors??.. I have a couple from an F motor I could replace it with...

Here is some of the process of pulling the motor apart.

P1020847.jpg


P1020851.jpg


P1020852.jpg


P1020856.jpg

Here is a picture of the face of the exhaust port..

P1020861.jpg

Also the bent push rod at the end... you can see it.

Does this motor look like a motor that has 92K miles on it? thats what its supposed to have..
 
The push rods are not the same through the years of the F motor.

Measure yours. I have a coffee can full of pushrods from F, 2F and 3FE. You pay the shipping and I will send you a couple.

Awesome!.. Thanks!.. I will let you know once I dig in this motor a bit more how many I think I will need.

I'm going to be making a purchase of a bunch of items for the motor here soon.
 
Alright so... in an effort to use my engine stand I bought new bolts and all that just to find out that the engine stand won't work on my engine.. :(
Then..! I thought .. all I need to do is drain oil out so as I started tugging on the oil drain bolt the entire engine broke loose of the chains and fell to the ground and almost killing me in the process..
I got lucky though.. the reason why the engine fell off was I had used chains before and they wedge onto the hook on the engine hoist.. while tugging on the drian bolt the link I guess moved enough to shoot off and the whole back side of the engine just about fell on my arm and in the process denting the oil pan and oil!!! everywhere!!!!! big puddle..
I won't be doing it this way again.. getting a table and modifying it for engine rebuild..
Jeebuzz Dude!!!!!

WTF? What kinda f'ed up engine stand you buy?
 
Jeebuzz Dude!!!!!

WTF? What kinda f'ed up engine stand you buy?

It was the Harbor Freight tools.... I don't suggest getting it..! I think its made for a Small block V8.. not a long Straight 6.. :doh:
Oh well.. turns out my brother is buying an engine for his car so he will need one.

I spent all day today building a nice strong engine table for it.. almost done.. I'll take pics when its done.
 
YOu have alot of room in there. That is a great space

p1020823.jpg

Its a great space in the Winter time..!! that little wood stove works really well!! and its free..
Even with a nice little area I wish I had more!
 
I have the 2,000lb Harbor Freight stand and it works well. It cost about $100 but was well worth it. The cheap $25 Craigslist stand I picked up wasn't up to the task. Glad to hear you are alright.
 
Been busy lately!!.. been slowly pulling the motor apart. pulled the head off and everything looks good!.. I'm stoked that all I need to do is replace gaskets and seals.. I think I can easily handle those jobs.. I didn't want to build a motor from ground up..!

Cleaning the motor is a big task. No mater how much I scrub it always seems to be dirty. Eventually I have it grime free..using a lot of engine degreaser and brake parts cleaner it come out nice.. wire brushing a lot also...
I have a lot of rust on the one side and the other had a little.
I wasn't sure what to do about it.. I didn't want to just paint on top of rust as it wouldn't last very long.
I figured it out I think!! I have some OSPHO that I brushed on with a foam brush and it kills the rust while at the same time creating a good surface to paint on!.. hopefully this will work as well as I think it will! I have read people doing it this way with really good results so we shall see.

P1020869.jpg


P1020870.jpg


P1020871.jpg


P1020875.jpg
 
Looking good man! Your thread helps keep me motivated so keep up the good work! Also, any idea what the CFM rating is on that compressor you were using to blast with? :cheers:
 
Nice work on your build. I am working on a 72 myself. I am in the process of doing the 60 disk knuckle and powersteering conversion. What did you use for drag links and tie rods? Did you just modify the 60 steering gear to fit the 40 since you already had the knuckles? I would also like to know what lift you went with. It kind of looks like hell creek. Thanks for the info.
 
Looking good man! Your thread helps keep me motivated so keep up the good work! Also, any idea what the CFM rating is on that compressor you were using to blast with? :cheers:

Compressor is rated to 175PSI but most of the time its at 150PSI.. its a buddies and it works pretty well! once I get my cruiser done and I have money to spend again I'll get a nice big compressor! I'm not really sure what the CFM is on it.. I do have to wait though for the pressure to build back up again sometimes but having 2 30 gallon tanks helps a bit with the pressure.
I must say I keep expecting myself to just lose interest which is usually how I am but I find that I like mindless tasks where I can just shut down and clean something.. like auto pilot. I'm A,D,D so I switch from one hobby to the next pretty quickly..... :steer::bang::clap::bounce::bounce2:
 
Nice work on your build. I am working on a 72 myself. I am in the process of doing the 60 disk knuckle and powersteering conversion. What did you use for drag links and tie rods? Did you just modify the 60 steering gear to fit the 40 since you already had the knuckles? I would also like to know what lift you went with. It kind of looks like hell creek. Thanks for the info.

It was a tuff decision when I was doing that whole swap.. I wanted to put the power steering in from the 60 parts cruiser I have here.. but it was extra time and money I didn't have. The plan for me is to get the cruiser back on the road and together but not rush though it you know. once its done then I will look into smaller upgrades like power steering and AC maybe.. I ended up not putting that all in because I like simple things.. the 72s are just so simple!.

I ended up using the 40 steering components.. when it came to making the tie rods fit to the 60 knuckle I saw some other guys on this site either welding the hole or getting a borg warner starter bushing. I went with a rear shock bushing from a bike! it was almost the same size and I had to sand the sides down still quite a bit but they work well.... then you can press them into the steering arm on the knuckle.. just be careful when cranking them down as you don't want to strip the tie rod.. use one of the old tie rods if you have one.

Suspension is still stock leafs and the shackles I'm not to sure what they are but I think they are Man A Fre 1.5" longer shackles that came on my cruiser from the last owner.
The shocks are Rancho shocks that were working fine.. I just sanded mine down and repainted them so they look newer.. I'm sticking to the plan of getting the cruiser working and on the road then I'll get new parts like suspension and all the other goodies. :D
 
Been working a bit more on the motor.. cleaning and wiping the OSPHO on it.. the heavily rusted side is now all black and clean!.. going to start painting in the morning I think!.. I came up with the best idea I have had yet!!.. I was thinking to myself how the hell do you get that crankshaft nut off to pull the timing cover off? I came up with a very effective way of loosening the large nut.. first of all you want to PB Blast it and let it soak.. to hold the pulley I took a crowbar and used a strap down and wrapped it around the pulley and crowbar. then you need a large adjustable wrench and big hammer!! take a heat gun and heat the nut up for awhile to get it nice and hot... then get you buddy or someone strong to hold the crowbar down and take the hammer and bash the end of the wrench and it will come straight off!.. and mine was pretty rusty.. I didn't think it would ever come off that easily..

got some pics of some progress on the motor..

P1020876.jpg


P1020877.jpg


P1020879.jpg

Got the timing cover and valve cover wire wheeled .. going to paint them pretty blue...

P1020880.jpg

So here is a handy tip!.. the main seals from an F motor will fit a 3FE motor.. along with timing cover gaskets seems..
 
Engine painting...!

So I have been doing a lot of cleaning and scrubbing... the steps are degrease.. wire brush degrease.. wire brush.. brake parts cleaner and then repeat!..:p

I have been figuring out how I want my engine to look and its a tough one!
I was going to do my oil pan, Valve cover, timing cover all blue.. but now that I think about it ..if my FJ40 is going to be blue and the blue of the engine doesn't match it can look a bit off.. so doing small parts blue.. :frown:

Right now just painted the engine block and timing cover and the valve cover.!! looks good to see a reborn engine! its a good feeling when you look at something that was just so nasty and greasy full of crud looking all nice and clean and repainted..! I tell ya though it is a lots of cleaning! ... lots and lots of brake cleaner I find works real nice.

P1020882.jpg


P1020881.jpg


P1020885.jpg


P1020886.jpg

Repainted dipstick..

I find sometimes the easiest way to clean is just get some sand paper.. usually the best way to get the surface cleaned and prepared for painting!

I may change the color of the valve cover I think.. I was going to do blue but I think I may just make it a darker gun metal silver..
:cheers:
 

Users who are viewing this thread

Back
Top Bottom