Decision Time - Am I Ready For A Frame Off Restoration (1 Viewer)

This site may earn a commission from merchant affiliate
links, including eBay, Amazon, Skimlinks, and others.

What type of paint did you use on the fire wall? I'm getting ready to do the same.


Great job in the fuel plumbing...really clean looking.
 
I am ashamed to admit the paint was an Ace brand rustoleom type paint. It was a gloss black color. It will do for now.

Thanks for the compliments on the fuel line. I will be getting a pressure gauge and then setting up the front end. I am really struggling with what is next. I need to read through the GM service manuals and get the engine set up specifically the throttle body. So much to learn...
 
Got some new to me fenders for my project. I am partial to the older style emblems so these were the right pair for me.

The passenger side just needs to be cleaned up a little bit but they are both solid and straight.
image-2703940912.jpg
image-1102881456.jpg
 
Got some new to me fenders for my project. I am partial to the older style emblems so these were the right pair for me.

The passenger side just needs to be cleaned up a little bit but they are both solid and straight.

Those are pretty clean looking, nice find. You need to tell about Greyhound shipping. I was very pleased to hear about that when we spoke.
 
Ok, so Bigger Blue has been on ice while I figured out the throttle body fuel inlet/outlet connections. It looks like the inlet is a 16mm fitting and the outlet is a 14mm fitting. My research shows the Dorman makes a fuel line repair kit that will suit my needs.

Once I get them I will cross the finish line on the fuel set up. Mental note to self, double clamp and soft line to hard line transition. Also, I need to get an inline fuel pressure gauge set up and enough high pressure hose to wrap it up.
 
Last edited:
Dorman Fuel Line repair kits 800-151 and 800-153, ACDelco fittings kit 17111462 (fuel inlet/outlet), EFI clamps and high pressure fuel line has been ordered.

The next line of thought is how I will run the lines from the TBI unit to the frame rail. I read that the donor car ran them down through the tranny hump over to the frame rail. It would make a cleaner looking install but I need to check for mounting points along the way.

On to some landscaping to build up garage time credits.

Here is what we accomplished:
image-1048886568.jpg
image-1088998391.jpg
image-3467860210.jpg
 
Last edited:
The throttle body had previously been rebuilt and the majority of new gaskets were in place so it made for an easy project. I installed the idle air sensor and gasket on the unit and installed it on the the 350. I had purchased a complete gasket set so I will put them on the shelf for the next go around.

I finally sourced the bolts for the fuel meter body at Home Depot. The were 10/32 fine thread socket head bolts .5 inches long. They have a torque spec of 28 lbs (thanks kjohnson).
 
Last edited:
AN fittings and Mr Gasket pressure gauge arrived today. Sweet mother of pearl I hope some forward movement occurs until the next hurdle.

I wish I took shop in high school...
 
View attachment 756030

Here is a pic of the fuel filter that runs to the throttle body. My concern is that it is too close to the Ram Horn. I am thinking of relocating it further down if I need to get it away from the heat.

View attachment 756031

Mr Gasket fuel line pressure gauge. I could relocate it if need be but I like the fact that it is viewable from the front of the engine bay.


View attachment 756032

Another shot of the pressure gauge.


View attachment 756033

Ram Horn test fit on the driver side.


View attachment 756034

Test fit of the Ram Horn on the passenger side. Shod I be concerned with the oil dip stick wrapped so close?


View attachment 756035

Fuel line to and from the throttle body. I am pleased with the AN 6 fitting and the Dorman line kit.

That gets me to current. I am starting to review the brake line routing so I know what is missing. I installed the extended brake line in the rear and tightened up all of the lines. It looks like I have purchased the wrong extended lines for the front and I am missing a stock line from the 'L' fitting on the passenger side to the front axel.
image-502976131.jpg
image-1292926630.jpg
image-799674064.jpg
image-1329340257.jpg
image-2833750036.jpg
image-1220338570.jpg
 
The stock hard lines were replace with EFI hose that connects to the throttle body.
 
Maybe I missed it but I always put the fuel filter before the pump. Plus it will act as a small. Very small sub tank and give you a few more seconds of fuel when your on your side.

Nice install. Good idea on the pressure gauge. Also might think about wrapping the fuel pump in foam if it's to loud
 
I went overkill on the fuel filters. I have one in between each tank and the fuel pump an then the one pictured right before the throttle body.

The fuel pump is mounted further back along the rear frame rail so it is positioned equally between the tank and aux tank. I had planned on wrapping it to lesson the noise factor.

I am not sure if it is too many filters. Regardless, I will be moving the one filter in the engine bay further away from the ram horn.
 
Brakes have been put on hold since I ordered the wrong fittings on the extended brake lines. Let's hope Trail Gear steps up to the plate and delivers an even exchange...

I am also researching the stock location of the proportioning valve for the rear drums. I think some sort of creative bracketry will be required.

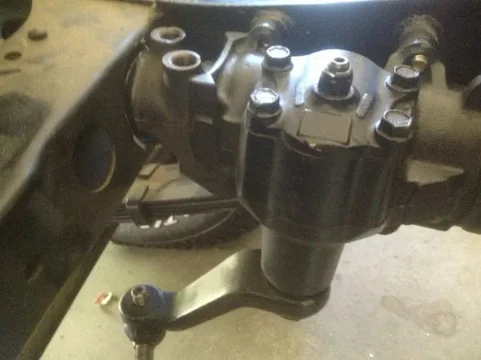
Now moving onto the power steering re-install. I had to trim off the lip on the Saginaw box so it would fit into the opening. Once I did that I was able to position it farther back. The PO made such a clean opening I did not want to hack it up similar to my old rig. Pics to follow.

Oh, and Happy 43rd Birthday to me. I got some cool presents. I now have the gas strut hood kit and I am a proud owner of a CZ 75 P-07 pistol. Whoot whoot!!! Now if I can get this project on the road it will be a great year.

image-1518606774.jpg

Borgeson U Joint mated to Saginaw 4.25 turn gearbox

image-765336911.jpg

Collapsible shaft will clear the ram horns...


image-3572958054.jpg

Super clean install of Saginaw box thru frame crossmember.


image-906774795.jpg

Up close glamour shot. U Joints rock.
image-1518606774.jpg
image-765336911.jpg
image-3572958054.jpg
image-906774795.jpg
 
Last edited:
On order. The wife bought it as a surprise and wasn't aware of the delay in getting the gun from CZ. I will post up in this thread as my security system for the cruiser.

How is your project coming along?
 
I'm stoked this rig ended up in the right hands and is being put together the way it should.

Keep up the good work! :cool:

Georg
 
Thanks Georg! Slow and steady wins the race. It has been a blast working on this beast.
 

Users who are viewing this thread

Back
Top Bottom