Navigation
Install the app
How to install the app on iOS
Follow along with the video below to see how to install our site as a web app on your home screen.
Note: This feature may not be available in some browsers.
More options
Style variation
You are using an out of date browser. It may not display this or other websites correctly.
You should upgrade or use an alternative browser.
You should upgrade or use an alternative browser.
Decision Time - Am I Ready For A Frame Off Restoration
- Thread starter TCSTARK
- Start date
This site may earn a commission from merchant affiliate
links, including eBay, Amazon, Skimlinks, and others.
More options
Who Replied?Vae Victus
Posting more than I know
On order. The wife bought it as a surprise and wasn't aware of the delay in getting the gun from CZ. I will post up in this thread as my security system for the cruiser.
How is your project coming along?
Like yours - slow but steady. Getting into transfer case last night. Wondering how to work around some of those SSTs.
Vae Victus
Posting more than I know
While waiting for parts to come rolling in and the gas tanks to be finished up I started looking at the throttle linkage and how the gas pedal will be installed. It looks like I will need to convert to an older pedal or purchase a conversion kit to change the mechanical linkage to a cable linkage. After reading up on this I went with Downy's cable conversion on eBay under tojoproducts. Yet another item to wait on.
Tomorrow I will be heading down to Waverly Hall GA to pick up some OEM brake lines.
I just converted mine to mechanical. I have a pedal that is for a cable linkage if you want to go "au naturale".
Vae Victus
Posting more than I know
Today's work
I continued working on the fuel line plumbing. I went back and found a return line access to the top of the tank so now I wall have a fuel inlet (without a 'T' connection for a return), breather, vent and fuel out line.
The auxiliary tank will be 'T'd' into the primary tank's evaporator system and will have a fuel filter prior to the pollack 6 port fuel selector switch then pass through the electric fuel pump. I mocked up the fuel pump in the rear passenger frame rail so it will have close proximity to both tanks.
The primary tank has it's own pre-filter and then routes to the rear where it meets up with the switch and fuel pump. The soft lines are then converted to hard lines that run up the frame rail and come out at the engine firewall.
That's as far as I got today.i tried to keep it neat and clean.
Tell us (me) lessons learned with fuel line plumbing. It's on my list. Soft line source? Hard line size and source?
TCSTARK
Master Debater & Cunning Linguist
- Thread starter
- #345
Tell us (me) lessons learned with fuel line plumbing. It's on my list. Soft line source? Hard line size and source?
Lessons learned...
1. The auto stores do not carry fuel lines and they will point you towards using hard brake lines. I went with 5/16 brake lines along the frame rail for both the fuel and return lines. I was reassured that this would be sufficient with my application (non-performance off road vehicle). Plus I had some in the garage that I wanted to use up.
2. The fuel injection hose is seven times more expensive than regular braided fuel lines. I used the EFI rated hose from the fuel pump to the throttle body and back to the return hard line. Most big box auto stores do not carry large quantities of the EFI rated hose so be ready to have them order up some.
3. Use EFI clamps rather than the standard hose clamp. They secure the whole way around the hose/hard line. Then racket them tight with a 9/16 socket.
4. Cheap tube benders are garbage and will break. Pony up for the good quality ones up front and be done with it.
5. For those who are contemplating a 350 TBI; get the Dorman fuel line repair kits in both 14mm and 16mm and the appropriate sized AN 6 fittings at the same time to minimize waiting on parts. Part numbers are on the previous page of my build.
One question I have for aux tank guys... Did you put an O ring on the fuel line out of the tank? I used them on the throttle body as per the instructions in the kit and got to thinking if they should be used on the aux tank fitting.
TCSTARK
Master Debater & Cunning Linguist
- Thread starter
- #346
I just converted mine to mechanical. I have a pedal that is for a cable linkage if you want to go "au naturale".
I spent the big bucks on the Downey pedal kit. I am pretty pleased with it since I was able to use the stock GM throttle cable and bracket and ditch the one in the kit. One small square opening in the firewall and it works pretty well.
Let me know if you want all of my stock fuel lines. I will hold them for you if you pass through Atlanta soon.
Vae Victus
Posting more than I know
I spent the big bucks on the Downey pedal kit. I am pretty pleased with it since I was able to use the stock GM throttle cable and bracket and ditch the one in the kit. One small square opening in the firewall and it works pretty well.
Let me know if you want all of my stock fuel lines. I will hold them for you if you pass through Atlanta soon.
I'm coming up 6/11-13. Your stock lines - you mean original or new OEM?
TCSTARK
Master Debater & Cunning Linguist
- Thread starter
- #349
Vae - just some stock lines I removed that are on great shape. They are yours if you need them. Hit me up when you head down this way...
Today's progress -

Steering column installed

Shiny new bolts thanks to Davework

Flamming river joint buttoned up

High pressure line and return line routed around the collapsible drive shaft

Saginaw gear box mounted - I had to file the inner hole to avoid rubbing from the second u joint.

Last piece of the puzzle. Remove the TRE and then install it on the relay rod.


Today's progress -

Steering column installed

Shiny new bolts thanks to Davework

Flamming river joint buttoned up

High pressure line and return line routed around the collapsible drive shaft

Saginaw gear box mounted - I had to file the inner hole to avoid rubbing from the second u joint.

Last piece of the puzzle. Remove the TRE and then install it on the relay rod.
Vae Victus
Posting more than I know
Clean work man! Nice job.
Thanks for the offer. Let me decide what to do about fuel lines, and I'll let you know.
Thanks for the offer. Let me decide what to do about fuel lines, and I'll let you know.
TCSTARK
Master Debater & Cunning Linguist
- Thread starter
- #351
Small victory tonight. Pitman arm puller versus tie rod end was not even a close race. The tie rod end is out.
This does bring up a question in regards to how close the relay arm is to the front passenger leaf springs. Is this normal on a SOA rig? Using logic I am thinking this is why a hy steer set up is used? Off to research some more and to try to find that tie rod end nut.
This does bring up a question in regards to how close the relay arm is to the front passenger leaf springs. Is this normal on a SOA rig? Using logic I am thinking this is why a hy steer set up is used? Off to research some more and to try to find that tie rod end nut.
happy belated birthday 

TCSTARK
Master Debater & Cunning Linguist
- Thread starter
- #354
I was going to clean up the garage and then one thing led to another and I wound up taking care of a few items.

I mounted a bracket for the clutch line. I used an off the shelf brake line and a 26" stainless steel line from Trail Gear to mate it to the GM slave cylinder.
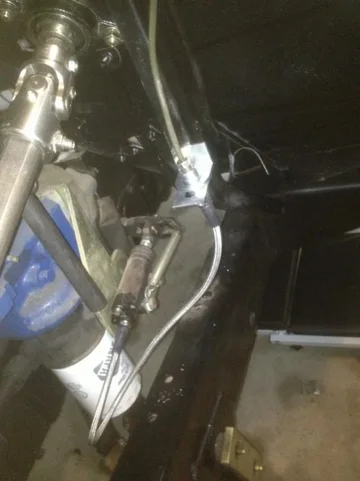
I spent some time adjusting the push rod to see if I could get full engagement of the clutch. It is looking more likely that I am going to have to install the centerforce low profile clutch.

I found the bracket that the proportioning valve is mounted on so I installed it. I tried to clean up the old brake lines the best I could (or was willing to invest time on). I found a few brackets and got the brake lines mounted.
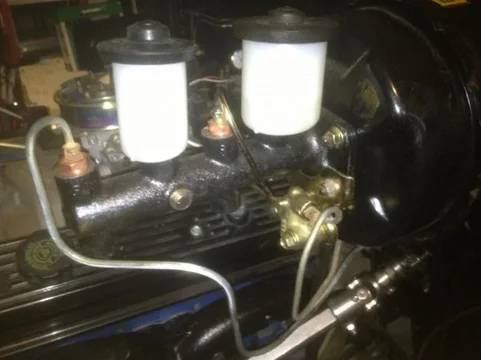
I am happy with the way the brake lines came out.
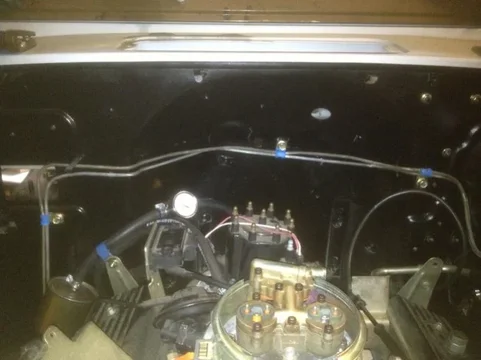
My mantra is,.. It looks good enough. If I say it enough I will believe it. Ommmm.

I dig the pig tails.

Another off the shelf brake line and Trail Gear extended brake line.

Routing of the extended brake line. I am unsure if this was the best way to route it.

Another shot of the extended brake line where it meets the axle.
Final thoughts of the day..
1. I forgot to snap a shot of it but I am now thinking I have a crossover arm installed and my problem with the relay arm being so close to the spring is due to the drop pitman arm I am currently running.
2. The aftermarket brake master I purchased does not have the brake warning switches so it was a leak fest in the garage. I am not sure if I want to buy them at $30 a pop and the blackmail postage SOR charges. I have two 1/8 Allen plugs on the way.


I mounted a bracket for the clutch line. I used an off the shelf brake line and a 26" stainless steel line from Trail Gear to mate it to the GM slave cylinder.

I spent some time adjusting the push rod to see if I could get full engagement of the clutch. It is looking more likely that I am going to have to install the centerforce low profile clutch.

I found the bracket that the proportioning valve is mounted on so I installed it. I tried to clean up the old brake lines the best I could (or was willing to invest time on). I found a few brackets and got the brake lines mounted.

I am happy with the way the brake lines came out.

My mantra is,.. It looks good enough. If I say it enough I will believe it. Ommmm.

I dig the pig tails.

Another off the shelf brake line and Trail Gear extended brake line.

Routing of the extended brake line. I am unsure if this was the best way to route it.

Another shot of the extended brake line where it meets the axle.
Final thoughts of the day..
1. I forgot to snap a shot of it but I am now thinking I have a crossover arm installed and my problem with the relay arm being so close to the spring is due to the drop pitman arm I am currently running.
2. The aftermarket brake master I purchased does not have the brake warning switches so it was a leak fest in the garage. I am not sure if I want to buy them at $30 a pop and the blackmail postage SOR charges. I have two 1/8 Allen plugs on the way.
Coming along nicely. 

TCSTARK
Master Debater & Cunning Linguist
- Thread starter
- #356
Ok, so on Saturday I dealt with a proportioning valve issue. I was not getting any brake fluid through the out port. I disassembled it and gave it a good cleaning but the center core was rusted and brittle. I did some research and got sage advice to simply replace it with an adjustable proportioning valve. A quick 50 mile trip to Summit Racing I purchased a Tilton adjustable proportioning valve. This is a metric unit so it was pretty close to bolt on as it gets. I reamed out the hole so that I can create a bracket to mount it to the stock location.
I attempted to bleed the rear brake lines but I was dealing with an obstruction. I narrowed it down to the rear driver's side drum. It turned out to be the bleeder that was gunked up. I used a small drill bit to get out the debris. Once back on I was able to bleed the brakes.
I had a leak in the front 'T' line. I suspected it was a bad flair that was the cause. Well, I knew it was suspect and would need to be redone. I picked up a new flair set and line at O'Reilly's so I quickly got it handled. It was not as clean as it was quick thus a hemorrhage of brake fluid all over the floor. With the leak dealt with I was able to billed the front brakes and call it a day (after clean up).
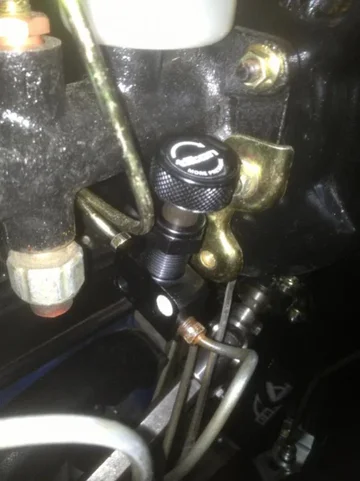
Tilton adjustable proportioning valve
So here is a recap:
Fuel lines - Done (untested)
Brake Lines - Done
Power Steering - installed but waiting on cross over arm and flat pitman arm.
On Sunday it was another road trip. I headed up to Rome Georgia to pick up a hood from Hugh Heifner. It was a fun drive with my 7 year old riding shot gun. The hood exceeded my expectations. Thanks Hugh! Safe travels to you and your family, it was a pleasure meeting you.
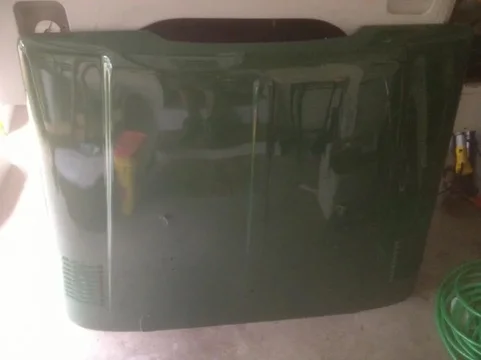
My new to me hood. Nice!!


I attempted to bleed the rear brake lines but I was dealing with an obstruction. I narrowed it down to the rear driver's side drum. It turned out to be the bleeder that was gunked up. I used a small drill bit to get out the debris. Once back on I was able to bleed the brakes.
I had a leak in the front 'T' line. I suspected it was a bad flair that was the cause. Well, I knew it was suspect and would need to be redone. I picked up a new flair set and line at O'Reilly's so I quickly got it handled. It was not as clean as it was quick thus a hemorrhage of brake fluid all over the floor. With the leak dealt with I was able to billed the front brakes and call it a day (after clean up).

Tilton adjustable proportioning valve
So here is a recap:
Fuel lines - Done (untested)
Brake Lines - Done
Power Steering - installed but waiting on cross over arm and flat pitman arm.
On Sunday it was another road trip. I headed up to Rome Georgia to pick up a hood from Hugh Heifner. It was a fun drive with my 7 year old riding shot gun. The hood exceeded my expectations. Thanks Hugh! Safe travels to you and your family, it was a pleasure meeting you.

My new to me hood. Nice!!
Last edited:
Vae Victus
Posting more than I know
Wow, nice hood.
Didn't know Summit was local.
I'm coming to get those fuel lines, but, dropped my phone in the Caribbean and just got home tonite. Won't have a phone till I can buy one in ATL tomorrow after I drive there from Nashville early. So, email or pm me your address.
Didn't know Summit was local.
I'm coming to get those fuel lines, but, dropped my phone in the Caribbean and just got home tonite. Won't have a phone till I can buy one in ATL tomorrow after I drive there from Nashville early. So, email or pm me your address.
Vae Victus
Posting more than I know
Chris - great meeting you yesterday! Bigger Blue is in great shape - jealous.
Thanks again for the hard lines - very generous of you.
I have some thoughts on tranny/xfer that I'll add when I get in front of a keyboard....
I'll also find the pics of the clutch pedal. You need a longer rod or more room for the pedal to travel, not a shorter rod.
Enjoyed the 50 mike ride through the beautiful GA countryside from your house to I75! It was nice to be off the interstate and forced to go slow. We don't get to do that often enough.
I'll say it again - this is a great community.
TCSTARK
Master Debater & Cunning Linguist
- Thread starter
- #359
Chris - great meeting you yesterday! Bigger Blue is in great shape - jealous.
Thanks again for the hard lines - very generous of you.
I have some thoughts on tranny/xfer that I'll add when I get in front of a keyboard....
I'll also find the pics of the clutch pedal. You need a longer rod or more room for the pedal to travel, not a shorter rod.
Enjoyed the 50 mike ride through the beautiful GA countryside from your house to I75! It was nice to be off the interstate and forced to go slow. We don't get to do that often enough.
I'll say it again - this is a great community.
No problem Scott. It was nice meeting you as well. I look forward to giving you that ride in Bigger Blue.
Vae Victus
Posting more than I know
I was wrong - your clutch pedal is stock. pics of stock pedals from a 76-82 series. Prob same in your model.
http://82fj40.shutterfly.com/pictures/150#133
http://82fj40.shutterfly.com/pictures/150#133
Similar threads
Users who are viewing this thread
Total: 1 (members: 0, guests: 1)

