Builds complete BJ45 rebuild start next week in Bolivia

This site may earn a commission from merchant affiliate
links, including eBay, Amazon, Skimlinks, and others.

guy's what do you think, that chassis frame... Is that suppose to be like that a double U [one U inside the other]? I mean, mud, water ed have no where to go....

I drilled small (6mm) holes in my chassis at the lowest point (with my landcruiser sitting in its normal home which is my sloping driveway).

The exiting water tends to flow down the drill bit into the powertool so you have to be careful. LOL.

I chose a small drill-size because it is also a point of high stress and I was concerned about weakening it. Rust weakens the chassis too so I think I win with the holes overall. But because they are small they are also easy to clog.

The key is to waterblast the mud/stones out regularly (or when you know you're likely to have accumulated some) as AntFJ says.

:cheers:
 
Great thread , subscribed...
 
I drilled small (6mm) holes in my chassis at the lowest point (with my landcruiser sitting in its normal home which is my sloping driveway).

The exiting water tends to flow down the drill bit into the powertool so you have to be careful. LOL.

I chose a small drill-size because it is also a point of high stress and I was concerned about weakening it. Rust weakens the chassis too so I think I win with the holes overall. But because they are small they are also easy to clog.

The key is to waterblast the mud/stones out regularly (or when you know you're likely to have accumulated some) as AntFJ says.

:cheers:


I had a better look today, and it seems we have little holes in the front section of the frame. So its just me not taking care and cleaning out the frame. Well, it´s not so obvious to encounter high pressure water guns on the road everywhere...

Another question: when everything is taken apart and the engine is out, what would be the proper way:

a- paint every single part and put it together
b- put it together and paint as a whole

And does the plastic roof take the same kind of paint or does it need a different kind of paint?

The engine goes today... More pictures soon...
 
I'm making 50 hours a week with shopping for parts on Saturday in San Pedro's car shops and on Sunday at 'La Feria' in El Alto where you can wonder around millions of used car parts and aftermarket stuff. Apart from that I have become a professional mountain climber. Doing ten blocks four times a day up and down the hilly streets at 4.000 meters carrying my tools is no mean feat as a say so myself.

Looked what rolled in the tyre shop last week. Kept me thinking I want a spare wheel carrier like that as well. Makes room under the car for an extra tank in the future.

25928_330750228542_55756113542_3556441_2290596_n.jpg


The best 'Tornero' in La Paz, has made a new plastic fitting for the ball joint of our windshield wiper arm.

25928_330750253542_55756113542_3556443_1625632_n.jpg


As we have seen before, the wheel wells are totally gone. Some enthousiast has started welding some metal sheet, but we will first look in the streets for some donor wells.

25928_330750563542_55756113542_3556456_3698225_n.jpg


Esteban already cut some parts out here on the right side.

25928_330750818542_55756113542_3556465_4050248_n.jpg


The side panels can be salvaged with only some minor holes on the sides.

25928_330750828542_55756113542_3556466_7851731_n.jpg


Finally I got the spagetti wires out. Labeled everything as good as I could. Hope I can fit everything in the right place again in a few weeks.

25928_330750838542_55756113542_3556467_2997428_n.jpg


Now it is starting to look more and more like a rally oldtimer.

25928_330750893542_55756113542_3556468_2474375_n.jpg


Esteban and Simon helping me a hand getting the tub loose from the frame.

25928_330750923542_55756113542_3556469_6070777_n.jpg


The fenders have gone, and the grill is tilted forward. The dismantling has started in ernest now.

25928_330750943542_55756113542_3556471_2524468_n.jpg


Now clearly visible the 'TEQ' logo of Toyota on the engine. I don't know if newer engines and parts still have this?

25928_330750958542_55756113542_3556472_4941651_n.jpg


Caesar is helping me solving the stuck-nuts-problem on the exhaust.

25928_330750283542_55756113542_3556444_5137484_n.jpg


Time to lift the famous 3B out of what is left of the truck.

25928_330750333542_55756113542_3556445_972102_n.jpg


There is some speculations on the weight of the engine, because the lift cannot get closer to the engine, or there is not enough patience to clear the bumper and get closer.

25928_330750363542_55756113542_3556447_5809225_n.jpg


Getting the engine unstuck from the gearbox is the biggest challenge. Moreover when the exhaust is still attached to the engine as we could not get two nuts of the pipe. While pulling and pushing we managed to ruin a pretty good engine mount [the fifth in three years] and still got surprised when we need to take the oil filter off because of the exhaust getting in the way.

25928_330750383542_55756113542_3556448_6003870_n.jpg


At last she gives away and the engine is airborne. The oil you can see on this side of the engine is still a mystery to me. For seven years this side of the engine is covered in oil, not leaking, but sweating a little. There is no oil consumption. Maybe while the engine is out we can clean it up and take it for some testing and see what is the problem? This might be also a good time to take a close look at the clutch and see that status on that.

25928_330750398542_55756113542_3556449_2031122_n.jpg


Hanging suspended in mid air is the famous 3B engine. Maybe we could find an old Volvo airconditioning unit and attach it for us of compressed air only? If there is time and money that is.

25928_330750413542_55756113542_3556450_2739635_n.jpg


My favorite friend these days: 'Aflojatodo' - unloosening everyting. A Mexican cheap copy of the well known 'WD40' or 'Liquid Wrench' cans. I like the long tube on this can for those hard to reach places. 550 ml for USD 4 it's a bargain here.

25928_330750428542_55756113542_3556451_2060300_n.jpg


I am only allowed to post 20 images in a post, so I will break up my update here....
 
and am continuing it now....

We gather the boys for the 'moment supreme' - getting the tub separated from the frame. Lifting a clean 45 frame is still pretty heavy even if it is stripped from the 85 liter tank.

25928_330750448542_55756113542_3556452_3788210_n.jpg


It takes some precarious steps before we have the tub clean from the frame, but with all the helping hands eventually it happens.

25928_330750528542_55756113542_3556454_2962100_n.jpg


Not much room to maneuver at the back end, because somebody put an engine there on the floor!

25928_330750553542_55756113542_3556455_476456_n.jpg


So the tub is off and wheel the frame outside for some serious cleaning and getting all the mud out. Those tyres look gigantic this way, or are my Bolivian friends that small?

25928_330750623542_55756113542_3556458_1885018_n.jpg


Turning the tub upside down on some old tyres, so we can weld the bottom more easy.

25928_330750643542_55756113542_3556459_5996511_n.jpg


Most of the cushioning is in very bad shape if they exist at all. 50% of the supporting beams need to be replaced and the wheel wells are gone.

25928_330750708542_55756113542_3556460_6186660_n.jpg


Here we can see a crack in the lower part of the frame. And rust has worked its way in on all sides... Can this be salvaged?

25928_330750738542_55756113542_3556461_5383136_n.jpg


The other side isn't looking any better. Hopefully we can make this still work.

25928_330750783542_55756113542_3556462_5914370_n.jpg


The front end has some precarious spots as well, but is more easily fixed I think

25928_330750808542_55756113542_3556464_1778978_n.jpg


Wish us luck, for next week we will asses the damage and make a more serious plan as to what has to be done.
Adventurous greetings,
Coen


And what about my paint question in the previous post?
 
Good pictures! I love following you two....

The frame is salvageable, but it would be much easier if you could find another frame. Unfortunately, I doubt you'd be able to find another BJ-45 at all. An FJ-45 or HJ-45/47 are doable, but you'd have to move the motor mounts from your BJ frame to the new frame (which is not too hard, actually). For that reason, I'd try to work with that frame. You NEED to get it clean though to really see what you've got to work with, to make sure there's nothing too bad hiding there. Either get at it with a sandblaster or get the frame acid dipped. The rust that is sandwiched between the frame rails is the scary stuff. You need to stop that now, and probably the only way to guarantee that is to acid dip the frame. You can separate the two channels of the frame to clean the rust out, but it's a pain.

Like I said, your frame is salvageable, but if you can find another frame, I'd definitely look into it. Moving motor mounts from your BJ-45 frame to an FJ-45 or HJ-47 frame would take about an hour.

As to your paint question... There are two schools of thought here.
  • I prefer to paint the parts separately, so that there is rust protection between the parts.
  • But painting the truck once it is all back together makes the shades of paint match better, and the paint will sort of help seal any of the seams.
  • A good mix of both methods is two paint all of the surfaces where the parts mate together now, and then once it's all together paint a final coat to tie it all in together. If you look in the 45 section you can see this technique in the 3 days/3300 miles thread (it's a sticky). I'm thinking of using this method next time I paint.
  • Are you going to use bedliner on the body? I might suggest bedlining the underside at least, and possibly the floors just to help seal up any little cracks and crevices.

Dan
 
Already this thread would have to rate as one of the "all-time best"

:clap:

Keep those pictures rolling!
 
... acid dip the frame....
... If you look in the 45 section...
... 3 days/3300 miles thread...
... going to use bedliner on the body...


Thanks Dan for your extensive answer. This brings more questions. I am being short and direct here [being Dutch], sorry for that [slow connection, sitting in an internet cafe].

- What would acid dip be in Spanish? Cutting a piece out of the frame and replace it would be out of the question now would it?

- I didn´t know that there was a seperate 45 section. And it took me a while to find it. Thanks for showing me that.

- Do you know what page of that thread, 70+ pages takes forever to load here. Can you direct me to that page?

- Sorry for my ignorance, but what is a bedliner? Do you mean something to spray underneath? Or something plastic that you fisically put in there? We have a wooden cargo floor that we will use again, very wearproof.

What other ways to improve the bad frame once it is clean of rust, what are the procedures here?

Adventurous greetings from a misty La Paz,
Coen
 
Thanks Dan for your extensive answer. This brings more questions. I am being short and direct here [being Dutch], sorry for that [slow connection, sitting in an internet cafe].

- What would acid dip be in Spanish? Cutting a piece out of the frame and replace it would be out of the question now would it?

Acid in Spanish is just Acido, and I'm not aware of any specific local term for it. It's just a chemical stripping of the metal. There are pics by Wagoneer5 in the 3 days/3300 miles thread of the process, which can probably be used to explain what you're interested in doing.

You certainly CAN cut out some of the frame and replace it (you will have to do so to salvage your frame), but your frame will take a lot of it. The more I think about your frame, the more I think that if you can find another 45/45 frame and transfer your motor mounts that you will be time and money ahead. The Altiplano should keep the frames nice and clean too, IIRC. It's been a few years since I've been there, but I don't remember seeing a lot of rusted out cruisers.

- I didn´t know that there was a seperate 45 section. And it took me a while to find it. Thanks for showing me that.

No problem. You can find answers to the generic 40 series questions faster in here, but if you've got specific 45 questions--that's the area I'd head.

- Do you know what page of that thread, 70+ pages takes forever to load here. Can you direct me to that page?

Sure. Here's the discussion in that thread. It links to other threads with more discussion on the topic. Look one or two pages around this page and you'll get pretty clear pictures of the method.
https://forum.ih8mud.com/fj45-owners-club/104821-3-days-3300-miles-later-37.html

- Sorry for my ignorance, but what is a bedliner? Do you mean something to spray underneath? Or something plastic that you fisically put in there? We have a wooden cargo floor that we will use again, very wearproof.

Here's a picture shamelessly stolen from Matt (buckrouseau) and his thread. You can see the difference between the bedliner and the paint. He used tintable bedliner, so the color matches the paint, but the paint is shiny, and the bedliner is the textured surface. It's really just a rubbery thick paint that isn't smooth, but it is thick and will resist chipping. Especially since you have the wooden cargo floor, I'd personally bedline the inside of your tub, because it will help keep it from rusting again underneath the wood.
attachment.php


The other places to often bedline/undercoat is the bottom of the tub and fenders. If you throw a rock with your tires and it hits the underside of your fender, it can chip the paint and eventually rust. If you use a rubbery bedliner on the underside of your truck then the rock will probably not chip the paint. Added bonus is that it will act as a little bit of insulation and sound deadener to keep the truck a little quieter.

Adventurous greetings from a misty La Paz,
Coen

Keep the updates coming when you can! I don't think La Paz is ever truly clear this time of year, is it? I wish I could visit again this year.

Dan
 
hmmmm I just saw this image:

4396832137_1930b62a7b.jpg


in this thread, and I see that the inner U in the frame doesn´t follow the outer frame all the way. From the rear axle, only the top part is double, the rest down, on both sides is single. In my case it is double for both sides. Why is that?

I understand the bedlining stuff now. It´s some kind of Hammerite in rubber form. There is a great Sika HQ near here, so I will ask if they have that stuff, same as some cold galavinishing coating.

I would have to look into either:

- getting a sandblaster somewhere
- finding a tub big enough to acid dip the frame
- finding a good 45 frame

But honestly I think all those three things would be hard to find here in Bolivia. They are going at it now with a hammer and chissel and a steel brush...

raining now... ciao,
Coen
 
Subscribed.. Great build up.. are you planning on comingto cartagena, colombia??? I would love to meet you guys... ?? Let me know..
 
@ Frank: sure we will be there, but it is impossible to guess any timeframe. I don´t carry a watch, phone or calendar with me...;)

Coen
 
hmmmm I just saw this image:

4396832137_1930b62a7b.jpg


in this thread, and I see that the inner U in the frame doesn´t follow the outer frame all the way. From the rear axle, only the top part is double, the rest down, on both sides is single. In my case it is double for both sides. Why is that?


Coen


That beautiful frame is from a FJ45 short bed pick up. My FJ45 long bed frame is like yours where the double frame continues up and over the rear axle. Different frames for different length truck.

see this link to one of my photo albums
 
sorry to get really off-topic, But i was wondering, you aren't by chance the Coen that has his own spot in the dutch 4wd auto magazine?

Really love your writing! hope to get to do a trip like yours once!

on-topic: looks like a really torough clean-up, hope you'll enjoy the rest of the trip in the 'new' car ;)
 
subscribing too

Just wanted to post to subscribe. This is exactly the kind of thing I'm interested in. I have two Troopies that I'll be going through so it's always nice to see other projects in action.
 
sorry to get really off-topic, But i was wondering, you aren't by chance the Coen that has his own spot in the dutch 4wd auto magazine?

Really love your writing! hope to get to do a trip like yours once!

on-topic: looks like a really torough clean-up, hope you'll enjoy the rest of the trip in the 'new' car ;)

Yes and no, I am the Coen that features every month in the 4WD Automagazine among 13 other magazines around the globe, but it isn´t me whose writing. Karin-Marijke is writing, I´m just the goalkeeper [photographer, mechanic, cook, driver etc...] And I must say I love her writing too. She´s working on a book right now as I am tooling to get the BJ45 in better shape.

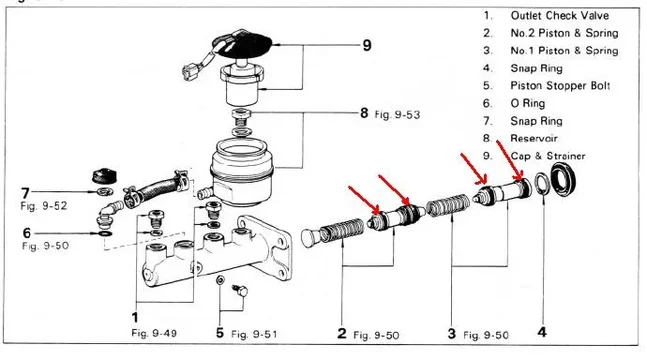
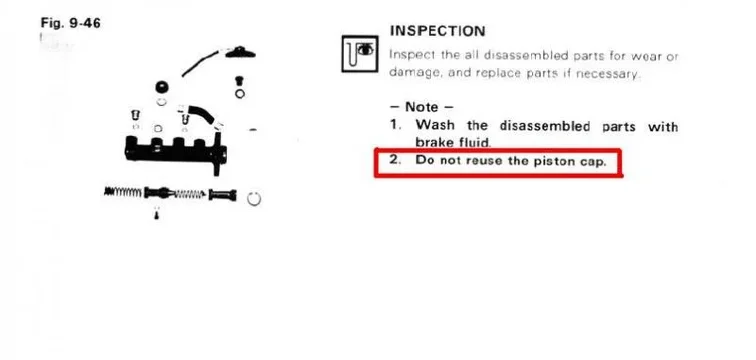
Today I took the Master brake cylinder apart [which is looking good] and will try to get a kit in town. The thing that I got confused while reading the manual which says:

Replace the piston cup.

But no reference to any part. All I can see are what the reference by as cylinder cups that are on the piston. So what do they mean by the piston cup.

Google give me a bunch of Disney references.. :-)

More images soon... I guess you all want those, right?

And... keep on buying those magazines, the sooner we are on the road again...
 
Interesting roof rack design. Was it designed to be a truss or did it just end up looking like a truss.
 
...The thing that I got confused while reading the manual which says:

Replace the piston cup.

But no reference to any part. All I can see are what the reference by as cylinder cups that are on the piston. So what do they mean by the piston cup...

cups.webp

The piston cups are as arrowed Coen. (You are right.)

I've looked at my manual and I think what you are referring to is this: (CAP not cup)
cap.webp

I think it must be an error.

I think they mean to say "Do not reuse the cups".

By the way - a lot of people here will advise against reconditioning a master cylinder because it can be hard to get new cups to become "leak-free".......But it is something I like to do too when the kits are readily available.

:cheers:
cups.webp
cap.webp
 
Today I started using a bucket of water, soap, a battery charger and a heavy steel bolt. Electrolyses is pretty easy!!! More images soon, as I am on my lunch break.


@ beaufort-fj60: I think the roofrack designed like a truss. I bought it like this with the extended hight and the roofrack in place. I must admit that it is an extremely well build roofrack. Very strong. We have a lot of kilo´s on the roof, and now and then occasionally one spoke broke. Try that with only 6 or 8 supports... And all is stainless steel! A double bonus. The only donwside is that the raindrip or gutter lost its initial purpose, so I have to find something to enhance the gutter now when everything is on the ground. Moreover I want to replace the metal part that sits between the plastic roof and the side piece. I would like it to be stainless [but undoubtebly impossible to get here in La Paz] or aluminium.

@ lostmarbles: I will run to the official Toyota dealer to see if they have the rebuild kits. I was gifted one rebuild kit for the master brake cylinder, but that one turns out to be for the drum brakes in front. Ours has discs in front, so a different kit all together. If someone is in need of the kit I have, lets here it. Otherwise I will make someone happy here...


Coen
 
Last edited:

Users who are viewing this thread

Back
Top Bottom