CCOT Quarter Panels: has anyone done thread on this? (1 Viewer)

This site may earn a commission from merchant affiliate
links, including eBay, Amazon, Skimlinks, and others.

I'm glad to see this thread start. It is getting me motivated.

I started doing this a couple of years ago on my second Cruiser. Going to try and get it finished this summer.

One recommendation I have is to weld it solid before you cut.

That brings me to my question. What is the distance between the drivers and pass. side of the rear opening for the ambulance doors.

Looking Good Dan.

Thanks,

Glad I'm not the only one who's good at procrastinating! ;)

I'm going to tack it along the seam, then weld it solid to the body (the spot welds) before I finish up the seam welds. I expect that to take a while, as I sure don't want to rush the welding there and end up with wiggles and squiggles in the metal.

I'll measure the opening for the amby doors for you when I go back up to the shop after dinner.

I've just about got a fix for the conundrum regarding the corner channels... I welded in a crossmember that the sill can attach to, so it'll all still be able to hold square and tight while I fix the rust in the corner channels. It will be a permanent crossmember (it's 1" square tubing--16GA), and I was needing to add it in anyway (for a little *project* I have in mind back there ;) )

I'll post pictures later tonight after I've tinkered more.

Dan
 
CCOT Quarter Panel Install

I am in the middle of doing a CCOT quarter panel replacement on my 1978 FJ40 as well. I finally had a free weekend to get after it. This is my first time doing any major body work, let me know if you see any major problems.
DSC01880.jpg

I started by removing all the spot welds on the driver side quarter panel. I made the mistake of drilling out about 7 spot welds on the top channel :doh:. I should have reviewed the install instruction before I started. My thoughts were:hmm: if I welded the new qrt. panel to the bend of the top channel, I would just replace the rocker panel with a thicker guage metal and raise it up an inch. So, I got on the CCOT website realized I would probably create more issues down the road, example . . . fenders not lining up with the raised step mount. The CCOT install requires you to cut 1" down from the top bend, basically cutting right down the center of the top channel spot welds. I removed the majority of the metal from the original quarter panel, and put the new panel in place to line every thing up before I made my final cuts.

I removed the first portion of metal by cutting a slot with the die grinder, and then used the handy Milwakee Sawzal with a metal blade to cut the rest.

DSC01889.jpg

DSC01892.jpg

Question:

This is my first time posting, how do I add more pictures if I have max out my folder with just these three?

I have more to post but man I am hungry.
DSC01880.jpg
DSC01889.jpg
DSC01892.jpg
 
Welcome! :flipoff2:

Looks good. How are the corner posts and fender wells as far as rust goes? And how's the sill?

You can only post three pictures per post. I don't know what the limit is, but buy a silver star and you can post lots and lots of pictures.

Dan

I am in the middle of doing a CCOT quarter panel replacement on my 1978 FJ40 as well. I finally had a free weekend to get after it. This is my first time doing any major body work, let me know if you see any major problems.
View attachment 306929

I started by removing all the spot welds on the driver side quarter panel. I made the mistake of drilling out about 7 spot welds on the top channel :doh:. I should have reviewed the install instruction before I started. My thoughts were:hmm: if I welded the new qrt. panel to the bend of the top channel, I would just replace the rocker panel with a thicker guage metal and raise it up an inch. So, I got on the CCOT website realized I would probably create more issues down the road, example . . . fenders not lining up with the raised step mount. The CCOT install requires you to cut 1" down from the top bend, basically cutting right down the center of the top channel spot welds. I removed the majority of the metal from the original quarter panel, and put the new panel in place to line every thing up before I made my final cuts.
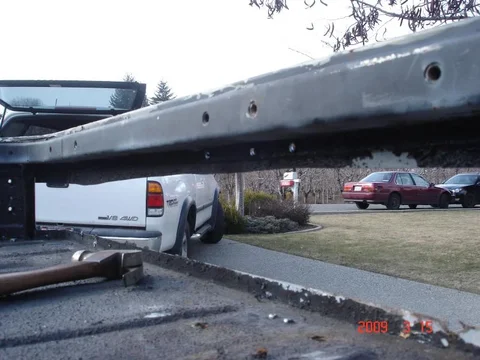
I removed the first portion of metal by cutting a slot with the die grinder, and then used the handy Milwakee Sawzal with a metal blade to cut the rest.

View attachment 306935

View attachment 306944

Question:

This is my first time posting, how do I add more pictures if I have max out my folder with just these three?

I have more to post but man I am hungry.
 
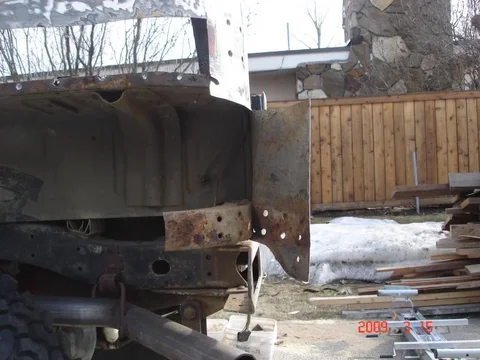
The sill has been replaced with tube steel. I am not sure if the corner posts have been replaced. I do not see the curved corner like you have shown on yours.

Here are some more pictures of the progress I made last weekend.

DSC01895.jpg

The original ear of the sill had been cut off and welded to the tube steel. It is pretty rusted, I would like to fab a new one but I may just use it since it already has the nuts welded to it.

DSC01897.jpg

DSC01898.jpg

I dont think I am going to have enough tire clearance with these new panels.

What do you think, new spring bumpers or a bigger lift?
DSC01895.jpg
DSC01897.jpg
DSC01898.jpg
 
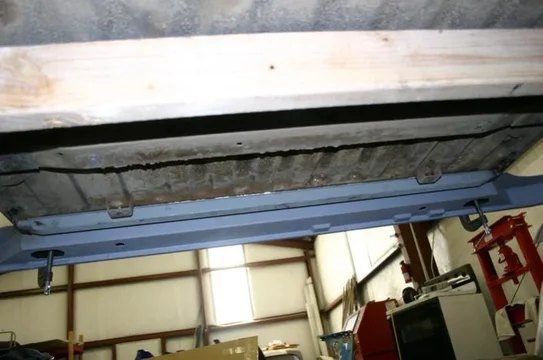
Here's a couple snaps of the added crossmember. It serves two purposes: it can support the sill without the corner channels being in place, and the other one is a secret still. :flipoff2:
new crossmember 2.jpg
new crossmember 1.jpg

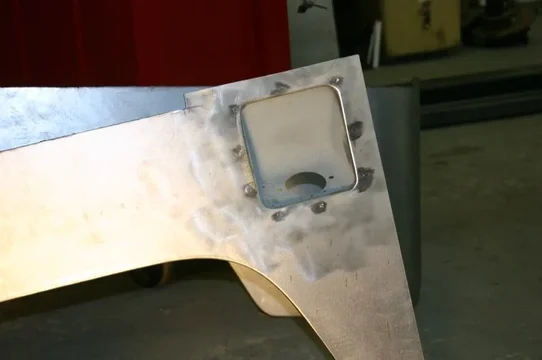
I also spot welded the fuel filler into the quarter panel... Looks good to me!
fuel filler.jpg
new crossmember 1.jpg
new crossmember 2.jpg
fuel filler.jpg
 
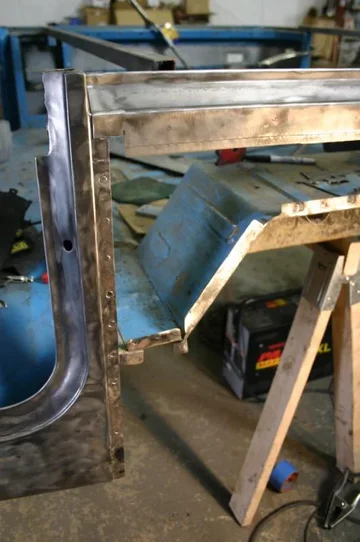
I also got some rusted flanges fixed....
flange 1.jpg
flange 2.jpg

And in this one, you can also see I've patched the rusted out bits of the rocker on the left side.
flange 3.jpg

Just another couple of things I can check off my list before I burn in the quarter panel itself.

I also measured the rear door opening for you: 41 3/4" from the outside of the corner channel flanges, and 41" wide between the inside edges of the corner channels.

Also got some other rust repair taken care of, but apparently I forgot to take pictures of it. Oh well, tomorrow for those...

Dan
flange 1.jpg
flange 2.jpg
flange 3.jpg
 
Dan, awesome pics! thanks for sharing. :beer:

I've decided to go with new quarters with wheel wells already attached as Im not as confident with my welding skills.

I will keep watching your build and eventually post up pictures of mine when I get to that stage.

AR
 
Dan, awesome pics! thanks for sharing. :beer:

I've decided to go with new quarters with wheel wells already attached as Im not as confident with my welding skills.

I will keep watching your build and eventually post up pictures of mine when I get to that stage.

AR

It'll DEFINITELY save time. It's the wheel well-quarter panel seams that hold all the rust here. If it weren't for that, this would be easy as pie!

I'm not mad at myself for welding the fuel filler onto the quarter. Why? The welds are fine, the metal isn't warped, it'll clean up nicely.... But because it should be spot welded. And because this one needs a good number of spot welds, combined with the fact that on my 45, I will ABSOLUTELY spot weld it back together--just because it's "correct" I went and ordered a spot welder from the local welding shop. It should be in early next week (which is fine, as I have to go to work tomorrow, and won't be back until Tuesday anyway). This way, the welds along the fender well will have the correct spot weld dimples.

Those are going to be some expensive dimples! ;) Really though, I realized I need one for my 45 (it'll take a LOT more bodywork than this 40), so it was a no-brainer to order one now, since I'll use it almost immediately and get what should be good results. Also, the guys at Matheson knocked off nearly $100 for me, so that made it an easy choice.

Dan
 
Midday break for me... Pictures are downloading to the computer as I type this...

I'm a bit perplexed actually at a few of the choices CCOT made on the rocker panels especially. They are cut to fit the doorjamb--sort of. They fall about 1.5" short of the actual door opening, which means I have to put the seam in the body panels in right about the same spot as the flange that it all spot welds to. It'll look fine on the outside, but frankly, I'd rather have a single, smooth piece of steel to run along that flange. It would be more rust-proof like that. Also, if it weren't for the seams, I'd rather just spot weld the bits on, and leave the dimples like they were originally. I'm just not too keen on filler to smooth stuff like that out--and these panels are definitely designed to get some body filler to smooth them out. Not a big deal, but another couple inches of steel (and it is surely on the cutting room floor) would have given me a natural place to weld the rocker panel (right where the door jamb is. I personally think it's easier to come up with a good looking corner than a sheet.

Ding! Pictures are done. Here's three pics of what I'm talking about here...

hey dansh, would you still recommend the precut CCOT rocker panels having gone through it once? or would you suggest, goin from scratch with a carboard cut out onto a flat sheet of metal to fit exactly how you want it?

thanks for sharing the process. :beer:
 
hey dansh, would you still recommend the precut CCOT rocker panels having gone through it once? or would you suggest, goin from scratch with a carboard cut out onto a flat sheet of metal to fit exactly how you want it?

thanks for sharing the process. :beer:

Jury is still out on the Quarters.

But the rocker panels I'd definitely go with rolling your own. The CCOT rockers are basically nothing more than a roughly cut sheet for the outside, with the flange set in the back, the bend on the bottom, and the fancy bit at the front. I can't imagine the bit at the front rusting through, and the bend on the bottom isn't exactly rocket science either. You could do the flange with a $20 HF flange without much problem.

So no, I would not buy the CCOT rockers again. Do you need both, or just one? We got the package left and right deal, but only used the right. PM me if you happen to need the left side.

Jury is still out on the quarters though, so far I think I'd do them again.

I do notice that the PACOL stuff seems a bit more complex than the CCOT panels, and I would consider those as well.

Dan
 
A bit out of sequence on the thread, but....Those flanges at the bottom of the CCoT quarter panel aren't formed by a press...at least they weren't about 9 years ago. The jig they use is basically two heavy pieces of steel with a curve tighter than the resulting fender curve. Once the fender is clamped in between the "dies", they hammer the sheet over the edge of the jig to make the flange, then cut it off to the right depth. It's possible they have evolved their process, but it was pretty archaic back then, and worked well, just required more man hours to make each one.
 
Last edited:
thanks for the feedback Dan. cool, well it turns out that i would need the left side if i went ahead with it. but i still gotta do some thinking and get some local advice, i'm clueless with body work/welding. but i'll pm ya when i'm ready. cheers.
 
This is a great thread, thanks for sharing all your work. I cant wait to see how it all comes out. I have a huge rust project to work on myself and I was looking for detailed pictures on how to do this. It looks like it takes some head-scratching as you go along. Good job.
 
Updates?

1). Fitting everything carefully takes a LONG time.
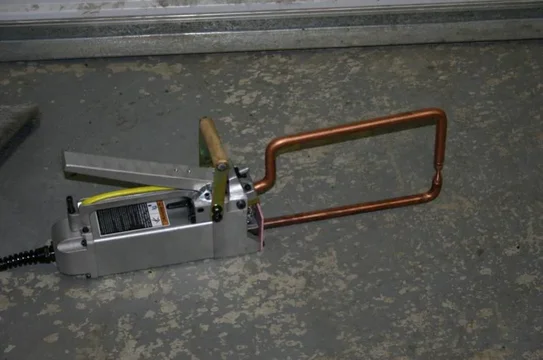
2). I love my new spot welder. So much easier and faster than the rosette style welds I was doing with the MIG.
3). There is a definite possibility that I'll get the rocker on this afternoon.
4). I forgot my camera in the shop, so no pictures for a few more hours. Sorry. :)

Dan
 
OK, rocker is not welded on--but I probably could now. Just decided to take it slow--just in case...

But...

Oooohhhhh..... It's the Miller 110V unit, without the timer (the timer is EXPENSIVE)
spot welder.jpg

And some samples:
spot welds.jpg
These were my first two spot welds--EVER. I am impressed. I could spot weld the rocker on in about a minute with this thing! And no grinding, no warping, etc....

I welded a bit of 22GA behind the rocker, just to help fill the gaps and generally act as a heat sink a little bit behind the welds. It also helps hold the new straight rocker to the slighly bent original doorframe (which is mostly straightened by the new rocker and some clamps). Of course the pictures just don't look cool, so I didn't take any. ;)

Dan
spot welder.jpg
spot welds.jpg
 

Users who are viewing this thread

Back
Top Bottom