
Just discovered you USB ashtray mod and it is brilliant. Did you tap off a power source in the door (e.g. door lights)? Or did you run separate wires from a fuse block? Thanks for the inspiration (my two boys will thank you especially). -Tedwhere did you buy all of the ABS/Kydex for this project? what are the specs on the material you used and rough est. of cost?
I really dig the ash tray idea... !!!
Navigation
Install the app
How to install the app on iOS
Follow along with the video below to see how to install our site as a web app on your home screen.
Note: This feature may not be available in some browsers.
More options
Style variation
You are using an out of date browser. It may not display this or other websites correctly.
You should upgrade or use an alternative browser.
You should upgrade or use an alternative browser.
Build BoltRipper's 2-year Overdue Build Thread
- Thread starter Overland Tailor
- Start date
Member Builds and Stories
This site may earn a commission from merchant affiliate
links, including eBay, Amazon, Skimlinks, and others.
- Joined
- Jun 24, 2012
- Threads
- 81
- Messages
- 1,142
- Location
- Birmingham, AL
- Website
- www.overlandtailor.com
- Thread starter
- #282
Ted-
Everything auxiliary was connected to the Blue Sea panel.
Get the boys helping!!
Hope that helps -
J
Everything auxiliary was connected to the Blue Sea panel.
Get the boys helping!!
Hope that helps -
J
- Joined
- Jun 24, 2012
- Threads
- 81
- Messages
- 1,142
- Location
- Birmingham, AL
- Website
- www.overlandtailor.com
- Thread starter
- #283
Went ahead and completed a project I've been wanting to do for a few years now. I want to run a Partner Stove and didn't want to be restricted to 1lb bottles. My rear tire carrier had a spare trailer hitch, so I decided to fabricate a 11lb propane bottle bracket. I've tossed around inter versus exterior and safety concerns with both solutions. For me, this seemed the best as it's a fairly high mounting location.
Started with a PoweTank bracket for the Worthington 11lb Propane Bottles. Using a hitch bar and 5" piece of 1/4 plate I had around the shop I went about getting everything mocked up.


Plate was now fabricated to mount to the PowerTank Bracket:

Ready for welding:

Some Primer and Paint:
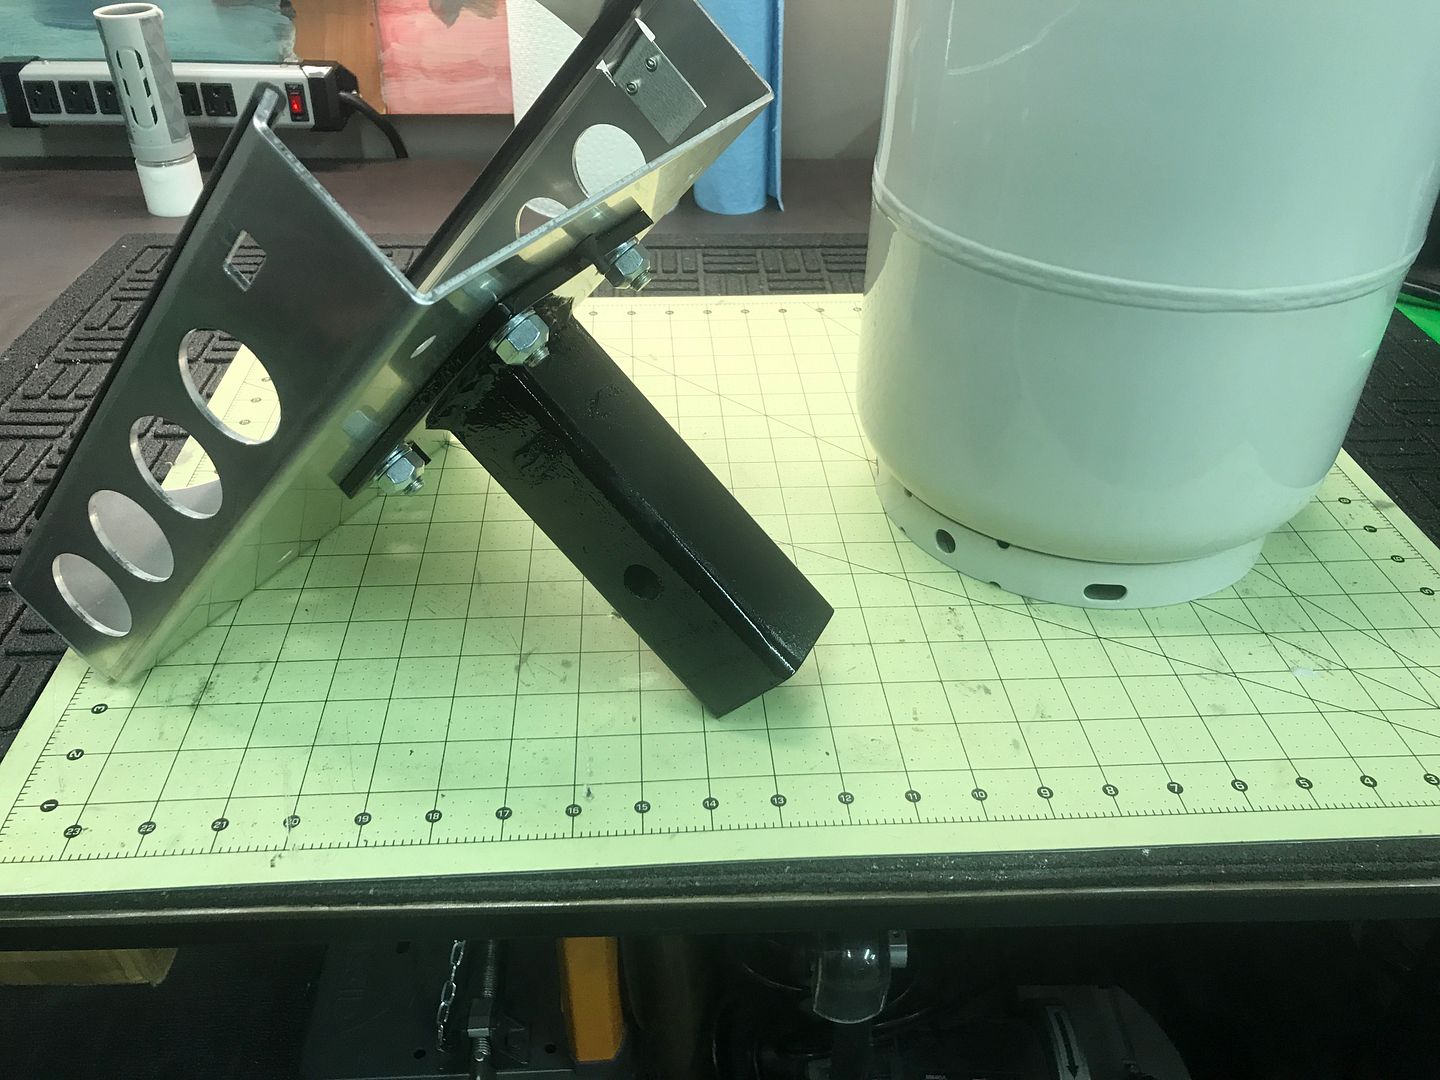
Secured with 8.8 Hardware:

Fit was perfect:

Finished Product:

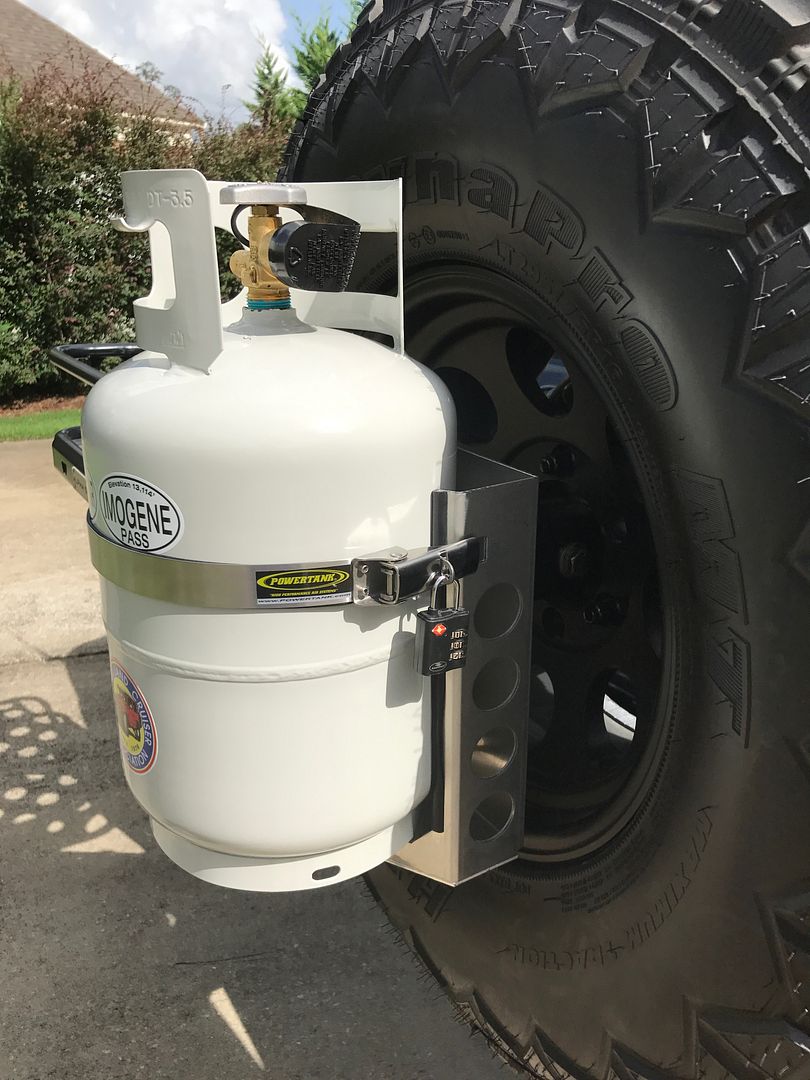
Cheers ~
John-
Started with a PoweTank bracket for the Worthington 11lb Propane Bottles. Using a hitch bar and 5" piece of 1/4 plate I had around the shop I went about getting everything mocked up.
Plate was now fabricated to mount to the PowerTank Bracket:
Ready for welding:
Some Primer and Paint:
Secured with 8.8 Hardware:
Fit was perfect:
Finished Product:
Cheers ~
John-
Last edited:
- Joined
- Jun 24, 2012
- Threads
- 81
- Messages
- 1,142
- Location
- Birmingham, AL
- Website
- www.overlandtailor.com
- Thread starter
- #284
I also committed Sacrilege today and installed a wonderful little German item in the Cruiser today... A great cupholder! I've been helping a good friend down the street with his 1991 Gelandewagen / G-Wagon and he ordered one for me... Its perfect and folds up out of the way,


I've got another German Item coming that will hopefully help with my long cross-country drives and associated bad back, hips and legs... More in a few days on that....
Cheers,
John-
I've got another German Item coming that will hopefully help with my long cross-country drives and associated bad back, hips and legs... More in a few days on that....
Cheers,
John-
Pretty incredible. Your all around talent is amazing. Congratulations.
Now though - if you can't eat or drink in it and you are stuck up to your rails in a mud pit, you will need to call in a Sky Crane for a dust off and you forgot to add lift points at all four corners. Sheez - I would have thought of that and a trauma package for emergency open heart surgeries as well.")
Seriously - it's awesome. We all have dreams and goals. They are all different in simplicity or complexity and the gratification of accomplishment is the same no matter the scale. Good luck, be safe and have fun.
And enjoy your time with that little girl. Before you know it she will be gone.
Now though - if you can't eat or drink in it and you are stuck up to your rails in a mud pit, you will need to call in a Sky Crane for a dust off and you forgot to add lift points at all four corners. Sheez - I would have thought of that and a trauma package for emergency open heart surgeries as well.
Seriously - it's awesome. We all have dreams and goals. They are all different in simplicity or complexity and the gratification of accomplishment is the same no matter the scale. Good luck, be safe and have fun.
And enjoy your time with that little girl. Before you know it she will be gone.

Oh gosh! Tell me you have a part number for that beauty!I also committed Sacrilege today and installed a wonderful little German item in the Cruiser today... A great cupholder! I've been helping a good friend down the street with his 1991 Gelandewagen / G-Wagon and he ordered one for me... Its perfect and folds up out of the way,
I've got another German Item coming that will hopefully help with my long cross-country drives and associated bad back, hips and legs... More in a few days on that....
Cheers,
John-
- Joined
- Jun 24, 2012
- Threads
- 81
- Messages
- 1,142
- Location
- Birmingham, AL
- Website
- www.overlandtailor.com
- Thread starter
- #289
Here ya go - I secured it with 3M Dual Lock, so no drilling and I can remove it and relocate if needed.
Mercedes G-Class cup holder UNIVERSAL.
$35

Mercedes G-Class cup holder UNIVERSAL.
$35
Cheers boltripper! You're a legend. I want to do a V8 swap if my FZJ engine decides it parts ways with me. You're an inspiration!Here ya go - I secured it with 3M Dual Lock, so no drilling and I can remove it and relocate if needed.
Mercedes G-Class cup holder UNIVERSAL.
$35
- Joined
- Jun 24, 2012
- Threads
- 81
- Messages
- 1,142
- Location
- Birmingham, AL
- Website
- www.overlandtailor.com
- Thread starter
- #291
Started gathering parts for my On-Board Air System... Going to run an ExtremeAire High Output under the rear of the truck. It will be configured without an air-tank, switched on the dash.
@NLXTACY and Wits' End sent me some great bits including bulkhead fittings, Parker Parflex Line and some other items. Joey was extremely helpful in getting everything I needed for the project from his side. Even a Friday Night Technical Consult !

Started by getting the bumper mounting holes right sized for the larger buklhead fittings.

Just waiting on the compressor from George so I can get a mounting bracket fabricated and start getting everything connected......
@NLXTACY and Wits' End sent me some great bits including bulkhead fittings, Parker Parflex Line and some other items. Joey was extremely helpful in getting everything I needed for the project from his side. Even a Friday Night Technical Consult !
Started by getting the bumper mounting holes right sized for the larger buklhead fittings.
Just waiting on the compressor from George so I can get a mounting bracket fabricated and start getting everything connected......
- Joined
- Jun 24, 2012
- Threads
- 81
- Messages
- 1,142
- Location
- Birmingham, AL
- Website
- www.overlandtailor.com
- Thread starter
- #292
Had some time this weekend to start the install of the ExtreamAire High Output Compressor. I chose this unit for several reasons:

The compressor is a big unit, probably 20 lbs so I utilized a sheet of 3/16" plate to make a mounting bracket. I would weld the bracket to the frame and utilize both direct plate mount and through frame bolts as well.


Next I took the stock connectors and will use Anderson SB50 Plugs with waterproof boots.

Finished compressor end:

Finished compressor mounted to frame and bracket... Now to start the wiring...
The compressor is high enough on the frame that unless I start to flood the interior compartment with water, it will not submerge.

The run from the battery to compressor is about 15', so I utilized 6 AWG fine strand welding cable with soldered and crimped connectors. This is the main harness I built for the unit. The negative runs from the battery all the way to the compressor. I have a connector cable from the 50 amp Bussmann to a 100 amp relay that I'll show in a moment. The positive of this cable runs from that 100 amp relay to the compressor.

More on the wiring to follow -
Cheers-
John
- 150 psi working pressure / 200 psi surge
- 100% Duty Cycle
- Sealed unit with the ability to mount in any orientation
- Ability to be utilized in wet environments
The compressor is a big unit, probably 20 lbs so I utilized a sheet of 3/16" plate to make a mounting bracket. I would weld the bracket to the frame and utilize both direct plate mount and through frame bolts as well.
Next I took the stock connectors and will use Anderson SB50 Plugs with waterproof boots.
Finished compressor end:
Finished compressor mounted to frame and bracket... Now to start the wiring...
The compressor is high enough on the frame that unless I start to flood the interior compartment with water, it will not submerge.
The run from the battery to compressor is about 15', so I utilized 6 AWG fine strand welding cable with soldered and crimped connectors. This is the main harness I built for the unit. The negative runs from the battery all the way to the compressor. I have a connector cable from the 50 amp Bussmann to a 100 amp relay that I'll show in a moment. The positive of this cable runs from that 100 amp relay to the compressor.
More on the wiring to follow -
Cheers-
John
Last edited:
- Joined
- Jun 24, 2012
- Threads
- 81
- Messages
- 1,142
- Location
- Birmingham, AL
- Website
- www.overlandtailor.com
- Thread starter
- #293
I ran the negative from the main battery and the positive from the Bussmann through the engine compartment and down the driver side fender well. I secured the cable with cushioned cable mounts.

Next is the Pollack 100 amp waterproof relay. This relay will be activated from a switch on the dash. Here I used some of the stock mounting holes from the old running boards. It was perfect.

I continued along the body and the up over the frame rail at the rear of the vehicle. This location was utilized as it has great protection due to my sliders.

As noted before the ends were terminated with Anderson SB50 and waterproof boots. The connection was secured together to prevent accidental detachment and then secured to the frame, up and out of the way.


Next I'll finish wiring the relay and adding the interior switch. After that I'll connect the compressor to the 2 outlets on the bumper with Parker fittings and line from @witsend.
Cheers,
John-
Next is the Pollack 100 amp waterproof relay. This relay will be activated from a switch on the dash. Here I used some of the stock mounting holes from the old running boards. It was perfect.
I continued along the body and the up over the frame rail at the rear of the vehicle. This location was utilized as it has great protection due to my sliders.
As noted before the ends were terminated with Anderson SB50 and waterproof boots. The connection was secured together to prevent accidental detachment and then secured to the frame, up and out of the way.
Next I'll finish wiring the relay and adding the interior switch. After that I'll connect the compressor to the 2 outlets on the bumper with Parker fittings and line from @witsend.
Cheers,
John-
Last edited:
clean install, the only thing I would worry about is submerging that compressor? I would think a water crossing with 4 feet of water would do enough splashing etc to cause some damage to the unit? I ended up mounting my viaair in the cabin for that reason.
do you plan to extend the air input into the cabin?
do you plan to extend the air input into the cabin?
- Joined
- Jun 24, 2012
- Threads
- 81
- Messages
- 1,142
- Location
- Birmingham, AL
- Website
- www.overlandtailor.com
- Thread starter
- #295
Yes, I have to run it to the cabin or at a minimum up into where the filler neck is. once thats done, it can be submerged as its a sealed unit once thats done. I know you can never say never, but I better never see 4' of water  ....
....
....Yes, I have to run it to the cabin or at a minimum up into where the filler neck is. once thats done, it can be submerged as its a sealed unit once thats done. I know you can never say never, but I better never see 4' of water
that's nice, when I did my setup I could not find a unit rated for submerssion, so extremeaire states the unit can be submurged?
Yes, I have to run it to the cabin or at a minimum up into where the filler neck is. once thats done, it can be submerged as its a sealed unit once thats done. I know you can never say never, but I better never see 4' of water
4 feet is not much really if you think about it, I have been up to my doorhandles before......
- Joined
- Jun 24, 2012
- Threads
- 81
- Messages
- 1,142
- Location
- Birmingham, AL
- Website
- www.overlandtailor.com
- Thread starter
- #298
I talked with George and with the intake mounted where it is, it cant.. But relocating as you described it should allow a stream crossing. A crossing is one thing, but its not "Waterproof" (rated to 3' for 30 min as required by those standards). ExtreameAire does not state or recommend submersion...
The description states "Since the unit is totally sealed from the elements, you can mount it under your truck on the frame rail so valuable storage space is preserved."
Basically my requirement was to be sealed so it could be mounted under the truck. George states that there are no issues with a wet environment or mounting it under the truck.
Best,
John-
Last edited:
- Joined
- Jun 24, 2012
- Threads
- 81
- Messages
- 1,142
- Location
- Birmingham, AL
- Website
- www.overlandtailor.com
- Thread starter
- #299
4 feet is not much really if you think about it, I have been up to my doorhandles before......
I can promise you this, I will never be in water over the wheels unless its an emergency... Then I don't care about the compressor. You sir and an animal !!! Never will I have it up to the door handles !!!
I can promise you this, I will never be in water over the wheels unless its an emergency... Then I don't care about the compressor. You sir and an animal !!! Never will I have it up to the door handles !!!
lol, it was only once and for a short distance, you would be surprised if you keep your bow wave and keep moving forward no water enters anything......