Biscuit's 2013 Projects Thread (1 Viewer)

This site may earn a commission from merchant affiliate
links, including eBay, Amazon, Skimlinks, and others.

Biscuit

Mars Rover Driver Emeritus
SILVER Star
Joined
Jun 5, 2005
Threads
77
Messages
903
Location
Boulder, CO
This will be a "build thread" of sorts. Hopefully it will keep me motivated to keep moving forward with the various projects on my 40. Also it will allow me to share what I have going on.

I have many projects in mind; some big, some small, some in the middle, and some that may not happen at all.

I give you: Biscuit's 2013 Project List (in no particular order)
  • [STRIKE]Repair (second) Fresh Pull Cable[/STRIKE] Done!
  • Repair or Replace Front Heater
  • Overhaul Wiring Harness
  • [STRIKE]Replace Transfer Case Front Drive Bearing[/STRIKE]
  • [STRIKE]Replace Seals On Transmission & Transfer Case[/STRIKE] Now swap in H42. In Progress
  • Rebuild E-Break
  • Build A New Rear Storage Platform That Is K9 Friendly (dog on top of the platform)
  • Actually Drive On Dirt This Year
  • Reinstall skid plates for the first time since the new engine
  • Redo or replace front seats
  • Install amauer's kit for Autometer gauges in a stock cluster, and if possible have custom gauge faces cut out of sheet so I can make OEM-look markings for the Autometer gauges

And as a goal, I'd like the downtime for each project to be no-more than two weeks.
 
Last edited:
:popcorn:

Subscribed.:)

Welcome back!
 
I need to get off my azz, too... Maybe this'll motivate a few peoples. Sub'd.

:D
 
Removing FRESH pull cable

I pulled the FRESH cable out of the truck tonight. Very straight forward.

I already had my fan duct out, so I was able to skip that step. If it was in place and not busted there is a clip on the duct that holds the cable in place so passengers won't catch their feet on it.

First thing is detaching the plastic guard for the recirculated air intake. It is almost 40 year old plastic so I was very gentle. There are three wide clips on the long sides that hook it to the firewall.

image.jpg

After that the cable sheath needs to be removed from the clip that holds it in alignment such that the entire system will function correctly. Then the loop of wire at the end of the cable can be lifted off a small sheet metal tab on the door that controls the air source.

image_3.jpg

After this I was able to reach up under the dash and loosen the nut that holds the whole assembly to the dash. It was able to loosen it by hand by reaching up behind the dash from the passenger side. I was able to fit my hand forward of the ashtray and above the heater to reach the nut.

After loosening the nut all the way, the cable can be pulled out though the dash. I then put the nut back on the cable assembly as not to lose it.
image.jpg
image_3.jpg
 
Repairing FRESH Cable

As I had mentioned in a different thread, I had purchased a second fresh cable off eBay for cheap and got what I paid for. That cable was busted in the same way too.

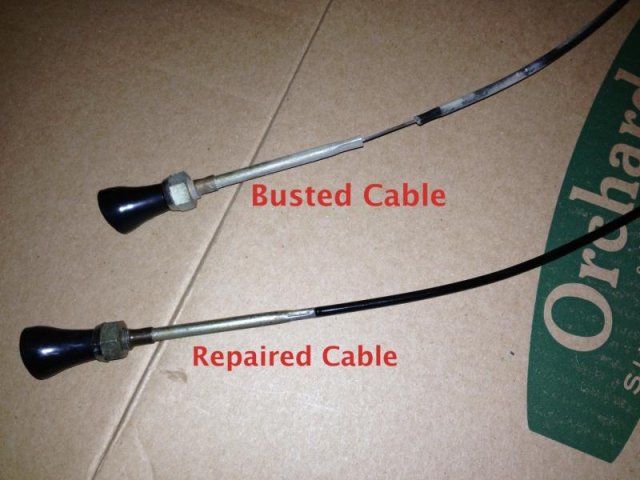
But it let me have two cables and practice repair on one. Below is a comparison of the busted and repaired cables.

image_1.jpg

See how the sheath is detached from the tube on the busted one? That's the failure point that causes the cable to not work. Each time you cycle your cable when it is broken all you are doing is pushing the sheath back and forth. None of the force is transmitted to the air source door.

The repair is very simple. First remove the plastic covering on the sheath (there is metal interior to it) only in the area that was previously crimped. The plastic will be deformed there making it easy to see. (See pic below)

image_2.jpg

I suspect corrosion of the wire in the assembly is the root cause of the failure. It corrodes to the inside of the metal sheath, binds, and one day you push in the knob to switch to recirculated air and BAM! the sheath is pushed out of the tube that connects to the dash.

Since I suspected corrosion, the first repaired cable I cleaned up with WD40 to get it moving again. On the next one I think I will use FluidFilm. Once I had the cable moving freely, I was ready to recrimp the tube on to the exposed metal sheath.

Before crimping I sprayed some white lithium grease into the metal tube to keep that moving freely. I then loosely held the part of the metal tube to be crimped in my bench vise.

Then I aligned the black plastic knob such that the text ran parallel to the flat keying spot on the threaded portion of the tube. I found this is necessary to provide the least resistance to actuating the cable. Finally I pushed the sheath into the metal tube until the plastic coating stopped it from being inserted anymore.

Once everything was in place and aligned, I tightened down the bench vise to crimp the metal tube on to the metal sheath.
image_1.jpg
image_2.jpg
 
Last edited:
Finally was able to get some work done on the 40 today. Today's project was finally repairing the ventilation duct. The plastic around the bolt hat holds the guide for the FRESH cable had cracked and broken out so I decided to reinforce it.

Instead of backing the single bolt with a washer, I used a piece of 3/4"x1/4" 1/16" thick aluminum angle with two extra bolts.


The new backing plate
image-1851124406.jpg

View from inside the duct
image-1339293404.jpg


I also hooked up the fresh cable and verified it works. I had to use a wire crimper to tighten down the brass tube onto the metal sheath of the pull cable to ensure the cable wouldn't fail again.
image-1851124406.jpg
image-1339293404.jpg
 
Last edited:
I'm trying to organize/prioritize the project list.

I will be starting on my wiring harness project once I am done with the LA Marathon (next week), my state tax refund is processed (also likely next week), and the foster cat that has been occupying my indoor project space is off to a new home (Tuesday, fingers crossed). But the wiring harness will be a slow burn project over most of the year and will probably get its own thread.

Which means I need to decide on a more near term project. I've narrowed it to a few contenders:
  • Replace hardtop to rain gutter weather stip
  • T-case & transmission work (might as well do it all at once)
  • Reupholster or replace the front seats

It's a debate. The hardtop seal would be nice as I put the cheap CCOT one in when I redid my hardtop in early '03 and put the seal between the gutter and fiberglass cap instead of where it should go between the gutter and hardtop sides. :whoops:

Both of my seats are torn badly now, and the foam on the driver's seat leaves something to be desired. That something is not feeling the springs when I go over bumps. The options are reupholster/refoam or replace. If I have them reupholstered I'll probably just have a local shop do it for me and rebuild the sliders while they are out. Probably cheaper than the SOR foam and covers from any of the vendors.

The transmission and t-case leak a descent amount. The font output bearing is pretty much shot. My e-brake is saturated and it's last rebuild was in mid '02. The e-brake still holds but not as well as it should. Figure all of this should be done at the same time while I have the gear boxes out of the truck. Of course I have the 3-speed, so there is always a temptation to switch to a 4-speed while I have it out. :hmm:


I am open to opinions which project to tackle next and any advice on making that project successful.
 
Today I was going to install a wide band air fuel ratio gauge, but took my time and all the local shops had no desire to weld the exhaust port bung on today. It is probably for the best as I hadn't figured out where I am going to mount the gauge.

So it was on to another project: starting to play with sound deadening ideas. I used some foam antifatigue mat to make floor mats. These will act both as a test and as a template. I'm thinking if I make some of these high density foam mats, put QuietCrap on the back of them and then a rubber floor mat over the top I can knock down some of the noise on the floor. I've also put in place some of the same foam in the recessed part of the hard top sides to try an absorb some of the noise bouncing around. If I like it, those panels will be held in place with some adhesive backed industrial velcro.

attachment.php
 
This is the wide band I picked up: http://autometer.com/cat_gaugedetail.aspx?ref=search&gid=4060 Still need to figure out where I'm going to put it. Probably in the old radio hole I made when I mangled my dash for a CD player install back in college.

Thanks for the heads up on the transmission and t-case. Maybe I can get the seller to run it down to the Bakersfield Swap Meet.
 
The initial sound deadening experiment was unsuccessful. The noise level on highway was not reduced at all, still ~ 92dB with the hardtop on (as measured by my iPhone). But my right heel was much more comfortable on the foam.

I'm thinking this will be the initial template for the floor mat uprage, unless I can locate the old SOR carpet kit I have/had. I think I may use jmdaniel's idea for making better mats: https://forum.ih8mud.com/showpost.php?p=7434612&postcount=18. Ideally I will use a rubber mat top material or outdoor carpet. Need to keep moisture absorption to the minimum.
 
Installed the wide band fuel air ratio gauge. It's not in the best location, but is usable and didn't require drilling another hole in the dash.

image-3227955570.jpg

It is interesting glancing at it while driving. I have found that I can ease up on the pedal position a bit at some speeds and not have an effective decrease in power. This is based on only one drive.


Also the power lead to the idle solenoid pulled out of its connector. I was out running errands so I fixed it with a multitool. A properly soldered and crimped connector is in its future.
image-3227955570.jpg
 
After a week of driving the 40 (and by week I mean three times in the past week) I have started to see some trends with the wideband AFR.

  • Choked idle is slightly lean at ~14.8-15.1 ARF
  • When coasting at 25mph slightly choked in 2nd* it runs rich at 10-12.5 AFR
  • When coasting at 25mph slightly choked in 3rd* the reading is basically stoichiometric (14.7).
  • On highway to run just slightly lean (~15.0) I have to have the choke control halfway out.
  • If I put the choke most or all of the way in the gauge reads off scale high, >18 AFR)

From this I am thinking the choke circuit is working fine, the idle circuit needs to be enriched a bit, and the main circuit needs to be enriched a bit. I'm smog free here in California (thankfully because the truck would have been sold in '05 when I moves out here) so I can adjust for best performance and not need to be perfectly stoichiometric.


Unfortunately all major projects are now on indefinite hold. I just found out that I will likely need to move out of my current place in the next 2-3 months :bang:. Depending on how that all goes down, some projects may end up being delayed to 2014. (Even worse buying a house is in the trade space for this, and the 40 may have to be sacrificed to help boost the down payment as a last resort :censor:. Lousy insane SoCal home prices.)
 
Last edited:
No ! Calico just sold his, too ...

On topic: You're fiddling with the choke at speed just to adj the mix reading to theortical perfect, to see if it would otherwise be lean or rich ?
 
No ! Calico just sold his, too ...
I saw that Calico sold the 40. Hopefully it won't come to that for me, but it needs to be in the trade space especially considering the last time it was off-road was SnT 2011.

On topic: You're fiddling with the choke at speed just to adj the mix reading to theortical perfect, to see if it would otherwise be lean or rich ?
More or less. I'm basically driving (mixture wise) it like a piston airplane.

I was doing this before the AFR sensor install by using the choke to lean until it ran a bit rough or lost some power then enriching the mixture.
 
Last edited:
Not trying to be a smart-ass or obtuse, but isn't that the carburetors' job ? I mean, a properly functioning carb ... ? So wouldn't it be better to just set the mix and forget it, if everything is jetted properly ?
 
Not trying to be a smart-ass or obtuse, but isn't that the carburetors' job ? I mean, a properly functioning carb ... ? So wouldn't it be better to just set the mix and forget it, if everything is jetted properly ?

That is the goal. I'm confident in the jetting, just need to adjust the mixture on the carb. Now that I have the data from a few drives, I can make it happen.
 
Biscuit, just wondering why you chose the analog AF gauge vs a digital one... Price? Or, less distracting than the digital ?
 
Biscuit, just wondering why you chose the analog AF gauge vs a digital one... Price? Or, less distracting than the digital ?

I went with analog for a few reasons.
1) The aesthetics, since it will be in the truck a while I figured make it fit in.
2) Much less distracting compared to digital
3) I can on the fly glance at an analog gauge if it is fluctuating and average the reading.
4) Precision (not to be confused with accuracy), with the analog gauge I can eyeball the AFR to 0.02-0.05 AFR, which is better than the digital with is precise to only 0.1AFR
 

Users who are viewing this thread

Back
Top Bottom