A Cheap Ass Rescues a 62

This site may earn a commission from merchant affiliate
links, including eBay, Amazon, Skimlinks, and others.

In case anyone is wondering that O-ring for the IAC valve is a 36mm ID by 2mm cross section (Someone is probably thinking "Why not just get the lousy o-ring from the dealer?"). The closest dealer is essentially a 90 minute round trip, and for stuff like this I can often get it Amazon Prime in 2 days without getting out of my chair or finding a part # so I do that in a lot of cases. Plus now I have 9 spares :cool:.

P3100290_zpsenugynmz.jpg


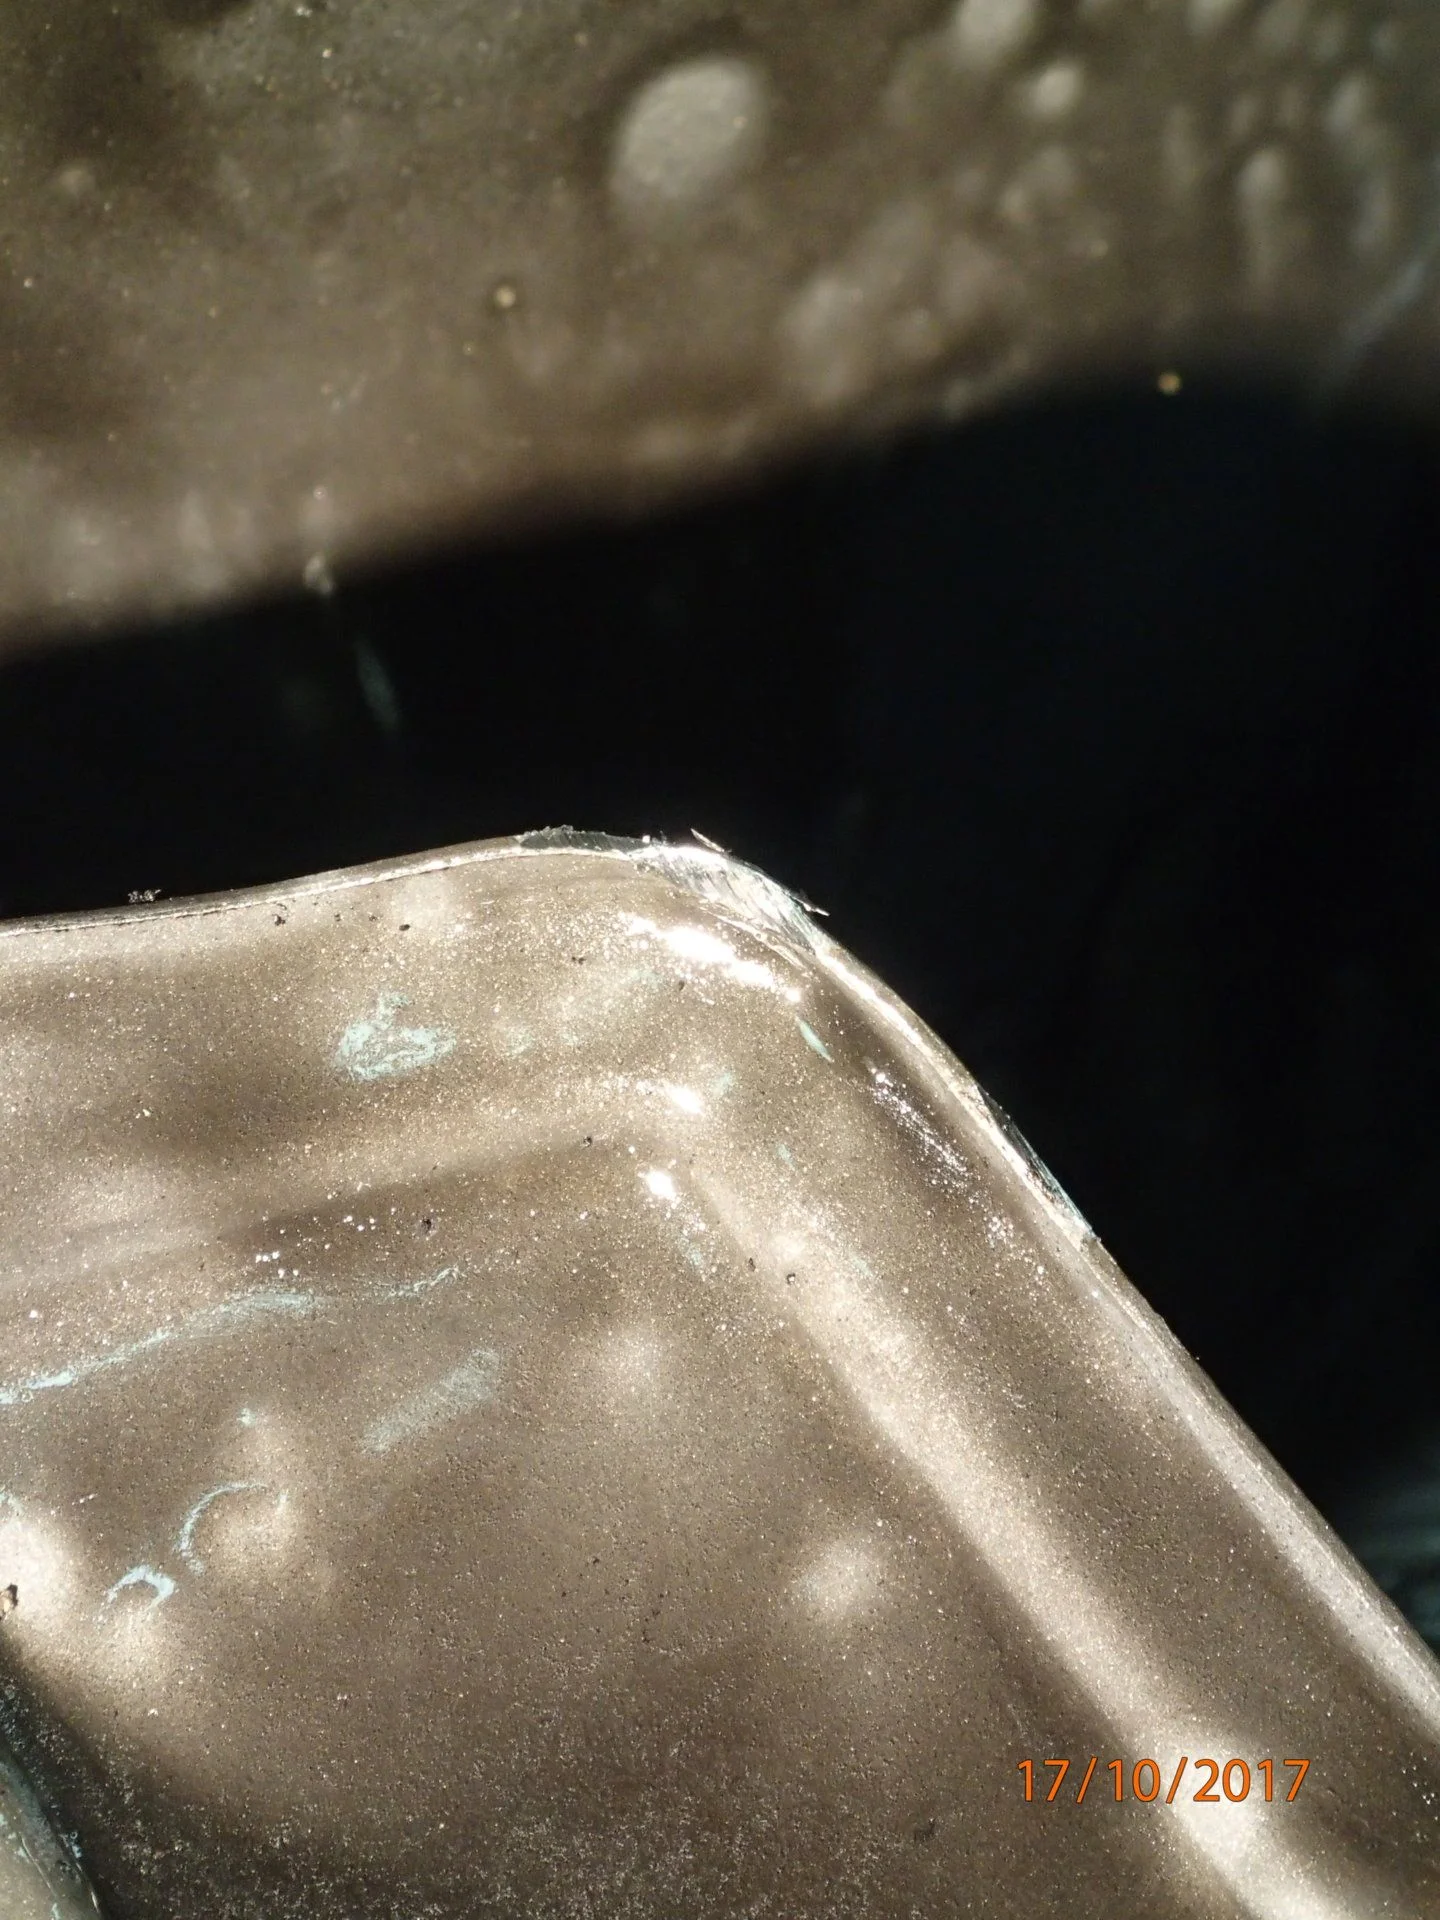
I always say if you're going to defeat a tamper resistant feature do it right.

P3120295_zpshswxz9bk.jpg


Someone had hacked through the plug for the air bypass screw on the AFM. Turns out the screw was fully closed. Might explain the hard start issue. Anyone know of a good starting point for that screw? I'm treating it like a carb air screw and starting at 2 turns out.

Eric
 
OK slow progress but that's how it goes around here. Finishing up under the hood for now.

Hillbilly fuel injector cleaning

P3190296_zpswzcvvpwm.jpg


Can someone help me diagnose my right front "clunk"?

P3240300_zpswc8tdk4y.jpg


I think I can squeeze another 100K miles out of these rotors

P3230298_zpscwzz8ihw.jpg


Anybody ever hear an oil leak before?

P3230297_zpsgiioropi.jpg


The front axle basically had no oil in it. So for now I was going to top it off. As I was adding oil to the fill plug it was running - as in a stream - out the right front when the wheels were cranked to the right. I was going to put off the axle rebuild for awhile but we all know how that goes. So apart it comes.

Been awhile since it's been apart I think

P3240299_zpsjrxfukia.jpg


'Cause 62s with red calipers are faster

P4090309_zpsgaj0q5lk.jpg


This was just for my own benefit - 8" of snow on April 8th the day I powdercoated my calipers

P4090306_zpsxeomydb0.jpg


I've never seen an oil pan rust through before but then I've never owned an F motor before

P4140316_zps9fb2jeog.jpg


It just never ends. So now I've got a ton of cleaning and refinishing to do so boring. Since the axle was run without oil the diffy has to come out and with all the labor into it thus far why not just put the ARB in now. Just too much crap to take apart to get there.

It will be slow here for awhile with work and the farm so that's it for now.

Eric
 
Man, this ain't you're average "Hi, I'm new.." thread!
A belated welcome and congrats on some thorough and quality work. That truck hit the lottery when you found it.

Thanks! "The Masochist Build" thread title was already taken but that's what this is. I'm just ornery about doing it right and doing it once.

Eric
 
Nice work and the cones can be removed separately with a brass drift and real heavy hammer (3+Kilograms)

file.php


You can also add a grease zerc for the birfields, it is supposed to be taken apart more than I like but if you pump to much grease it will pass the diff seal into the diff oil.

file.php


file.php


file.php
 
Last edited:
Nice work and the cones can be removed separately with a brass drift and real heavy hammer (3+Kilograms)

That's exactly what I did and in some cases it was quite a bit of pounding. In the picture the cone washers were broke free but needed a little help getting off of the studs.

Thanks for the tip on the grease zerks. I'll definitely do that but I will have to be careful not to over grease.

Eric
 
Great job on the baseline'n of that rig. your doing heck of a job. Nice find. that thing is going to go another 300k.
Welcome to the madness.
 
that rotor is unbelievable! Busted shock is a nice touch too. Who the fawk owned this thing? It's like a 16 year old girl stayed 16 for 28 years.
 
OK slow progress but that's how it goes around here. Finishing up under the hood for now.

Hillbilly fuel injector cleaning

Can someone help me diagnose my right front "clunk"?

I think I can squeeze another 100K miles out of these rotors

P3230298_zpscwzz8ihw.jpg


Anybody ever hear an oil leak before?

P3230297_zpsgiioropi.jpg


The front axle basically had no oil in it. So for now I was going to top it off. As I was adding oil to the fill plug it was running - as in a stream - out the right front when the wheels were cranked to the right. I was going to put off the axle rebuild for awhile but we all know how that goes. So apart it comes.

Been awhile since it's been apart I think


'Cause 62s with red calipers are faster

This was just for my own benefit - 8" of snow on April 8th the day I powdercoated my calipers


I've never seen an oil pan rust through before but then I've never owned an F motor before

P4140316_zps9fb2jeog.jpg


It just never ends. So now I've got a ton of cleaning and refinishing to do so boring. Since the axle was run without oil the diffy has to come out and with all the labor into it thus far why not just put the ARB in now. Just too much crap to take apart to get there.

It will be slow here for awhile with work and the farm so that's it for now.

Eric

Nice work sir. I thought mine had a pretty rough life, but wow! Probably just in time too!
 
Thanks! The scary thing is I drove it 115 miles home like that! I don't have Carfax so have no history. The guys I got it from were just bumming around in it and had no wrenching skills.

I'm guessing they got a quote to get it safe and had to dump it. I'm glad it ended up here. These things are eminently re-buildable.

Off to Missouri this weekend to pick up doors and fenders that seem pretty solid from a fellow Mudder. They'll sit in storage awhile but I wanted to snag them while I could.

Eric
 
OK so when I bought this thing it had to crank and crank cold before it would start. Once warmed up it started a lot easier (not surprisingly.)

It sat outside for awhile while I cleaned and organized barns to make room for the new orphan. As I recall it still started hard when I went to move it into the barn. I did do a pretty thorough going through on the fuel system. I'm assuming fuel is flowing freely enough as it seemingly had no problem going 60 MPH down the road on the way home.

Checked the fuel pressure per the FSM and it was right on the money. Checked the function of the cold start injector system and that seemed OK. No obvious vacuum leaks but you never know.

So once in the barn I'm getting ready to do compression check and valve adjustment. Now IIRC is was in the high 20s F in the barn and it seemed to start much easier - maybe due to the contribution of the cold start injector? Don't know. Anyway compression numbers are surprisingly good for 360K miles if you believe them. The battery was fully charged but weak I think.

P2060259_zps8gptdx3e.jpg


The range of compression is not the best but I expected lower numbers. Do these things build up a bunch of carbon that could be propping up my numbers? I don't have a scope. From what I can see in the spark plug holes the cylinders are filthy.

Valve clearance was also surprisingly good. Once again I expected worse. I though I heard a tick during warm up (hard to hear with no exhaust) so maybe that was number 12 valve somewhere over .030" clearance. Yes I set these cold but I'll come back and check later anyway.

The rocker box is disgusting.

P2060256_zpstdasin2l.jpg


I'm not pulling the head right now but that bothers me.

PCV system completely plugged up stem to stern.

P2060257_zpssakfaekc.jpg


P2070260_zpswi9rkcwz.jpg


I had to burn that carbon out of the metal PCV pipe. Now I'm a big fan of "While you're in there....". I've read some here that have a different point of view but that's how I roll. I'm never in a hurry to get a project done. Soooo...as Dave (KAWAZX636) over at Yotatech says.....bakin' cookies.

P2070264_zpsftakyzgq.jpg


The valve cover is very much part of the PCV system and that too is completely plugged - all the passages between the inner and outer stamping. I can just hear the old man now. "What? You don't have time to homebrew but you have time to hot tank your 3FE valve cover?".....or something like that.

P2190276_zpsgcdc5trw.jpg


So down the rabbit hole we go. More to follow.

Eric
Plugged PCV hard pipe... I found mine plugged hardcore too when I recently pulled my manifolds ('87 fj60). I dumped it into a can of carb dip. Guessing tho that it might not do a thing. Heat is gonna be it huh?
 
That might work if you have time to let it soak. But pure (or nearly pure) carbon is hard stuff. Give it a try and see what happens. If that fails just grab a propane torch and go for it. Keep the little one away and wear safety glasses. The stuff came out of mine molten and on fire. Kind of cool actually. Then you're in for painting it but that's no big deal.

Eric
 
Hi, Great work. I bet that gas tank and hard lines are not long for this world after seeing what you have fixed so far. Mike
 
OK I believe I said I work slow for various reasons.

Shortly after the last update I took off on a mad dash to (the far side of) Springfield, MO to pick up some metal from a Mudder. Truly just some surface rust - very little metal will need replacing. These will likely sit for years but "Bird in hand" is a motto to live by.

full


So yeah I know you can get a brand new oil pan for $250 but I wanted upgrades. So out with the bad and in with the good. Yeah I know just stupid but....

full


I leak tested, found and fixed a couple leaks, but I'll feel better with Caswell tank coating on the inside.

full


I believe the stock bash plate to be a poor design that will eventually fail. So I put a bash plate on with an air gap. Plus three coats of POR-15 so it should outlast me.

full


Start the thing up for first time in forever and I have a rod knock from hell. So off comes the oil pan. Looks like I didn't get the windage tray back in the exact same spot.

full


I suppose that would have eventually clearanced itself out tho. Let me know if you guys get tired of my POR15 pictures.

full


full


So while I'm in the vicinity, I might as well fix oil cooler leaks and paint. I'd say the oil side of the cooler is water tight by looking how my mask sucked in during de-grease.

full


New hoses of course. WTF is that and why is it in there?

full


I need to send a prize to a Mudder who ID'd it in another thread - side post battery bolt. Just.....WTF.

full


There is something very odd about Carrie....I mean this truck. The sway bar is either not the right one or something. Had a hell of a time finding mounting bushings that fit, and end links I kept ordering were way too short. So I bought stuff (stainless of course) to make my own. The sleeve is too long here but I can cut it down when I get back on the ground. Also some $14 Chinese shocks for now.

full


Making new brake lines from nickel-copper. I don't have the tools to properly bend and flare stainless brake lines and didn't want to invest. What I have really wanted is a tubing straightener thing. Eastwood sells a sheet steel Chinese version for $200. Screw that so I made my own from scraps. As the Brits would say it works a treat.

full


That's enough for now. Lots more going on and tons ($$$$$$) of goodies have arrived. I'll have another update as soon as I upload some pics.

Thanks for looking.
 
Nice work - just read through your whole thread...
 
Wow. You could likely repair a very rust-prone 7.3l Powerstroke Ford oil pan with those skills. Great work here and the pictures are a treat. Your tubing straightener is very cool - I used my thigh to straighten tubing last weekend, and it's not nearly so nice.
 
Ok the reason the axle is apart in the first place is that oil would run in a stream out the right side as soon as I added it. So it's all apart so why not:

full


Gears and even the bearings looked OK for 360K miles. I guess it spent a lot of time on road hubs unlocked. Decided to go with the solid spacer from Just Differentials for durability. I started another thread asking about the late 62 axles being oddball. The online dealer catalogs actually call out unique differential parts with the build dates 11/89 to 1/90. I actually had to machine a significant about off the solid spacer to get it to work (better than having to add material.) My first attempt put the pinion too deep.

full


Even tho the pic above is the side being driven while going forwards down the trail it is still called the "Coast" side. This is actually the weaker side of the gears but generally OK for the front. This is the reason for Hi Pinions as this situation gets reversed up front and is there fore stronger.

"Drive" side.

full


.005" off the pinion depth shim and things got better.

full


While in my very newb opinion these gears are not worn out they are worn in. Maybe the people who actually know what they're doing would have replaced them. Time will tell.

full


I know a lot of guys get rid of the disk brake dust shields I think they are cool with the air ducting and all. I like to think this one has a bullet hole - but probably not.

full


Easy fix.

full


The cancer had really gotten to the other side. But not available new and no luck finding used.

full


All done.

full


3rd member all done. 20 in-lb of total dynamic bearing pre-load which I think is what Zuk recommends.

full


3rd member is back in. USPS lost my package of genuine Toyota hardware. So I still don't have the stuff I ordered a month ago. File a claim, re-order, wait....PITA. So I can't even put my knuckles on to use my cool new knuckle centering tool from Jason. I've got other little cleanup and things to do in the meantime.
 

Users who are viewing this thread

Back
Top Bottom