Navigation
Install the app
How to install the app on iOS
Follow along with the video below to see how to install our site as a web app on your home screen.
Note: This feature may not be available in some browsers.
More options
Style variation
You are using an out of date browser. It may not display this or other websites correctly.
You should upgrade or use an alternative browser.
You should upgrade or use an alternative browser.
81 BJ42 - I have to bring it home and pass inspection
- Thread starter Awl_TEQ
- Start date
This site may earn a commission from merchant affiliate
links, including eBay, Amazon, Skimlinks, and others.
More options
Who Replied?Awl_TEQ
Supporting Vendor
- Thread starter
- #284
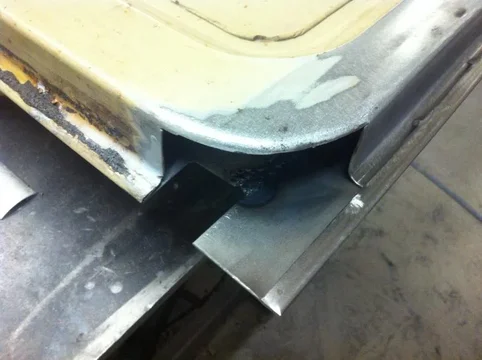
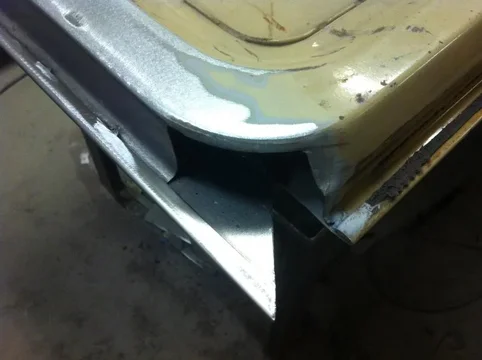
Then the fun. I just took my time and copied the upper door corners and consulted online photos to get a similar profile to stock.
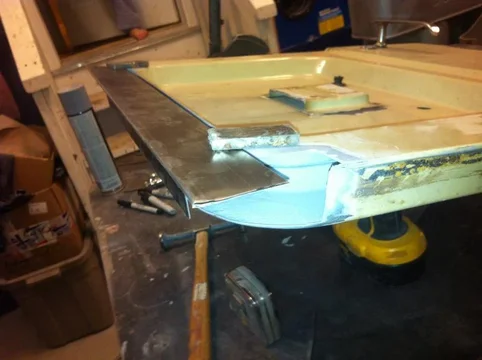
Here you can see I started with a section of the patching material and slit it with the grinder so I could bend it. Then I made little slits on the top of it and tapped it in a bit with a hammer. That gives it a bit of a radius instead of a sharp edge. You can see the scraps sitting on top that I used to finish it out.

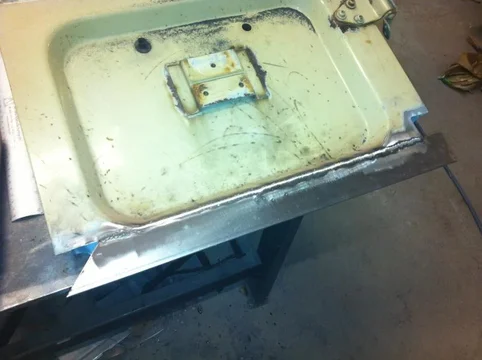
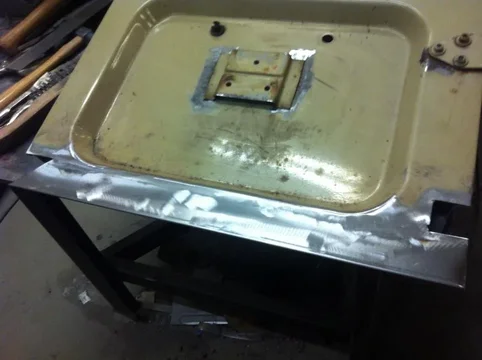
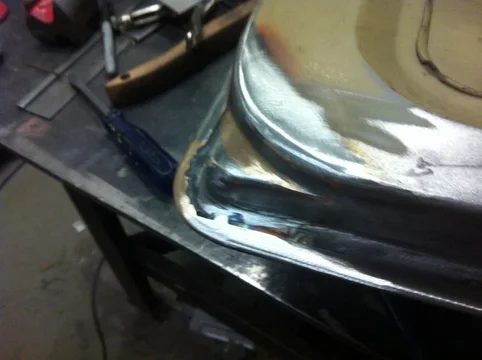
Sorry for the blur. This is where I switched to the TIG and brazing rod. I filled all the voids in the joints and also used the brazing to build up the form so I could sculpt it out with the grinder and a flapper disc.

Done. ish. Thats all I got to today. About three hours. Spent the rest of the day doing family stuff.


Here you can see I started with a section of the patching material and slit it with the grinder so I could bend it. Then I made little slits on the top of it and tapped it in a bit with a hammer. That gives it a bit of a radius instead of a sharp edge. You can see the scraps sitting on top that I used to finish it out.

Sorry for the blur. This is where I switched to the TIG and brazing rod. I filled all the voids in the joints and also used the brazing to build up the form so I could sculpt it out with the grinder and a flapper disc.

Done. ish. Thats all I got to today. About three hours. Spent the rest of the day doing family stuff.

Yeah, your lucky that corner pic was blurry. It's hiding your shi**y work.
Why aren't you working on tail gates?
You're going to do a complete resto on that 42 before you drive it, aren't you?
Did you loose your license or something?
Why aren't you working on tail gates?
You're going to do a complete resto on that 42 before you drive it, aren't you?
Did you loose your license or something?
It looks good Kevin, even the fillet between the two pieces in that bottom corner look amazing.
How do you take the weld/metal down to blend the two pieces youve welded so well, and without taking too much material off the surrounding metal that youve warped it or made it too thin?
For me its very difficult to not end up with paper thin steel where ive welded two pieces of sheet metal together by smoothing it with a flap disc.
Simply amazing, and all that in 3 hours.
Amazing work!
Awl_TEQ
Supporting Vendor
- Thread starter
- #290
cody c said:It looks good Kevin, even the fillet between the two pieces in that bottom corner look amazing.
How do you take the weld/metal down to blend the two pieces youve welded so well, and without taking too much material off the surrounding metal that youve warped it or made it too thin?
For me its very difficult to not end up with paper thin steel where ive welded two pieces of sheet metal together by smoothing it with a flap disc.
Short answer= grind carefully.
Long answer= I use a 5" 80grit flapper disc if there is access just to take the bulk of the weld material off. The a 2" Roloc (3M) disc on an air angle grinder to feather the weld down to the parent material. Trick is to keep moving. If you stop you will make a depression. Thats depressing.
The flapper disc works well when you use the edge to feather an inside radius like where the complex shapes are on that corner.
Huh, maybe its the heat applied when holding it one spot to remove the bulk of the weld that creates that problem.
I still plan on widening the rear wheel wells on my hilux so I definitely want to know your secrets!
Ill have to have a peek for the Roloc 3M discs too. Actually Ive used the gasket remover pads lots before and they are excellent.
You get enough wrenches/tools for your tool kit yet?
Chamba
Too short. Too long. Just right: the 43
That door is so pretty that I almost teared up.

Josh


Josh
That door is so pretty that I almost teared up.
Josh
Yeah, if he wanted, he could probably work with sheet metal for a living with them skills! ;p
Hey Kevin, you got any self clinching 1/4-20 steel or stainless nuts at your shop?
- Joined
- Dec 8, 2006
- Threads
- 158
- Messages
- 2,974
- Location
- Greenfield, MA
- Website
- thecarpentryway.blogspot.com
Could you talk a little bit more about "tig and a brazing rod"? Are you using a brazing rod with the Tig or are you tig welding and then brazing afterwards?
Awl_TEQ
Supporting Vendor
- Thread starter
- #296
Cody, yes
HJ, yes. Using silicon bronze filler rod with the TIG. Essentially brazing. The TIG is just a fancy torch and silicon/ bronze filler rod is basically (if not exactly) like brazing rod. I could do the same thing with steel filler rod but the S/B rod requires less heat and is easier to flow into gaps and build up fillets for fill.
HJ, yes. Using silicon bronze filler rod with the TIG. Essentially brazing. The TIG is just a fancy torch and silicon/ bronze filler rod is basically (if not exactly) like brazing rod. I could do the same thing with steel filler rod but the S/B rod requires less heat and is easier to flow into gaps and build up fillets for fill.
Awl_TEQ
Supporting Vendor
- Thread starter
- #299
Next question.... Tomorrow I am sending a shipment of parts to our plating subcontractor. Should I send him all the plated stuff for a re-coat??
Next.... What the f... heck is this thing? Bruce was trying to explain it was for pushing the center cap off the wheels on some models???
I dunno, but all three are slightly different.


Next.... What the f... heck is this thing? Bruce was trying to explain it was for pushing the center cap off the wheels on some models???
I dunno, but all three are slightly different.
Similar threads
Users who are viewing this thread
Total: 1 (members: 0, guests: 1)

