1978 LPB Teardown and Rebuild (1 Viewer)

This site may earn a commission from merchant affiliate
links, including eBay, Amazon, Skimlinks, and others.

hummm, interesting setup with the hydroboost. i wish i would have had time to stop by during my visit a couple weeks back, i would have enjoyed an upclose and person look at the build.

cheers

Yes, it would have been nice to officially meet. I was at the last meeting you attended bout a year ago but I think that was my first meeting and I was a wall flower. I had planned to go to the Atlas Pizza affair but time got away from me at the shop that night.

Cool , great idea on the hydro boost .
Was thinking of the electric vac pumps, but i like the hydro boost much better , and keep the electro-vac for the crusie :-) ,, 2002 GMC Safari Van , was that diesel ?

Would like to see a pix of the home-made manifold and the turbo, don't think it's a volvo one tho.

thanks for the info so-far

VT

No, not diesel but I swear it had eight wires on the distributor cap which is weird cuz I thought the biggest engine in those was a 4.3L vortec. I'll get a shot of the manifold for you.

Are you planning to cover the gap between the grill and the rad?

I wasn't planning on it but now that you mention it... do you think too much air will go up and over the rad? or was there another concern you had?
 
So unless someone can think of any other reason that I need vacuum for I am considering ditching the $1200 stock vacuum pump and getting a high amp aftermarket alternator. AFAIK the vacuum was just for the brake booster and I ain't got one now. That also eliminates the vacuum tank and all related hoses as well as the oil lines for the pump. Anyone got input on that :idea:
 
Wayne, who did you deal with out here for alternators? Many moons ago I dealt with B&F Auto Electric on 52nd and Hubalta Rd. with no issues and good service. I don't need no 300 amp mean green alt - just something that will fit the stock 3B bracket and put out decent amps.
 
over behind C/T off 36th street, AutoWorld, they built up my starters, alternators winch motors, 24V or 12V, exotic s***, didn't matter.
they do the work for ProActive, Stampede Toyota, many of the Stealerships.
take yours in and ask what they suggest to use.
 
I wasn't planning on it but now that you mention it... do you think too much air will go up and over the rad? or was there another concern you had?

No concern with airflow, although it might help a bit, I just think it would look better not to have a big gap there, clean it up a little. Maybe out of stainless? Just my 2 cents.
 
i would say air flow will be an issue, even the stock trucks have a shield with that foam to seal that area tight. more air into the rad and more cooling will happen.

plus, it might look purdy.
 
Thanks for the lead Wayne.

I'll check with the hood down and see how much space there is up top. With the hood down there is still the opening between the bib and hood that lets air hit the top portion of the core. Down below I can easily make a shroud-ish piece.
 
Awl_TEQ ,,
Thanks for the update..
I'll go looking 4 a hydro assist ,, Vac sucks (pun intended) , and will always be a PITA.
Remember Vac wipers for us youngins :candycane:, man was that DUMB !
 
Yes and no. I've been busy building and selling parts for a bunch of different Mudders. This of course is all to create more funds for the cause. I have a full OME suspension kit waiting for me to pick up so it seems to be working.

Bullet points to tackle for the near future are....

-Finish rollcage
-Alter floor and doghouse for Toybox install
-mount seats
-build (and maybe sell) dashbox
-Pull drivetrain / compression test / install toybox / re-install drive train
-build aux fuel tank and install
-teardown to the frame rails
-blast / paint / powder coat / plate everything
-overhaul tranny/ t-case/ axles
-rebuild rolling chassis
-cut and paste sheet metal
-paint and reassemble body


So, not much to do really :rolleyes:

The good news is that other than gauges, tires and painting supplies all the big ticket items are purchased. The rest is fabrication and labor. With the possible exception of the engine. I have two - a runner and an unknown. Ideally I want a full rebuild and a spare but I may settle for using the runner for now and rebuilding the unknown for a quick swap later.

I am anxious to get back at it as soon as I patent my pause button for the "space time continuum"
 
I am slowly using up my "waiting for parts" excuse when it comes to the final tear down.

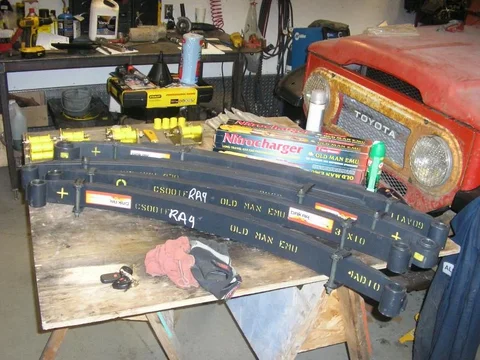
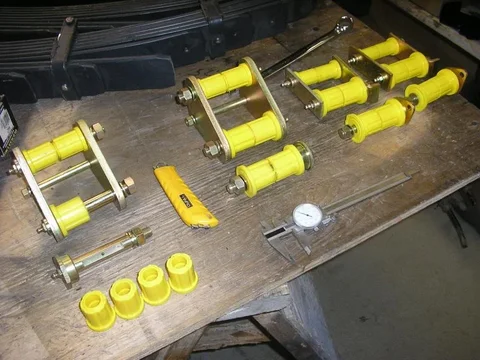
A sharp eye (you know who you are ;)) will notice the bushing issue in the middle picture. I'm working that out with the supplier.

P1010014.webp

P1010013.webp

P1010010.webp
P1010010.webp
P1010013.webp
P1010014.webp
 
A couple more pictures and a question or two...

Question - I knew at one time what the "+" and "0" painted on the top leaf meant but can't remember.... was it that the spring tested slightly higher than spec or...

Question - my 45 is a 1978. what are the inside diameters of the spring perches and the shackle mounts on the frame. I'm not ready to disassemble my rig yet and I need to confirm my bushings are correct.

There are 3 different sizes of bushing here
#1 - 15mm ID x 25mm OD
#2 - 18mm ID x 30mm OD
#3 - 18mm ID x 35mm OD

All the spring eyes are 35mm ID so all the #3's are for the springs therefore there should be 16 of them. I have 13 :hillbilly:

The #1's seem to be for the frame side of the front shackle.

The #2's seem to be for the frame side of the rear shackle.

Net effect is I am three short on the #3 and have four extra of the #2...... I think. Could someone please back up my thinking of educate me please.


P1010011.webp

P1010012.webp

P1010013.webp
P1010011.webp
P1010012.webp
P1010013.webp
 
Kevin

Not to stick my nose in here but is that the standard OME kit/parts?

What's going on when you see 4 of those "triangle-type" shackles (like the deluxe kit picture at Old Man Emu Suspension Kits 40 Series ) instead of the simple "stock-like" front shackles (which I like) in your photos?

I'm getting ready to buy a 2 1/2" kit for my 40 (thinking about Kurt/Cruiser Outfitters).

thanks,
Gus
 
A couple more pictures and a question or two...

Question - I knew at one time what the "+" and "0" painted on the top leaf meant but can't remember.... was it that the spring tested slightly higher than spec or...

I believe you are right + means above tolerance - less than and 0 balls on !
 
Kevin

Not to stick my nose in here but is that the standard OME kit/parts?

What's going on when you see 4 of those "triangle-type" shackles (like the deluxe kit picture at Old Man Emu Suspension Kits 40 Series ) instead of the simple "stock-like" front shackles (which I like) in your photos?

I'm getting ready to buy a 2 1/2" kit for my 40 (thinking about Kurt/Cruiser Outfitters).

thanks,
Gus

I bought my kit not from a OME distributer but from a friend of mine who makes a living fixing and restoring Landcruisers and other Toyotas. He prefers this particular mix of parts on his restos so I just went with his recommendation. The bushings and shackles are marked "Terrain Tamer" which I gather is an aftermarket outfit from Aus that sells a lot of Cruiser parts. If I was going to buy anywhere else it would be from Kurt based on the plethora of good reviews he has here on Mud and the utter lack of negative feedback about his business and ethics.

The actual distributer these came from is a well known 4 wheel auto....motive supplier ;). He had apparently been sitting on these rear springs for quite some time and so let them go at a discount. I've got the medium fronts (CS001F same as for the 40's) and the 45 heavy rears (CS003R) which is a medium with an extra leaf. If I find the rears too stiff I can remove it.

For interests sake, I landed this kit in my garage for $175.00 more than Kurt's current sale price..... but.... remember I am in Canada and would have to pay tax, shipping, duty and currency exchange on top of his price. I also saved about $500 off the Canadian distributers listed prices and didn't pay any shipping.

I believe you are right + means above tolerance - less than and 0 balls on !

That's the way I remembered it. Funny how when you read a thread and think to yourself "I need to remember this thread cuz I'm gonna do the same thing" but you never do. I know there is a thread with a complete discussion about installing these. It's got trivia and marking info and pin and bushing sizes for different year frame etc etc.
 
OME info

The OMESB30 bushing kit will have a 15mm I.D. and 25mm O.D.
The OMESB1 bushing kit will have a 18mm I.D. and 35mm O.D.
The OMESB79 bushing kit will have a 18mm I.D. and 30mm O.D.
With that info you should be able to order what you need.
If you need info on shackles or pins let me know.

The + denotes drivers side.
Right side in Australia
Left side in U.S.
? in Canada:doh:

Hope that helps.:cheers:
 
minor progress

I moved the suspension into the basement to await the rolling chassis assembly, tidied the garage and did a couple of minor tasks.

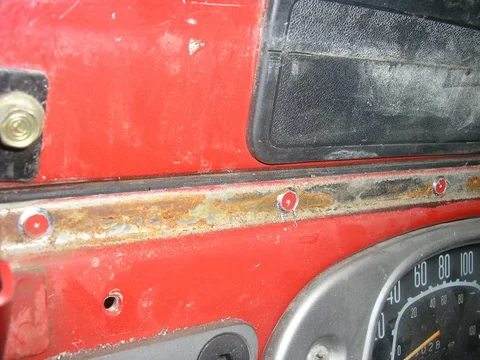
I previously notched the corners on the dash pad mounting flange to allow the cage risers to pass. I have since decided the stock dash will be removed completely to allow the cage to pass and I will fabricate a custom "Dashman" style storage box that will look good and also house several gauges (pyro, boost etc.). A while ago I got a couple of spot weld cutter drill bits from McMaster Carr and have been wanting to try them out.
P1010002.webp
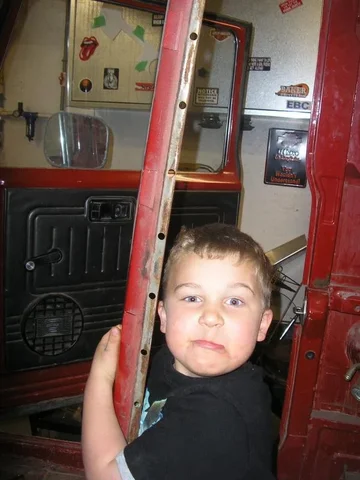
With mom in full on "x-mas baking mode" I took the initiative and occupied the mini me with some testosterone building exercises. I used a center punch to help the spring loaded bit tip to stay put and pulled the trigger. The bits were a very good purchase as they cut almost too fast and I had to try hard not to cut the second layer.
P1010001.webp
Starting at one end and adding a little tension by jamming the screwdriver in made it easier to detect when the weld let go.
P1010004.webp
P1010002.webp
P1010001.webp
P1010004.webp
 
I like these bits :wrench::wrench:
P1010006.webp
The flash really shows the dust
P1010008.webp
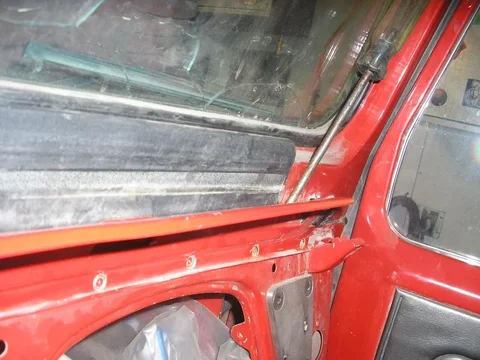
Looks like the grey primer was applied and then the parts assembled before body color was sprayed. A natural moisture collector for rust. Now to grind off the "buttons" left behind.
P1010007.webp
P1010006.webp
P1010008.webp
P1010007.webp
 
I flopped the windscreen to get better access with the 2" air grinder. 80 grit for the "buttons" and then medium (purple) scotchbrite pad to remove the rust. After cleaning I stood the windscreen back up and set the top back in place.
P1010009.webp

I also mounted my waste gate actuator with a bracket I made at work. Took several tries to get it just right (hammer and vise).
P1010011.webp

Like I said - minor progress. Felt good to actually work on it again.
P1010009.webp
P1010011.webp
 

Users who are viewing this thread

Back
Top Bottom