get the sliders ..
Navigation
Install the app
How to install the app on iOS
Follow along with the video below to see how to install our site as a web app on your home screen.
Note: This feature may not be available in some browsers.
More options
Style variation
You are using an out of date browser. It may not display this or other websites correctly.
You should upgrade or use an alternative browser.
You should upgrade or use an alternative browser.
100 SERIES DOCUMENTED BUILD; step by step
- Thread starter H E A V Y M E T A L
- Start date
This site may earn a commission from merchant affiliate
links, including eBay, Amazon, Skimlinks, and others.
More options
Who Replied?I'm just going to put these here to defend my position on getting sliders first:

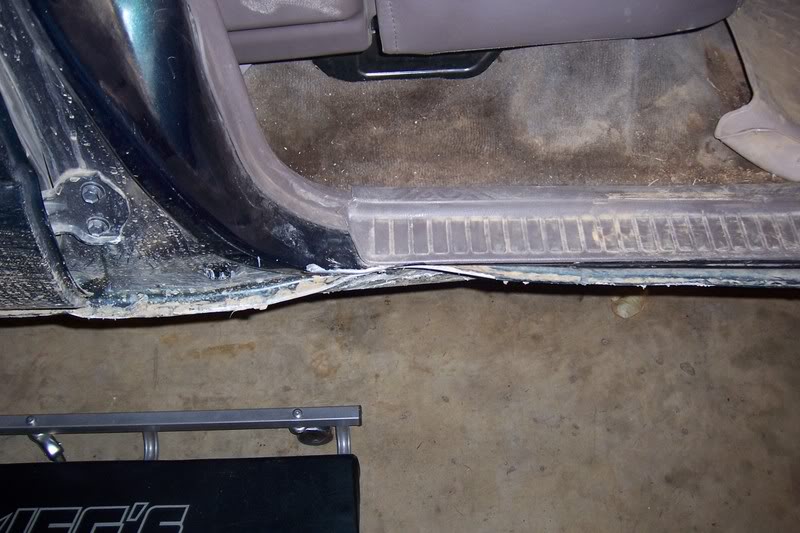
You state you plan to go "FULL Slee Mode"... That's 35 inch tires right? If so, you need to tackle the suspension, IFS relocation bracket and other related stuff in order to fit the big tires. And if you put the big tires on I guess you are planning to get into the rocks, so definitely Sliders first and then the rest of the armor (don't forget undercarriage armor).
What size tires do you have on that picture you posted?
What size tires do you have on that picture you posted?
sliders and then beer
- Thread starter
- #25
OOOOooooOOOHHhhhhhh man thanks for that rock solid evidenceI'm just going to put these here to defend my position on getting sliders first:


I'm in the first stages of my build as well. I removed old running boards first. Reindexed tbars second. Have one slider on now and doing the other tomorrow. Then rear suspension and bumper.
I should definitely document everything from here on seeing this thread.
After all the heavy hard wear is on (bumper, roof rack) I'm regearing, putting in the compressor and adding the front locker.
Keep the posts coming!
I should definitely document everything from here on seeing this thread.
After all the heavy hard wear is on (bumper, roof rack) I'm regearing, putting in the compressor and adding the front locker.
Keep the posts coming!
- Thread starter
- #27
GUYS!!!!! DUDE, DUDE, DUDE........DUUUUDE two jumbo pallets of awesomeness.
my goodies showed up (they actually came a week ago- I am just opening them now)

my goodies showed up (they actually came a week ago- I am just opening them now)
- Thread starter
- #28
the opening

- Thread starter
- #29
LOOK AT THIS!


schwing!LOOK AT THIS!
Okay, the sliders...not as cheap as I thought. His CL ad said $200. I texted him "$200 Installed?" and he replied "OK". I got there, got them welded on, handed him $200 and he said that was the price of the sliders, and it was an additional $150 for install. I just said okay, and I will be sending him a check for $150 in a week or so, once I have the cash. However, I will be doing my own fab work from this point forward. While I know I'm probably in the right, it just wasn't worth it since I have a few friends that have used this same guy for fab work. Don't feel like burning a bridge. Plus, $350 for sliders, welded on, is about right. Not like I got ripped off, just paid more than I anticipated.
But I will fab my own stuff. Metal is not cheap, but it is extremely inexpensive compared to what most fabricators charge (and rightfully so, it's a good amount of work). However, if you like to wrench and know how to weld, it makes for a relaxing afternoon (or couple afternoons) in the garage, and the satisfaction of saying "built, not bought". My welds aren't as pretty, so I'll be doing lots of grinding.
But I will fab my own stuff. Metal is not cheap, but it is extremely inexpensive compared to what most fabricators charge (and rightfully so, it's a good amount of work). However, if you like to wrench and know how to weld, it makes for a relaxing afternoon (or couple afternoons) in the garage, and the satisfaction of saying "built, not bought". My welds aren't as pretty, so I'll be doing lots of grinding.
Okay, the sliders...not as cheap as I thought. His CL ad said $200. I texted him "$200 Installed?" and he replied "OK". I got there, got them welded on, handed him $200 and he said that was the price of the sliders, and it was an additional $150 for install. I just said okay, and I will be sending him a check for $150 in a week or so, once I have the cash. However, I will be doing my own fab work from this point forward. While I know I'm probably in the right, it just wasn't worth it since I have a few friends that have used this same guy for fab work. Don't feel like burning a bridge. Plus, $350 for sliders, welded on, is about right. Not like I got ripped off, just paid more than I anticipated.
But I will fab my own stuff. Metal is not cheap, but it is extremely inexpensive compared to what most fabricators charge (and rightfully so, it's a good amount of work). However, if you like to wrench and know how to weld, it makes for a relaxing afternoon (or couple afternoons) in the garage, and the satisfaction of saying "built, not bought". My welds aren't as pretty, so I'll be doing lots of grinding.
sounds like a good deal compared to what i have seen online...pics?
- Thread starter
- #35
You state you plan to go "FULL Slee Mode"... That's 35 inch tires right? If so, you need to tackle the suspension, IFS relocation bracket and other related stuff in order to fit the big tires. And if you put the big tires on I guess you are planning to get into the rocks, so definitely Sliders first and then the rest of the armor (don't forget undercarriage armor).
What size tires do you have on that picture you posted?
33's on there now. I wasn't planning on going bigger; I still have to load kids in there. BUT... now that you called me out I feel inadequate without 35's. you think I can still claim full slee or should I go 3/4

HAHA That's funny! I've been traveling in an 80 series with 33 inch tires for a lot of miles and didn't really have a problem that I couldn't solve with a winch..
I will be setting my own 100 with 33 " as it is my DD and do feel the truck rides better with the 33s. I was just asking as I though your rig looks very nice with those tires. They actually look bigger than a 33".
I will be setting my own 100 with 33 " as it is my DD and do feel the truck rides better with the 33s. I was just asking as I though your rig looks very nice with those tires. They actually look bigger than a 33".
33's on there now. I wasn't planning on going bigger; BUT... now that you called me out I feel inadequate without 35's.
- Thread starter
- #37
ok guys I have officially broke ground on the build.
step 1: (this is step one for SLEE lift kit)measure vehicle all for wheels to fenders
LF: 21 1/4 RF: 20 3/4
LR: 23 3/4 RR: 22 3/4
(fyi- I put it in "HI" mode before I started, not a SLEE requirement)
wow I knew I had ahc problems, cruiser raises and drops all the time, super harsh in the front, but wow that is a 3 inch difference. I am taking everything off with the intent to sell the system/components to whom ever wishes for ahc items.
next step: ahc-overview
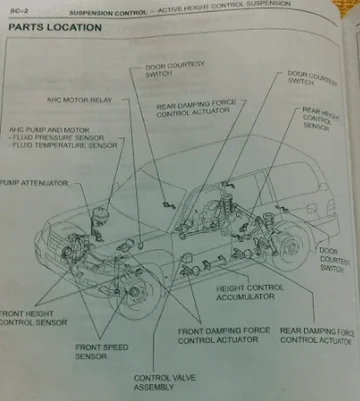
drain & remove accumulator from under drivers door and (4) actuators from all four corners on the frame rails and finally remove reservoir, pump and motor. after draining, use SST or a flare wrench to remove all the lines and unplug all connections. I soaked everything with penetrant prior.
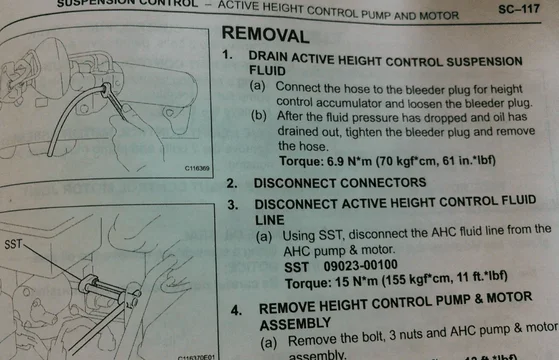


This may take a few days but I am ok with that. I am stepping through the removal process according to the manual (so glad I bought them).
The fluid is definitely under pressure and will make a mess- a long bleed hose down into your drain pan will help
step 1: (this is step one for SLEE lift kit)measure vehicle all for wheels to fenders
LF: 21 1/4 RF: 20 3/4
LR: 23 3/4 RR: 22 3/4
(fyi- I put it in "HI" mode before I started, not a SLEE requirement)
wow I knew I had ahc problems, cruiser raises and drops all the time, super harsh in the front, but wow that is a 3 inch difference. I am taking everything off with the intent to sell the system/components to whom ever wishes for ahc items.
next step: ahc-overview

drain & remove accumulator from under drivers door and (4) actuators from all four corners on the frame rails and finally remove reservoir, pump and motor. after draining, use SST or a flare wrench to remove all the lines and unplug all connections. I soaked everything with penetrant prior.


This may take a few days but I am ok with that. I am stepping through the removal process according to the manual (so glad I bought them).
The fluid is definitely under pressure and will make a mess- a long bleed hose down into your drain pan will help
PM sent
- Thread starter
- #39
The exterior system has been removed (I have some under dash work left- cover that later)
 these bolts are no joke, I almost light fire to the vehicle and called my insurance.
 go out and buy a 12mm flex head ratchet wrench. you will thank yourself later for doing it. I used this little gem on almost everything I removed.
 the rear shock removal is very hard and time consuming, patience my friends. use the 12mm and 1/16 turns at a time and forever later the 12mm bolts will come off
 seriously be patient
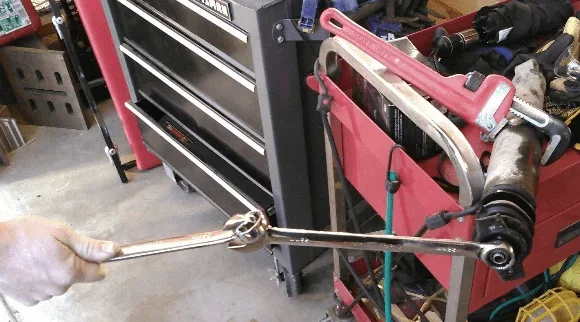 for the large 22mm nut on top of the shock use a 22mm 12 point wrench. You can hook on another wrench on the end of it and make it a breaker bar.
 these bolts are no joke, I almost light fire to the vehicle and called my insurance.
  go out and buy a 12mm flex head ratchet wrench. you will thank yourself later for doing it. I used this little gem on almost everything I removed.
 the rear shock removal is very hard and time consuming, patience my friends. use the 12mm and 1/16 turns at a time and forever later the 12mm bolts will come off
 seriously be patient
 for the large 22mm nut on top of the shock use a 22mm 12 point wrench. You can hook on another wrench on the end of it and make it a breaker bar.
- Thread starter
- #40
so the lift looks pretty good so far
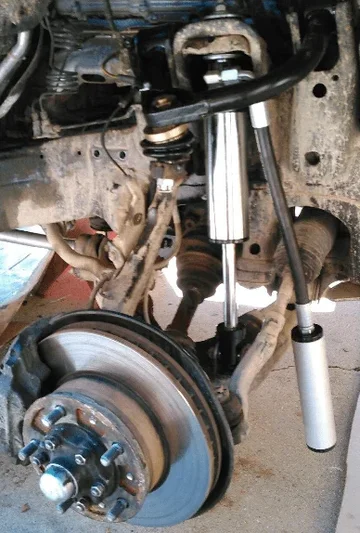 the control arms are pretty straight forward, just follow the directions
now the torsion bars were a different story, there was much debate over how to count splines. which side to start on, etc. ultimately I am still only 80 % on how we put them in. but they are easy to change position. They are counted and located the same as stock bars.


 front bumper is easy if you follow slee and Toyota manual.
 the control arms are pretty straight forward, just follow the directions
now the torsion bars were a different story, there was much debate over how to count splines. which side to start on, etc. ultimately I am still only 80 % on how we put them in. but they are easy to change position. They are counted and located the same as stock bars.


 front bumper is easy if you follow slee and Toyota manual.
Similar threads
Users who are viewing this thread
Total: 1 (members: 0, guests: 1)
