
Navigation
Install the app
How to install the app on iOS
Follow along with the video below to see how to install our site as a web app on your home screen.
Note: This feature may not be available in some browsers.
More options
You are using an out of date browser. It may not display this or other websites correctly.
You should upgrade or use an alternative browser.
You should upgrade or use an alternative browser.
My UZJ40 Build - 2UZ iForce V8 and a750f 5spd auto (4 Viewers)
- Thread starter UZJ40
- Start date
This site may earn a commission from merchant affiliate
links, including eBay, Amazon, Skimlinks, and others.
More options
Who Replied?Sub'd this build is incredible! Can't wait to see how it all comes together!
- Thread starter
- #84
My god man! That guy who builds Icons has nothing on this.

How long is your rear drive shaft? What about e-brakes?

Thanks Eddy, I appreciate it. My rear drive shaft is about 19.5". I'm not too concerned about a mechanical ebrake, being that I have an auto with PARK. But, just in case, I do have an inline line-lock for short time periods on steep hills.
Absolutely awesome build and story. Hang on to them both - they are keepers !
Thank you tmarx. I believe you are the one that sent me measurements from your triple wipers. It worked out great!
Awesome build!!!! Love the mix between old school looking and modern features!
Thank you, that was my goal with the project!
Sub'd this build is incredible! Can't wait to see how it all comes together!
Thanks, I'll update the thread soon with a lot more pictures and info!
I'm considering that lizard skin ceramic coating for the underside of my roof. Comes in white. Wonder if that would help with the heat much since there is so much glass.
I actually coated the underside with the ceramic coating. It gets so hot out here in Vegas, I definitely wanted to at least try it. I'll post my results here in a few months when it heats up.
Excellent thread. Wish I had your skills and patience. The 2UZ/5 speed combo in my 100 series is awesome and can't think of a better performer for the 40. Be interested to see in your build thread how you handled the frame supports as I just had to correct what the PO did for my 350/NV4500 setup
I will post some pictures of the mounting soon. I agree about the 2UZ/5spd. We have an o3 4Runner V8, and I love the combo. It is perfect in my opinion.
top quality stuff here. thanks for sharing and motivating everyone
any reason you added flares instead of leaving the rear fender line stock?
Mostly to piss off purists... did it work?
......Just kidding.... I really wanted 35's, and I'd be extremely upset if I crunched my rear fender. In general, I do not like flares, but I think they look good on this 40 with all of the other black accents. Believe me, I went back and forth for months before I cut them. When I finally decided to, I knew I couldn't be sober when I did, so I drank a few beers and grabbed the grinder. I'm glad I did though, i wouldn't change it now. Plus, we have a stock 67, so if I really want to drive something that's more original, I can.
- Thread starter
- #85
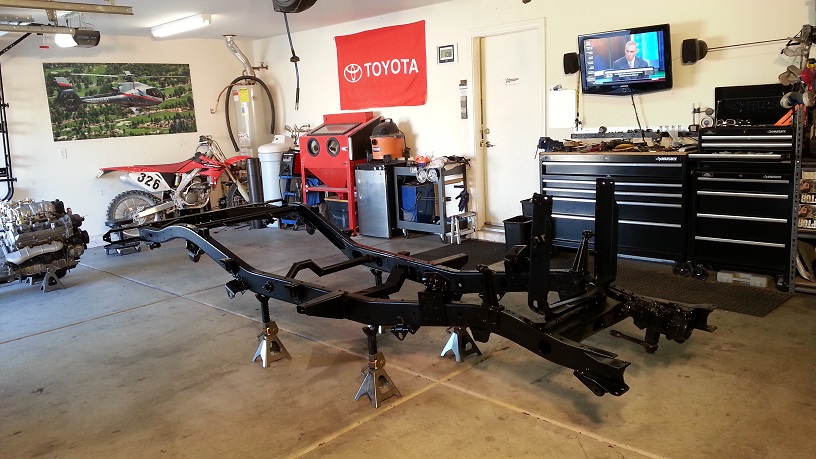
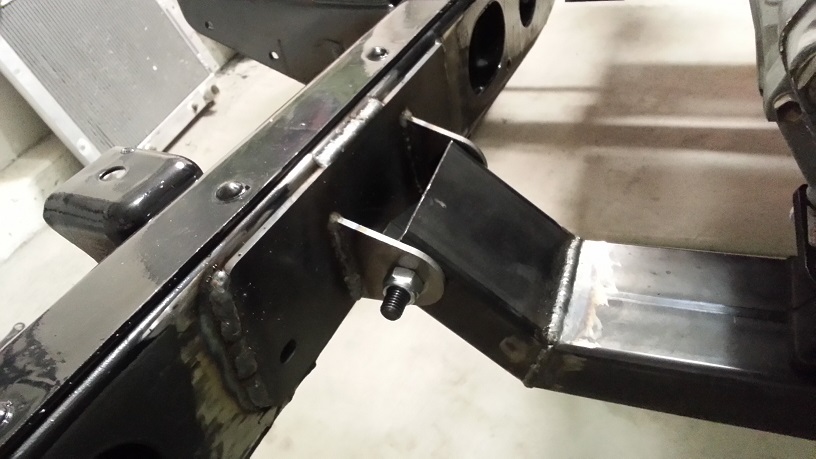
While the body shop had the body, I was able to spend some time on the frame. Fortunately, the Tundra engine mounts are the exact same width apart as the 40 frame is wide. But if I set the engine down on the Tundra mounts, it sat a bit low. I made some spacers and reinforced the sides of them with 1/4" steel.
I posted this picture in the first post, but this is ground zero. You can see the motor mounts:

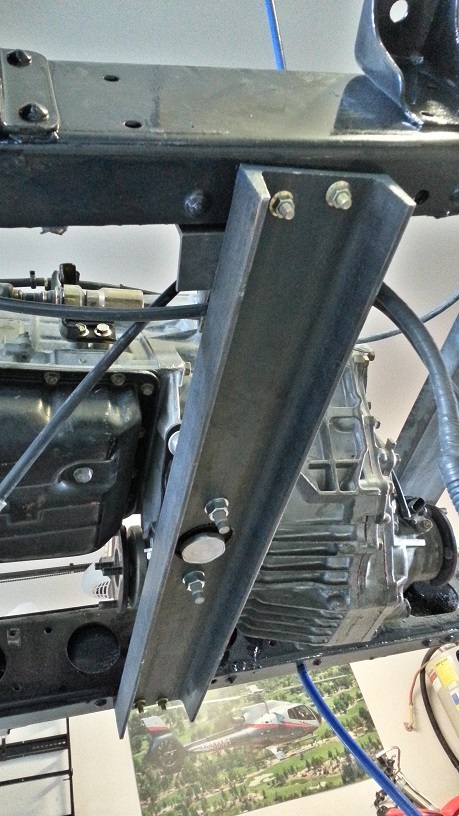
I also had to make a transmission support, as well as remake a cross member since I had to cut the factory piece out.
I temporarily supported the transmission with a piece of C-channel while making the motor mounts. To cushion the transmission, I used the OEM Toyota rubber mount.
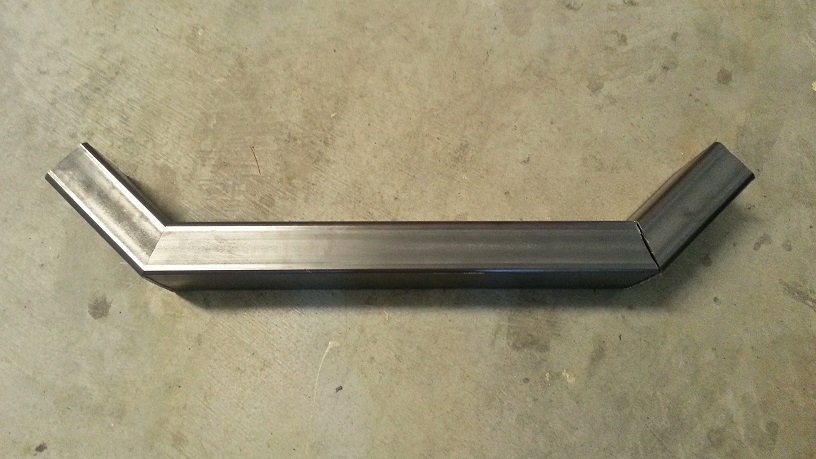
I used 2x4 boxed steel for the support:
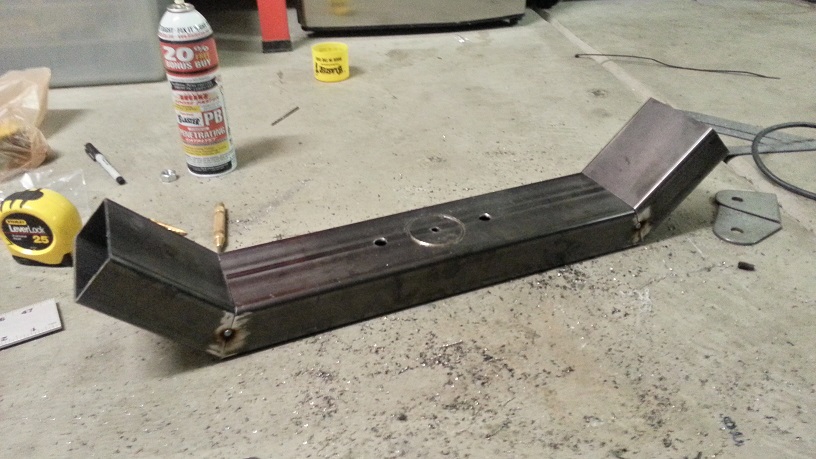
Tacked and cutting the holes for the OEM rubber mount:
Welded into place:
And the new cross member reshaped to go up and around the 100 series output flange:
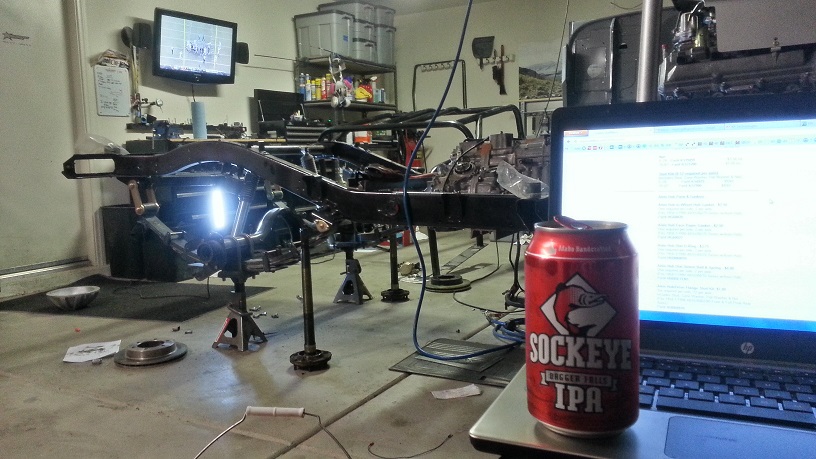
Redoing axle seals, browsing the internet, drinking a beer, and watching football. What a perfect day....
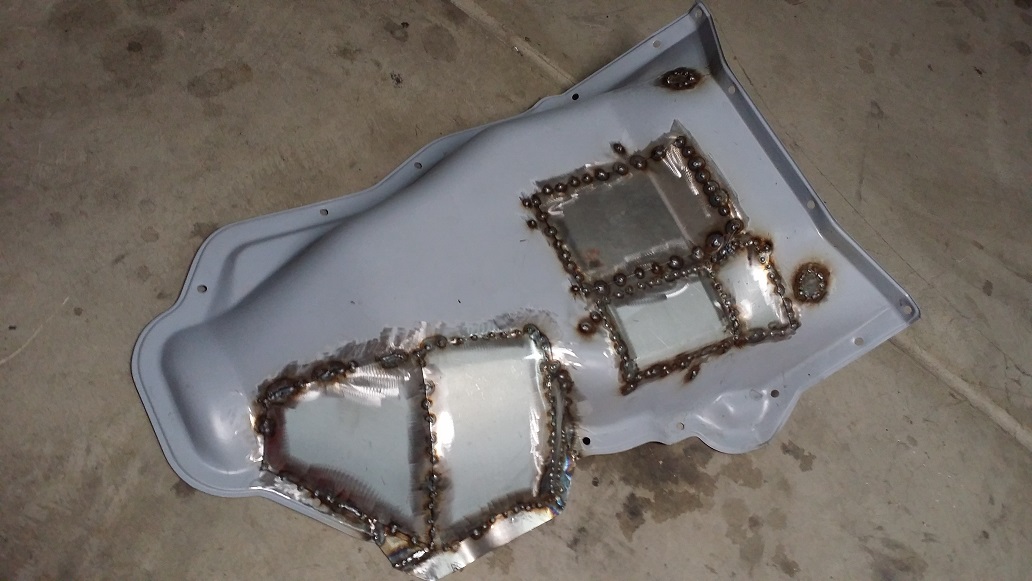
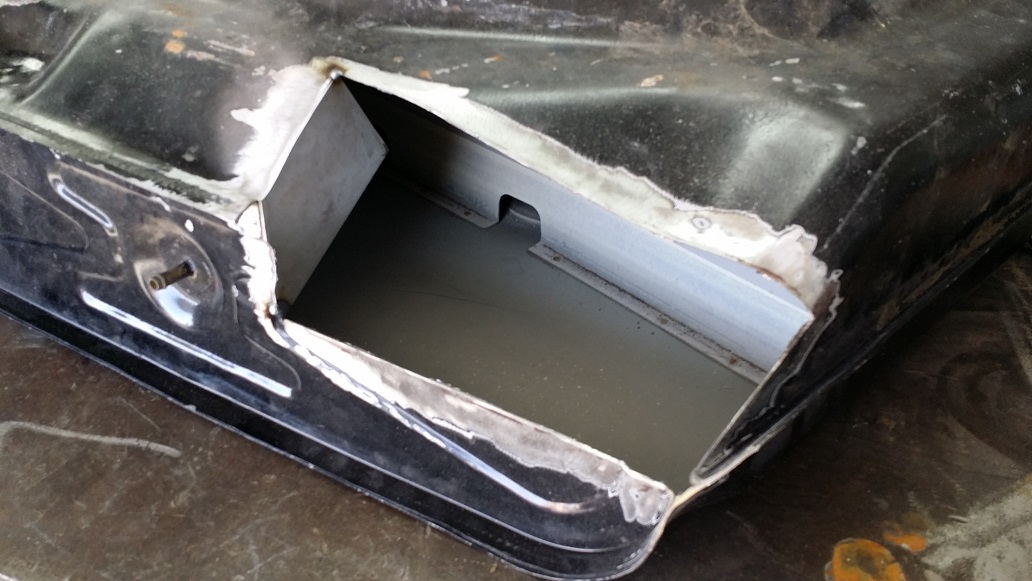
Because of the size of the 100 series transfer case (the electronic actuator, to be specific), I had to clearance the transmission tunnel, as well as the fuel tank. Also, I would no longer have shifters on the floor, so I filled in the hack jobs created by the PO.
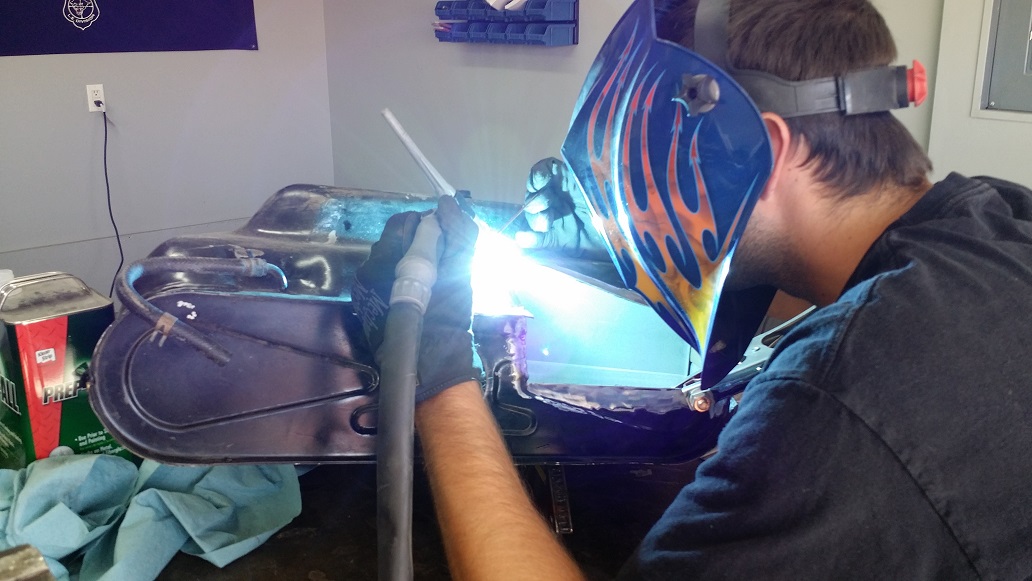
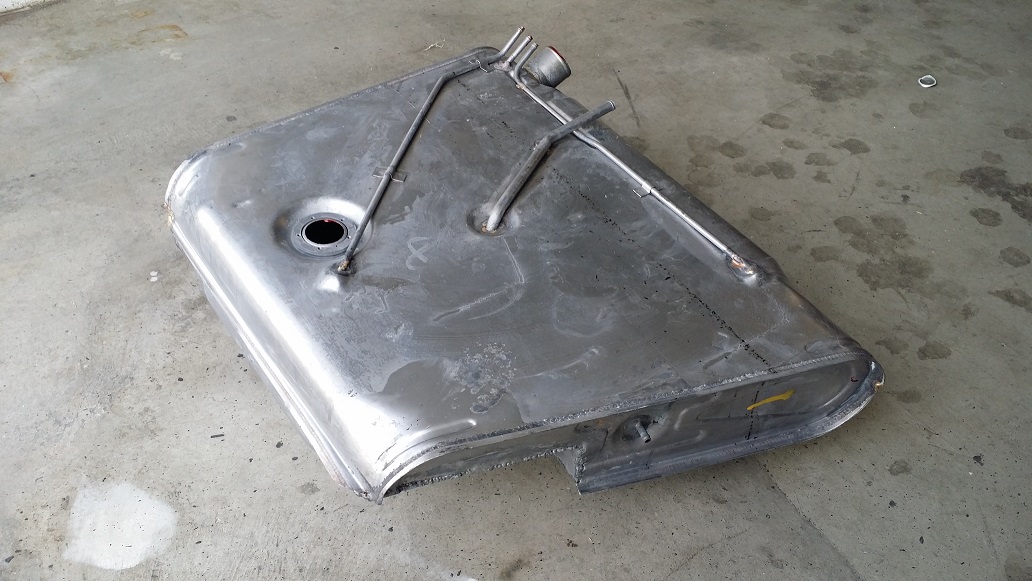
Freshly cut fuel tank (I got lucky, VERY clean tank inside):
My helpful neighbor TIG'ing it up for me:
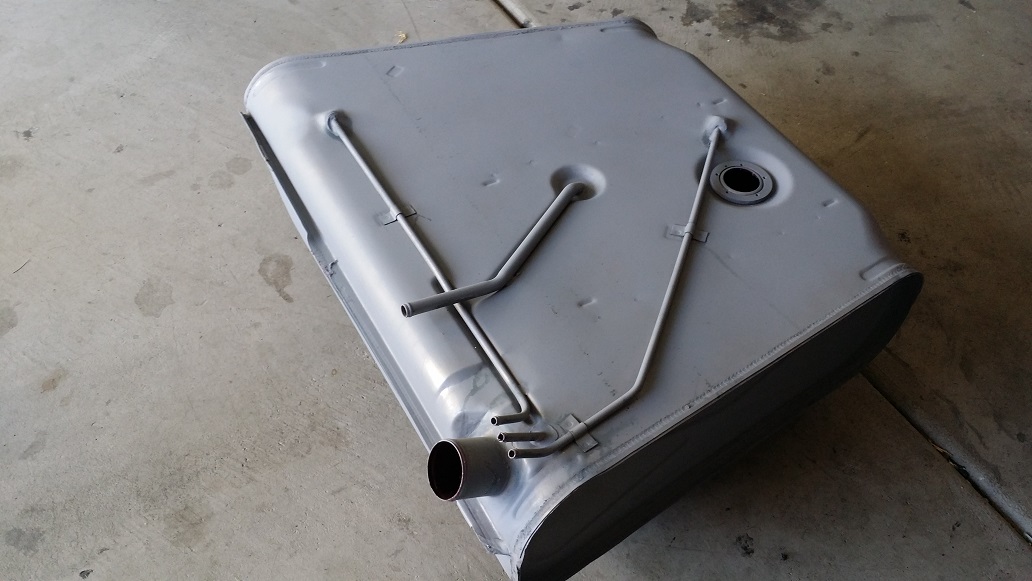
I then had the tank dipped and sealed to plug any pinholes:
Fresh coat of primer and looking good!
I posted this picture in the first post, but this is ground zero. You can see the motor mounts:
I also had to make a transmission support, as well as remake a cross member since I had to cut the factory piece out.
I temporarily supported the transmission with a piece of C-channel while making the motor mounts. To cushion the transmission, I used the OEM Toyota rubber mount.
I used 2x4 boxed steel for the support:
Tacked and cutting the holes for the OEM rubber mount:
Welded into place:
And the new cross member reshaped to go up and around the 100 series output flange:

Redoing axle seals, browsing the internet, drinking a beer, and watching football. What a perfect day....
Because of the size of the 100 series transfer case (the electronic actuator, to be specific), I had to clearance the transmission tunnel, as well as the fuel tank. Also, I would no longer have shifters on the floor, so I filled in the hack jobs created by the PO.
Freshly cut fuel tank (I got lucky, VERY clean tank inside):
My helpful neighbor TIG'ing it up for me:
I then had the tank dipped and sealed to plug any pinholes:
Fresh coat of primer and looking good!
Last edited:
- Joined
- Sep 25, 2011
- Threads
- 84
- Messages
- 3,631
- Location
- Harbour City, the New Southern Wales
- Website
- www.freewayoneentertainment.com
How do you feel about plating the ends of the trans member?
- Thread starter
- #87
For gauges, I was originally going to used a Racepak to display everything. Luckily, Dakota Digital had just come out with the FJ40 dash. Right when I saw it, I knew it would be a part of my build. I called Scott Johnson at Dakota Digital immediately to reserve a unit. I got in on the first production run... I couldn't wait to use it!
I also order a few expansion modules for it. I ordered a pressure module, allowing 3 additional inputs. I can now monitor my air pressure in my on board air tank, as well as my fuel pressure on the LCD screens.
Another module I got was the voltage/amperage. In addition to the voltage analog gauge, I can see the voltage on my second battery as well, by scrolling through the LCD screens. I am using the Blue Sea 7622 ACR to control my dual battery setup, and the Dakota gauges to monitor it.
Lastly, I got a fan controller. I will be using an electric fan since I will have A/C. This module turns the fan on when the A/C is on, as well as turns the fan off at a specified MPH. You can also select the temps to turn it off and on.
I can't say enough good things about Dakota Digital. From their customer support, website, packaging, quality of products, ease of use, etc. I'm extremely happy I bought their setup!!! Look how big their shipping box is compared to the cluster!


Last edited:
- Thread starter
- #88
I had to have so interior panels made, so I contacted a local shop that had set up my ARB lockers. He had a Burntable, so I knew he could cut exactly what I needed. The shop name is Nefarious Customs in Las Vegas. Incredibly talented and nice owner. I'd highly recommend him for any type of fab work!
I sent him measurements for:
Center console
Dash pieces
Door panels
Speaker pods
I also gave him the layout of how I wanted everything on the center console. The finished products were amazing.
Center console measurements:
Finished up:
Door panel (1/4" aluminum):
Speaker pods for back corners:
Dash pieces:
You can see I powder coated my OEM gauge cluster bezel and glove box door to match everything else. The finish on the interior panels also matches the finish on my dash box:
Before anyone asks my about my switches (and why I have so many).....
From left to right:
MAIN BATT (off/on/off) Middle is OFF, down is ON, up is ACCY position
AUX BATT (off/on/off) Middle is OFF, up and down positions manually control the Blue Sea ACR
ENGINE START (off/momentary on) Self explanatory
DOOR LOCKS (momen on/off/momen on) Self explanatory
WIPERS (on/off/on) Middle is OFF, down is LOW, up is HIGH
WINDSHIELD WASH (off/momentary on) Self explanatory
FAN for heat/AC (on/off/on) Middle is OFF, down is LOW, up is HIGH
A/C (on/off) Engages A/C compressor
LIGHTS (on/off/on) Middle is OFF, down is PARK lights, up is PARK and HEADLIGHTS
LIGHT BAR (on/off) 40" Rigid combo light bar
OFF ROAD LIGHTS (on/off) Under vehicle LED's
The top row of switches on the center console are for windows/vents. The middle row are for:
AIR COMPRESSOR
CENTER DIFF LOCK
FRONT LOCKER
REAR LOCKER
And then of course, heated seats behind those.
A couple notes on the wiring of the switches-
No, the vehicle will no start with the power button and and engine crank pressed. A key with the appropriate chip must be next to the key transponder in the vehicle.
When the vehicle is unlocked, the backlighting on the BATT switch illuminates. Once the BATT switch is pushed, the HEADLIGHT switch illuminates. Once the HEADLIGHT switch is pushed in either position, the rest of the dash and instrument cluster illuminates.
When the headlights are off, the LED light bar is controlled by the LED light bar switch. But when the headlights are on AND the LED light bar switch is pushed on, the LED light bar will only illuminate when the headlights are in the high beam position.
The locker switches are wired how ARB likes them set up. The lockers will only actuate if the compressor is on. The front locker will only engage if the rear is already engaged.
I sent him measurements for:
Center console
Dash pieces
Door panels
Speaker pods
I also gave him the layout of how I wanted everything on the center console. The finished products were amazing.
Center console measurements:

Finished up:

Door panel (1/4" aluminum):

Speaker pods for back corners:

Dash pieces:

You can see I powder coated my OEM gauge cluster bezel and glove box door to match everything else. The finish on the interior panels also matches the finish on my dash box:

Before anyone asks my about my switches (and why I have so many).....
From left to right:
MAIN BATT (off/on/off) Middle is OFF, down is ON, up is ACCY position
AUX BATT (off/on/off) Middle is OFF, up and down positions manually control the Blue Sea ACR
ENGINE START (off/momentary on) Self explanatory
DOOR LOCKS (momen on/off/momen on) Self explanatory
WIPERS (on/off/on) Middle is OFF, down is LOW, up is HIGH
WINDSHIELD WASH (off/momentary on) Self explanatory
FAN for heat/AC (on/off/on) Middle is OFF, down is LOW, up is HIGH
A/C (on/off) Engages A/C compressor
LIGHTS (on/off/on) Middle is OFF, down is PARK lights, up is PARK and HEADLIGHTS
LIGHT BAR (on/off) 40" Rigid combo light bar
OFF ROAD LIGHTS (on/off) Under vehicle LED's
The top row of switches on the center console are for windows/vents. The middle row are for:
AIR COMPRESSOR
CENTER DIFF LOCK
FRONT LOCKER
REAR LOCKER
And then of course, heated seats behind those.
A couple notes on the wiring of the switches-
No, the vehicle will no start with the power button and and engine crank pressed. A key with the appropriate chip must be next to the key transponder in the vehicle.
When the vehicle is unlocked, the backlighting on the BATT switch illuminates. Once the BATT switch is pushed, the HEADLIGHT switch illuminates. Once the HEADLIGHT switch is pushed in either position, the rest of the dash and instrument cluster illuminates.
When the headlights are off, the LED light bar is controlled by the LED light bar switch. But when the headlights are on AND the LED light bar switch is pushed on, the LED light bar will only illuminate when the headlights are in the high beam position.
The locker switches are wired how ARB likes them set up. The lockers will only actuate if the compressor is on. The front locker will only engage if the rear is already engaged.

Last edited:
Riley,
Looking awesome man, couple more questions.
What did you use for LED parkers/indicators on the front - just LED bulbs?
I see you have power windows - what are the two centre power window switches on your console used for?
In Australia, we never got the lower dash pads - do you mind sharing your measurements so I can see if your solution is a viable option?
Cheers,
Dan
Where did you get the switch covers? I'm trying to find them for doing wipers, headlights, etc.
- Thread starter
- #91
Riley,
Looking awesome man, couple more questions.
What did you use for LED parkers/indicators on the front - just LED bulbs?
I see you have power windows - what are the two centre power window switches on your console used for?
In Australia, we never got the lower dash pads - do you mind sharing your measurements so I can see if your solution is a viable option?
Cheers,
Dan
Dan,
Yes, just LED bulbs for the front park/ind.
The two center switches are for the rear vent actuators. This is the reason I have 77+ hard top sides, I specifically wanted the vent windows. Here's a video of them in action!
I can take some measurements for you within the next few days.
Thanks!
Where did you get the switch covers? I'm trying to find them for doing wipers, headlights, etc.
All switches are from OTRATTW.com They have many logos on hand, but a few of them ones I wanted, I actually sent them. The options are almost endless with the types of switches, lighting, covers, etc. Look around on their website, you'll love it. My switches are laser etched Contura V's. Contrura is the same company that make the ARB locker switches.
Awesome stuff, Riley!! Glad you are so readily sharing the mystery behind how you made all this work!!
I already knew you loved the wiring side of this... now, I see just how much you loved the wiring side of this build!!
I already knew you loved the wiring side of this... now, I see just how much you loved the wiring side of this build!!
See!! Automated vent windows!! I still have to get out, walk around, open the back and open the vent windows... I'm worn out!!
JohnnyC
Long ago TLCA# 2231
You are making great progress !
Good help is hard to find... The combined age of my helpers (all 4) don't add up to one of yours lol
I've been looking into many a great build these days on Mud ... And this is one... Look forward to seeing yours done
Love to see interior pictures of dash and console at night when it's done... It's going to look great!
You are blessed in many ways
- Thread starter
- #95
Now that I got the body back, it was time to put it back on the frame for the first time in almost 6 months! Also mounted the Metal Tech Jackson cage. What an awesome product that is... I'm really glad I got it!
Fender flares and 4+ side steps on, as well as 4+ rear bumper. Onyx is approving the new seats also...
And a few of the body panels. Its starting to look like a car again!
Some painted bits, powder coated bits, and the JW Speaker headlights.
Engine cover on, BTB brake booster on, steering shaft in:


Fender flares and 4+ side steps on, as well as 4+ rear bumper. Onyx is approving the new seats also...


And a few of the body panels. Its starting to look like a car again!


Some painted bits, powder coated bits, and the JW Speaker headlights.

Engine cover on, BTB brake booster on, steering shaft in:

Last edited:
Cement Gray looks as good on your 40 as it does on the Trail Teams FJC ... sweet colour, and the black accents are a great contrast ... 
- Thread starter
- #98
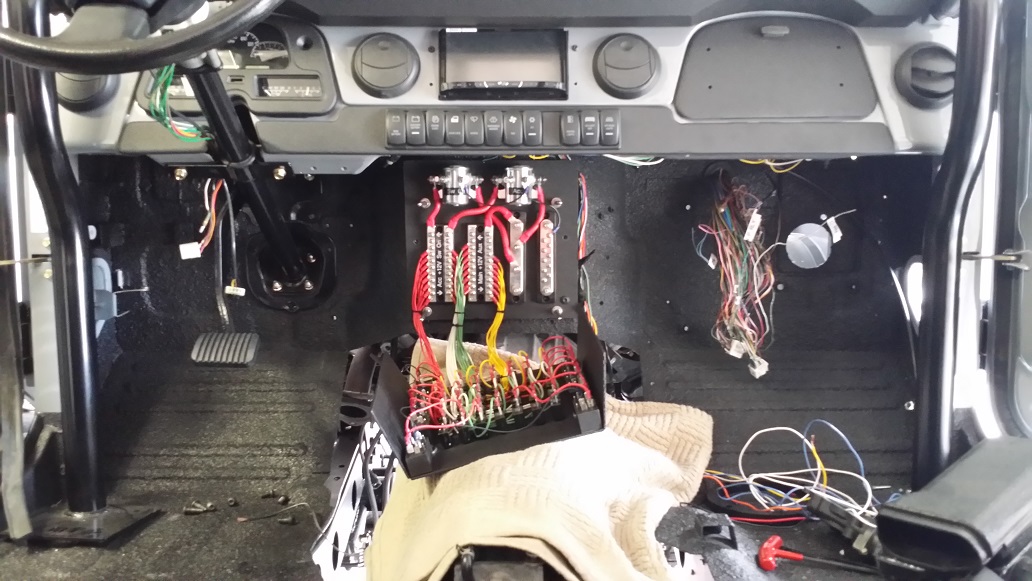
Speaking of wiring, Danny, here we go!
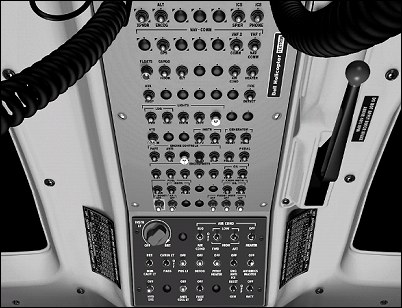
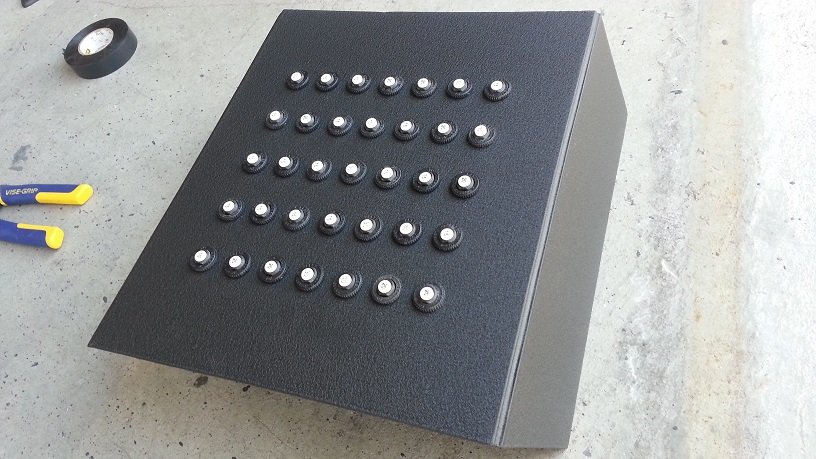
I did not want any fuses in the vehicle, only circuit breakers. There's nothing worse than not having a fuse when you need it! I also like the look of aircraft interiors with circuit breaker panels:
Bell 407 helicopter panel:
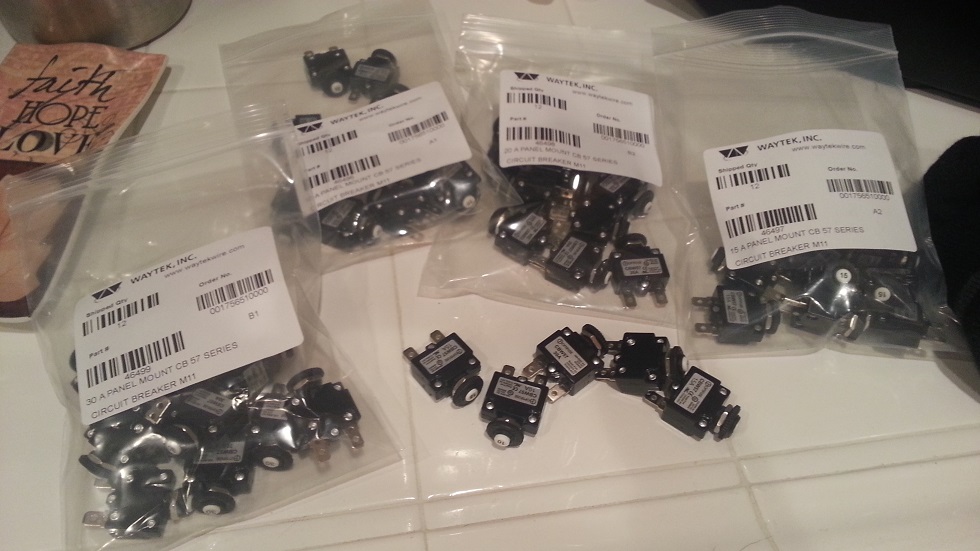
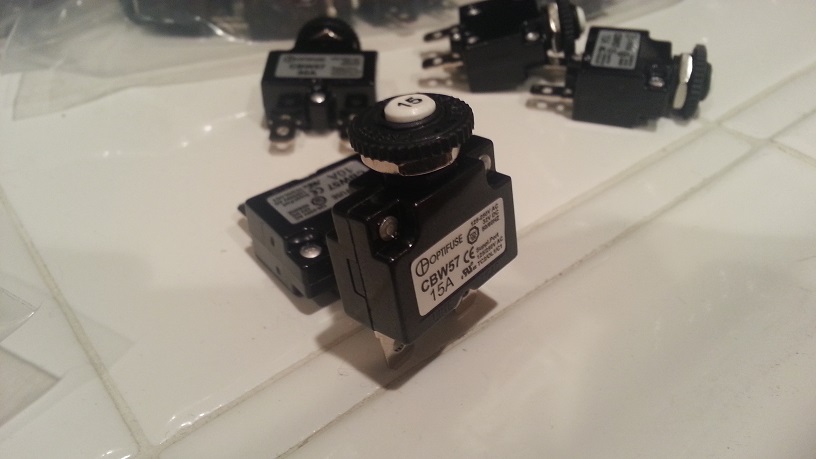
I bought some circuit breakers from the company I buy all my wiring from. Anywhere from 10a to 40a.
I decided to make my own, so I used my metal brake and bent some aluminum and drilled holes:
And powder coated to match the rest of the interior, or course:
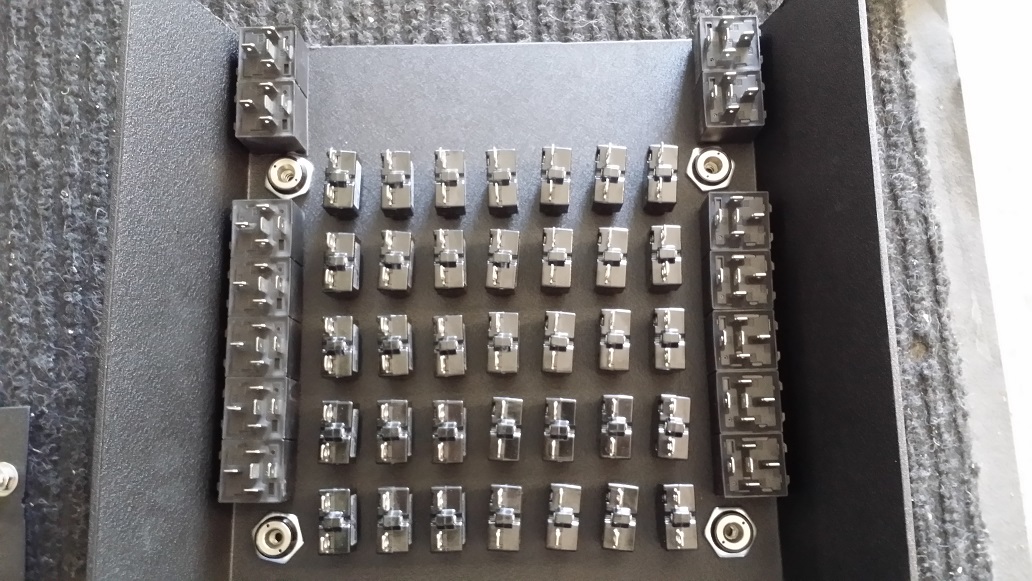
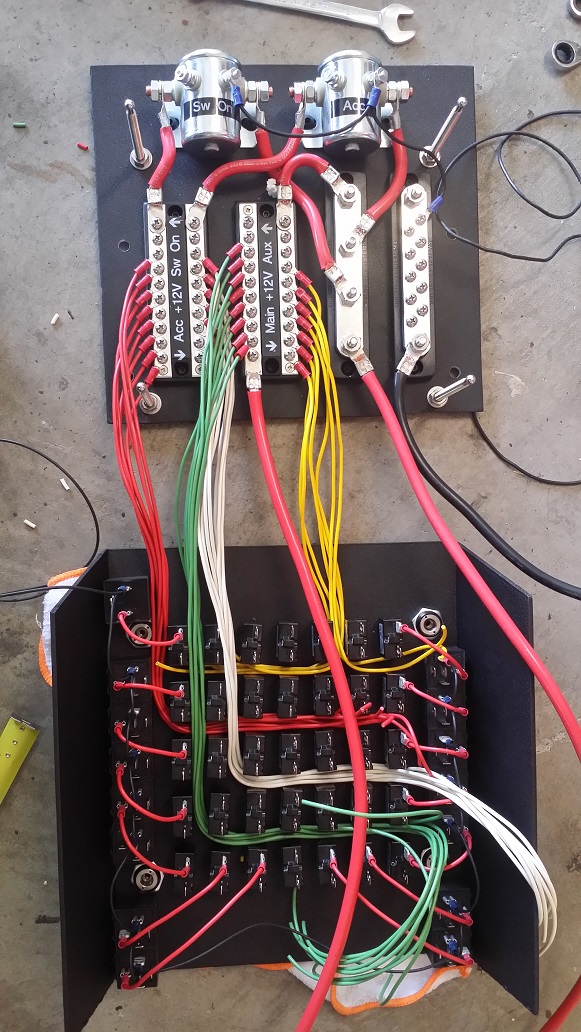
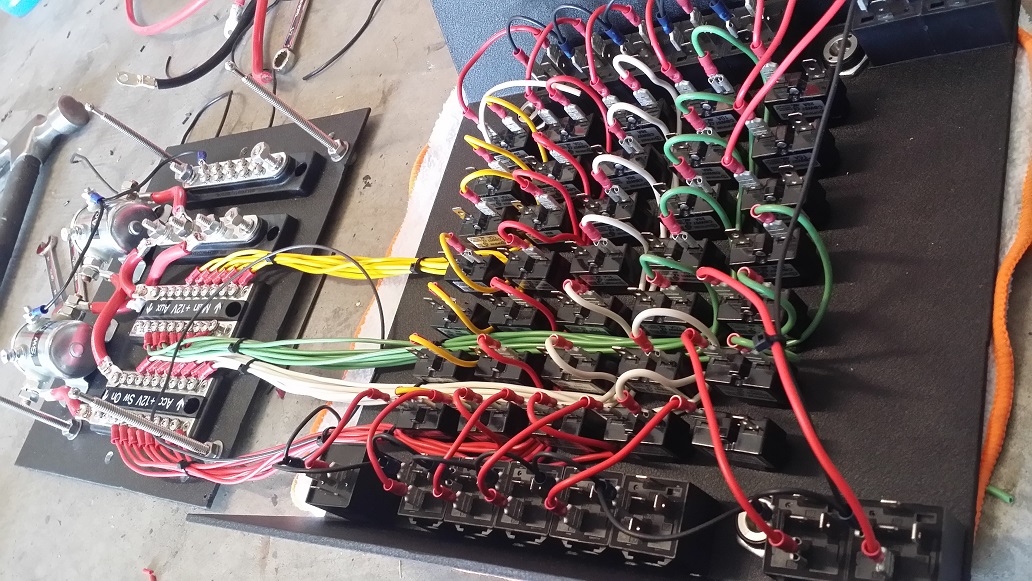
The inside of it. Circuit breakers on the inside, and relays lining the outside:
The reason the sides of the panel are bent back is to hide the main piece of the electrical system. The circuit breaker panel attaches to the back panel, shown below.
Two continuous duty solenoids energize different bus bars. They are all labeled. Far left is BATT switch in ON position. Second from left is ACC position. 3rd left is constant power from main batt, 4th left is constant power from aux batt. Far right is ground bus.
The four posts on the outside corners support the circuit breaker panel:
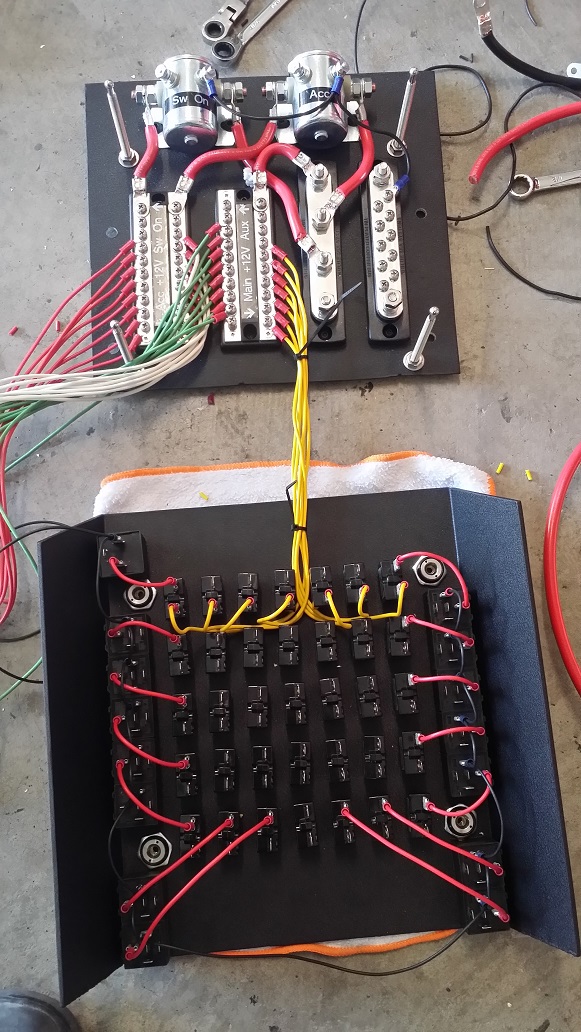
Dropping wires down to the circuit breakers.
YELLOW = Constant main batt
RED = ON position main batt
WHITE = ACCY position main batt
GREEN = Constant AUX batt
Cutting to length and connecting:
Circuit breakers and relays energized:
And, both units together and mounted on the firewall:
For those of you wondering, I used these http://www.quik-latch.com/ in anodized black to secure my door panels and circuit panel. They are awesome!
I did not want any fuses in the vehicle, only circuit breakers. There's nothing worse than not having a fuse when you need it! I also like the look of aircraft interiors with circuit breaker panels:
Bell 407 helicopter panel:
I bought some circuit breakers from the company I buy all my wiring from. Anywhere from 10a to 40a.
I decided to make my own, so I used my metal brake and bent some aluminum and drilled holes:

And powder coated to match the rest of the interior, or course:
The inside of it. Circuit breakers on the inside, and relays lining the outside:
The reason the sides of the panel are bent back is to hide the main piece of the electrical system. The circuit breaker panel attaches to the back panel, shown below.
Two continuous duty solenoids energize different bus bars. They are all labeled. Far left is BATT switch in ON position. Second from left is ACC position. 3rd left is constant power from main batt, 4th left is constant power from aux batt. Far right is ground bus.
The four posts on the outside corners support the circuit breaker panel:
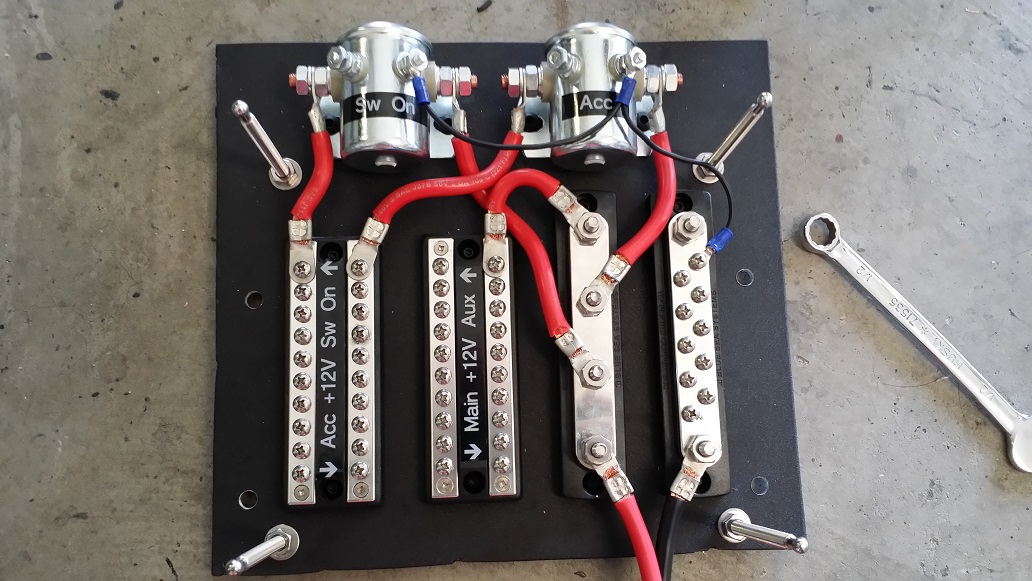
Dropping wires down to the circuit breakers.
YELLOW = Constant main batt
RED = ON position main batt
WHITE = ACCY position main batt
GREEN = Constant AUX batt
Cutting to length and connecting:
Circuit breakers and relays energized:
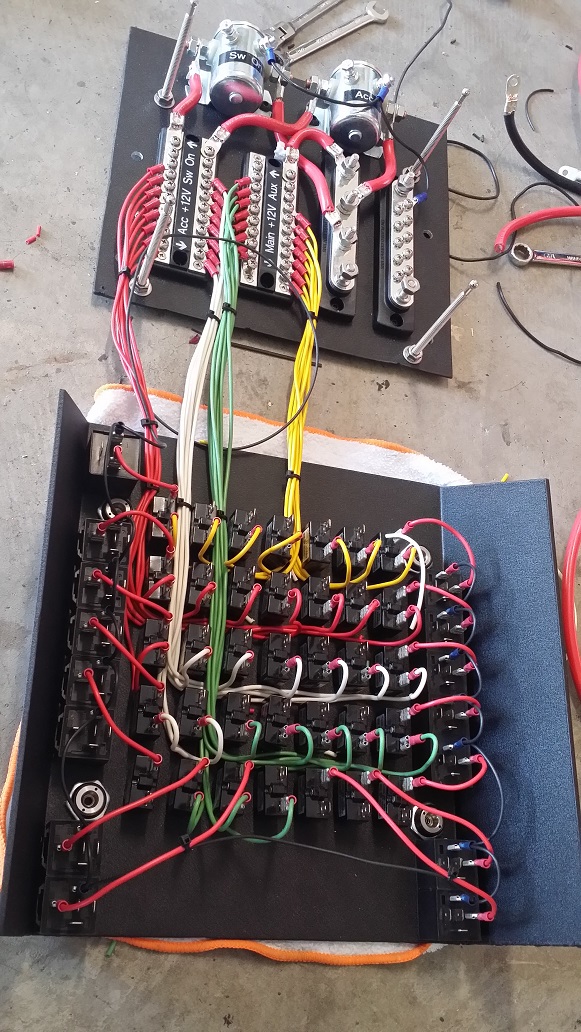
And, both units together and mounted on the firewall:
For those of you wondering, I used these http://www.quik-latch.com/ in anodized black to secure my door panels and circuit panel. They are awesome!
Last edited:
Tigerstripe40
SILVER Star
DAMN! Killer build!
This is what the FJ Cruiser SHOULD HAVE BEEN!
This is my dream 40.
This is what the FJ Cruiser SHOULD HAVE BEEN!
This is my dream 40.
- Thread starter
- #100
Cement Gray looks as good on your 40 as it does on the Trail Teams FJC ... sweet colour, and the black accents are a great contrast ...
Thanks! I am happy with it! People either really like or really hate the color. It's actually fun to have a controversial and bold color choice.
Where did you find the black mirrors?
The heads are OEM mirrors from Sam Stewart. I lightly sand blasted them, primed them with plastic primer, then painted them. Hopefully it holds up... time will tell. The arms are OEM that I had powder coated with all of the other bolt-ons.
Similar threads
Users who are viewing this thread
Total: 5 (members: 0, guests: 5)