Builds 1987 FJ60 Expedition Build (2 Viewers)

This site may earn a commission from merchant affiliate
links, including eBay, Amazon, Skimlinks, and others.

I remember doing that job, it was a super hot weekend and all that reflective aluminum turned my 60 into an easy-bake oven!:bang: At least you had a nice shady garage! It was totally worth it though, it does make it noticeably quieter.

Can't wait to see that diesel! :clap:
 
What type of sound deadening did you use? That's next on my list... Your truck looks great. Ours are very similar:

image.jpg
 
What a Nice Clean RED 60! I would like my RED 62 looks as clean as yours in a year or two !

Where did you purchase the sound deadener at and is it thicker than Fat Mat?
 
What a Nice Clean RED 60! I would like my RED 62 looks as clean as yours in a year or two !

Where did you purchase the sound deadener at and is it thicker than Fat Mat?

I purchased the deadener at my local hardware store. After trying every major retailer like Home Depot, OSH, Lowes, etc. I finally decided to try my small local store. Sure enough, they had stuff that was even BETTER than what I was looking for.
 
Nice 60. For what ever reason, I would prefer a two tone color on a 60 then red. Guess it is just me. BTW, the under componets look nice!! I built a compressor frame for a old AC compressor for air. The problem is, it keeps cracking. Ever consider doing the same? I need to replace my bumper "It bent" and then make a new bumper. I may even enclose it and turn it into a Air compressor tank.
 
Nice 60. For what ever reason, I would prefer a two tone color on a 60 then red. Guess it is just me. BTW, the under componets look nice!! I built a compressor frame for a old AC compressor for air. The problem is, it keeps cracking. Ever consider doing the same? I need to replace my bumper "It bent" and then make a new bumper. I may even enclose it and turn it into a Air compressor tank.
I plan to make my rock sliders air tight and make them air tanks for when I buy a compressor for lockers and tires. I have a friend with a plastic welder who could make me up some custom water tanks to fit into my bumper spaces. The other option I have been thinking of is to move my spare tire, and replace the space with a long range fuel tank and a small water tank.
 
What did you do over the wheel wells? Got a pic of it? I put deadened on mine and the OEM covers didn't really fit very good.
 
What did you do over the wheel wells? Got a pic of it? I put deadened on mine and the OEM covers didn't really fit very good.
The deadener wasnt especially thick so it didnt cause much of a problem. I will admit it doesnt look quite as clean as before where the cover goes up the wall and tucks under the clamp strip. may adjust it so that it looks perfect where it climbs the wall, and then cover the actual wheel well in carpet or rubber matting. My covers are pretty beat up as it is so I think I may do a slight rebuild as far as the wheel well covers are concerned.
 
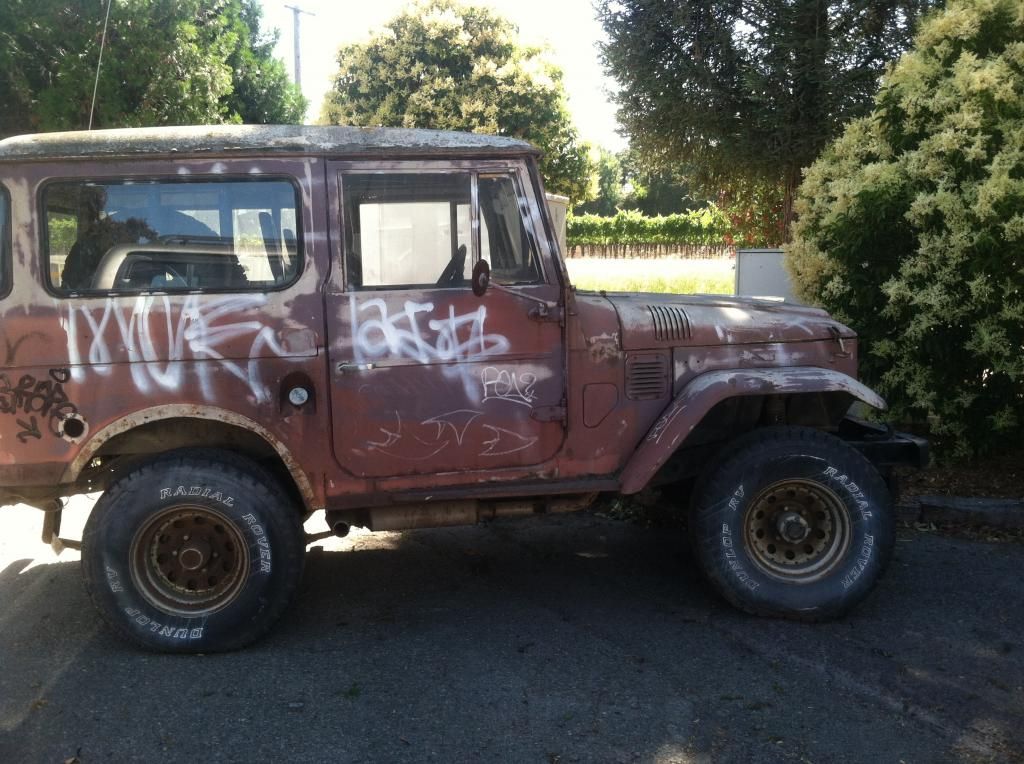
For those of you that live in the bay area and have ever driven down 19th avenue in San Francisco; Here is the FJ40 that didnt move for YEARS. I thought it would be my first 40 some day....... but someone else got it first. It showed up at the shop the other day. We have our work cut out for us.......

 
In other news:

THE SWAP BEGINS TOMORROW!

Prepare for nightly (or nearly nightly) updates!

My general timeline
-Friday June 27 - Begin pulling 2F

- Prep and pull as much as possible

-Monday/Tuesday June 30-July 1 = Engine arrives!
-July 1- July 9= Drop in the 12HT!!!!

My mission is to get the car drivable (Basically road worthy) by the 9th....... Fingers crossed.
 
Well. Theres no going back now. Got started pulling the 2F.
By the end of the day the
-Alternator was out
-Fluids drained
-Radiator and AC out
-Battery out
-Hood off
-Bellhousing disconnected from transmission
-Engine unbolted from motor mounts (its just resting there now)
-Carb fan is out
-fuel lines removed and drained
-Started pulling apart the dash

More to come in the next week!

 
For those of you that live in the bay area and have ever driven down 19th avenue in San Francisco; Here is the FJ40 that didnt move for YEARS. I thought it would be my first 40 some day....... but someone else got it first. It showed up at the shop the other day. We have our work cut out for us.......

ha,totally have seen that rig there for years, they must have just pulled that thing out of there recently, I just saw it there?!!?
 
Good stuff, keep the posts coming! :D


...via IH8MUD app
 
Day 2!!!

- Engine is OUT!
- All lines and pipes are sealed with silicon
- Power steering drained
- Engine sitting on blocks in storage
- Engine bay de-greased and prepped
- Front chassis and engine bay STEAM CLEANED

Other news
-Custom awning and work bench fabricated......

If you guys want to see the time lapse of day 2 just ask. I have it made I just have to post it to youtube and link it. I can drop it in a later post or do a massive lapse at the very end.

Unfortunately my camera cut out minutes before we actually pulled the engine :bang: soooooo ya that sucked.

Regardless, Im getting so stoked for this diesel! Engine delivery date was pushed back AGAIN.... so as of now Ill be doing the swap in 4 days... TIME CRUNCH

The engine bay and chassis had paint missing, and spots of rust. I might run to the paint shop next door and get a color matched rattle can to do some touch ups here and there. The steam cleaner was AMAZING. It got everything so unbelievably clean.

I hope everyone likes the custom garage.


This last picture gives a great contrast to BEFORE and AFTER with the steam cleaner. We just hit that one spot of lower fender to show how well it works

 
Man... I know that 40 and I'm from Oregon. Had a girlfriend that lived on 19th that I dated for a couple years.

Good job on the pull. Delivery delay gets you time to really clean up the engine bay.
 
Well the first day of the swap is done. Im completely worked so Im not going to upload pictures just now.

Basically I got the engine unloaded, the old exhaust cut off before the first mounting bracket (some idiot welded the exhaust to the flange so I cant use it.... I pulled apart the dash, swapped the gauges (except the speedo cause thats mechanical) got all the parts lined up, and started mounting/fitting the clutch components.

I had to do some real digging at the shop to find the bolts I needed, and we custom built some parts that the seller failed to include (For example the pivot stud inside the bellhousing that the clutch fork pivots on). Not only that but the seller didnt remove the tach sensor from the automatic trans, nor did they remove the sheet metal plate that goes between the engine block and the bellhousing preventing dust and rocks from being sucked into the clutch assembly...........

Regardless, both parts are on their way in the mail, and Gary (aka Mudrak) let me borrow the shield plate off another cruiser that needed work.

After that I learned that the only clutch part that isnt compatible is the clutch fork. I should have researched it more heavily but for some reason I anticipated it being the same. Regardless, we ordered one from toyota.

While the parts make their way to the shop I started working on cleaning up the engine. I got the "pipes" (air and exhaust pipes that cross over the top) removed, washed, blasted, and clear coated to preserve their classic look. I also pulled the exhaust shields, blasted and painted them.

Tomorrow we will steam clean the engine, and set it in for its first test mount on the factory 2F body mounts to see what needs to be done.

IF ANYONE HAS MEASUREMENTS FOR THE CORRECT MOTOR MOUNT ADJUSTMENT FROM THE STOCK POSSITIONS, PLEASE LET ME KNOW! It would really help us have a starting point with less guesswork. Even just a "oh move the drivers side motor mount back 1.25" "

More pictures and info to come!
 
My suggestion is while the engine is out and bay is cleaned, go ahead and get the entire engine bay professionally painted. Get a few extra coats of clearcoat on the fenders. If you don't do the engine bay painting now, and get it looking great, you will regret it a couple years down the road. It's easier now then later. Especially with a spiffy looking diesel sitting in there. Paint it right!!
Jeff

Jeff you are absolutely right. But the fact is. I'm 17 and out of money.

I just have to do what I can with what I have. I know I'll regret it but I don't have a choice.
 

Users who are viewing this thread

Back
Top Bottom