Builds 1987 FJ60 Expedition Build (1 Viewer)

This site may earn a commission from merchant affiliate
links, including eBay, Amazon, Skimlinks, and others.

Great tip, hard about it before, but didn't know it could be that smooth and accurate.
I was worried the parts that needed paint would be contaminated with grease film, or do you clean the affected areas, the raised area with brake cleaner?
I've only used it for inside threads, welded nuts and such.

Thanks for the kind words, mate!
I miss it bigtime...
 
Finally made some serious headway on the swap!

I pulled apart my clutch components, and took it down to just the bell housing. No flywheel.
Then we got the forklift out and slid the engine into place. The old mounts were NOT going to work and weren't even close. So while the engine was in there, I took a sawzall to the mounts and cut em off. Then ground down the remainder of the mounts.
The removal and grinding of the motor mounts was probably the most annoying job so far. It took hours and was so uncomfortable. Regardless, got the mounts off, and started bolting the engine up to the transmission. That took much longer than expected but it got done.
Once it was all bolted up I tried measuring out the dimensions for the mounts. The real issue was I didn't know where the engine should sit in relation to the frame. I know it should be offset to one side a bit, and clearly toward the drivers side, but how much? I don't want to weld it all in there, throw on my fan and shroud and realize it won't fit..... So basically what I did was let the engine hang from the chain while connected to the trany, line it up as best I could so the edge of the oil pain stayed parallel to the frame, blocked it there, and built some motor mounts out of cardboard.

Today I'll get the cardboard models to Chris our fabricator, and he'll weld em up for me and tac them to the frame. Then I'll do a couple final checks and we can weld em in for good! And I can finally pull all the jacks and blocks out from under the engine!

Once that's done I'll pull the engine again and put it on a pallet. Then assemble the whole clutch, put it BACK in for real, line it up, bolt it up, and it's time to plug everything in!!!!!!
Iv got my friend Jeff to help me out. He's an actual pro with diesels so I'll take a lot of photos.
 
ImageUploadedByIH8MUD Forum1404925153.132068.jpg


ImageUploadedByIH8MUD Forum1404925172.743865.jpg


I also got the radiator painted up and it's lookin goooooood
ImageUploadedByIH8MUD Forum1404925193.231636.jpg
 
Since the radiator was out of an automatic vehicle, and has those two extra holes and bottom independent cooler that I won't need, iv been thinking about turning it into a hot water system down the road! It might me 2,000 degrees though, but in theory I could run water through it and get hot water for a shower or something

Any thoughts?
 
I think your hot water system is genius. But like you said it might be too hot.
Thanks! Iv been playing around with another idea. So maybe what I could do is plumb the system from a draw hose (a flexible rubber hose that I could toss in a river or pond with a filter on the end) to a pump, then down to the radiator holes, then back to the front or rear bumper where there could be a T, the T would be fed by both cold water direct from the river, and the scalding hot water from the radiator, they could mix and bring the temp down a bit. What would be cool is if I barely passed any water through the radiator, but still had a hot shower!
I think I'll give it a shot once the diesel is in. It would be a super fun project for sure!
 
Nice, good looking progress!
Do you use a stock crossmember to line it up at the rear, or do you eyeball it?
From what i can remember, the 12ht was not in a parallel line to the frame, but i might be wrong.

Shower system trough rad sounds great, i don't think the water will be too hot, that loop on the rad is thin, and not very long.
If you circulate it, it will be quite hot after a while, depending on the volume of your loop.
For example ten liters of water for a shower can just be ciculated until you find it comfy, or even mount a gauge to monitor it.
 
I'm loving this thread. I love your enthusiasm. I just bought an hj60 as well and coulndn't be happier
 
Another day down! Making serious progress.
I got the cardboard templates made up for the motor mounts, and Chris welded up the first one for me.
ImageUploadedByIH8MUD Forum1404971977.825117.jpg


It fits absolutely perfect, and those welds are gorgeous!

I got the second template cut out, and was about to weld it up when I grabbed the wrong piece of metal and burned the crap out of my hand
ImageUploadedByIH8MUD Forum1404972069.677534.jpg


That stopped my progress for a while cause the pain was unreal.
But then the UPS guy came and EBERYTHING got better!! I got my fork, my plate cover, AND my tach sensor. Then came the Toyota guy with my trany parts and my 80 series throttle cable.

^the cable that came with the 12HT was for a right hand drive so it wouldn't reach across the engine. 80 series run on the same throttle system with a long cable to make the span. So I got me one.

Tomorrow's plan:
Get the motor mounts welded to the frame, and let the engine rest on its own. Unbolt it, and pull it out. Assemble clutch components and replace the engine for a final time. And finally start plugging stuff in!!!
 
I'm loving this thread. I love your enthusiasm. I just bought an hj60 as well and coulndn't be happier

Im so glad you like it. I really love doing this stuff and I enjoy sharing it just as much. If it wasn't for the guys on Mud, I wouldn't have even attempted or known how to attempt this. The support is greatly appreciated!!!
 
Nice, good looking progress!
Do you use a stock crossmember to line it up at the rear, or do you eyeball it?
From what i can remember, the 12ht was not in a parallel line to the frame, but i might be wrong.

Shower system trough rad sounds great, i don't think the water will be too hot, that loop on the rad is thin, and not very long.
If you circulate it, it will be quite hot after a while, depending on the volume of your loop.
For example ten liters of water for a shower can just be ciculated until you find it comfy, or even mount a gauge to monitor it.

I left the trany in the truck the whole time. I never removed it or the crossmember so that helped with alignment quite a bit.
I ended up testing with the fan, and since it passed just fine and nothing else would really be affected if it was out of alignment, I just blocked it and got it set for welding. Worst case I add shims or adjust my fan shroud.
We'll see but I think it's going to work fine.
 
Ok. Tough day on the swap. The most trying by far. One of those days you just want to walk away for a week and come back later but know you gotta be back tomorrow.

I got the mounts on, and the engine bolted in. It was sitting just a tad crooked and off line but everything was working so I didn't care.
Then came the struggle of putting in the new clutch, flywheel, and clutch fork.
We had two options, 1: take the engine out, or 2: drop the trany and tcase.
Eventually the motor mounts made the choice for us. The studs on the mounts were at such an angle that the engine couldn't be lifted out without cutting off the mounts id spend hours measuring and building. The engine was in to stay.
So we decided to drop the trany.

To describe our work space, it's dirt and gravel floor with about 3 layers of cardboard. The sides of the car are hemmed in with junk and the walls of the ally. Very little space to move and by no means is there a lift.

We propped the trany and tcase up on a floor jack, dropped the drive shafts and lowered the trany with the crossmember and tcase attached.
Then we assembled the the clutch components and flywheel. We bolted up the bell housing and were ready for the trany.

Today was one of the first days I had any help. My friend Chris helped me all day and I really couldn't have done it without him. It's so tough doing some of this stuff solo.

So when we tried to get the trany in, it was so heavy and awkward, and we had so little space to move, and so few angles from which to pull or lift, that we fought to raise the trany for over 3 hours.

Finally, after numerous attempts with a floor jack, bottle jacks and more, we found a good plan.

We hoisted each end of the cross member by a floor jack, with cable ties through the holes to secure it somewhat. Then the bulk of the tcase and trany were supported at the rear by a third (only partially functioning) floor jack.

The whiled system would be lifted to the desired height, angled for approach, and slowly crawled forward by pry barring each jack a centimeter at a time. Finally the input shaft was lined up with the clutch fork. After another hour the trany input shaft had only 1.5 inches or so to go. We couldn't move it any farther. It was stuck.
The splines must have been off or something because we could NOT get it in.
We blocked it up, half way in the bell housing, and left for the day.
We were so exhausted and frankly disheartened it was hard to want to come back.
I'll be on my own again tomorrow, an I have no idea how I'll ever get this trany in.

Thoughts?

ImageUploadedByIH8MUD Forum1405057978.861105.jpg


Bellow is our system of removal.....
ImageUploadedByIH8MUD Forum1405058001.141218.jpg

ImageUploadedByIH8MUD Forum1405058094.530319.jpg
 
I got 2 bolts that threaded into the bell housing about 1-1.5 inches longer than the bolts you use to mount tranny. Then cut heads off and slotted the ends for a screwdriver to fit. Thread the bolt into the bellhousing, bottom 2 holes, get tranny lined up on bolts, slide in, bolt top 2 bolts, remove bottom long bolts, thread in the original bolts and, wahlah, tranny mounted.
 
Great day on the swap!!!
After a ton of work, me and 3 of the shop guys got the trany in. It was by far the biggest PIA I have EVER experienced.

We got it bolted up, and I lifted the trany and crossmember into alignment. Everything is now resting independently of any jacks or blocks for the first time. It looks great!

The engine is VERY angled toward the drivers side. Apparently the HJ61's had shifted crossmembers to straighten it out.
I don't have one so I have a crooked engine. But it works!!!! If anything the engine needs to be MORE crooked so the fan clears the shroud more evenly.

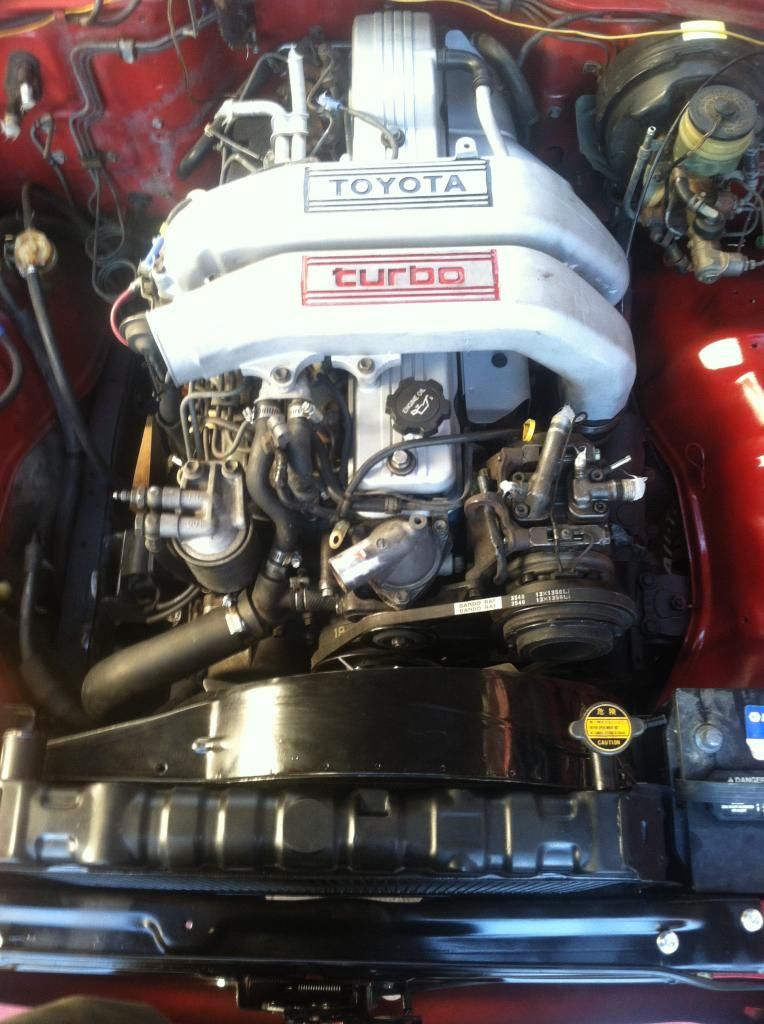
Regardless, all is in, and it's time to plug and wire!!!! I got the AC compressor on, aswell as the starter and new pedal assembly.

I need to double check how the belts are routed before I put the fan on.
Anyone have pictures???

I can finally see the light at the end of the tunnel. I think I could have this baby done by the end of next week.


I NEED PICTURES OF THE THROTTLE ASSEMBLY!!! Please. Anyone with a 12HT. I have to build this thing by hand and I don't want to be flying by the seat of my pants.

Oh I also got my tach sensor installed! Soooooo excited I don't have to live without a tach gauge
 
Good job man! I envy you right now with all that upgrade your doing to your 60. Are you driving it to Gold Lake?
 
Good job man! I envy you right now with all that upgrade your doing to your 60. Are you driving it to Gold Lake?
Thanks so much! Id really like to take it gold lake. I just want to be sure its all de-bugged before I take it wheelin up in a remote area.

Fingers crossed. If I can get it running and de-bugged by thursday, I think I could take it to Gold Lake. Id love to show it to you guys!!!! If I dont make it this year, Ill come next year.

I'm confident you'll make it, you've been moving pretty fast on this build! Were going to have enough collective cruiser knowledge up there to fix practically anything should something go funky on you! :lol:

Parts are getting ordered first thing Monday morning for my truck, hopefully they get to the shop by Wednesday. No more Toyota PS pump... going for waaayy overkill with a PSC pump. ($220 vs. $500 for a new pump from Toyota. with labor it shouldn't be too much more than a stock replacement lol.)
 
Finally nearing the end of the tunnel here guys.
I made some serious progress on the swap today. My dad finally came down to give me a hand and it was really awesome to have two guys workin on the rig.

Heres what we got done today:
-Connected front and rear drive shafts
-Put the AC compressor on
-Hooked up all the pulleys and belts
-Got the fan on
-Fan shroud in
-Radiator in and mounted
-Bottom radiator hose is on (Top one is awaiting pickup at NAPA)
-Air cleaner housing is blasted and painted
-Batteries are mounted

I also installed a new cable to pop the hood. Mine was super frayed and barely holding on.
I disconnected the rear heater lines, and pulled them from the bottom of the car. I never use my rear heater, and it would have taken a lot of work to plumb it up. I can always re-connect it, but for now, Im going to just use the front one, seeing as though it more than gets the job done. Unless I go to Alaska in the dead of winter with 3 passengers in the back seat, my front heater should fill my needs. I left the rear heater in, I just plugged the holes with silicon.


More to come on monday!

Tomorrow Ill pull apart the gauge cluster, and customize it.
 

Users who are viewing this thread

Back
Top Bottom