Betsy Build Thread (1 Viewer)

This site may earn a commission from merchant affiliate
links, including eBay, Amazon, Skimlinks, and others.

Finnyfam60

Driving miss daisy
Joined
Sep 21, 2011
Threads
62
Messages
2,459
Location
Dixon, Ca
Top o' the morning to ya!!

I figured I would put my build projects all into one thread instead of separates... This will be a quick first post since I just spent a half hour on a long intro post and it got deleted when I tried to upload a pic!!

She is affectionately named Betsy Ross by my sis in law, has 185k, original saggy springs, a new roof rack, and is getting a bumper today!

Which brings me to my current question: are there any issues with removing the rear crossmember? I know it is common practice, but what should I replace it with? Will it be ok to cut it out at work with the right tools and then drive it home (15 miles)? I will be installing a TG model 2 rear bumper, modified to fit the 60 width. Think this will be strong enough or should
I put in a crossmember (I have some 2x4 .188 wall, or some 1.5" 1/8 wall round tubing) in addition to the bumper...

Thanks guys!! And I will post up pics and a "catch-up" post soon!
 
Betsy Gets a Rear Bumper!

I guess I should have posted this up as its own "help needed" question/thread....

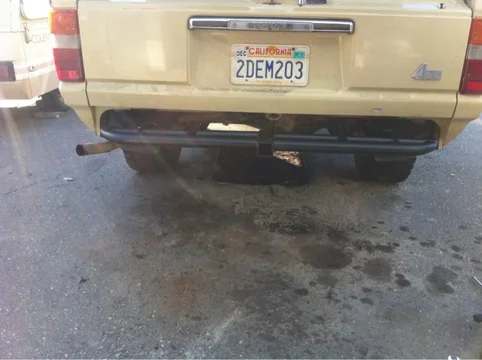
Anyhow, I went ahead and cut out most of the rear crossmember with a handheld bandsaw at work then drove it to sactown60's house and finished by grinding down rivets and air chiseling.... Chopped 2 inches off back of frame rails, smoothed down the top rear rivets on the body mounts, an got the bumper bolted in... It's off right now so I can paint it, but I'll post a halfway point pic.


image-1969260961.jpg

I should probably note at this point, if I haven't already, that this is the TG style #2 rear bumper (for a mid 80s 4runner). I surprised myself by really liking the style of this tube bumper, and the price is right!!

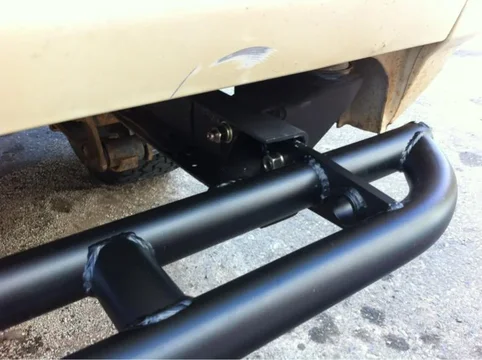
This will make more sense once I get pics of everything, but what I am doing to make it fit up is I cut off the wrap around fender protection right where they come off the main horizontal bumper section, because the bumper goes vertical there, and it is about 4inches too narrow (for the tailgate and for the fenders/total widths of vehicle). Cutting it here doesn't mess with the hitch (leaves it centered), as well as doesn't mess with the frame attachment points. On that note, those are stepped up which drops the bumper really low and they are really long, pushes bumper out too far. So I cut the mounting tabs off flush where they stepped up and they ended up being the exact thickness needed to thicken the mounts so they are snug against the inside of the frame rails!! The pre-drilled holes also ended up being the right spacing to straddle the supports that come in at an angle from the main bumper rails to the mounting tabs. Just clamped them in place, drilled the mounts to match the "spacer" plates, clamped it all to the frame and drilled. (side note, rigid cobalt drill bits are the best out there!)

Pics soon.....

:beer:
image-1969260961.jpg
 
Looks good so far, are you putting the receiver hitch back on under the bumper? I don't think cutting the rear cross member off is bad if you replace the structural integrity with the bumper and hitch.
Keep the pics coming!
 
Bumper has a hitch incorporated into it.


image-1702755386.png
 
Okay... Been a busy week but here is the main bumper center section and a quick handheld shot of where the corner protection will end up with a 2-3" piece of tube added...

Center section
image-4267292729.jpg


How it attaches
image-1808169159.jpg


How corners will look (approx.; obviously over a lil bit more for tailgate to clear! :beer: )
image-145642467.jpg
image-3525815093.jpg
image-4267292729.jpg
image-1808169159.jpg
image-145642467.jpg
 
Ya know it looks okay. Are you going to fill the gap above to the bottom of the tailgate? I like the wrap around, looks good. What is the thickness of the bumper tube? I would be tempted to add a diagonal from the inner frame to somewhere along the bumper towards the center for a bit extra rear protection.
But that's just opinion.
 
looks great!
 
Update: I've been moving and busy with work, ad will get back to giving Betsy some tlc soon....
 
Okay, it's been a month, and we've started to settle into our new place... Finally got enough of the garage cleared to get a vehicle in!
I've been inspired by the Machinist and yanked out the entire interior! It's been fun to get to the inside, besides the center console... Yanked the seats and the carpet, front kick panels and rear cargo panels.. Discovered evidence of a few mice nests and a few bare wires!! I think maybe the same people who did machinist's wiring did mine!!
Carpet "before" shots:
image-178235943.jpg


image-1996549704.jpg


Floor "before" shot:
image-2284195152.jpg

I ordered 50 sq. ft. of RattleTrap from amazan for $92 plus shipping, and can't wait to put it in... Just need to spend some time cleaning up the carpet and figure out what to do with my ratty-tat-tat driver seat....
I finally grew a pair and decided to try to address the rust in my right A pillar!

image-3618251689.jpg

I had the glass guy that was doing my wife's windshield pull mine out for me, and discovered some more cancer...

image-204238381.jpg


image-796990728.jpg

Talked with the glass man (can't say enough good things about this guy so far and I'll let you know how re-install goes. He's In the greater sacramento area, mobile, His name is Kevin (916) 802-6002. He uses Pilkington glass and Precision gaskets, and the same Dow window sealant: refer to spike strips thread on quality windshields professional installation) and he said he worked with a lot of body shops and could give me a good referral, so I got a referral from him and with a wild hair decided to have all the body work done!!!
Before shots:
image-4249439961.jpg


image-1371089301.jpg


image-4266900897.jpg


image-326114523.jpg


image-968398290.jpg

It was such a good price, i couldn't say no!!!
I spent some time doing a little prep in order to try to get the best estimate possible!! The body shop is going to scrape and reseal the gutter as well. I plan on spending some time blacking out the trim pieces while Betsy's body gets some augmentation!!

So, the big question of the day is: what color should I have her painted!!!???? Please please chime in!! I am leaning towards keeping it the original color. Or possibly white.... I will be using flat/low gloss black on all the exterior pieces (bumpers, grill, vents, rack, etc....)

Also, as a teaser for what's to come: my Mojave spring set and shackle reversal kit comes tomorrow via mudship!! There's a pair of 62 mirrors in the mail headed my direction as well!! Sliders sitting in the garage next to a tube bumper I may or may not use...

Fun times lie ahead!!!
image-178235943.jpg
image-1996549704.jpg
image-2284195152.jpg
image-3618251689.jpg
image-204238381.jpg


image-796990728.jpg


image-4249439961.jpg


image-1371089301.jpg


image-4266900897.jpg


image-326114523.jpg


image-968398290.jpg
 
Last edited:
YOU HAVE A TAN ONE AND YOU WANT TO PAINT IT A DIFFERENT COLOR!!!!! BLASPHEMY!!!
LOL... Sorry I am in love with the 464 color code (what you have) and have been looking for one for sale that is in decent condition. Unfortunately, other things have pushed back the purchase but when I do get one it will be the same color as yours, blacked out (tinted too) with black rims and good knobby tires.
 
Thanks guys!! I am definitely leaning stronger towards keeping it the same color!! Blacking out the pieces I have off it now, it already has matte black rims, 32" BFG A/T, and I missed the last groupon for window tint and will grab the next one!
 
No rust under pleather wheel well covers...
 
DB - "after" pics will definitely come! just need to get her back from shop (I talked him to such a good deal that he said he would only work on it at the end of the day each day, so might take 3 weeks or so... :(

Reevesci - Yep, same rig! I never got to putting those pics here so good reminder! (also, if you end up not using that grab bar you snagged recently let me know!!) here are some pics of the rack from rear, front and side showing the attachment setup i came up with...

image-1544900788.jpg


image-1070723836.jpg


image-4007665052.jpg


image-110101777.jpg


also, while I'm at it, here is a quasi list of what Ive done:

bought her:

image-993519625.jpg


custom fog light (and others) switches (in progress along with aux fuse panel):

image-2267343960.jpg


hood and rear hatch shocks:

image-1318959997.jpg


center console:

image-1648164238.jpg


intake/exhaust manifold (resurface and gasket(no comment pls pighead):

image-3965813737.jpg


vacuum lines:

image-1424291947.jpg


roof rack: pics above
rear bumper: in progress, as you saw
image-2267343960.jpg
image-993519625.jpg
image-3965813737.jpg
image-1424291947.jpg
image-1318959997.jpg
image-1648164238.jpg
image-4007665052.jpg
image-1070723836.jpg
image-1544900788.jpg
image-110101777.jpg
 
Last edited:
I'm glad to know I've been motivating people to re-vamp their interiors! :p

I've got the interior on mine half finished now, and will be getting back to the rear storage panels and rear carpeting soon. So far all the work on the sound deadening has paid off, its starting to sound like my Dad's 00' Suburban! I cant wait to have it all put back together again!
 

Users who are viewing this thread

Back
Top Bottom