
Torsion bars 101
FOR NON AHC VEHICLES
First some terms so the search function picks this up:
- help with torsion bars
- how to adjust torsion bars
- reindex torsion bars
This all went in Amy's thread but I thought those who weren't subscribes may like to see it.
Ok lets try get to the bottom off all of this for new readers and to try and clear some things up for old readers. Its been discussed a thousand times so here is my take on torsion bars.
To start off with I would like to say that if you sit and read through every thread on this site on torsion bars you are going to end up confused and not very confident about doing the job yourself, if however you get under your truck with some PB blaster, a 22 and 30mm spanner and get cranking you will start to understand how everything works very quickly.
1. Front shock install
2. The names of all the bits
3. How torsion bars work (from a dummy for dummies)
4. How to lift the front of your vehicle
5. How and why we measure droop
6. How to re-index the torsion bars
Here we go
Baaaaaaa
1. Front Shock install
From the top lip of the wheel cap to the fender (with empty tanks and no winch/bumper)
478mm = FR FL = 485mm
485mm = BR BL = 465mm
Now I’m going to start with the front despite the fact that the winch and bumper are not on. It is the easier of the two jobs with the shocks but the torsion bars seem to confudle most new members so I’m going to go through it very slowly with loooooooooots of photos.
If I get something wrong please correct me so others can learn from my mistakes, this will be my first time.
For the front I have bought 2 new Old Man Emu long travel Nitro Charger shocks. There were no torsion bars in stock, I will probably have to re index my stock ones and use them until I can get OME replacements.
To start off with I went and got myself some axle stands (yes yes yes… the brick lift is gone ) I took the opportunity to get myself some nut lock, WD40 (we don’t have PB blaster here) and a 22mm racketing ring spanner, do not underestimate the importance of any of these items. I also filled up both of my tanks.
I jacked the front up and placed the axle stands underneath, then the wheels came off and the jack was used to get the swing arm to the exact height to change out the shocks.
Once that was done (it really is a job) I decided to crank the torsion bars to their max to see what I could get out of them without having to re-index them (wasn’t in the mood for a huge job in this heat, and wanted to learn about how they worked before I re-indexed them).
I didn't get much out of the bolts (1 turn on the right and 2 on the left)
Considering the front bumper and winch are not yet installed and the back, which is currnetly at 485mm is going to go up by 3" I will be re indexing the bars ( I plan to have a 1" rake and 50mm droop as per recommendations)
It turned out that they didn't have enough thread in them to get them to the right height so I was in for some work to re-index the bars. I took the opportunity to educate myself and maybe a few others.
Torsion bars
2. The names of all the bits
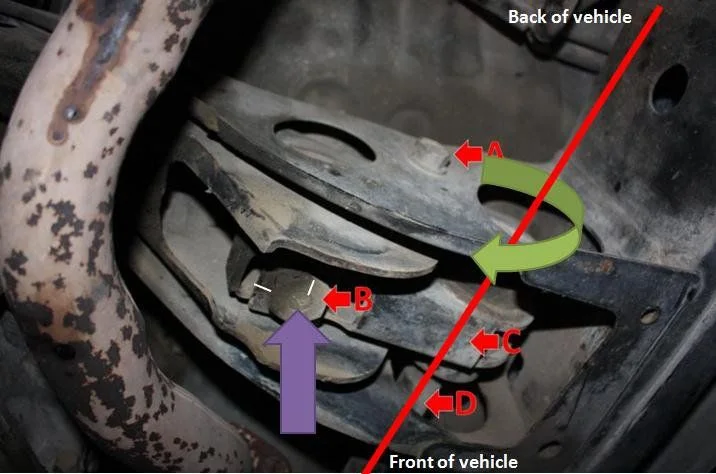
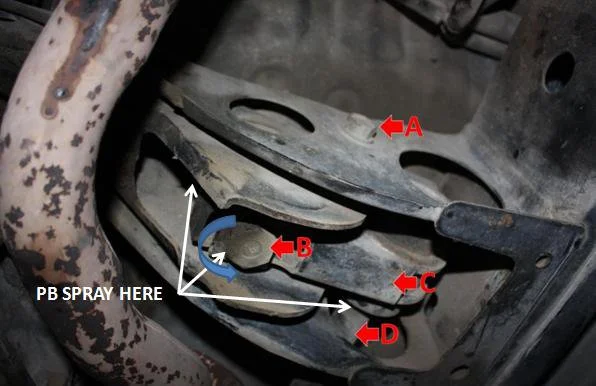
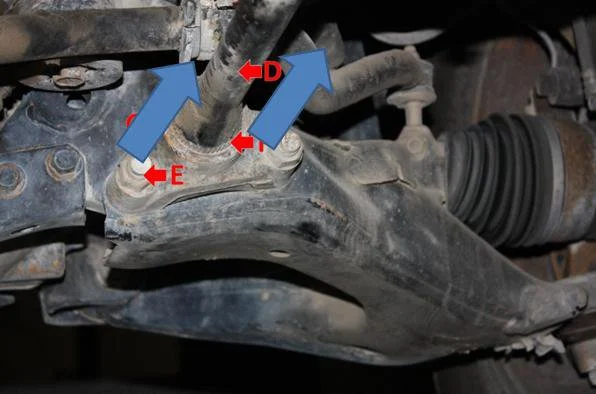
Print off this picture and go and crawl under your car, the torsion bars are the 1.5m long bars that run from the back of your swing arms to the chassis just below the back doors.
A = don't worry about A, don't touch A
B = Adjusting Bolt/nut
C = Rear housing Adjuster arm / Anchor Arm
D = Torsion Bar
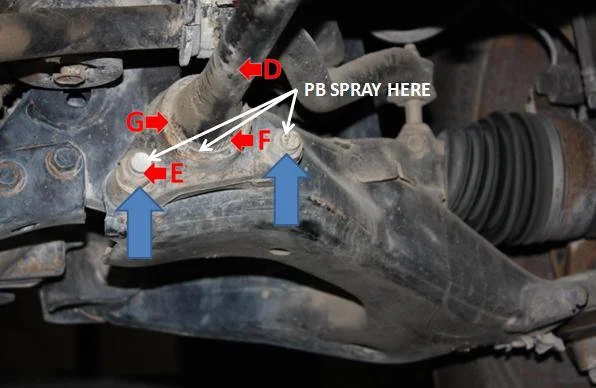
E = Front housing, AKA Tourque arm / T-Bar Bracket / torsion bar anchor plate (mounted to the lower control arm)
F = Spines
G = Rust that is going to give me a headache next weekend
3. How torsion bars work (from a dummy for dummies)
Imagine holding a piece of string in both hands, if you twist one end one way, and the other end the other way the piece of string beings to coil up. If you then let go both ends it will uncoil. This is exactly what your torsion bars do, except they are big chunks of steel.


Now apply the same principal to the torsion bar, the back of the bar is clamped firmly to the vehicle and the front twists up and untwists as the front wheels go up and down. When the car is sitting stationary on the ground there is some preloaded spring in the bars (it is this spring we are messing with when we lift the car with the adjuster nut). As the wheels are compressed up, the twist is built up (red arrow) and as the wheels go down the twist is released (green arrow).

We need that little bit of negative (red arrow) twist in the bar when the car is stationary otherwise when the car goes over a bump and the wheels lift up the bar will have no twist left in it and it will pull the tyres off the floor. This is why that 55mm of droop is so important! it is also why we adjust and re-index the bars with no load on the front, so that as we drop the car back down the bars get that bit of preload from the weight of the vehicle.
4. How to lift the front of your vehicle
Ok so now that we know how the torsion bars work it should be pretty easy to work out how to get the front of the vehicle up while standing still.
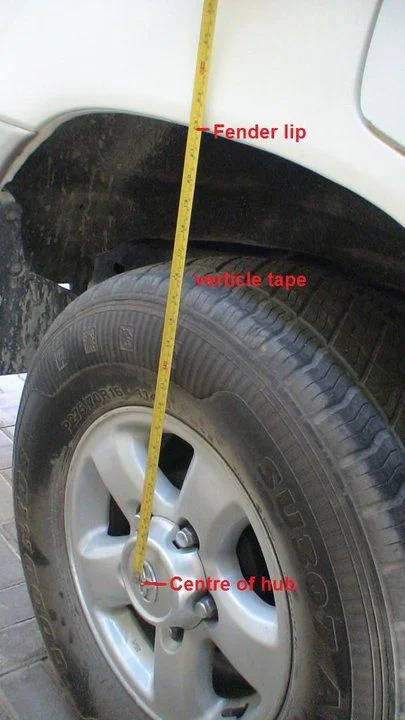
First things first, measure the distance from the centre of the hub to the wheel arch. This is your starting measurement.
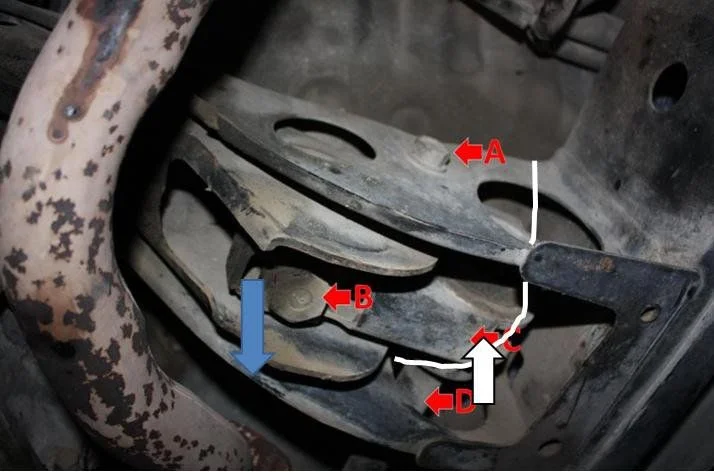
Now we need crank the bars to put more twist in them, so that they will push down on the swing arm more. Have a look at the picture below. We want the swing arm to be pushed down (orange arrow), to do this we need more green arrow twist in the bar (think about twisting that bar and how it will push the swing arm down), to do this we need to push up at the new purple arrow because black is a fixed point.
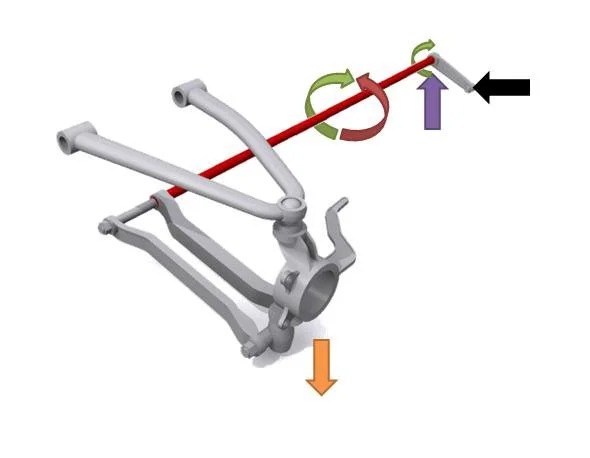
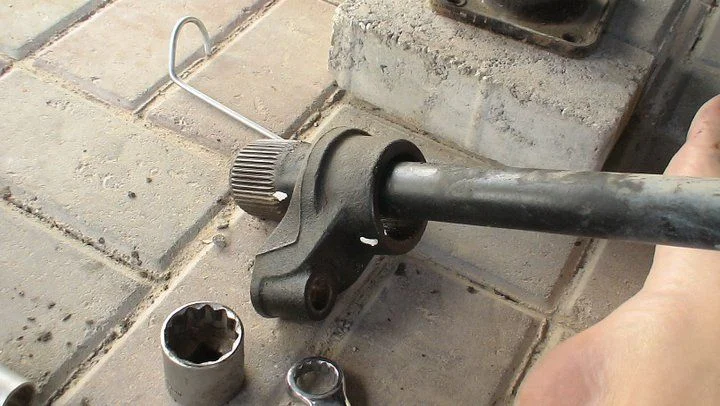
Fortunately pushing up at the purple arrow is easy because Toyota has given us a bolt to crank that will push it up. Now have a look at the picture below of the LC’s bar and how it relates. Turning this bolt clockwise will push it up increasing the twist on the bar and turning it anti clockwise will release some of the twist in the bar.
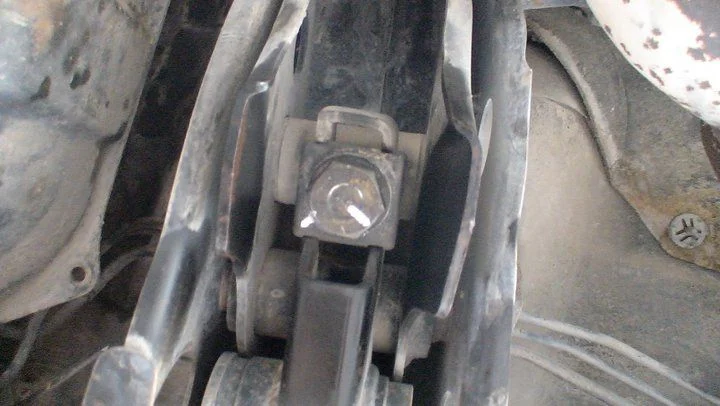
Once you have jacked the front wheels up off the ground, using a white out pen draw a line from the middle of the bolt B onto the bracket is crews into, this way you will be able to count the turns as you crank away at the bolt (you can see from my picture that my bolt has had one quarter of a turn clockwise).
Give it about 3 or 4 full rotations clockwise, drop the vehicle back down and measure the distance from the centre of the hub to the wheel arch again. Hey presto, you just lifted the front of your car!!! (you’re not done yet keep reading)
5. How and why we measure droop
Remember this “We need that little bit of negative (red arrow) twist in the bar when the car is stationary otherwise when the car goes over a bump and the wheels lift up the bar will have no twist left in it and it will pull the tyres off the floor. This is why that 55mm of droop is so important!”
Well now that you have lifted your car up and put a whole lot of green arrow twist in the bar you need to make sure there is still some left for when the car goes over a bump.its easy just follow these instructions.
• Measure the distance from your hub to the wheel arch.
• Start to jack up your car from the chassis
• As your tyre lifts of the ground stop and measure the distance from the hub to the wheel arch
If the difference between the two measurements is 55mm or more you are ok, if its less, you need to drop the vehicle down a little by unscrewing bold B a bit.
FOR NON AHC VEHICLES
First some terms so the search function picks this up:
- help with torsion bars
- how to adjust torsion bars
- reindex torsion bars
This all went in Amy's thread but I thought those who weren't subscribes may like to see it.
Ok lets try get to the bottom off all of this for new readers and to try and clear some things up for old readers. Its been discussed a thousand times so here is my take on torsion bars.
To start off with I would like to say that if you sit and read through every thread on this site on torsion bars you are going to end up confused and not very confident about doing the job yourself, if however you get under your truck with some PB blaster, a 22 and 30mm spanner and get cranking you will start to understand how everything works very quickly.
1. Front shock install
2. The names of all the bits
3. How torsion bars work (from a dummy for dummies)
4. How to lift the front of your vehicle
5. How and why we measure droop
6. How to re-index the torsion bars
Here we go
Baaaaaaa
1. Front Shock install
From the top lip of the wheel cap to the fender (with empty tanks and no winch/bumper)
478mm = FR FL = 485mm
485mm = BR BL = 465mm
Now I’m going to start with the front despite the fact that the winch and bumper are not on. It is the easier of the two jobs with the shocks but the torsion bars seem to confudle most new members so I’m going to go through it very slowly with loooooooooots of photos.
If I get something wrong please correct me so others can learn from my mistakes, this will be my first time.
For the front I have bought 2 new Old Man Emu long travel Nitro Charger shocks. There were no torsion bars in stock, I will probably have to re index my stock ones and use them until I can get OME replacements.
To start off with I went and got myself some axle stands (yes yes yes… the brick lift is gone ) I took the opportunity to get myself some nut lock, WD40 (we don’t have PB blaster here) and a 22mm racketing ring spanner, do not underestimate the importance of any of these items. I also filled up both of my tanks.
I jacked the front up and placed the axle stands underneath, then the wheels came off and the jack was used to get the swing arm to the exact height to change out the shocks.
Once that was done (it really is a
job) I decided to crank the torsion bars to their max to see what I could get out of them without having to re-index them (wasn’t in the mood for a huge job in this heat, and wanted to learn about how they worked before I re-indexed them).I didn't get much out of the bolts (1 turn on the right and 2 on the left)
Considering the front bumper and winch are not yet installed and the back, which is currnetly at 485mm is going to go up by 3" I will be re indexing the bars ( I plan to have a 1" rake and 50mm droop as per recommendations)
It turned out that they didn't have enough thread in them to get them to the right height so I was in for some work to re-index the bars. I took the opportunity to educate myself and maybe a few others.
Torsion bars
2. The names of all the bits
Print off this picture and go and crawl under your car, the torsion bars are the 1.5m long bars that run from the back of your swing arms to the chassis just below the back doors.
A = don't worry about A, don't touch A
B = Adjusting Bolt/nut
C = Rear housing Adjuster arm / Anchor Arm
D = Torsion Bar
E = Front housing, AKA Tourque arm / T-Bar Bracket / torsion bar anchor plate (mounted to the lower control arm)
F = Spines
G = Rust that is going to give me a headache next weekend
3. How torsion bars work (from a dummy for dummies)
Imagine holding a piece of string in both hands, if you twist one end one way, and the other end the other way the piece of string beings to coil up. If you then let go both ends it will uncoil. This is exactly what your torsion bars do, except they are big chunks of steel.
Now apply the same principal to the torsion bar, the back of the bar is clamped firmly to the vehicle and the front twists up and untwists as the front wheels go up and down. When the car is sitting stationary on the ground there is some preloaded spring in the bars (it is this spring we are messing with when we lift the car with the adjuster nut). As the wheels are compressed up, the twist is built up (red arrow) and as the wheels go down the twist is released (green arrow).
We need that little bit of negative (red arrow) twist in the bar when the car is stationary otherwise when the car goes over a bump and the wheels lift up the bar will have no twist left in it and it will pull the tyres off the floor. This is why that 55mm of droop is so important! it is also why we adjust and re-index the bars with no load on the front, so that as we drop the car back down the bars get that bit of preload from the weight of the vehicle.
4. How to lift the front of your vehicle
Ok so now that we know how the torsion bars work it should be pretty easy to work out how to get the front of the vehicle up while standing still.
First things first, measure the distance from the centre of the hub to the wheel arch. This is your starting measurement.
Now we need crank the bars to put more twist in them, so that they will push down on the swing arm more. Have a look at the picture below. We want the swing arm to be pushed down (orange arrow), to do this we need more green arrow twist in the bar (think about twisting that bar and how it will push the swing arm down), to do this we need to push up at the new purple arrow because black is a fixed point.
Fortunately pushing up at the purple arrow is easy because Toyota has given us a bolt to crank that will push it up. Now have a look at the picture below of the LC’s bar and how it relates. Turning this bolt clockwise will push it up increasing the twist on the bar and turning it anti clockwise will release some of the twist in the bar.
Once you have jacked the front wheels up off the ground, using a white out pen draw a line from the middle of the bolt B onto the bracket is crews into, this way you will be able to count the turns as you crank away at the bolt (you can see from my picture that my bolt has had one quarter of a turn clockwise).
Give it about 3 or 4 full rotations clockwise, drop the vehicle back down and measure the distance from the centre of the hub to the wheel arch again. Hey presto, you just lifted the front of your car!!! (you’re not done yet keep reading)
5. How and why we measure droop
Remember this “We need that little bit of negative (red arrow) twist in the bar when the car is stationary otherwise when the car goes over a bump and the wheels lift up the bar will have no twist left in it and it will pull the tyres off the floor. This is why that 55mm of droop is so important!”
Well now that you have lifted your car up and put a whole lot of green arrow twist in the bar you need to make sure there is still some left for when the car goes over a bump.its easy just follow these instructions.
• Measure the distance from your hub to the wheel arch.
• Start to jack up your car from the chassis
• As your tyre lifts of the ground stop and measure the distance from the hub to the wheel arch
If the difference between the two measurements is 55mm or more you are ok, if its less, you need to drop the vehicle down a little by unscrewing bold B a bit.
Last edited:
 you don't get photos untill the back is in and she is sitting level

")