Worn hood hinges? (1 Viewer)

This site may earn a commission from merchant affiliate
links, including eBay, Amazon, Skimlinks, and others.

Joined
Sep 3, 2007
Threads
71
Messages
8,870
Location
New Zealand
Worn hood hinges? (& lathe work)

Do your hood hinges look worn like this?

hinge2.webp

Many years ago I was fooled into thinking my hinges were badly worn because the pins were quite noticeably off-centre (as in that photo). At that time, replacement hinges were cheap so I just bought another pair. --- Only to discover that the new ones were off-centre too.

The problem is actually caused by poor manufacturing technigue. So if yours look like the one in the photo, they probably aren't worn at all.

Have a look at this. I've cut the pivot out and you can see the plastic bush is quite free of wear. -But note how off-centre it is in the "scroll".

hinge7.webp

No doubt your now wondering why I mutilated perfectly good hinges. Well, suffering from "obsessive compulsive disorder" I couldn't bear to look at those "worn out looking" hinges anymore. I had to "fix" them and decided to go for "phosphor-bronze bushes" and "grease nipples" at the same time.

Here is the jig I used to hold the hinge-halves in their correct relationship while I cut out and replaced the pivot arrangement.

hinge5.webp

I made some measurements too of course. - for instance the pin centre-line was 16mm above the bottom-surface-line. I wanted the new hinges to exhibit exactly the same opening characteristics as the old ones - not that it probably matters much - but that's just me.
hinge2.webp
hinge7.webp
hinge5.webp
 
Last edited:
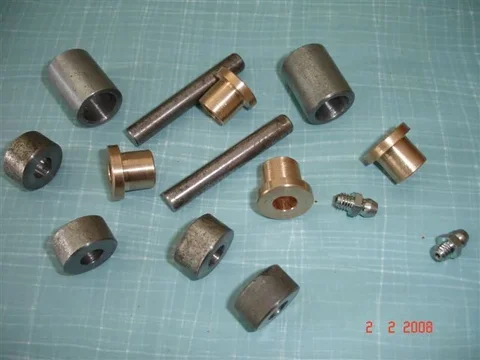
And here's the new phosphor-bronze bushes being made:

hinge3.webp

And here are some more parts I've made/assembled:

hinge4.webp

Here's a hinge-half getting the "grease nipple treatment":

hinge6.webp
hinge3.webp
hinge4.webp
hinge6.webp
 
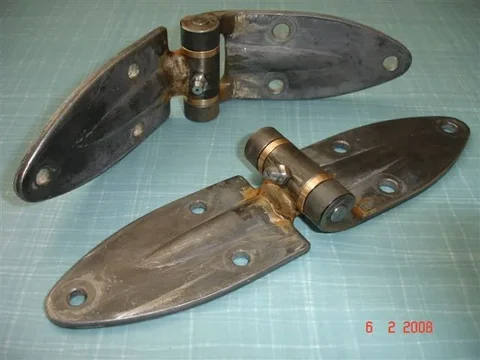
And here the completed hinges:

hinge8.webp


And here they are painted in Sky Blue: -- Daa Daaaaaa

hinge9.webp

Finally I will be able to look at my hinges and see "things of beauty" rather than "manufacturing errors".

I've already got new stainless-steel hooks and other new/repainted bonnet hardware. So the next step is to rip the bonnet errrrrrrr HOOD off, cut a few more holes in its bracing (mainly for cleaning/painting access), weld up some/all of its seams - and repaint it. Then my BJ will have "turned the corner" appearance-wise - because the body looks pretty rough at present. And the hood is probably the "largest panel" (apart from the roof but then that's fibreglass).

PS. The hinges I've modified were the factory-originals that I had kept. So I didn't need to remove the hood to do the work thus far.
:cheers:
hinge8.webp
hinge9.webp
 
:clap:

So when can I order a set from you? :D

Good work, makes my windshield hinge repair look amateurish! ;)

Make sure you use a grease that does not separate easily so your paint doesn't stain. A water proof grease for boat trailer bearings would work great!
 
Well, suffering from "obsessive compulsive disorder" I couldn't bear to look at those "worn out looking" hinges anymore. I had to "fix" them and decided to go for "phosphor-bronze bushes" and "grease nipples" at the same time.

Have you lost your marbles? :eek:

Actually, that is an awesome fix. :cheers:
 
......So when can I order a set from you? :D......Good work, makes my windshield hinge repair look amateurish! ;) ....Make sure you use a grease that does not separate easily so your paint doesn't stain. A water proof grease for boat trailer bearings would work great!

Thanks Coolerman

I've done the same treatment to the pivots on the "spare wheel carrier".

I was intending to do the door hinges (driver & passenger) likewise but looking at them now - the space looks too confined because I would need to increase the outside diameter (overall) of the pivot in order to have the metal thick enough to be able to weld without destroying things (and it's difficult to turn and press-in "very thin" bushes). And those "seam lips" already almost touch that part of the existing hinges.

Nah- Your windscreen hinge repair was good. I try to stop those pins rusting inside their "tubes" by applying lanolin spray to the pivot area whenever I notice extra rust stains in the paint-joint-cracks there. But then I don't have salted-roads to contend with.
(Penetrating oil washes away too readily whereas Lanolin penetrates just as well but provides more lasting protection - Well I think so anyway?)

I would never consider grease nipples and bronze bushes on my windscreen hinges!

:cheers:

PS. To my way of thinking - Reusing/modifying/refurbishing old gear is much more rewarding than buying new/aftermarket gear. Of course I usually don't have the budget for the second option anyway.

The reason I drive buses for a living (and work late/night shifts) is because it gives me the best part of the day (mornings and early afternoons of EVERY day) for my hobbies/interests. And on the rare occasions I've paid people to do work (laying vinyl floor covering back in the early eighties was the last time I think!) - I've been so unhappy with their work I've ended up redoing it myself.
Also, when driving a bus, I can "use my mind for myself" by thinking out how to do things. (But sometimes my passengers get quite vocal when my "automatic pilot" fails and they find the bus wandering away from the correct bus route. - That get's even more embarassing when I'm driving a trolley bus that must follow "overhead wires" - so it can take AGES to get back on the correct bus route to take the ungrateful buggers home!!!!)

Besides for my generation (not so much - the "new breed") - "Doing it yourself" has always been "the kiwi way".
 
Agree 100%! It's getting harder and harder to find folks that do quality work. Do you have a machine shop set up at home? I just got my drill press and have a lot to learn to use it properly. I dream of one day having a small lathe to work with. Of course that means going to a night class to learn how to use it!

Keep these types of post coming! I can learn a lot from them!
 
Marbles - super work. You should come to Malawi and give lessons. OCD, indeed... :)
 
boing


tight. that look like a hellaofalota work but superb. how much
 
boing...tight. that look like a hellaofalota work but superb. how much

Yeah - It was a lot of work - And it would be depressing to calculate just how many hours went in (because I could probably have finished off quite a few other projects on my "To Do" list with that time).

But then "getting projects off my list" doesn't satisfy me as much as "doing a good job on whatever it is that I'm working on".

I tried to make the thread brief because we're all pushed for time and "cartoon-type threads" (lots of pictures and few words) are fast to "read".

And I never thought the technical side would be of much interest to MUD members. But since Coolerman's interested - And since it will help explain just how labour-intensive (note .... NOT difficult) it was - ---------I'll add a few posts here on the technical side to show more about how I went about it.

I dunno when or if I'll get around to a similar lathe job on the cruiser in the future. (There's nothing planned.)

I hasten to add that I have no formal fitting/turning training apart from spending 3 months in a "machine shop" during my refrigeration engineering apprenticeship back in the 70s. (Some of those 3 months were spent on a turret-lathe turning up valve spindles for "shut-off valves" used in ammonia refrigeration plants.) So anyone with enthusiasm/care can do a similar job once they've got the gear. And if a REAL "turner" out there want's to point out things I've done wrong - Then please do.

Anyway- Today I'll try and take some more photos and post up a "sequel" to show more about how I went about it.

:cheers:
 
wow those are nice just got 2 lathes from my neighbor who is 89 and just retired looks like a fun project for me to learn on thanks and keep up the good work
 
About 1,000 years ago we use to sell new push pins (with spring loaded ball, removable) including new nylon bushings. We quit selling them due to a lack of interest, but those items could still be obtained from McMaster Carr. On the other hand, if the steel hinge portions are bad, perhaps the home-builts above are the ticket.
 
OK - Sequel time! I've taken a few pics (and drunken a few beers) and here we go: (Do you realise this will turn a short thread into something that's verbose?)

This was the epicentre of operations. My big lathe: (I have a couple of other miniature model-maker lathes too)

triumph.webp

And here's a closer look. I bought it at auction for $750 a millenium ago. It had been really abused and is really quite worn but it does the job OK for me:

lathe2.webp

Incidentally, when a lathe has had a lot of use (like this one), the "slide rails" get worn lower where there has been the most movement of the "slide". So when you try to turn a parallel diameter along the length of "the work" - it becomes tapered as the slide drops into the worn section of the bed. Bit of a "bummer" but you can compensate for it.

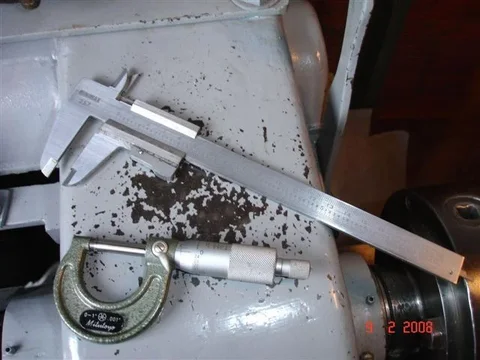
However you need accurate measuring gear like the micrometer and callipers I use:

lathe11.webp

Lucky my lathe is REALLY OLD because the dials are callibrated in "units of antiquity" - that is, inches (or thousandths of an inch to be more correct). So this would suit you people in the US of A.

Thus I selected micrometer and callipers that read in inches. (Actually the vernier callipers measures in millimetres too which is very handy for me. I often switch to and fro between the different units while tackling the same job.)
lathe2.webp
lathe11.webp
triumph.webp
 
Last edited:
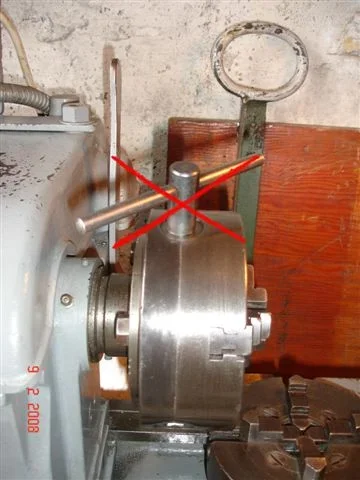
Now safety is always important. I really had to "cringe" when I took this photo:

lathe3.webp
That is an absolute NO NO.

Never ever ever ever leave the chuck key in the chuck. Unlike using a drill press (where doing so is still dangerous), a lathe places your head/eyes directly in the firing line almost ALL the time.

But I'm a slow learner. See my right hand here:

lathe4.webp

Well that crooked finger is the result of leaving the key in the chuck (and I was lucky).

Back in the days of horses and carts (well ALmost), I drove a 1965 series 2A diesel landrover. And I had this brilliant idea for fitting a heater. (Back in those days, REAL 4x4s never had such luxuries.) I was going to make a heat exchanger between a section of the exhaust pipe (nice HOT temperature source) and the air flow from an electric fan/blower. So I sneaked into the works factory one Sunday when no-one else was there (I had been given keys) and began turning up the parts on a MONSTROUS lathe there. But I was unfamiliar with it. I hit a lever that I thought would take the thing "out of gear" (so I could turn the chuck to a better position to turn the chuck key) but that lever "fired it up" instead. And you guessed it - the chuck key spun around - caught my wedding ring - and stalled the lathe with my finger jammed between the chuck key and the lathe bed.

Actually it didn't hurt and there was no blood. Well not at first - That came later. But I know why they say we are made up of 90% water. Some clear liquid just like water was sitting on the lathe bed near my jammed hand. Anyway, too scared to touch any other levers - I bashed the chuck backwards off my hand with a mallet that (luckily) was sitting nearby and drove myself to hospital.

I've NEVER worn a ring since. (Mind you that one ended up too flat to get anything though it.)

Ooops. Sorry for the sidetrack. But never eeeeevvvveeeerrr leave the key in the chuck!!!!!!

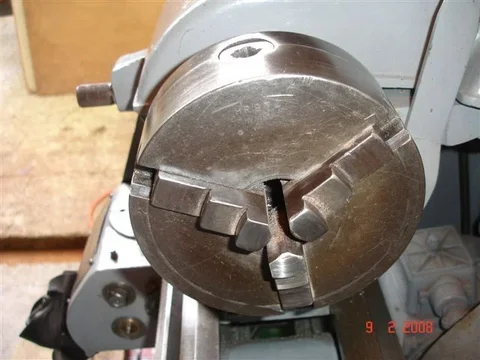
Now - carrying on here- My lathe has a 3-jaw chuck:

lathe5.webp

In this, the jaws can't be reversed (can't be turned around individually to face in the opposite direction) but I use this chuck most often (and used it for all the hinge work) because the jaws remain "centred" in all positions. (Any key-hole moves all 3 jaws in unison.)
lathe3.webp
lathe4.webp
lathe5.webp
 
I also have a 4-jaw chuck:

lathe6.webp

In this photo each jaw has been turned the other way around. That must be because the last piece of "work" I had been turning/drilling in that chuck must have been held more securely that way. (The "work" should NEVER be able to work loose. If it does, you're in BIG trouble!)

With the 4-jaw, each chuck-key-hole controls its own jaw --- So you can turn things "off-centre". Or if you are REALLY fussy, you can turn things even more CONCENTRICALLY TRUE than the 3 -jaw allows (because you can perform the centre-ing operation manually to perfection!).

With a lathe - drilling is normally accomplished in the opposite way to a drill press. --- You spin the work instead of spinning the drill.

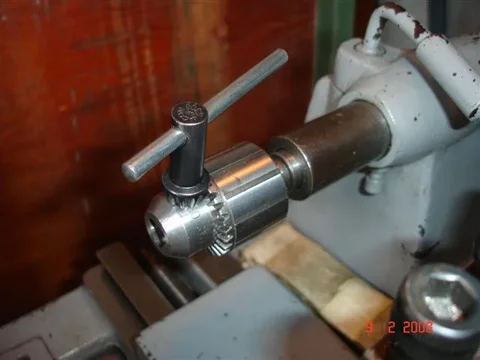
Here is a picture of my small drill chuck in the "tailstock"

lathe7.webp

And here is the larger one.

lathe8.webp

I don't cringe when I see these chuck keys left in place because those chucks don't spin ---- UNLESS of course the drill bit "grabs" (so I still wouldn't leave the keys in place when the lathe is in operation).
lathe6.webp
lathe7.webp
lathe8.webp
 
Last edited:
But lathe workers mostly use drills with morse-taper shanks (instead of the paralled-shank drills most people use). And reamers usually have this type of shank too.

I have loads of morse-taper stuff that I got from auctions (when most manufacturing businessess in this country were shutting down due to the governemt ceasing to protect them from competing imported goods). Here's just one tray:

lathe10.webp

Despite having lots, I still have to modify my designs according to what size reamers I have. (Those items cost a fortune new!)

The ordinary "flutes" on a drill bit won't form a hole that is "dimensionally true". That's why reamers are used. They produce holes that are much more "dimensionally accurate".

Here are the two reamers I used to make the hinges:

lathe9.webp

The far one is 3/8" parallel and the close one is tapered.

I used the parallel one to create the final bush ID and for the outer "collars" for the pin supports. ((Although I had to increase the bush ID slightly by twiddling 200 grit wet-and-dry in the hole while it was wrapped around a drill bit. This drill bit was selected to be as large as possible while still fitting through with the wet&dry paper wrapped around it.)

The tapered reamer was used to create an "interference fit" for the pins in the inner collars.

All hinge halves are labelled LF LR RH or RR to fix their on-vehicle orientation.

If ever the need arises in the future to dismantle those hinges - those pins needs to be pressed OUTWARDS. (Can't see the need arising though.) The pins would be next to IMPOSSIBLE to push out in the opposite direction.

The pins are made from 3/8 "bright steel". This is more "dimensionally perfect" than ordinary mild steel rod.

The OD of the bushes was turned as shown in an earlier picture but the intial ID (before reaming and after drilling) and the ID of the "tubes" they sit in was turned using this hand-made boring bit (made from "high speed steel" which is what ordinary drill bits are made from):

lathe12.webp

This "boring bit" requires "opposite chuck rotation" - which is OK because the lathe motor has a forward/reverse switch.

Oh yes. I bought a 300mm length of 20mm solid round section phosphor bronze ($50NZ delivered) so I have plenty for future bush manufacturing.
lathe10.webp
lathe9.webp
lathe12.webp
 
Last edited:
What else? Ahmmmm.

Oh yes. I used the "stick welder" (pictured beside the lathe earlier on) for the welding. and I used 2.5mm mild steel "general purpose" electrodes and a setting of about 90 Amps.

And I was reluctant to weld with the bushes inside so these "collars" were made to hold the "tube" central during "tacking" with an 8mm thru-bolt to hold the "pivot assy" together. (8mm is slightly smaller than 3/8"):

lathe13.webp

The 2 different lengths are because that is the only dimension that didn't have to be at all accurate.

The combined length (ignoring the lips) of each pair of BRONZE bushes was about 0.5 to1.0mm less than the length of the steel "tubes" they sit in. This ensures grease will be directed evenly outwards through the bushes by the grease gun during servicing.

I used loctite on the "fits" whereever movement is undesirable (even though my machining work was accurate enough to make this unnecessary).

Being able to do jobs easily is often due to not throwing stuff out. Here are just some of the old bearings I've kept. They are VERY useful:

lathe14.webp

To get the pins to sit "slightly proud" of the hinges I had to belt one end (of each pin) with a hammer while allowing the other end to protrude into an old bearing race that I used as a "backing spacer".

And the welds were tidied up using files and this "die grinder" that I also obtained "at auction":

lathe15.webp

Well - I'm sure I've forgotten to mention some important details - But that's the best I can do at describing the process involved (for the moment anyway).

And as I said at the start - I'm NOT trade-qualified in lathework.

:cheers::cheers:
lathe13.webp
lathe14.webp
lathe15.webp
 
Last edited:
Been doing other things for a while - and I've remembered a few essentials I've left out of my "unqualified amateur's guide to latheworking".--------------------

Of course "wearing goggles" is essential:

lathe16.webp

Not sure if they'll help protect you against a flying "chuck key" though?

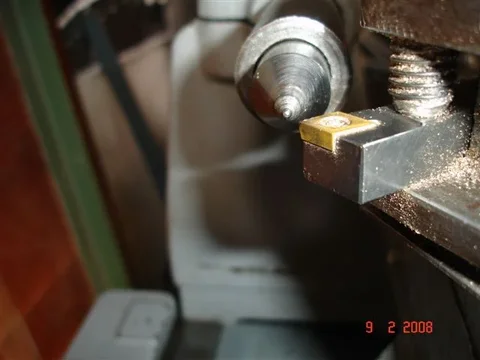
Another thing ------ You must "centre" the "cutting edge" of the "cutting tool" before you do any turning from the "toolpost". This is done by lining up that edge with the "centre" when the "centre" is in the "tailstock". (It doesn't take much thought to work out how the "centre" got its name.):

lathe17.webp

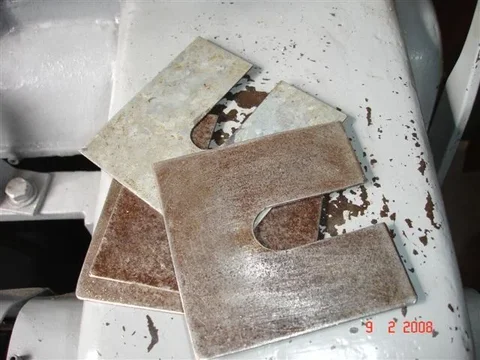
Here are the shims that you add or remove to get the height correct:

lathe18.webp
lathe16.webp
lathe17.webp
lathe18.webp
 

Users who are viewing this thread

Back
Top Bottom