
Navigation
Install the app
How to install the app on iOS
Follow along with the video below to see how to install our site as a web app on your home screen.
Note: This feature may not be available in some browsers.
More options
Style variation
You are using an out of date browser. It may not display this or other websites correctly.
You should upgrade or use an alternative browser.
You should upgrade or use an alternative browser.
The 4WheelUnderground 3 link thread
- Thread starter jcardona1
- Start date
This site may earn a commission from merchant affiliate
links, including eBay, Amazon, Skimlinks, and others.
Just run the right hand drive lower arms and run hiems and double shear it.
Waited 9 months for HF knuckles, they're too small for use as testicular jewelry, so gonna run 'em....
Way premature, but hoped to drop at machine shop next week, to enlarge the face for a birf to pass through, and thought about having them cut new arms, too.
4WheelUnderground
Suspension is EVERYTHING
- Joined
- Nov 4, 2010
- Threads
- 7
- Messages
- 502
Me thinks we need updates
- Thread starter
- #184
Update time! Lots of things happened even thought it doesn't look like much in pics. After my last update I had several discussions with Brian about the panhard bracket touching the Hellfire arms. I was fine with it but Brian wasn't happy. So what does he do? He drives up to my house to check it out in person. I'll repeat that. BRIAN DROVE FROM HALFWAY ACROSS THE STATE TO HELP ME OUT. I was surprised he even suggested it and I didn't think it was necessary but I'm glad he was able to come up. Talk about customer service! This was a good chance for Brian to see what the interference was so he could make the changes in the kits going forward. The only thing we could think of is a slight difference in the new generation of Hellfire arms that threw off Brian's templates.
Brian took the panhard bracket and modified it, pushing it in and back. He also shortened the panhard about an inch by, putting in a new welded bung.
Here's the panhard bracket in its new position.

Here it is at full turn. No touching at all. We shaved a bit of the Hellfire arm to let it slide under the heim but at full turn it still doesn't even touch.


For full steer, we let the knuckles hit the lower shock mounts. Turned out to be nearly perfect as the knuckles are almost maxed out at this point.


Even though his job was done Brian decided to stick around and help me cycle the suspension, find out the true location for the towers and check for clearance. We started off by re-squaring the axle and setting caster at about 6º for the estimated ride height.

The angle finder was set on the flat surface of the knuckles as seen here

I then tacked the shock towers to the outside of the frame just to cycle everything with shocks in place. This is full stuff and full droop. Not too bad eh?!

Lots of down travel

Can't thank Brian enough for helping me out. I said it before and I'll say it again, this guy goes above and beyond to make sure his kit works to its fullest potential.
The next day I cut off the shock towers after measuring where they should go. I redid the air bumps by notching them into the frame. I was a little hesitant about this but I'm glad I did it. Much cleaner install. One thing is cutting brackets off the frame. It's entirely different cutting INTO the frame.

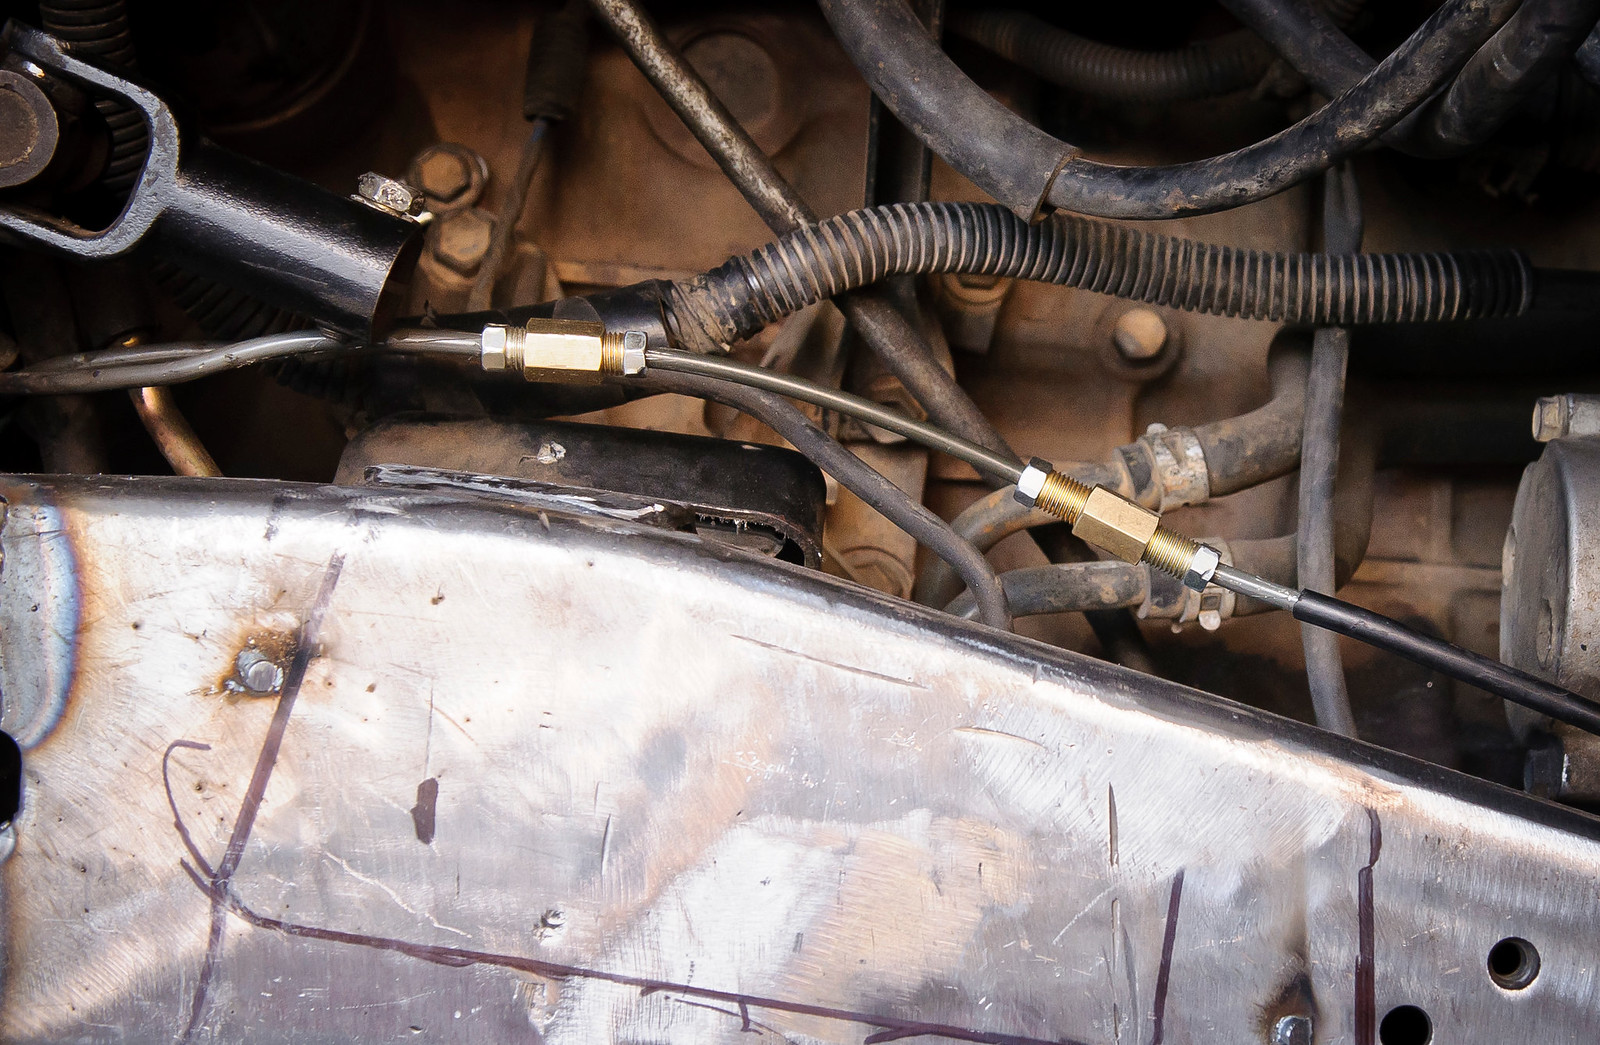
And I finally fixed the brake line I cut a few weeks ago while grinding. Had to make 3 flares and use several fittings to fix this. Don't make the same mistake I did. Now I can finally proceed with the towers. Once I have those in it will be home stretch and time to do all the finish welding!
Brian took the panhard bracket and modified it, pushing it in and back. He also shortened the panhard about an inch by, putting in a new welded bung.
Here's the panhard bracket in its new position.
Here it is at full turn. No touching at all. We shaved a bit of the Hellfire arm to let it slide under the heim but at full turn it still doesn't even touch.
For full steer, we let the knuckles hit the lower shock mounts. Turned out to be nearly perfect as the knuckles are almost maxed out at this point.
Even though his job was done Brian decided to stick around and help me cycle the suspension, find out the true location for the towers and check for clearance. We started off by re-squaring the axle and setting caster at about 6º for the estimated ride height.
The angle finder was set on the flat surface of the knuckles as seen here
I then tacked the shock towers to the outside of the frame just to cycle everything with shocks in place. This is full stuff and full droop. Not too bad eh?!
Lots of down travel
Can't thank Brian enough for helping me out. I said it before and I'll say it again, this guy goes above and beyond to make sure his kit works to its fullest potential.
The next day I cut off the shock towers after measuring where they should go. I redid the air bumps by notching them into the frame. I was a little hesitant about this but I'm glad I did it. Much cleaner install. One thing is cutting brackets off the frame. It's entirely different cutting INTO the frame.
And I finally fixed the brake line I cut a few weeks ago while grinding. Had to make 3 flares and use several fittings to fix this. Don't make the same mistake I did. Now I can finally proceed with the towers. Once I have those in it will be home stretch and time to do all the finish welding!
- Thread starter
- #185
And a bad cell phone pic of where I think ride height will be. You'll notice the axle has been moved forward several inches.

Looking badass Jose. Keep it up. Thats some great customer service. That says a lot for his type of business. True quality and care.
That fender is gonna have a bad time.
Looks great dude!
Looks great dude!
- Thread starter
- #188
Sure does! Now, when are you starting?Looking badass Jose. Keep it up. Thats some great customer service. That says a lot for his type of business. True quality and care.
That fender is gonna have a bad time.
Looks great dude!
Thanks! Yeah those fenders are gonna need even more trimming, especially towards the front.
- Joined
- Sep 9, 2004
- Threads
- 186
- Messages
- 13,329
- Location
- Boise - Idaho
- Website
- www.snlandcruisers.com
I'd say about 1/2". But keep in mind this is without steering stops, pushing the knuckles as far as they go. I'm not even sure if that's safe for the seals and birfield. This is also one of the things I discussed with Brian. Going to remove the panhard bracket and try to push it back rearward a bit. Speaking of which, how do you know where to set the steering stops? Is there a recommended range?
30* is max for the CVs. A simple tool like this will tell you where you are at.
http://www.sears.com/general-tools-...a=00903484000P&kpid=00903484000&mktRedirect=y
All the way to the seal though is right about 30*, I checked a number of times when working on my front end. I didn't check before doing the work but I believe Toyota set it about 27-29*. Don't quote me on that, I am pulling it out of my arse and going by intuition not the FSM or anything.
As far as the panhard issues, why not simply use off set GM tres? That may be enough to cure the issue at the panhard axle side. It cured the issues for me, I had draglink into panhard with 4* caster where as you didn't with 0* caster. If not the fix why not look at a custom panhard bracket? Look into moving up and back slightly? As long as the angle to the drag link doesn't change a lot you should be fine. *Correction, you are already a bit off on these angles by the pics, raising panhard axle side may have negative results, ie bump steer. Flat pitman arm certainly seems like it would help on driver side but with the high steer on the HFs, I am not seeing that being a 100% cure. Seems to me you will have to limit up travel to stop the hitting of the tie rod to pitman arm. Don't think this would be an issue without the HFs.
I take it you are not doing anything with caster? Still going to be at 0*?
I would certainly try and get the c/o more vertical and putting the bump into the frame rail seems like the way to go. What do I know though!?
I am interested to see where this goes. Anyone that thinks a suspension that works in the rocks can not be stable at 75-80 MPH need only look at Ultra 4 Racing, King of Hammers. As 4WU, Brian if I may, said it is about the geometry. If he can make a repeatable system that is a stable platform that removes all the negative aspects of the OEM suspension I say go for it!!
That is great and all but it is like comparing a stock 4Runner, 100 or Taco IFS to a $50,000 KoH IFS. So many limitations in an 80 compared to a custom built Ultra4 race truck it is not even funny. If that isn't obvious by this thread I don't know what is.
I agree though, if it can be done, go for it.
Cheers
- Thread starter
- #191
All the way to the seal though is right about 30*, I checked a number of times when working on my front end. I didn't check before doing the work but I believe Toyota set it about 27-29*. Don't quote me on that, I am pulling it out of my arse and going by intuition not the FSM or anything.
I've always read 32~36ºish, but we got it all squared away in my recent post.
As far as the panhard issues, why not simply use off set GM tres? That may be enough to cure the issue at the panhard axle side. It cured the issues for me, I had draglink into panhard with 4* caster where as you didn't with 0* caster.
Tried these but they won't work since my TREs are UNDER the arm, not on it. The offset goes the wrong direction and pushed it in towards the housing. Ruffstuff's y-link adapter would need to have LH threads in order for the offset TREs to push it out when mounting under the steering arm.
If not the fix why not look at a custom panhard bracket?
They're both custom, at the axle and at the frame. But it's already been addressed in my last post.
Seems to me you will have to limit up travel to stop the hitting of the tie rod to pitman arm. Don't think this would be an issue without the HFs.
Yeah that's the limitation of running Hellfire knuckles, they limit up travel somewhat. I was focusing too much on up travel at first. But I see there's no point in trying to get more. When I cycled everything a 37" tire is well beyond factory sheet metal. Even with my extensive fender trimming it will still hit. More up travel is pointless on these rigs.
I take it you are not doing anything with caster? Still going to be at 0*?
Why wouldn't I? Caster was/will be set at 6º, see my recent post.
I would certainly try and get the c/o more vertical and putting the bump into the frame rail seems like the way to go. What do I know though!?
Brian said to not get caught up too much with the angle of the coilovers so that's the approach I took. Trying to mount them vertically would be really difficult especially on the driver's side. Because the axle has moved forward several inches, trying to mount them vertically leaves very little room for the air bumps in between the panhard bracket. I'm sure it could be done, but I'd wait to see what Brian comes up with for his kit solution.
RMP&O
I was not comparing an 80 to an Ultrta 4 car. I was merely using the demands on an Ultra 4 car, meaning good at the slow in the rocks stuff along with high speed. The point IS that it is possible to do. Obviously, an Ultra 4 car is far more sophisticated but geometry is what make the suspension work in the first place. All the high dollar parts in the world will not make a suspension work if the geometry is not right.
I was not comparing an 80 to an Ultrta 4 car. I was merely using the demands on an Ultra 4 car, meaning good at the slow in the rocks stuff along with high speed. The point IS that it is possible to do. Obviously, an Ultra 4 car is far more sophisticated but geometry is what make the suspension work in the first place. All the high dollar parts in the world will not make a suspension work if the geometry is not right.
4WheelUnderground
Suspension is EVERYTHING
- Joined
- Nov 4, 2010
- Threads
- 7
- Messages
- 502
I think we're going to need a wheel base measurement so we can answer the question of how far forward the axle is actually moved.
Last edited:
- Thread starter
- #195
Time for an update! Sorry for the lack of activity. I made a stupid mistake which cost me over a week of downtime as I waited for new parts to arrive. I ended up making the shock towers too short. So short that I was losing about 2" of up travel. I couldn't live with that so I ordered a new set. My mistake was that I measured and marked the cuts while I had the towers tacked onto the outside of the frame. It didn't occur to me that after making the cuts and moving them INTO the frame, the shock travel had now changed. Lesson learned!
Here's the old photo showing where I had them mounted for mock up and cutting. No bueno.
After the new towers arrived I knew what I had to do. Make a template of the frame's contour then transfer that to the tower. The driver's side will be the guide for setting the height of the towers. To set the height I tested the axle at the most extreme angles in order to find the interference. This turned out to be driver's side fully stuffed, passenger side fully drooped and the wheel turned all the way left.

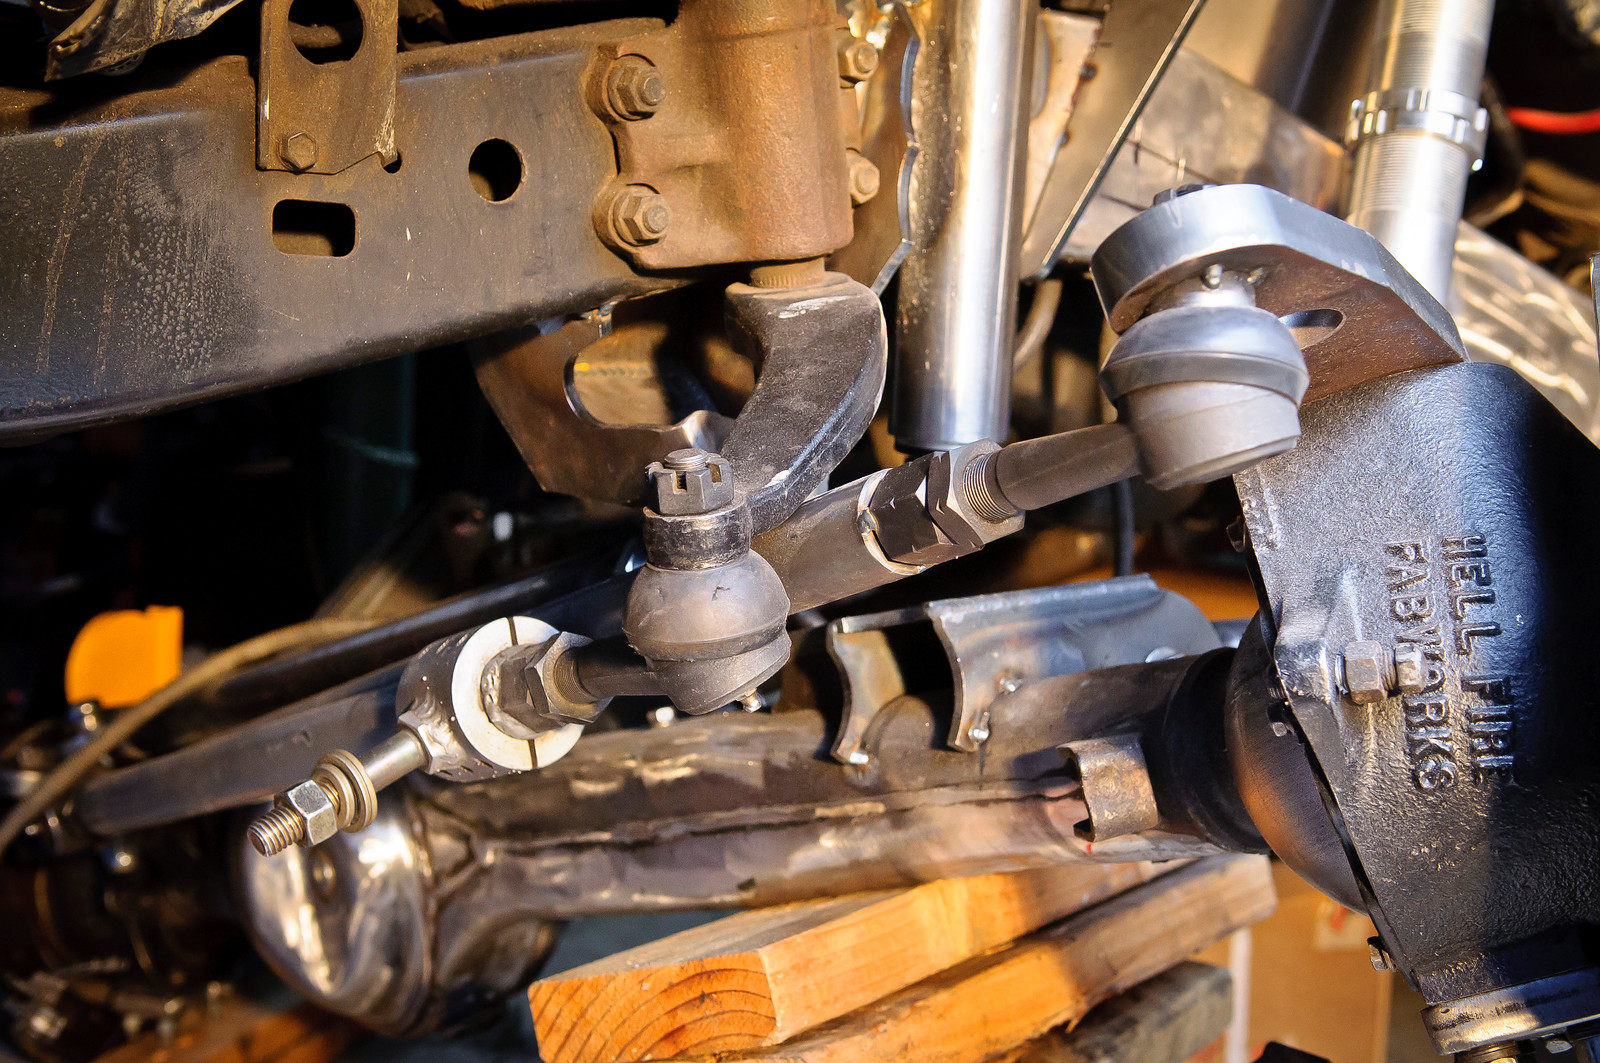
And here's why. In this scenario this is the absolute maximum up travel you can achieve before the tie rod hits the pitman arm. Note that this already puts a 37" well beyond your factory sheet metal, both inner and outer fenders.

Not much to worry about on the passenger side when fully flexed out

All the steering clears and neatly tucks in between the panhard bracket

Also note that if you straighten the steering wheel the tie rod drops, leaving more room between the pitman arm.

Using the template I made for the frame's contour I carefully trimmed the towers. I was playing it safe this time. Ended up making a series to two cuts as to not make them too short again!

The height of the towers was set so that the shock is fully compressed and the shock's bump stop stops movement just before the tie rod hits the pitman arm. At this point I'll be also slightly compressing the air bumps.

And lowered back down to ride height, you can see the final angle of the towers and coilovers. I'll have about 5" of shock showing at ride height which is the number that gives Brian the warm n fuzzies. Here you can see the tower matches the contour of the frame exactly. I had to clearance just a bit around the motor mount.
Final steps will be to duplicate this for the passenger side. Put the steering shaft back in and notch the driver's side tower then FINISH WELD EVERYTHING

Here's the old photo showing where I had them mounted for mock up and cutting. No bueno.
After the new towers arrived I knew what I had to do. Make a template of the frame's contour then transfer that to the tower. The driver's side will be the guide for setting the height of the towers. To set the height I tested the axle at the most extreme angles in order to find the interference. This turned out to be driver's side fully stuffed, passenger side fully drooped and the wheel turned all the way left.
And here's why. In this scenario this is the absolute maximum up travel you can achieve before the tie rod hits the pitman arm. Note that this already puts a 37" well beyond your factory sheet metal, both inner and outer fenders.
Not much to worry about on the passenger side when fully flexed out
All the steering clears and neatly tucks in between the panhard bracket
Also note that if you straighten the steering wheel the tie rod drops, leaving more room between the pitman arm.
Using the template I made for the frame's contour I carefully trimmed the towers. I was playing it safe this time. Ended up making a series to two cuts as to not make them too short again!
The height of the towers was set so that the shock is fully compressed and the shock's bump stop stops movement just before the tie rod hits the pitman arm. At this point I'll be also slightly compressing the air bumps.
And lowered back down to ride height, you can see the final angle of the towers and coilovers. I'll have about 5" of shock showing at ride height which is the number that gives Brian the warm n fuzzies. Here you can see the tower matches the contour of the frame exactly. I had to clearance just a bit around the motor mount.
Final steps will be to duplicate this for the passenger side. Put the steering shaft back in and notch the driver's side tower then FINISH WELD EVERYTHING
Last edited:
Why are there tacks on your tie rod end?
And wouldn't you want your air bumps to be engaging well before the bump stop on the coilover is limiting travel?
- Thread starter
- #198
Had to cut and shorten the steering links because of the longer tie rod and y link adapter I used. Haven't finished the welding.Why are there tacks on your tie rod end?
- Thread starter
- #199
No. Height of the air bumps is set by fully stuffing both sides. This height is different than when one side is stuffed and the other drooped because of how the axle pivots.And wouldn't you want your air bumps to be engaging well before the bump stop on the coilover is limiting travel?
Note that this already puts a 37" well beyond your factory sheet metal, both inner and outer fenders.
Is it safe to assume that your fender cuts will clear the tire at this articulation?