Builds Stevo's 6BT60 Build Thread (1 Viewer)

This site may earn a commission from merchant affiliate
links, including eBay, Amazon, Skimlinks, and others.

The rivets are hell on the rear bumper/cross-member removal...hard to get at too.

These build threads are cool.... I'm waiting to see how it plays out, its a lot of work and time and $$ but that make it fun and aggravating at the same time...or it can be. :)
 
I figured I would refresh my list of things to do to get it driving.

Things to left do:


Install fuel tank
[STRIKE]Box rear framerails[/STRIKE]
[STRIKE]Anti-wrap[/STRIKE] bar
[STRIKE]Rear shocks[/STRIKE]
Rear brake lines
Clutch line
Modify transmission crossmember to clear front driveshaft
Install front driveshaft
Change fuel filter and install fuel lines
[STRIKE]Intake[/STRIKE]
Exhaust
[STRIKE]Turbo Piping[/STRIKE]
Hood struts and reinstall hood
Change oil and check fluids
Tranfercase linkages
Remove E-brake cable
[STRIKE]Trim driver side fender[/STRIKE]
Install bumpstops
Install limit straps
[STRIKE]Mount last 43" tire[/STRIKE]
[STRIKE]Install Spacers[/STRIKE]


Also I'm glad to see people still tuned in. I will be picking up a Gopro soon to document the first ride in it.
 
I figured I would refresh my list of things to do to get it driving.

Things to left do:

Install fuel tank
[STRIKE]Box rear framerails[/STRIKE]
[STRIKE]Anti-wrap[/STRIKE] bar
[STRIKE]Rear shocks[/STRIKE]
Rear brake lines
Clutch line
Modify transmission crossmember to clear front driveshaft
Install front driveshaft
Change fuel filter and install fuel lines
[STRIKE]Intake[/STRIKE]
Exhaust
[STRIKE]Turbo Piping[/STRIKE]
Hood struts and reinstall hood
Change oil and check fluids
Tranfercase linkages
Remove E-brake cable
[STRIKE]Trim driver side fender[/STRIKE]
Install bumpstops
Install limit straps
[STRIKE]Mount last 43" tire[/STRIKE]
[STRIKE]Install Spacers[/STRIKE]


Also I'm glad to see people still tuned in. I will be picking up a Gopro soon to document the first ride in it.

Technically, you don't have to install the front drive shaft to drive it the first time...if you can control yourself.
 
Technically, you don't have to install the front drive shaft to drive it the first time...if you can control yourself.

True, and the exhaust is sorta unnecessary too. I could leave the hood off and flip the existing downpipe to make a stack.

That would be pretty good.

I do need to put the shifters in for the transfercase and will have to modify the front crossmember to do that. I was planning on knocking that junk out tomorrow anyhow and maybe getting the brakes all run.

Thinking about it, It's more of a list to get it wheelable. I know it will drive. I just want to see how it works on some trails. :D
 
It looks like a big ass beast of a Cruiser but you did a nice job keeping it good and low. I would like to see it on some trails too!

:cheers:

Thanks, hopefully it will be nice and stable.


Also in the way of fuel line fittings, I have to make a new pickup and return lines for the fuel tank. The old ones are rusted and I would like to bump the line size up in case I ever want to do more with fueling in the future.

Could anyone point me in the direction of what kind of fittings I will need and where to get them?

Wow, I don't remember. I needed a bigger line into the tank for the fuel injection that was on the 383. I had to refabricate the plate, intake and return. In hindsight, I would build your custom tank right now and avoid the future hassle of the problems that will arise making a different system fit with the old Toyota tank. Seriously, that tank and the system I mated to it have been a huge headache over the years.
 
Wow, I don't remember. I needed a bigger line into the tank for the fuel injection that was on the 383. I had to refabricate the plate, intake and return. In hindsight, I would build your custom tank right now and avoid the future hassle of the problems that will arise making a different system fit with the old Toyota tank. Seriously, that tank and the system I mated to it have been a huge headache over the years.

I really want to get the truck drivable and for the time being that means just reusing the stock tank.
I still plan on making a custom tank in the future. Its just a bit further down the line.

Any other input on fittings for making the draw straw and fuel return?
 
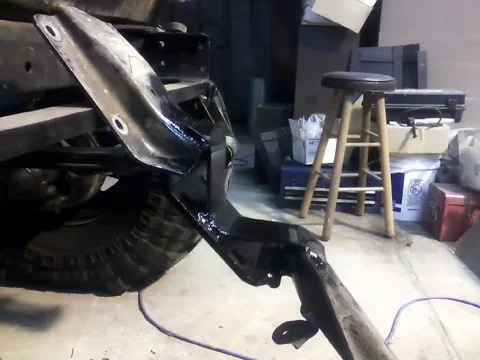
Some more time in the shop allowed me to modify the transmission crossmember to get the front driveshaft in. I unfortunately didn't have any small tubing laying around so I made use of some spare metal I had in the shop.

1228121726.jpg

It turns out a leaf spring plate and some flat stock worked pretty well for what I needed.

1228121726a.jpg

1228121817.jpg
1228121726.jpg
1228121726a.jpg
1228121817.jpg
 
I also started on the twin sticks for the NP205.

I had made some pivot blocks at the shop and bent up some 1/2" CRS to form the shifter rods.

1228121956.jpg

1228122058.jpg

1228122108.jpg

I still have to weld some 1/2"-20 thread to the shifters so I can thread some knobs on.
I also need to measure up the linkage lengths for under the truck as well.
1228121956.jpg
1228122058.jpg
1228122108.jpg
 
Almost finished :D

Things to left do:


Install fuel tank
[STRIKE]Box rear framerails[/STRIKE]
[STRIKE]Anti-wrap[/STRIKE] bar
[STRIKE]Rear shocks[/STRIKE]
Rear brake lines
Clutch line
[STRIKE]Modify transmission crossmember to clear front driveshaft
Install front driveshaft[/STRIKE]
Change fuel filter and install fuel lines
[STRIKE]Intake[/STRIKE]
Exhaust
[STRIKE]Turbo Piping[/STRIKE]
Hood struts and reinstall hood
Change oil and check fluids
Tranfercase linkages (80 % Done)
[STRIKE]Remove E-brake cable[/STRIKE]
[STRIKE]Trim driver side fender[/STRIKE]
Install bumpstops
Install limit straps
[STRIKE]Mount last 43" tire[/STRIKE]
[STRIKE]Install Spacers[/STRIKE]
 
When I did my fuel lines for the fuel injection I refabricated the round plate at the corner of the tank where the draw line and the return line go. I drilled two holes in the center of the round plate and then had a buddy tig two small threaded (inside) pipe elbows onto the plate. They were welded so that I could get barbed brass fittings top and bottom. For the draw I used a rubber hose that went to the place in the tank that the old hard line used for furl pick-up. this is directly below the plate for the fuel sensor. I drilled a hole in the fuel sensor plate and put a long bolt through it with a nut on the bottom to hold it in place with the plate (I used rubber o-rings on the top and bottom of the plate to seal the bolt). I took a piece of pipe coupling that was threaded on the inside and welded a nut to it. I cut a length of tubing with an I.D. that was just big enough to slip over the bolt that was in the fuel meter plate. On one end I welded a peice of all thread that would thread into the nut welded to the pipe coupling. I put a brass barbed fitting into the pipe coupling and attached the pickup hose to it (You might want to do this before you snake the hose into the tank). Looking into the fuel meter access hole, you should be able to see the end of your pickup hose with the coupling and the nut. Carefully take the tube with the all-thread welded to the end and thread the all-thread into the nut. Now take the access plate with the long bolt and insert the bolt into the tube. What you're looking for is the tube to be long enough that when you screw the access plate down, it will hold the fuel pick-up to the bottom of the tank, and just short enough to be able to screw the access plate down. If your bolt is long enough, it will keep the tube from slipping of the end. I used a four or five inch bolt. Your return line should be easy from there.

Clear as mud, right?
 
Stevo.... lookin' Good as usual ma Man! Hopefully, I'll be back this summer and seeing where my Project To Do List....left off. Great work!

Rasta it's great to see you are still tuned in.
You gotta get your truck over to the east coast for a meet up.

In the meantime I'll try to get my truck ready to go. :D
 
Great progress Steve. Fab work is coming along nicely. Like the fender design.

J

Thanks J, been chugging along. A bit slower than I would like but its getting there.

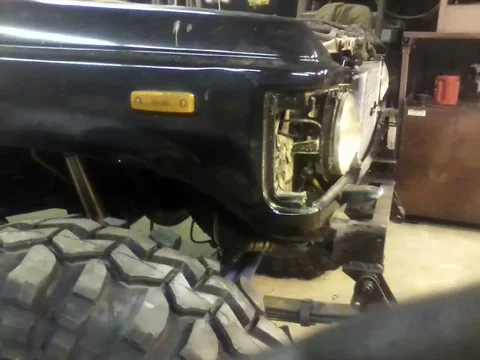
I finished up the fenders last night.
They're not quite "show truck" but they aren't terrible for a wheeling truck.

0111132006.jpg

0111132006a.jpg

I also reinstalled the front bumper after getting some paint on the fenders.

0111132242.jpg
0111132006.jpg
0111132006a.jpg
0111132242.jpg
 
Looking good! Its always nice to cross some stuff off the list as well.

Sent from another Galaxy
 
Yeah, it is nice to get that list a bit shorter.

Unfortunately no progress has been made on the truck in a while. Been too busy and worn out from work. :frown:

I did pick up a gopro.

GOPR0001.jpg

And I am headed to Costa Rica for two weeks for a vacation.
Hopefully when I get back I will have some time to get this truck driving.
GOPR0001.jpg
 

Users who are viewing this thread

Back
Top Bottom