SQOD Squad - Stupid Question Of the Day (7 Viewers)

This site may earn a commission from merchant affiliate
links, including eBay, Amazon, Skimlinks, and others.

If you aren't tied to a specific fuse block, there are options that can handle switched/unswitched circuits in a single block. Here's 1 example I found that might be a good option:


It sounds like it was originally designed for motorcycle use, so it's compact.
@linuxgod This post made me think of a device I have from a motorcycle called a Fuzeblock FZ-1 - it is similar form factor, but has the ability to have both ignition and always on, depending on how you place the fuse.

The only thing is, it has these screw clamps where you connect wires directly, not using a terminal like you would on the BlueSea panel.

It might be an alternative so you can have both switched and unswitched circuits.

image.jpg
image.jpg

The black module at the top of the unit is a built-in relay. On this one, there are only three fuses, the others are “off”. you can place the fuses to decide which circuits are constant on versus switched.

In mine shown above, the 2 amp fuse is set up for constant power, whereas the 10 amp fuses are set up to be energized when the ignition is on (or whatever 12v signal you might use for switching). I seem to recall having my auxiliary lighting on the ignition switched circuit and my gps on the constant, or something like that.

I could imagine using the switched circuit on your daughters phone charging port, and constant power on interior led lights and some other bank of charging ports that you use with the vehicle off, for example.

One thing is that you may be limited in the amount of amperage you can handle. These wires I used on a motorcycle are MUCH smaller size than the large gauge wire I ran to the cargo area in my last land cruiser.

Maybe you could run your large gauge wire back to the 100amp blue sea distribution panel, and then use one of the branch circuits off the BlueSea panel to run to this device that you run your additional switched circuits off. It would basically be the same as the relay idea proposed earlier in this thread, but a lot more tidy an install to handle multiple circuits. And you could hook up the more power intensive loads like fridges, etc, to the BlueSea.

 
Last edited:
@linuxgod This post made me think of a device I have from a motorcycle called a Fuzeblock FZ-1 - it is similar form factor, but has the ability to have both ignition and always on, depending on how you place the fuse.

The only thing is, it has these screw clamps where you connect wires directly, not using a terminal like you would on the BlueSea panel.

It might be an alternative so you can have both switched and unswitched circuits.

View attachment 2677450View attachment 2677451
The black module at the top of the unit is a built-in relay. On this one, there are only three fuses, the others are “off”. you can place the fuses to decide which circuits are constant on versus switched.

In mine shown above, the 2 amp fuse is set up for constant power, whereas the 10 amp fuses are set up to be energized when the ignition is on (or whatever 12v signal you might use for switching). I seem to recall having my auxiliary lighting on the ignition switched circuit and my gps on the constant, or something like that.

I could imagine using the switched circuit on your daughters phone charging port, and constant power on interior led lights and some other bank of charging ports that you use with the vehicle off, for example.

One thing is that you may be limited in the amount of amperage you can handle. These wires I used on a motorcycle are MUCH smaller size than the large gauge wire I ran to the cargo area in my last land cruiser.

Maybe you could run your large gauge wire back to the 100amp blue sea distribution panel, and then use one of the branch circuits off the BlueSea panel to run to this device that you run your additional switched circuits off. It would basically be the same as the relay idea proposed earlier in this thread, but a lot more tidy an install to handle multiple circuits. And you could hook up the more power intensive loads like fridges, etc, to the BlueSea.

Nifty. I might have to try that. Thanks!
 
I've replaced a lot of parts on vehicles but never shocks since I don't own a spring compressor. I need to pull me right front shock as it seems to be damaged with a fairly loud squeak coming from the lower uniball. My normal private mechanic is concerned about the pulling it due to the KDSS system, having never worked on a front suspension with one. From what I can see the KDSS system doesn't come into play at all and its the same as removing any coilover. Is there anything more to removing it due to the KDSS system? I'm not sure I'll convince him to try but it'll be a first step towards him or me doing it.
You don't have to touch the KDSS system to remove the coilover, doing so just makes it easier since you're fighting against the sway bar otherwise. Then again if you have all 4 wheels in the air while on a lift your KDSS is probably full extended so it might not matter anyway
 
I’ve done it both ways. Without loosening the shutter valve screws it is a ton more work. I highly recommend loosening both kdss shuttler valve screws (no more than 3 turns!).
 
This made me think of a device I have from a motorcycle called a Fuzeblock FZ-1 - similar form factor, but has the ability to have both ignition and always on, depending on how you place the fuse. The only thing is, it has these screw clamps where you connect wires directly, not using a terminal like you would on the BlueSea panel. It might be an alternative?

View attachment 2677451
The black module at the top of the unit is a built-in relay. On this one, there are only three fuses, the others are “off”. The 2 amp fuse is set up for constant power, whereas the 10 amp fuses are set up to be energized when the ignition is on (or whatever 12v signal you might use for switching. I seem to recall having my auxiliary lighting on the ignition switched circuit and my gps on the constant, or something like that.

I could imagine using the switched circuit on your daughters phone charging port, and constant power on interior led lights and some other bank of charging ports that you use with the vehicle off, for example.

That's just about a perfect option, including the super small size. The 12 gauge wire limitation on the power input is a bit unfortunate, but it would probably be fine to use 8 gauge from the battery for the long run to reduce voltage loss and then use one of those reducer butt connectors to go from 8 gauge to 12 gauge for the last few inches for connecting to the terminal block. The ability to choose constant or switched power for each circuit is really nice, as is the integrated relay.
 
I’ve done it both ways. Without loosening the shutter valve screws it is a ton more work. I highly recommend loosening both kdss shuttler valve screws (no more than 3 turns!).

I've thought about this and I think it's unnecessary to open the KDSS valve to remove the coilover. Or rather, a buddy of mine who builds drag cars says we're doing it wrong.

While the vehicle is on the ground: strap the spring in the slightly compressed position (use a ratchet strap, spring compressor, hose clamps, etc), remove the lower shock bolt, then lift the vehicle. The LCA should drop down and out of the way. To get it back in, use a spring compressor to squeeze the spring slightly and then strap it in the slightly compressed position and slide it in then loosen the straps/clamps.
 
I like the idea, but in my very limited experience, I found it to be very difficult to compress the springs on the 200 in place. At least with the two types of spring compressors and other straps, etc. that I’ve tried. It is a great idea, if people can find a way to make it work. Somebody should do a write up on it.
 
I like the idea, but in my very limited experience, I found it to be very difficult to compress the springs on the 200 in place. At least with the two types of spring compressors and other straps, etc. that I’ve tried. It is a great idea, if people can find a way to make it work. Somebody should do a write up on it.
At least to remove, I don't think you need to compress though. They're already sufficiently compressed when you're on the ground. You just need to keep them from stretching out when you lift the truck in the air.
 
Any reason to use the TRD version?
 
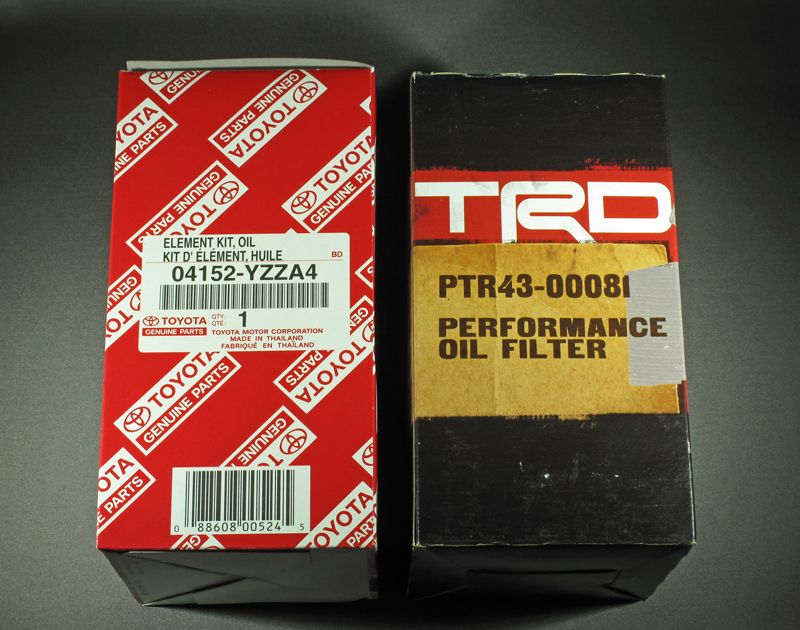
Getting the stuff to do my first oil change on my 21 HE. The McGeorge website says I should use the TRD oil filter: 2007-2021 Toyota Trd, Oil Filter PTR43-00081 | Toyota Parts - https://toyotaparts.mcgeorgetoyota.com/oem-parts/toyota-trd-oil-filter-ptr4300081 at 13 bucks each.

Is this different than the standard 04152-YZZA4 filter? Can get a case of 5 filters with O rings on amazon for 25 bucks from a dealership.

Any reason to use the TRD version?
Yes, it is different. Both the standard and TRD cartridge filters fit, but the TRD one seems like a more substantial and solidly built item with a metal cage and nicer gaskets. Who knows if it filters any differently? Not sure I’ve seen anyone test them. For a couple of bucks difference, I use the TRD filters. You should be able to find more feedback if you use the search feature.
 
Getting the stuff to do my first oil change on my 21 HE. The McGeorge website says I should use the TRD oil filter: 2007-2021 Toyota Trd, Oil Filter PTR43-00081 | Toyota Parts - https://toyotaparts.mcgeorgetoyota.com/oem-parts/toyota-trd-oil-filter-ptr4300081 at 13 bucks each.

Is this different than the standard 04152-YZZA4 filter? Can get a case of 5 filters with O rings on amazon for 25 bucks from a dealership.

Any reason to use the TRD version?
Avoid amazon and eBay for filters. Or any parts for that matter. Too many fakes.

Local or online dealers only.
 
Yeah, dealer for filters is easy and cheap. Any time I order parts I throw some filters to get over $75 to get free shipping so it ends up cheaper than Amazon anyway.


1621433578179.png

1621433451659.png
 
Sorry for filling up this thread with my dumb questions.

Does anyone know the actual length of the wheel studs? I'm getting spacers for mine from Bora and they told me 1 inch would be enough to clear the factory studs without trimming them, BUT almost everyone I've seem is running 1.25 inch spacers.

I'd take off a wheel myself, but currently away from my cruiser for work for about the next 8 weeks.
With the 1” vs 1.25” spacer situation, the issue is how much wheel stud sticks out past the spacer. If you use 1” spacer, there Needs to be recesses in the face of the wheel that mounts to the hub to clear the protruding studs. I believe that most of the OEM wheels have the recesses, but YMMV with aftermarket. Although in most cases, aftermarket wheels don’t need spacers. Usually the 1” spacer is better for scrub radius, unless going very tall on the tire.
 
With the 1” vs 1.25” spacer situation, the issue is how much wheel stud sticks out past the spacer. If you use 1” spacer, there Needs to be recesses in the face of the wheel that mounts to the hub to clear the protruding studs. I believe that most of the OEM wheels have the recesses, but YMMV with aftermarket. Although in most cases, aftermarket wheels don’t need spacers. Usually the 1” spacer is better for scrub radius, unless going very tall on the tire.
I need to redo the math but if you're using OEM wheels then the approximately correct spacers are:

none for 31s (stock +60mm offset)
0.5" for 33s (R/W +50mm offset)
0.75" for 34s (IIRC optimal offset is something like +43mm)
1" for 35s (I think optimal offset is around +35mm)
1.25" for 37s (roughly +25mm offset)

You can run different offsets/spacers, it just changes the vehicle handling dynamics a bit
 
@linuxgod are those spacer sizes for each tire size assuming stock height? Once you lift the vehicle, don't you need more spacer to compensate for the scrub radius changes (moving the centerline of the wheel outward to dial out changes in the scrub radius)?
 
@linuxgod are those spacer sizes for each tire size assuming stock height? Once you lift the vehicle, don't you need more spacer to compensate for the scrub radius changes (moving the centerline of the wheel outward to dial out changes in the scrub radius)?

@TeCKis300 is the expert but I believe the answer is that lift doesn’t matter since you’re only changing the “neutral” point in your IFS suspension arc and thus the kingpin angle stays the same. I may be mistaken though.
 
With the 1” vs 1.25” spacer situation, the issue is how much wheel stud sticks out past the spacer. If you use 1” spacer, there Needs to be recesses in the face of the wheel that mounts to the hub to clear the protruding studs. I believe that most of the OEM wheels have the recesses, but YMMV with aftermarket. Although in most cases, aftermarket wheels don’t need spacers. Usually the 1” spacer is better for scrub radius, unless going very tall on the tire.
I've got a Heritage, so I have the BBS wheels. Do you know if they have the recess?
 
@linuxgod are those spacer sizes for each tire size assuming stock height? Once you lift the vehicle, don't you need more spacer to compensate for the scrub radius changes (moving the centerline of the wheel outward to dial out changes in the scrub radius)?

Agree with @linuxgod. Simple answer is that scrub radius geometry is not directly affected by lift.

This diagram may help. You can see that the scrub radius relationship to the tire footprint is defined by the pivot points on the suspension upright. That doesn't change with lift, i.e. angles of the UCA/LCA.

1621526746466.png
 

Users who are viewing this thread

Back
Top Bottom