Rear AC cap question (1 Viewer)

This site may earn a commission from merchant affiliate
links, including eBay, Amazon, Skimlinks, and others.

I’m gonna cap mine too similar to the spot shown in leandro’s post. Does anyone know how much Freon should be charged since I now don’t have rear AC. I hear it’s bad for the compressor to overcharge the AC system.

The a/c compressor has a relief valve, so if you overcharge it, which is actually kinda hard to do with the DIY in a can kits, it will vent the extra.
 
I’m gonna cap mine too similar to the spot shown in leandro’s post. Does anyone know how much Freon should be charged since I now don’t have rear AC. I hear it’s bad for the compressor to overcharge the AC system.

If you have a manifold gauge set, go by the FSM pressures. If not, start with 2 cans.

(This is for R134A. Based on your location: are you recharging with R12A HC? Then it may be different.)
 
I took it to a shop to vacuum the system y recharge.
The guy there took his time and by trial and error figured it out. IIRC, he put something like 0.7 to 0.8 kgs.
The AC has been working great ever since.
 
I’m actually gonna go to a shop and have them vacuum and test my block to see if it will hold -30lbs and then have them to recharge.

I think the fsm says something like 1.1kg with rear AC and that’s what they went by before finding out about the leak.
 

We use our rear AC for the kids so fixing it was a must. The area that was leaking was just before the hoses go into the collector under the rear quarter, both hoses. I found 2 leaks on the larger hose and had a local shop splice in a flexible section then the smaller hose leak appeared.

We were not interested in another $100 custom job so looked online for a solution. I wish I would have found this stuff earlier! Easy as microwaveable mac-n-cheese.

https://www.muggyweld.com/product/super-alloy-5/
 
We were not interested in another $100 custom job so looked online for a solution. I wish I would have found this stuff earlier! Easy as microwaveable mac-n-cheese.

I have some aluminum brazing rod and never thought to use that to seal the AC lines. Very interesting. Hard to tell from the picture, but did you seal the leaking tube by brazing the outside? Or did you install a fitting over the leaking area?

I'd be very interested to hear more about the surface prep and procedure. Was a propane torch enough heat? Or did you have to resort to pre-heating and MAP gas?
 
I have some aluminum brazing rod and never thought to use that to seal the AC lines. Very interesting. Hard to tell from the picture, but did you seal the leaking tube by brazing the outside? Or did you install a fitting over the leaking area?


I'd be very interested to hear more about the surface prep and procedure. Was a propane torch enough heat? Or did you have to resort to pre-heating and MAP gas?

I just followed the instructions from the Muggyweld. They have a flux that lowers the melt point and cleans out impurities. There are quite a few videos of the process on YouTube.
 
Whack-a-Mole? I had a failure of the 3rd row AC high-pressure line. Capped the high and low, recharged, and thought I had everything working well. Blowing cold air in the low 40's. Two days later, I had a neon yellow pool under the LC. Any thoughts on this likely being a gasket issue vs. needing to replace the line or fitting before I evacuate the refrigerant and start digging in?

UNADJUSTEDNONRAW_thumb_783b.jpg


UNADJUSTEDNONRAW_thumb_783a.jpg
 
Whack-a-Mole? I had a failure of the 3rd row AC high-pressure line. Capped the high and low, recharged, and thought I had everything working well. Blowing cold air in the low 40's. Two days later, I had a neon yellow pool under the LC. Any thoughts on this likely being a gasket issue vs. needing to replace the line or fitting before I evacuate the refrigerant and start digging in?

View attachment 2390110

View attachment 2390111

Looks very much like an O-Ring leak. Replace O-Ring and use Nylog on the O-ring and the mating surfaces, you won't have a leak there again.

Nylog.jpg
 
Hi guys,
A few moonths ago i fixed a leak on my rear AC line with a dorman kit, worked great, but unfortunately last night I saw that damn fluorescent puddle under the truck again.
This time it broke above the heat shield of the muffler, very hard to get.
I'm driving to Miami next week (from chicago) and it's not gonna be pleasant without the AC, so I'm gonna cut my loses and cap it.
My questions are:
What is the better place to cap it? I was thinking at the very top, where the main lines split to go to the back.
Can i just cap both lines or i need to loop it to close the circuit?
Thanks in advance. I'm doing the work tomorrow, don't have much time left.
@Leandro. Reviving your great post and awesome pictures!. Just checking to see if your solution still works and does the front AC keep the entire vehicle cool enough?
 
Last edited:
@SeattleStew So I just did this exact repair not even a week ago using an AC manifold set from harbor freight and their cheap venturi vacuum pump. I also used the line terminators that are linked earlier in the post. I capped the lines based on the photos. I watched three generic youtube videos: and and How To Recharge an AC System - EricTheCarGuy

Once I hooked it up and pulled vacuum, I closed the lines and let it sit. It held vacuum for a few hours and that meant my repairs worked. I did have to add pag oil because my rear line blew out and was spitting the oil. To do that I just pulled vacuum on the low side and had the hose hooked up to the high side and opened the valve and stuck the hose in a cup of the oil. It sucked it all in. Then I just followed the steps in the videos, and made sure to purge the refrigerant line before opening it to the system.

The AC was the first thing to go on my truck, about 2 weeks after I bought it. Ive never had AC in the hot weather in two years. Drove 250miles with AC last weekend and it was glorious. It was just me driving, but it felt plenty cold.

If I were to do it again, I didnt realize you could get a vacuum pump and the ac manifold directly from autozone for free with their rental program. Definitely would have done that had i known, but i only spent about $75 on parts from HF.

20200806_161417.jpg
 
Long time lurker here - registered just to say that this thread was great. '00 LX740 - this is the second time that my rear AC has gone bad. First time was 7 years ago and I needed the rear AC working so I paid a shop to fix it. This time I followed what people did here, watched a video or two, and was able to quickly cap the lines. I then took it into a shop that did a vacuum test and recharged the system for $100.

A few tips -
- near the commonly used cut point for high pressure line is where two tubes are connected - I actually disconnected that with a few wrenches first with a whole bunch of rags around to catch any residual oil. With the lines disconnected, it was very easy to flex the tube into a position where it could be easily cut .
- clean and gently sand the tubing where the fitting will go. The compression sleeve gets caught on any imperfection in the tube.
- need big wrenches/sockets - 1 1/4" for the low pressure cap. I had no wrenches that large, no sockets that large, and only had one adjustable crescent wrench that could go up to that size. I ended up using that wrench and a set of channel lock pliers to tighten the connections - I guesstimated the torque.
 
I foolishly cut off too much of the low pressure line so I can't fit the block off cap on there properly. Would there be any issue with pinching the line closed and using solder or jb weld to fill the seam?
 
Soldered/brazing refrigerant linesets is common in the HVAC world do it should work here. Just need to make sure it is fully sealed so vacuum can be pulled on the system.
 
Just wanted to mention this in case it helps anyone on the topic of capping rear AC. I used a cap kit that screws into the tubes that sits behind the passenger wheel. No cutting required.

Here's the kit I ordered ($70): Rear AC block kit for Toyota Land Cruiser, fits years 1996 | 2002 | 2003 | 2004 | 2005 | 2006 | 2002 | 2003 | 2004 | 2005 | 2006 - https://www.streetrodguys.com/index.php?route=product/product&product_id=172&search=Land+cruiser

The kit is a lot pricier than the Dorman kit, but it doesn't require any cutting which means you can bring back your Rear AC in the future if you wanted or for selling.

6B50AF35-F3B7-48FA-8F46-362757EE997C.jpg
 
I just want to update this thread.

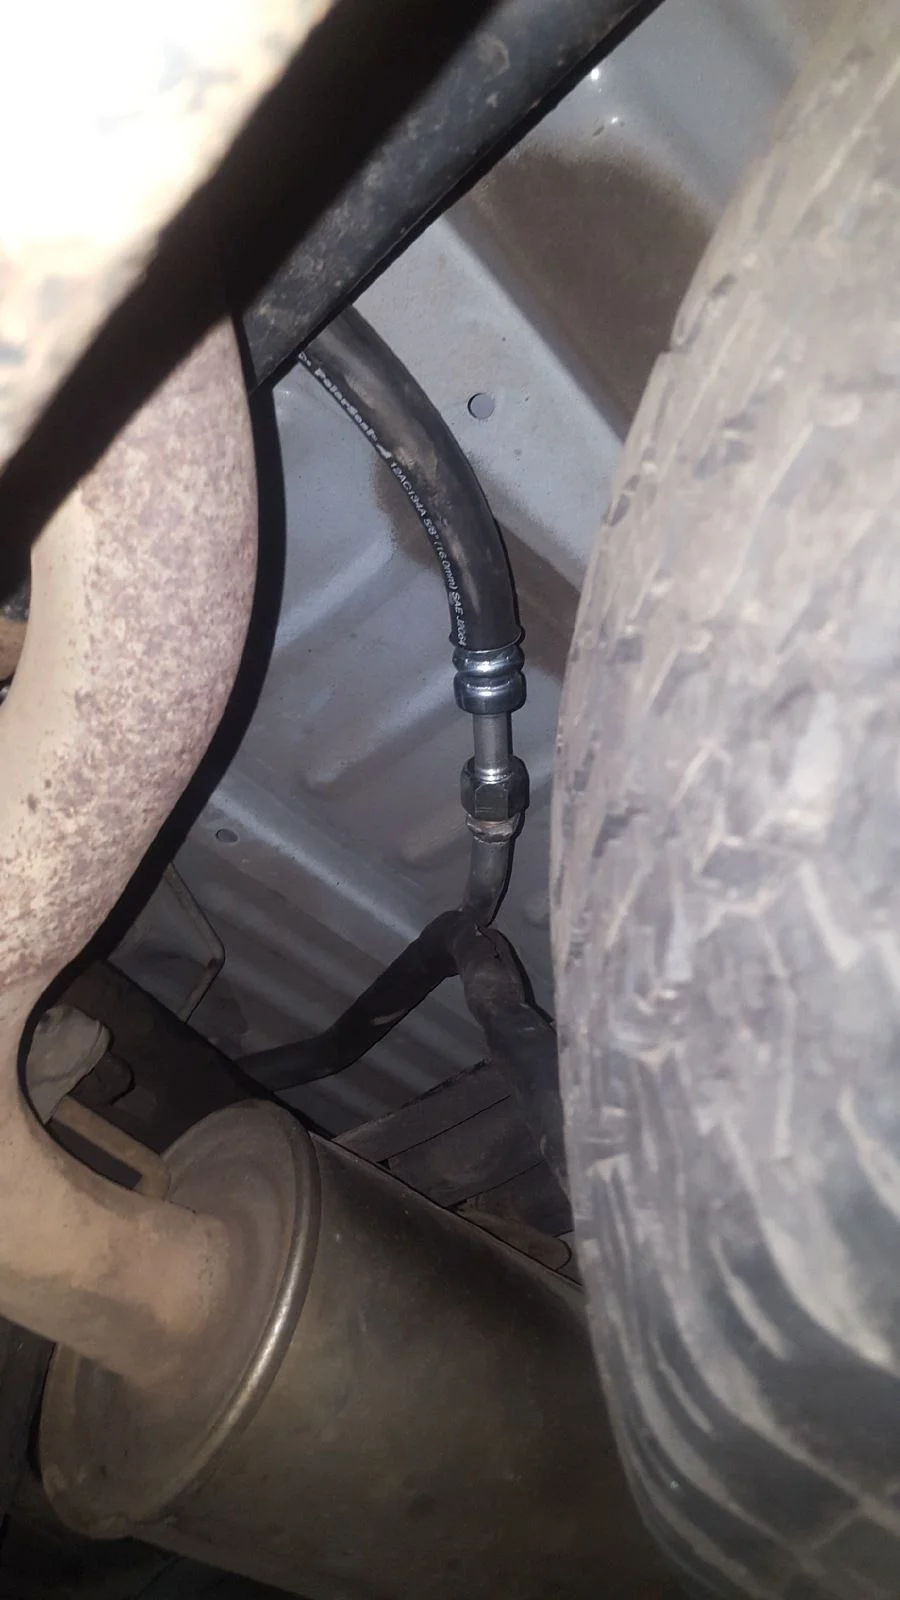
A/C was not working on my 06 LX when I bought it last year. I found a hole in the line in the normal spot by in the passenger wheel well where the line curves and starts going to the back. I ordered Dorman A/C line splice kits off of Amazon.
For the small line:
Dorman 800-673 A/C Line Splice Kit for 5/16 Line With No.6 Hose, Black
For the big line:
Dorman 800-674 A/C Line Splice Kit for 3/4 Line With No.12 Hose

When I dug into it I found that only the small line has deteriorated so I will return the kit for the big line.
Here's the area:
1000023040.jpg


I cut out the bad section of the small line:
1000023048.jpg


I cleaned up the ends really really well (ignore the filthy undercarriage):
1000023041.jpg


I cut the hose to length and made the line according to the instructions:
1000023045.jpg


Fans followed the instructions to install the line splice:
1000023046.jpg


I have been procrastinating this because I imagined it would be very difficult. In reality access was easy and the whole job ended up being relatively quick and easy compared to what I was expecting. When I finished I was VERY glad I didn't just cap the lines because I don't think it would have been easier than doing the splice.
 

Users who are viewing this thread

Back
Top Bottom