
Navigation
Install the app
How to install the app on iOS
Follow along with the video below to see how to install our site as a web app on your home screen.
Note: This feature may not be available in some browsers.
More options
Style variation
You are using an out of date browser. It may not display this or other websites correctly.
You should upgrade or use an alternative browser.
You should upgrade or use an alternative browser.
Build Project Wintergreen - '97 FZJ80 Gen V 6.2 Swap - Richmond, VA
- Thread starter RICVirginiaHJ61
- Start date
Member Builds and Stories
This site may earn a commission from merchant affiliate
links, including eBay, Amazon, Skimlinks, and others.

- Thread starter
- #42
Rebuilt Bosch/Bendix hydroboost from ebay and Wilwood MC + proportioner valve installed yesterday.
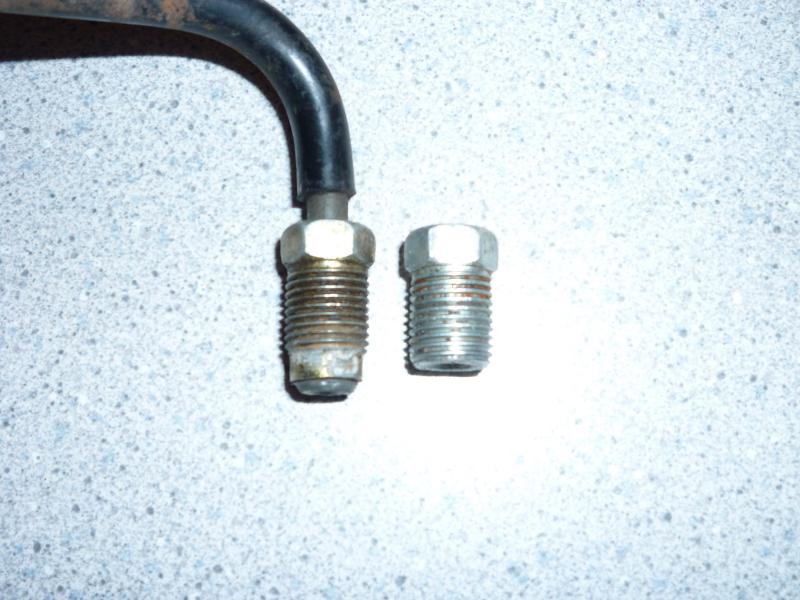
Deleted the malfunctioning ABS and the LSPV in the back along with the extraneous brake line. Was having a lot of trouble making good flares on my scrap practice pieces, so I'm going to go the adapter route. I think the old school Toyota lines are not quite as soft as what folks sell today. Considered running all new lines, but that seems like a lotta work. Earl's (00122ERL) seems like it's the right adapter - will update if not. Note that the Dorman M10x1.0 to 3/8-24 adapter (PN 327850) is the opposite of what you need male / female -wise.
See a few posts earlier for an update re. the mounting bracket. I reused the square drilled plate that came with the booster and was able to drill a functional (but not exactly pretty) rectangle into it and everything seems nice and snug through the firewall. Used a tapered round grinder attachment on a die grinder to open up the yoke that came with the booster just a few mm for the Toyota brake pedal pin to fit. The slightly thinner pin that came with the booster would have ended up bouncing around in the Toyota brake pedal hole and I think that would have driven me crazy. It also didn't have the nice machined notch for the spring. The Toyota pin's now perfectly snug (though took a tap or two with a hammer).

Some good resources:
 forum.ih8mud.com
 forum.ih8mud.com
(NOTE: Do not go through the pain of trying to order from the vendor baldilocks used in this thread. I didn't do enough homework and find all the poor reviews and I am now in a dispute with him & my credit card company. It's a mess.)
 forum.ih8mud.com
Deleted the malfunctioning ABS and the LSPV in the back along with the extraneous brake line. Was having a lot of trouble making good flares on my scrap practice pieces, so I'm going to go the adapter route. I think the old school Toyota lines are not quite as soft as what folks sell today. Considered running all new lines, but that seems like a lotta work. Earl's (00122ERL) seems like it's the right adapter - will update if not. Note that the Dorman M10x1.0 to 3/8-24 adapter (PN 327850) is the opposite of what you need male / female -wise.
See a few posts earlier for an update re. the mounting bracket. I reused the square drilled plate that came with the booster and was able to drill a functional (but not exactly pretty) rectangle into it and everything seems nice and snug through the firewall. Used a tapered round grinder attachment on a die grinder to open up the yoke that came with the booster just a few mm for the Toyota brake pedal pin to fit. The slightly thinner pin that came with the booster would have ended up bouncing around in the Toyota brake pedal hole and I think that would have driven me crazy. It also didn't have the nice machined notch for the spring. The Toyota pin's now perfectly snug (though took a tap or two with a hammer).
Some good resources:
Write-up: Toss the LSPV and install a manual proportioning valve
**I haven't tested this on the road yet since my truck is on jack stands, working on a knuckle rebuild. But I did test the system and so far no leaks** After fighting with my rusted-to-hell LSPV and trying to adjust it, I got fed up and decided to get rid of it. Debated and bypassing it and...
forum.ih8mud.com
80 Series brake hydro booster conversion installed
I am editing this thread today 9/8/2025 because so many members have had a bad buying experience through the vendor that I bought my hydro booster kit through. My experience was a bit frustrating but not as bad as some posts on the last pages here. My advice would be to contact a company...
forum.ih8mud.com
(NOTE: Do not go through the pain of trying to order from the vendor baldilocks used in this thread. I didn't do enough homework and find all the poor reviews and I am now in a dispute with him & my credit card company. It's a mess.)
Yet another LSPV/ABS delete how to...
I finally had some time to get to this today. Figured I would take some pictures and do a write up. There is plenty of info here, but it is a bit scattered. This will go from the start to the end. Is it worth it? Absolutely! For all those that complain about the brakes, we have plenty of...
forum.ih8mud.com
Last edited:
- Thread starter
- #43
For anyone that might be following along... have been in a bit of 1 step forward 2 steps back mode.
Forward:
Forward:
- Finally got my shifter set-up to a place where I am confident in the cab shifter moving the control lever of the transmission to the right places and back again.
- Leak tested all my plumbing -- had a couple -- and got everything snug & leak free. Still need to run the engine & trans up to temperature to burp the radiator and get the right fill level for the ATF. There's no dipstick on these GM transmissions and you've got to get them engaged and up to temp to get the right fill level.
- Found a highly recommended exhaust guy (Robert @ Hendrick's Muffler in Moseley, VA) who is ready when I am to get some pipes on it, but gotta get this thing moving under its own power first.
- Crossed the starter / ignition wires when I went to re-connect everything and fried my fusible link (had an extra on-hand) and then plugged in the starter relay backwards after bench testing it (this lead to a couple days of head scratching until the "eureka! you're an idiot..." moment).
- Shredded the serpentine belt because the power steering pulley was about 1/8" mis-aligned. Got that alignment sorted out this morning to realize I'd bought too short of a belt (wanted ***770 and got ***700).
- My ECU is throwing off just about every OBD2 DTC under the sun. Some have been easy fixes (using the wrong swaptime accelerator connector -- camaro vs. truck). Others are "permanent codes" that require error free run-time to clear. Doing some more homework here, but at present the ECU / TCU are not happy and have the truck in no-drive mode.
- Thread starter
- #44
Annnnddd the rig's rolling under its own power...
Having the t'case in neutral was my issue (another face/palm moment). Still a lot of codes, but we're moving!
Having the t'case in neutral was my issue (another face/palm moment). Still a lot of codes, but we're moving!
Crickets... haha HOWS IT GOING?!?!
- Thread starter
- #46
Crickets... haha HOWS IT GOING?!?!
Gah - just about to restart things on the project truck as the peak summer temps / humidity have seemed to break here in Virginia.
I got supremely side tracked in July with power steering issues in my daily driver 60 series that chewed up a bunch of my time / truck project budget / sanity working in 90pct humidity on a gravel driveway. After some missteps, I’ve finally got it dialed in with a bit of a frankenstein rebuild of the pump (half old / half new bc the hj61 is a little different than the gas engine setups) and a rebuilt 80 series gearbox. Note: if you have a later model 60 series on big tires and have the opportunity to make the upgrade, it is great. The 80 series box is a bit beefier and my steering is vastly improved.
@mattnandie - good to read your break in update. I haven’t driven the 80 on the road yet, but have similar thoughts about the shifter setup.
Will have some more progress in the coming weeks / months.
Last edited:
3 / n:
Tachometer: To get your dash tach to work with Mitch's 4 pulses / rev output - check out post 4,011 here: 8x Series V8 Swaps - https://forum.ih8mud.com/threads/8x-series-v8-swaps.948869/page-201. The Toyota tach is calibrated for 3 pulses / rev, but you can adjust the variable resistor on the tach circuit board to calibrate for 4 pulses / rev. With combination meter out of the dash, taking the tach out of it is 3 screws. Then just get out a multimeter and small screwdriver to adjust and test. It's a very slight counter clockwise adjustment -- maybe 20 deg. I then ran some extra wire off the black wire into the combination meter that drives the tach to connect to Mitch’s lead. Many thanks @NeverFinis for bench testing this with a wave generator and finding out the appropriate resistances.[Update] - For clarity, neverfinis lays out the resistances you want to get between the ABC points on the board that he highlights. You don’t need the wave generator box. He did the work for us in replicating the signal in and figuring out what adjustments will give you a decently accurate output. Set your multimeter to the right level of sensitivity (ohms) and adjust / test / adjust / test.CEL: The check engine light is an easy connection to make off the combination meter. I cut and extended the Y-R wire to run to Mitch’s lead. I think this light may turn on when I engage the Tow Mode, but that will be fine.Tow Mode: There seems to be a dearth of 80 Series style aftermarket switches out there (if you know any more please let me know). You'll want a momentary (on) / off switch. Air On Board sells a few flavors of 80s switches though nothing blank. I got one marked for a garage door and some stickers to cover over "Garage Door".Tap Shift: I ordered a 3D printed switch plate with a cutout for a USB A cable from Solve Function (I did not realize, I'd actually get the USB A cable as well - will figure out something to do with it) and trying to find the right size momentary (on) off (on) switch from Digikey that will fit into the cut out. The plan here is to put this tap shift button where the OD / 2nd buttons used to be on the shifter console (or maybe somewhere else if that turns out to be less than ideal).Cruise Control: I bought a Rostra cruise control kit from www.thecruisecontrolstore.com. I got a universal RH side stalk and the “Cruise Control for GM LS Drive by Wire ETC Engines.” The kit is relatively easy to install, but note that there is a bit of a missing step in the instructions to mate the stalk to the control unit. From the stalk wires to the CCU connector, Green = pin 1 / Set; Yellow = pin 2 / Res; Brown = pin 3 / On-Off; Red & Blue = pin 6 12v; Black = pin 8 GND. The truck pedal I ordered from Mitch appears to be the right match to the pedal interface plugs of the Rostra kit. I'll also connect the On-Off wire to the “Cruise” light in the combination meter and there are a bunch of other wires you’ve got to tap to make it all work.With some finessing, the universal stalk and its wire / mounting nuts will fit into the little plastic mounting box for the Toyota stalk and is totally unobtrusive on the column.Note: I am going to use Mitch's MCM speedo lead to feed this CCU vehicle speed, but I'm just running the combination meter VSS off the transfer case for the speedo on the dashboard.
[A different set of big guns to put the LT in. Many thanks @matzell @Landshark @mess331470 @Beach80 and @captainva for some hands and tools to get this done. Note that you'll want to extend that arm out to 1 ton to actually get the engine in and I would install only the first piece of the PS pump bracket before install and bolt in pump after you've got the engine in the bay.
P.S.A. - join your local TLCA club!]
View attachment 3637699
View attachment 3638315
View attachment 3638317
Is this the cruise control module you bought? 2008 - 2018 Sierra3 / n:
Tachometer: To get your dash tach to work with Mitch's 4 pulses / rev output - check out post 4,011 here: 8x Series V8 Swaps - https://forum.ih8mud.com/threads/8x-series-v8-swaps.948869/page-201. The Toyota tach is calibrated for 3 pulses / rev, but you can adjust the variable resistor on the tach circuit board to calibrate for 4 pulses / rev. With combination meter out of the dash, taking the tach out of it is 3 screws. Then just get out a multimeter and small screwdriver to adjust and test. It's a very slight counter clockwise adjustment -- maybe 20 deg. I then ran some extra wire off the black wire into the combination meter that drives the tach to connect to Mitch’s lead. Many thanks @NeverFinis for bench testing this with a wave generator and finding out the appropriate resistances.[Update] - For clarity, neverfinis lays out the resistances you want to get between the ABC points on the board that he highlights. You don’t need the wave generator box. He did the work for us in replicating the signal in and figuring out what adjustments will give you a decently accurate output. Set your multimeter to the right level of sensitivity (ohms) and adjust / test / adjust / test.CEL: The check engine light is an easy connection to make off the combination meter. I cut and extended the Y-R wire to run to Mitch’s lead. I think this light may turn on when I engage the Tow Mode, but that will be fine.Tow Mode: There seems to be a dearth of 80 Series style aftermarket switches out there (if you know any more please let me know). You'll want a momentary (on) / off switch. Air On Board sells a few flavors of 80s switches though nothing blank. I got one marked for a garage door and some stickers to cover over "Garage Door".Tap Shift: I ordered a 3D printed switch plate with a cutout for a USB A cable from Solve Function (I did not realize, I'd actually get the USB A cable as well - will figure out something to do with it) and trying to find the right size momentary (on) off (on) switch from Digikey that will fit into the cut out. The plan here is to put this tap shift button where the OD / 2nd buttons used to be on the shifter console (or maybe somewhere else if that turns out to be less than ideal).Cruise Control: I bought a Rostra cruise control kit from www.thecruisecontrolstore.com. I got a universal RH side stalk and the “Cruise Control for GM LS Drive by Wire ETC Engines.” The kit is relatively easy to install, but note that there is a bit of a missing step in the instructions to mate the stalk to the control unit. From the stalk wires to the CCU connector, Green = pin 1 / Set; Yellow = pin 2 / Res; Brown = pin 3 / On-Off; Red & Blue = pin 6 12v; Black = pin 8 GND. The truck pedal I ordered from Mitch appears to be the right match to the pedal interface plugs of the Rostra kit. I'll also connect the On-Off wire to the “Cruise” light in the combination meter and there are a bunch of other wires you’ve got to tap to make it all work.With some finessing, the universal stalk and its wire / mounting nuts will fit into the little plastic mounting box for the Toyota stalk and is totally unobtrusive on the column.Note: I am going to use Mitch's MCM speedo lead to feed this CCU vehicle speed, but I'm just running the combination meter VSS off the transfer case for the speedo on the dashboard.
[A different set of big guns to put the LT in. Many thanks @matzell @Landshark @mess331470 @Beach80 and @captainva for some hands and tools to get this done. Note that you'll want to extend that arm out to 1 ton to actually get the engine in and I would install only the first piece of the PS pump bracket before install and bolt in pump after you've got the engine in the bay.
P.S.A. - join your local TLCA club!]
View attachment 3637699
View attachment 3638315
View attachment 3638317
Or did you buy the 2019+ one?
That's all great info, you can also get a Dakota Digital unit to convert tach signal to match factory unit, and as a bonus you can use it to calibrate your speedo. Mitch and I are working on a solution to modify his MCM so that it can match the factory tach and also control the GM PWM fans at the same time (if you are running the E90 ECM).
- Thread starter
- #49
Bought 250-1881... I've been extremely stalled in the project though and do not have this fully worked out yet.
- Thread starter
- #50
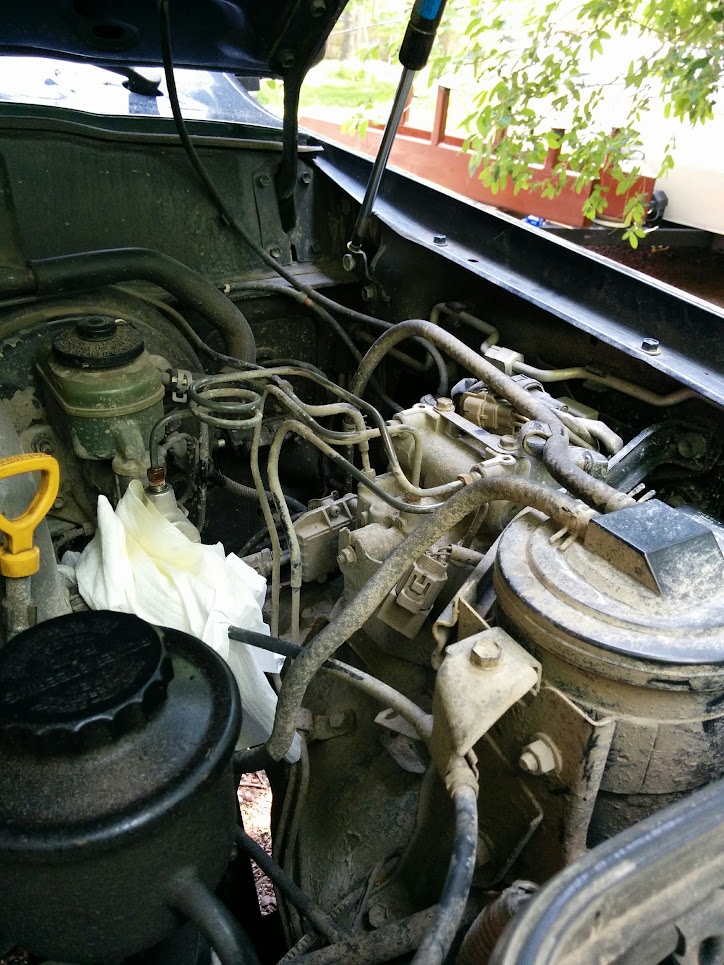
So things kind of came to a standstill over the summer and early fall, but at long last, it’s off to the folks @ Roy Hendrick’s Muffler in Midlothian, VA for exhaust and a shakedown. I drove it up on to the tow truck bed!
Slightly chaotic under the hood, but at least I know where everything is / goes.


Slightly chaotic under the hood, but at least I know where everything is / goes.
Last edited:
- Thread starter
- #51
Project went on a long hiatus over the winter and had some setbacks, but for anyone still following along - finally got things sorted enough to fire it up!
Next up is replacing a damaged or misaligned P/N switch / pawl in the transmission (we’ll see), which i’ve jumped for now and a bunch of other little things before the body / frame shop.
Next up is replacing a damaged or misaligned P/N switch / pawl in the transmission (we’ll see), which i’ve jumped for now and a bunch of other little things before the body / frame shop.
- Thread starter
- #53
Worked through re-bleeding brakes, adjusting power steering pully alignment, filling transmission @ temp, etc. and the 80 swap went for its first lap around the block . Plenty more to work on, but it has left it's semi-permanent spot on that concrete pad to the left for the first time in ages.

- Thread starter
- #54
Have my shifter set up tentatively dialed in. Ended up with a small pile of brackets and parts from ordering the swaptime 10L80 / C10 kit and tor’s initial kit. Key to not having to put a new hole in the Toyota shift lever to shorten its throw to match the swaptime / factory transmission lever was @torfab ’s longer one. I’d like a better bracket set up on the top side of this, but will sleep on it.


Hi guys fellow Torfab / Swaptime 80 series swapper here and I have found a pretty simple solution to the Torfab shift linkage situation. I found the Torfab tab that mounts to my 8l90 transmission fit perfectly but the angle was off by a few degrees and my linkage rod was just a tad too long. My solution was to cut the bottom part (where the keyed slot is) off of the torfab transmission tab and weld on the factory GM tab, putting the arm at around a 40-45 degree angle facing towards the rear when the transmission is in park (photo) then I cut out a 4cm section from the torfab transmission linkage rod that connects the factory shifter and the tab to the transmission and rewelded everything back together with a cheopo harbor freight flux welder. It ended up working perfectly and my rig shifts across the PRND2L range with all the detents lining up as well.


Any updates?!!
Awesome work!
Awesome work!
- Thread starter
- #57
Any updates?!!
Awesome work!
Two steps forward one step back kinda progress!
I’m also basically restoring everything else in this project too. Rebuilt the front axle and replaced with an rcv one and installed a new OME suspension / new bushings etc. back in the late spring, just did the rear axle last week and fixed my incorrectly installed (DS vs PS) springs, and installed new calipers and rotors and soft lines (and a couple hard ones too).
Most of the summer I was going down an expensive blind alley redoing the fuel rails, plugs, etc. thinking they were a problem when i was stuck with the truck cranking but not starting (except briefly with starter spray) it ultimately was a sneaky disconnected wire that I just couldn’t find until I did.
At present, i’m looking for a short or a parasitic drain that’s sucking the amperage out of my battery inside of a day of fully charging it. Getting closer to being ready to send it out for a little body work and a paint job… i hope.
Awesome man!
Your’s and Matt’s build thread are giving me hopes that a noob like me have a chance of tackling this project in a year or so!
Your’s and Matt’s build thread are giving me hopes that a noob like me have a chance of tackling this project in a year or so!
Has to be a major draw if it's draining the battery that fastTwo steps forward one step back kinda progress!
I’m also basically restoring everything else in this project too. Rebuilt the front axle and replaced with an rcv one and installed a new OME suspension / new bushings etc. back in the late spring, just did the rear axle last week and fixed my incorrectly installed (DS vs PS) springs, and installed new calipers and rotors and soft lines (and a couple hard ones too).
Most of the summer I was going down an expensive blind alley redoing the fuel rails, plugs, etc. thinking they were a problem when i was stuck with the truck cranking but not starting (except briefly with starter spray) it ultimately was a sneaky disconnected wire that I just couldn’t find until I did.
At present, i’m looking for a short or a parasitic drain that’s sucking the amperage out of my battery inside of a day of fully charging it. Getting closer to being ready to send it out for a little body work and a paint job… i hope.
- Thread starter
- #60
Just got around to testing the alternator diodes. It looks like that is my culprit, but I am also a little suspicious of these spal fans pulling current when everything should be powered off.Has to be a major draw if it's draining the battery that fast