
Where do you mount your hi-lift? Rook rack? Rear bumper?
Navigation
Install the app
How to install the app on iOS
Follow along with the video below to see how to install our site as a web app on your home screen.
Note: This feature may not be available in some browsers.
More options
Style variation
You are using an out of date browser. It may not display this or other websites correctly.
You should upgrade or use an alternative browser.
You should upgrade or use an alternative browser.
Project Hundy Build Thread - 2000 UZJ100 Land Cruiser (Deathstar)
- Thread starter cruiseroutfit
- Start date
This site may earn a commission from merchant affiliate
links, including eBay, Amazon, Skimlinks, and others.
- Thread starter
- #82
...Kurt, do you have a photo you can post showing what you did after pulling the AHC switch? Not sure what you mean by putting the "storage holder" in its place.
When you remove the AHC switch (which you don't have too) in your center console, you either need to get a blank (I have spares) or go with the pocket option:
http://tlcfaq.com/main/2012/05/part-number-for-the-console-storage-pocket/
- Thread starter
- #83
Kurt, any pulls or experience with the vr10 yet?
Strongly considering a vr10 or 12 and would love to hear a little feedback if you had any..
Thanks!!
Sorry I have not, I spent a fair amount of time inspecting the build quality, I'm not expecting any issues

- Thread starter
- #84
Where do you mount your hi-lift? Rook rack? Rear bumper?
Hi-Lift? People still carrying those things?
I've converted to an exhaust jack for use in my 100 and Tacoma, zero complaints after hundreds of days on the trail in the last 5 years sans Hi-Lift. I fully recognize they are a great tool and for many they are the ideal option, I still carry one in my FJ40 as the X-Jack isn't always appropriate with 35"+ tires.
- Thread starter
- #85
100 was on bike hauler duty this weekend in Moab, couldn't be happier. The seat heater did wonders on a sore body after a couple days of absolutely brutal trail riding (Sovereign, Salt Wash and Cliffhanger)

What motorcycle do you have on back, see a plate is it dual sport?
- Thread starter
- #87
What motorcycle do you have on back, see a plate is it dual sport?
Good eye! KTM 450 XCW with a 'barely legal' kit on it, enough to get it plated. It has been nice to burn around town or run for gas without fear of a ticket
A few more pics of the bike in our ride report thread here:
http://www.rme4x4.com/showthread.php?96011-Ride-Report-Moab-on-Motos-March-1st-3rd
When you remove the AHC switch (which you don't have too) in your center console, you either need to get a blank (I have spares) or go with the pocket option:
http://tlcfaq.com/main/2012/05/part-number-for-the-console-storage-pocket/
Got it, thanks. I like that pocket option as I'm planning to get an iPod/iPhone adapter for the stereo and looks like an ideal place to put the iPod.
- Thread starter
- #89
Got it, thanks. I like that pocket option as I'm planning to get an iPod/iPhone adapter for the stereo and looks like an ideal place to put the iPod.
It is perfect for a phone or a an Ipod, one of those simple additions you really come to enjoy.
- Thread starter
- #90
Internet Post #5
Death Start Part #5 - All hands on deck!
By 9am Saturday morning it was game on. Help was arriving in masses and soon we had over a dozen pairs of hands at my disposal. Drawers were under construction at the hands of Scott and Devin meanwhile Ryan and Corey were rocking out the dual battery and winch wiring under the hood, Paul rocked out the assembly of the tracks for the roof rack and Darren and Dave helped Paul lift the new rack into position. While dodging the action, Jason and Chris were installing the step-sliders and side-rails. Stephen was installing the Landtank fan clutch. Between those items we are able to torque the front suspension and mount the front wheels. The Slee skid plates were the last item for the day, we had to make some quick mods to the belly skid to work with the ARB step-sliders and deal with a broken bolt in the frame.
Saturday Build Photos:

Rear Drawer Construction & Install

ARB Step & Side Rail Assembly

Paul supervises the Eezi-Awn roof rack install

Ryan & Cory rocking out the dual batteries and winch wiring

The full crew overview

Arms deep on the winch install

Starting to take shape

Rear cargo setup fleshing out

Progress continues!
To Do List By End of Day 2 (Saturday 8AM - Sunday 2AM):
[strike]Inventory Parts[/strike]
[strike]Break wheel lug nuts[/strike]
[strike]Rear End on Jack Stands[/strike]
[strike]Remove Rear Tires[/strike]
[strike]Rear Stock Shocks & Coils Removed[/strike]
[strike]Rear OME Suspension Installation[/strike]
[strike]Rear Tires Mounted[/strike]
[strike]Rear End Lowered & Rear Tires Torqued[/strike]
[strike]Remove Front Bumper[/strike]
[strike]LandTank Fan Clutch Installation[/strike]
[strike]Front End on Jack Stands[/strike]
[strike]Stock Skid Plate Removed[/strike]
[strike]Stock Shocks Removed[/strike]
[strike]Stock Torsion Bars Removed[/strike]
[strike]OME Shocks & Torsion Bars Installed[/strike]
[strike]Slee Diff Drop Kit Installed [/strike]
OME Torsion Bars Adjusted
[strike]Front Tires Mounted[/strike]
[strike]Front End Lowered & Front Tires Torqued[/strike]
[strike]Stock Trans Cross Member Removed[/strike]
[strike]Slee Skid Plates Installed[/strike]
[strike]Install ARB Front Bumper[/strike]
[strike]Warn Winch Installed in Bumper[/strike]
[strike]IPF Lights on Bumper[/strike]
[strike]Remove Stock Roof Rack[/strike]
[strike]Remove Stock Rear Bumper[/strike]
[strike]Install ARB Rear Bumper[/strike]
[strike]Assemble & Install ARB Wheel Carrier[/strike]
[strike]Assemble & Install ARB Jerry Can Holder[/strike]
Rough Electrical to Rear
[strike]Rear 3rd Row Seats & Seatbelts Removed[/strike]
[strike]Outback Drawer System Installed[/strike]
Finalize ARB Fridge Wiring & Aux power outlets
Install ARB Fridge
[strike]Remove Stock Battery[/strike]
[strike]Install Slee Dual Battery Tray[/strike]
[strike]Install Optimas[/strike]
[strike]National Luna Dual Battery System Installation[/strike]
[strike]Remove Factory Running Boards[/strike]
[strike]Install ARB Side Steps & Side Rails[/strike]
[strike]Install Eezi-Awn Roof Rack[/strike]
[strike]Safari Snorkel Installation[/strike]
Helton Hot Shower System Installation
Death Start Part #5 - All hands on deck!
By 9am Saturday morning it was game on. Help was arriving in masses and soon we had over a dozen pairs of hands at my disposal. Drawers were under construction at the hands of Scott and Devin meanwhile Ryan and Corey were rocking out the dual battery and winch wiring under the hood, Paul rocked out the assembly of the tracks for the roof rack and Darren and Dave helped Paul lift the new rack into position. While dodging the action, Jason and Chris were installing the step-sliders and side-rails. Stephen was installing the Landtank fan clutch. Between those items we are able to torque the front suspension and mount the front wheels. The Slee skid plates were the last item for the day, we had to make some quick mods to the belly skid to work with the ARB step-sliders and deal with a broken bolt in the frame.
Saturday Build Photos:
Rear Drawer Construction & Install
ARB Step & Side Rail Assembly
Paul supervises the Eezi-Awn roof rack install
Ryan & Cory rocking out the dual batteries and winch wiring
The full crew overview
Arms deep on the winch install
Starting to take shape
Rear cargo setup fleshing out
Progress continues!
To Do List By End of Day 2 (Saturday 8AM - Sunday 2AM):
[strike]Inventory Parts[/strike]
[strike]Break wheel lug nuts[/strike]
[strike]Rear End on Jack Stands[/strike]
[strike]Remove Rear Tires[/strike]
[strike]Rear Stock Shocks & Coils Removed[/strike]
[strike]Rear OME Suspension Installation[/strike]
[strike]Rear Tires Mounted[/strike]
[strike]Rear End Lowered & Rear Tires Torqued[/strike]
[strike]Remove Front Bumper[/strike]
[strike]LandTank Fan Clutch Installation[/strike]
[strike]Front End on Jack Stands[/strike]
[strike]Stock Skid Plate Removed[/strike]
[strike]Stock Shocks Removed[/strike]
[strike]Stock Torsion Bars Removed[/strike]
[strike]OME Shocks & Torsion Bars Installed[/strike]
[strike]Slee Diff Drop Kit Installed [/strike]
OME Torsion Bars Adjusted
[strike]Front Tires Mounted[/strike]
[strike]Front End Lowered & Front Tires Torqued[/strike]
[strike]Stock Trans Cross Member Removed[/strike]
[strike]Slee Skid Plates Installed[/strike]
[strike]Install ARB Front Bumper[/strike]
[strike]Warn Winch Installed in Bumper[/strike]
[strike]IPF Lights on Bumper[/strike]
[strike]Remove Stock Roof Rack[/strike]
[strike]Remove Stock Rear Bumper[/strike]
[strike]Install ARB Rear Bumper[/strike]
[strike]Assemble & Install ARB Wheel Carrier[/strike]
[strike]Assemble & Install ARB Jerry Can Holder[/strike]
Rough Electrical to Rear
[strike]Rear 3rd Row Seats & Seatbelts Removed[/strike]
[strike]Outback Drawer System Installed[/strike]
Finalize ARB Fridge Wiring & Aux power outlets
Install ARB Fridge
[strike]Remove Stock Battery[/strike]
[strike]Install Slee Dual Battery Tray[/strike]
[strike]Install Optimas[/strike]
[strike]National Luna Dual Battery System Installation[/strike]
[strike]Remove Factory Running Boards[/strike]
[strike]Install ARB Side Steps & Side Rails[/strike]
[strike]Install Eezi-Awn Roof Rack[/strike]
[strike]Safari Snorkel Installation[/strike]
Helton Hot Shower System Installation
Kurt love your pics and build thread!!
I'm curious about the Arb fender rails. How do they install on the slider side? If I have a Arb bull bar with Slee's Rock sliders (not step) would they jive??
Looks like no problem on the front bumper side, more curious about the slider side..
Also, as these are a rarer item, I assume you guys at outfitters can get these?
Thanks as always!!
- Thread starter
- #92
Kurt love your pics and build thread!!
Thanks!
I'm curious about the Arb fender rails. How do they install on the slider side? If I have a Arb bull bar with Slee's Rock sliders (not step) would they jive??
Looks like no problem on the front bumper side, more curious about the slider side..
Also, as these are a rarer item, I assume you guys at outfitters can get these?
Thanks as always!!
Unfortunately they wouldn't mate at the slider side. The ARB steps have a 'stub' that the side rails slide over and then have a bolt tab to keep them from rotating. It would be entirely possible to mate them to just about any slider but it is going to take some custom fab to make happen. We can absolutely help you with the parts themselves.

- Thread starter
- #93
Death Start Build Part #6 - Time to put this thing to bed and go to bed myself
Sunday was fairly low key, after burning the candle at both ends on both Friday and Saturday nights, we were hoping Sunday was going be a cakewalk. The main agenda items were finishing up the wiring to the rear fridge and auxiliary outlets in the rear drawer system as well as work on the Helton shower install. I recruited Cody to help me pull wire from the engine bay to the rear drawers. Cody did a fantastic job tucking it all under the trim and looming it from front to back, leaving a super clean look throughout the cab. We terminated the wiring within the side panels of the drawer system and utilized flush mount plugs for the ARB fridge plug, 12V accessory plugs and the dual USB plug as well. The location of the ARB fridge plug was dictated by the location of the fridge slide but the extra 12V and USB ports just made logistical sense. Not only do they serve the needs from the back of the truck but they are super easy to utilize by those in the 2nd row seating, eliminating cords running from the dash to the backseat.
The Helton Hot Water system took a little more time. I have previously installed a handful of Helton systems in 100's belonging to customers but it was always done right against the firewall above the passenger side fender well, unfortunately rightwhere the dual battery is positioned in my particular setup. This required a change of plans as I had the Slee dual battery tray mounted and an ARB compressor mounted right next to the auxiliary battery. After a bit of scoping out and measuring up we found the most copacetic configuration was right behind the shroud of the engine, tucked high against the firewall. While this made for some creative plumbing restraints I was able to tie into the factory coolant system with two additional hoses and if I ever need to remove the Helton, a single OEM hose takes it out of the loop. For the fresh water lines to the bumper I opted for some high temperature rated 1/2" hose in red and blue coloring, the red for the hot (output) side and the blue for the cold (input) side of the system. These lines mate to the Helton bumper fitting bracket thus allowing easy of use in the field.

Plumbing the Helton

Helton Mounted

Helton Bumper Fittings

Rear 12V Plug Wiring

Finalized plug configuration

Bluesea Fuseblock
Finalized Dual Battery & ARB Compressor Mounting & Wiring
To Do List By End of Day 3 (Sunday 8AM - 5PM):
[strike]Inventory Parts[/strike]
[strike]Break wheel lug nuts[/strike]
[strike]Rear End on Jack Stands[/strike]
[strike]Remove Rear Tires[/strike]
[strike]Rear Stock Shocks & Coils Removed[/strike]
[strike]Rear OME Suspension Installation[/strike]
[strike]Rear Tires Mounted[/strike]
[strike]Rear End Lowered & Rear Tires Torqued[/strike]
[strike]Remove Front Bumper[/strike]
[strike]LandTank Fan Clutch Installation[/strike]
[strike]Front End on Jack Stands[/strike]
[strike]Stock Skid Plate Removed[/strike]
[strike]Stock Shocks Removed[/strike]
[strike]Stock Torsion Bars Removed[/strike]
[strike]OME Shocks & Torsion Bars Installed[/strike]
[strike]Slee Diff Drop Kit Installed [/strike]
[strike]OME Torsion Bars Adjusted[/strike]
[strike]Front Tires Mounted[/strike]
[strike]Front End Lowered & Front Tires Torqued[/strike]
[strike]Stock Trans Cross Member Removed[/strike]
[strike]Slee Skid Plates Installed[/strike]
[strike]Install ARB Front Bumper[/strike]
[strike]Warn Winch Installed in Bumper[/strike]
[strike]IPF Lights on Bumper[/strike]
[strike]Remove Stock Roof Rack[/strike]
[strike]Remove Stock Rear Bumper[/strike]
[strike]Install ARB Rear Bumper[/strike]
[strike]Assemble & Install ARB Wheel Carrier[/strike]
[strike]Assemble & Install ARB Jerry Can Holder[/strike]
[strike]Rough Electrical to Rear[/strike]
[strike]Rear 3rd Row Seats & Seatbelts Removed[/strike]
[strike]Outback Drawer System Installed[/strike]
[strike]Finalize ARB Fridge Wiring & Aux power outlets[/strike]
[strike]Install ARB Fridge[/strike]
[strike]Remove Stock Battery[/strike]
[strike]Install Slee Dual Battery Tray[/strike]
[strike]Install Optimas[/strike]
[strike]National Luna Dual Battery System Installation[/strike]
[strike]Remove Factory Running Boards[/strike]
[strike]Install ARB Side Steps & Side Rails[/strike]
[strike]Install Eezi-Awn Roof Rack[/strike]
[strike]Safari Snorkel Installation[/strike]
[strike]Helton Hot Shower System Installation[/strike]
100% complete, done, finished. While I was fully confident in our ability to make it happen on such a condensed schedule, I was still a bit in awe that all the pieces came together so nicely.
Helpers:
I couldn't have done it without my crew of ringers. These guys all sacrificed parts of their weekend to come slave away on what most considered an impossible build. In the end with many helping hands the actual work load was relatively light and I don't think anyone felt too burned out. We were able to cram nearly 150 man hours worth of projects and installs into a 72 hour window of time and still get a bit of shut-eye in between, all due to the generosity of my pals. I have to lead off my list (which is alphabetical) with my wife Candace who not only put up with my wrenching all weekend but also helped with key components of the build such as parts pickup and even more important feeding the hungry crew.
Candace Williams
Chris Peterson
Cody McKendrick
Corey Fillmore
Dan Lockington
Darren Webster
Dave Connors
Devin Baumgardner
Jake Chatwin
Jason Goates
Johnny Cassel
Josh Stanfield
Kirk Farrell
Olly Bradsteeet
Paul May
Ryan Davis
Scott Jackson
Stephen Nielson
Tovin Benson
(Anyone I'm missing? Please chime in!)
Companies:
While there were many companies that we could have used or did use for different roles on the build, these ones really stood out both in their interest of the project and their ability to help us make it happen on such an abbreviated schedule. I wouldn't hesitate to recommend any of them for your build needs, tell them I sent you
ARB USA - Bumpers & OME suspension
Armor Coatings - Power coating of wheels, bumper and step components
Big-O Tires Sandy - Tires, mounting and balancing.
Equipt Expedition Off-Road - Roof rack and dual battery system
Slee Offroad - Skid plate system, battery tray and diff drop kit.
Ajik/Landtank - Modified fan clutch
Pfran - Interior LED retrofit kit.
Sunday was fairly low key, after burning the candle at both ends on both Friday and Saturday nights, we were hoping Sunday was going be a cakewalk. The main agenda items were finishing up the wiring to the rear fridge and auxiliary outlets in the rear drawer system as well as work on the Helton shower install. I recruited Cody to help me pull wire from the engine bay to the rear drawers. Cody did a fantastic job tucking it all under the trim and looming it from front to back, leaving a super clean look throughout the cab. We terminated the wiring within the side panels of the drawer system and utilized flush mount plugs for the ARB fridge plug, 12V accessory plugs and the dual USB plug as well. The location of the ARB fridge plug was dictated by the location of the fridge slide but the extra 12V and USB ports just made logistical sense. Not only do they serve the needs from the back of the truck but they are super easy to utilize by those in the 2nd row seating, eliminating cords running from the dash to the backseat.
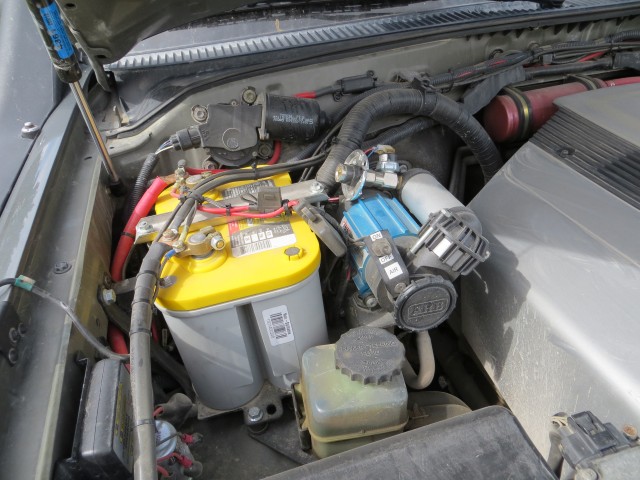
The Helton Hot Water system took a little more time. I have previously installed a handful of Helton systems in 100's belonging to customers but it was always done right against the firewall above the passenger side fender well, unfortunately rightwhere the dual battery is positioned in my particular setup. This required a change of plans as I had the Slee dual battery tray mounted and an ARB compressor mounted right next to the auxiliary battery. After a bit of scoping out and measuring up we found the most copacetic configuration was right behind the shroud of the engine, tucked high against the firewall. While this made for some creative plumbing restraints I was able to tie into the factory coolant system with two additional hoses and if I ever need to remove the Helton, a single OEM hose takes it out of the loop. For the fresh water lines to the bumper I opted for some high temperature rated 1/2" hose in red and blue coloring, the red for the hot (output) side and the blue for the cold (input) side of the system. These lines mate to the Helton bumper fitting bracket thus allowing easy of use in the field.
Plumbing the Helton
Helton Mounted
Helton Bumper Fittings
Rear 12V Plug Wiring
Finalized plug configuration
Bluesea Fuseblock
Finalized Dual Battery & ARB Compressor Mounting & Wiring
To Do List By End of Day 3 (Sunday 8AM - 5PM):
[strike]Inventory Parts[/strike]
[strike]Break wheel lug nuts[/strike]
[strike]Rear End on Jack Stands[/strike]
[strike]Remove Rear Tires[/strike]
[strike]Rear Stock Shocks & Coils Removed[/strike]
[strike]Rear OME Suspension Installation[/strike]
[strike]Rear Tires Mounted[/strike]
[strike]Rear End Lowered & Rear Tires Torqued[/strike]
[strike]Remove Front Bumper[/strike]
[strike]LandTank Fan Clutch Installation[/strike]
[strike]Front End on Jack Stands[/strike]
[strike]Stock Skid Plate Removed[/strike]
[strike]Stock Shocks Removed[/strike]
[strike]Stock Torsion Bars Removed[/strike]
[strike]OME Shocks & Torsion Bars Installed[/strike]
[strike]Slee Diff Drop Kit Installed [/strike]
[strike]OME Torsion Bars Adjusted[/strike]
[strike]Front Tires Mounted[/strike]
[strike]Front End Lowered & Front Tires Torqued[/strike]
[strike]Stock Trans Cross Member Removed[/strike]
[strike]Slee Skid Plates Installed[/strike]
[strike]Install ARB Front Bumper[/strike]
[strike]Warn Winch Installed in Bumper[/strike]
[strike]IPF Lights on Bumper[/strike]
[strike]Remove Stock Roof Rack[/strike]
[strike]Remove Stock Rear Bumper[/strike]
[strike]Install ARB Rear Bumper[/strike]
[strike]Assemble & Install ARB Wheel Carrier[/strike]
[strike]Assemble & Install ARB Jerry Can Holder[/strike]
[strike]Rough Electrical to Rear[/strike]
[strike]Rear 3rd Row Seats & Seatbelts Removed[/strike]
[strike]Outback Drawer System Installed[/strike]
[strike]Finalize ARB Fridge Wiring & Aux power outlets[/strike]
[strike]Install ARB Fridge[/strike]
[strike]Remove Stock Battery[/strike]
[strike]Install Slee Dual Battery Tray[/strike]
[strike]Install Optimas[/strike]
[strike]National Luna Dual Battery System Installation[/strike]
[strike]Remove Factory Running Boards[/strike]
[strike]Install ARB Side Steps & Side Rails[/strike]
[strike]Install Eezi-Awn Roof Rack[/strike]
[strike]Safari Snorkel Installation[/strike]
[strike]Helton Hot Shower System Installation[/strike]
100% complete, done, finished. While I was fully confident in our ability to make it happen on such a condensed schedule, I was still a bit in awe that all the pieces came together so nicely.
Helpers:
I couldn't have done it without my crew of ringers. These guys all sacrificed parts of their weekend to come slave away on what most considered an impossible build. In the end with many helping hands the actual work load was relatively light and I don't think anyone felt too burned out. We were able to cram nearly 150 man hours worth of projects and installs into a 72 hour window of time and still get a bit of shut-eye in between, all due to the generosity of my pals. I have to lead off my list (which is alphabetical) with my wife Candace who not only put up with my wrenching all weekend but also helped with key components of the build such as parts pickup and even more important feeding the hungry crew.
Candace Williams
Chris Peterson
Cody McKendrick
Corey Fillmore
Dan Lockington
Darren Webster
Dave Connors
Devin Baumgardner
Jake Chatwin
Jason Goates
Johnny Cassel
Josh Stanfield
Kirk Farrell
Olly Bradsteeet
Paul May
Ryan Davis
Scott Jackson
Stephen Nielson
Tovin Benson
(Anyone I'm missing? Please chime in!)
Companies:
While there were many companies that we could have used or did use for different roles on the build, these ones really stood out both in their interest of the project and their ability to help us make it happen on such an abbreviated schedule. I wouldn't hesitate to recommend any of them for your build needs, tell them I sent you
ARB USA - Bumpers & OME suspension
Armor Coatings - Power coating of wheels, bumper and step components
Big-O Tires Sandy - Tires, mounting and balancing.
Equipt Expedition Off-Road - Roof rack and dual battery system
Slee Offroad - Skid plate system, battery tray and diff drop kit.
Ajik/Landtank - Modified fan clutch
Pfran - Interior LED retrofit kit.
- Thread starter
- #94
Death Star Part# 7: Follow-Up & Future Plans
Lets start with the name, Death Star. I don't really hurry to name a new vehicle or any of my vehicles for that matter but eventually they end up with a nickname one way or another. Most seem to get dubbed by friends, love it or hate it. While sitting on a beach in San Felipe, MX before the start of the Baja 1000 the discussion revolved back to the names of Land Cruisers. Between the dozen of us on the beach were the better of 50 past and current named Land Cruisers, all with their own story to tell. Before long "Millennium Death Star Chicken Hawk Falcon", it became the running joke to add another word into the mix hence the long-winded verse. Well, it turns out Paul May's 100 Series was often jokingly dubbed the Millennium Falcon so he suggested the Death Star. It stuck.
The first real road test for the post-build 100 Series was the ~1000 mile round trip from Salt Lake City to SEMA in Las Vegas. ***While this trip would be entirely on pavement, it would offer a reliable test of many of the installed components. Particularly important was the general road handling, I wanted to know what I could expect from the vehicle in its now outfitted and weight laden form. Given the fact our Baja 1000 trip would be around 4500 miles round trip, much of the route on dirt, I wanted to have plenty of time to adjust and tune any items before the big trip. As I optimistically expected, there were zero notable issues with the truck and it was time to start packing. As I noted earlier on in the thread the entire build premise for this vehicle was to serve as a chase vehicle for our desert racing pursuits. Well, that was the motivation to get it done but the truth is I was looking for something a little bigger to replace my Tacoma and the 100 fit the bill. With the build behind us, the truck packed, four gents, and gear loaded into the 100, it was time for Baja. The Baja 1000 race is a story for another thread but the 100 performed perfectly. We rallied the 100 up and down the Baja peninsula, often along sections of the race track chasing the action. It soaked up the nastiest washboard roads, floated over the sandy beaches and powered up and down the long grades back to Utah. One of the most notable impressions I can relay about long distance driving in the 100's lack of driver fatigue. I absolutely love driving my similarly built Tacoma but I feel like a 12 hour day behind the wheel would leave me somewhat jaded. Whereas I think I could do the same drive in the 100 and come out a bit more on the spruce side? Combine the additional space, smooth handling and much decreased road noise and I think I'm really going to like this rig in the years to come.
So the build has been complete for for over 6 months now, what do I plan to do next?
Gearing: Still on the fence here. I don't often feel like it is under geared in fact even heavily loaded it still moves up the canyons. However I think the gears could get the shift points back where they belong and perhaps pick up a little extra fuel economy. Who am I kidding, the extra ooomph would be nice. That said I did recently pick up a new-in-box TRD Supercharger for the 2UZFE, perhaps that will seal the fate on the re-gear conundrum?
Additional Fuel Capacity: The factory setup offers a fair fuel range however long road trips really have me wanting additional fuel capacity. As luck would have it a friend pointed me to a Front Runner 16 gallon auxiliary tank that had never been installed. It is now sitting in the shop waiting for a slow day. While there are bigger options on the market that I would prefer, the price was right with this one and 16 gallons will be a welcome addition.
Follow-up projects: There were several items I addressed after the build was complete. Obviously it needed an alignment, Big-O supplied not only the tires but they did a solid job on the alignment, it runs smooth and true even at what some might consider excessive speeds. I didn't have my communication equipment lined up for the initial build weekend but they were installed shortly thereafter. After minor delegation I installed a Kenwood dual band HAM and Cobra CB, similar setups to those in my other vehicles although a much more modern HAM.
With that said I'm done. I'll continue to maintain and upgrade things as needed but I simply plan to continue to use it. Feel free to holler if you have any questions or ideas for the build, I'll do my best to answer and of course I'm always up for pointers or suggestions.
Time lapse build video coming shortly In the meantime, more pics
- Thread starter
- #95
And now that the build thread has reached the end of the 48 hour build weekend topics. Time for the video
http://www.youtube.com/watch?v=hAYlUgfQLLw
Big thanks to my pal Jason for capturing all the footage of the build before and during. The post build pictures are courtesy of my pals in Canguro Racing and some of my own shots. And last but not least Steve from Stan Productions here in Utah for the editing and compilation of the video. Started in 2013, Stan Productions is a film company dedicated to creative short videos that highlight companies, product, and projects. If your interested in having them help with a project, I'll vouch for them. Contact them direct @ stanfilmproduction@gmail.com
Well, what do you think?
Awesome! Great video bro.
- Thread starter
- #97
Awesome! Great video bro.
Thanks, glad you enjoyed it!
Kurt love the video. Really Cool!
Question about your ARB Compressor. How are you liking it? Much usage so far? I know you dont yet have lockers hooked up, im assuming your primarly using it for traditional on board air needs, tires, etc..
Would you recomend this route for those needs? Hows the tire fill rate, Duty cycle etc...
Im looking at getting the same in the very near future and would appreciate a little user feedback.
Thanks Kurt!
great video , thanks for posting.